
Vendor
The Vendor Master stores complete supplier information, including vendor details, contacts, addresses, tax ID, documents, and vendor codes. It is used to link vendors with inventory receipts and items,items, track stock purchases,purchases, and generate vendor-wise spending and inventory reports.reports.
Complete the required fields marked with * before saving the vendor.
1. Vendor Details
EnterUse this tab to enter the basicvendor's informationmain aboutbusiness theinformation.

| Field | Required | Description |
|---|---|---|
| Vendor Type | Yes | |
| Vendor Code | Yes | |
| Vendor Name | Yes | Enter the |
| Federal Tax ID (EIN) | No | Enter the vendor's Federal Tax Identification Number (EIN), if applicable. |
Steps
Select theVendor Type.Enter theVendor Code.Enter theVendor Name.Enter theFederal Tax ID (EIN)if required.Review the information before continuing.
Note: Fields marked with * are mandatory.
2. Contact Details
AddUse thethis tab to add people who can be contacted regardingat the vendor.vendor company.
You can add more than one contact. Each contact email must be unique within the vendor's contact list.
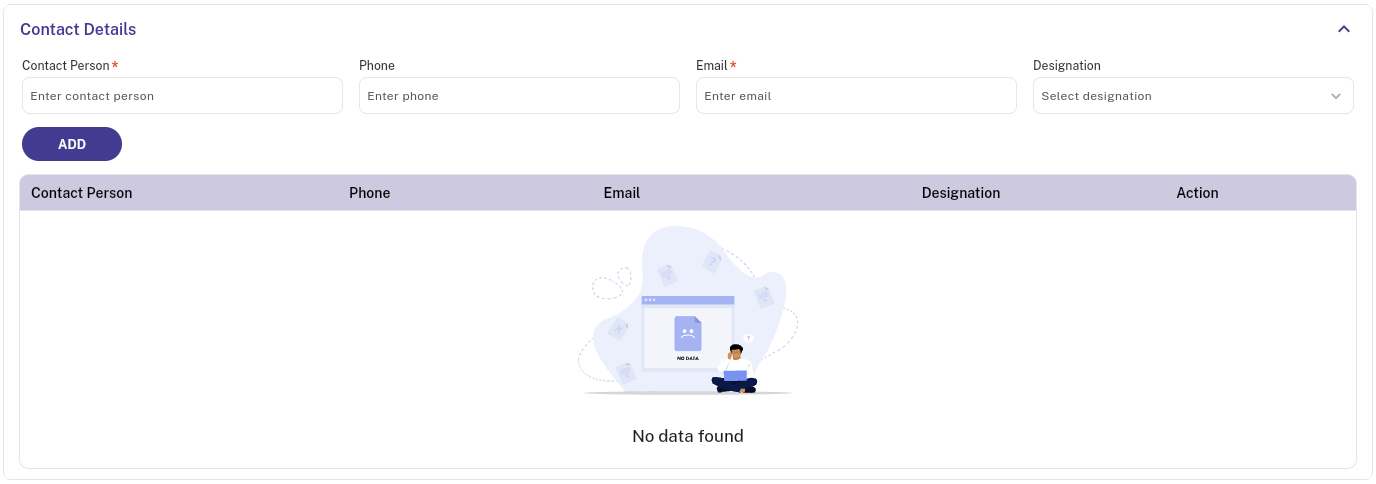
| Field | Required | Description |
|---|---|---|
| Contact Person | Yes | |
| Phone | No | |
| Yes | ||
| Designation | No |
Add a Contact
- Enter the Contact Person.
- Enter the Phone number.
- Enter the Email address.
- Select the Designation, if applicable.
SelectTap ADD.- The contact is added to the contact list.
The contact list displays:
- Contact Person
- Phone
- Designation
- Action
If needed, use the available Action option to manage the contact entry.
3. Billing Address
EnterUse this tab to enter the address used for the vendor'svendor billing information.and financial documents.

| Field | Required | Description |
|---|---|---|
| Address | No | |
| Country | No | |
| State | No | |
| City | No | |
| Postal Code | No |
Steps
Enter theAddress.Select theCountry.Select theState.Select theCity.Enter thePostal Code.Review the billing address.
4. Shipping Address
EnterUse this tab to enter the address where goods or shipmentsservices should beare delivered.

| Field | Required | Description |
|---|---|---|
| Address | No | |
| Country | No | |
| State | No | |
| City | No | |
| Postal Code | No |
Steps
Enter theAddress.Select theCountry.Select theState.Select theCity.Enter thePostal Code.Review the shipping address.
Tip:If the billing and shipping addresses are different, enter each address separately.
5. Documents
AddUse supportingthis tab to store documents related to the vendor.
You can add multiple documents for one vendor.
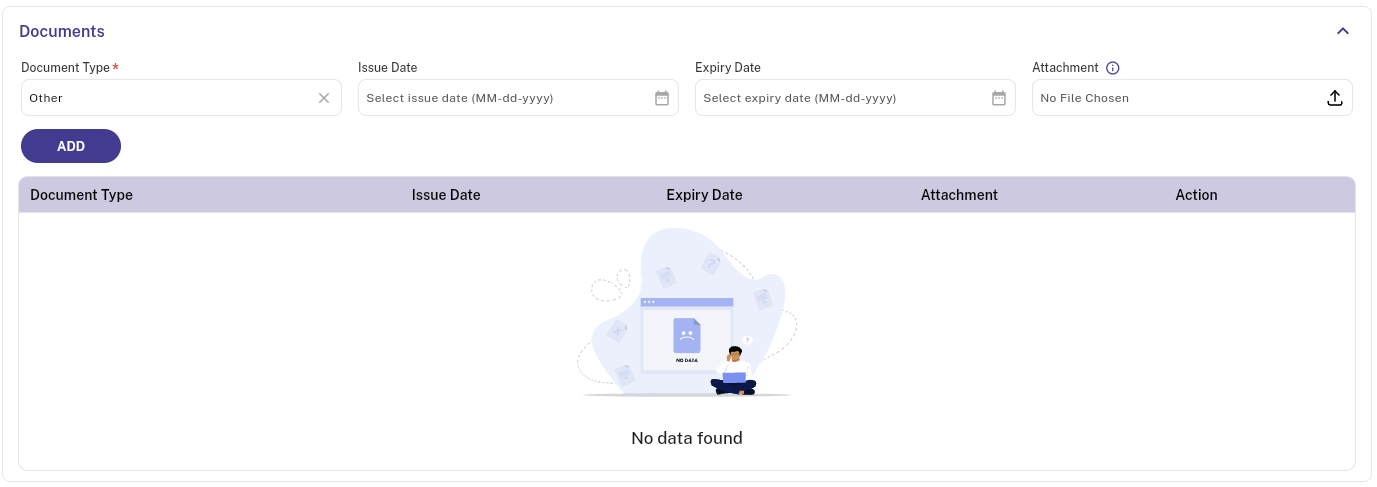
| Field | Required | Description |
|---|---|---|
| Document Type | Yes | |
| Issue Date | No | Select the date on which the document was issued. |
| Expiry Date | No | Select the document's expiry date, if applicable. |
| Attachment | No | Upload the related document file. |
Add a Document
- Select the Document Type.
- Select the Issue Date, if applicable.
- Select the Expiry Date, if applicable.
- Select the Attachment upload option and choose the required file.
SelectTap ADD.- The document is added to the document list.
The document list displays:
- Document Type
- Issue Date
- Expiry Date
- Attachment
- Action
Use the available Action option to manage the added document.
6. Save the Vendor
After entering all required information:
- Review the Vendor Details.
- Review the Contact Details.
- Check the Billing Address.
- Check the Shipping Address.
- Review the added Documents.
- Select
UPDATESAVE to save the vendor information.
Other
Actions
RESET— Clears or resets the entered form values.X (Close)— Closes the vendor form.
Quick Flow
Vendor Details → Contact Details → Billing Address → Shipping Address → Documents → UPDATE