
Inventory Receive
Overview
The Inventory Receive feature allows users to record inventory received from vendors and add the received items into the inventory management process.
Inventory can be received in two ways:
- Fetch from Invoice — Upload a vendor invoice and allow the system to extract the item and purchase information.
- Manual Entry — Manually select inventory items and enter the purchase quantity and unit price.
After an inventory receipt is created, it follows the inventory receiving workflow:
Pending → Approved → Assigned
- Pending — The inventory receipt has been created but has not yet been approved. The received quantity is not added to available stock until approval.
- Approved — The receipt has been approved and the received stock is added to inventory.
- Assigned — The approved inventory has been assigned to the appropriate Store Room according to the configured inventory assignment rules.
Inventory Receive List
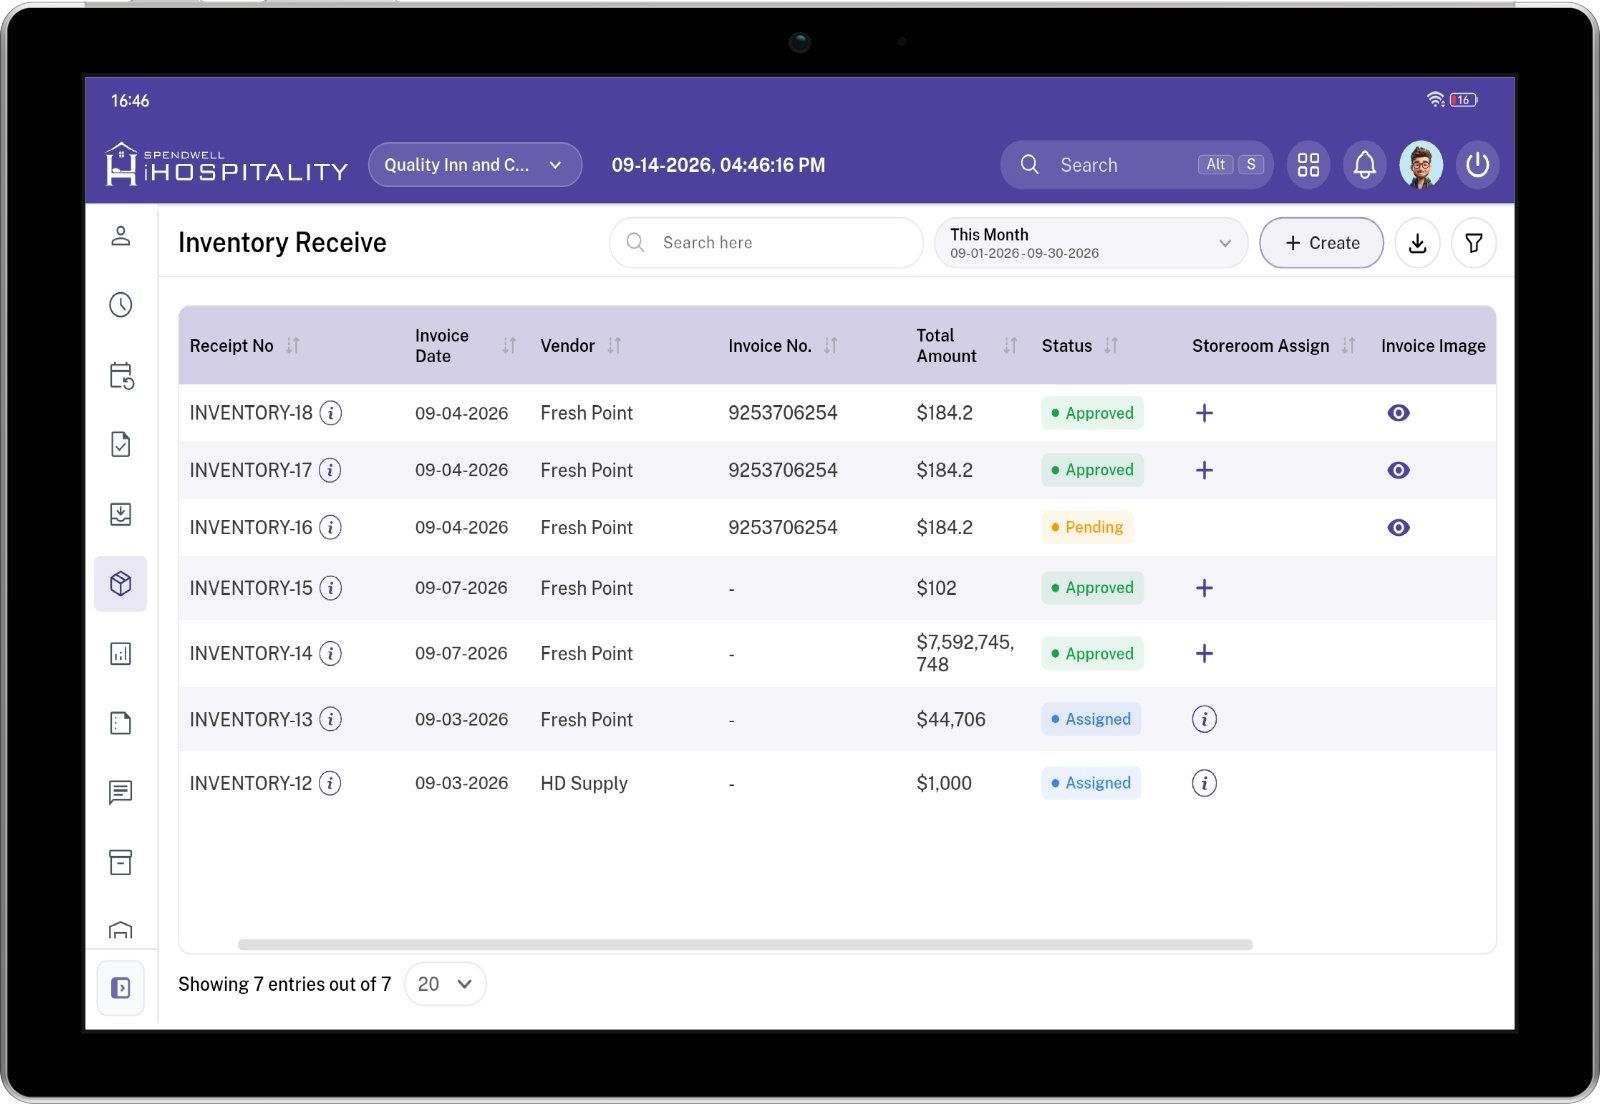
The list allows users to review the current status of each inventory receipt and identify whether the receipt is pending, approved, or assigned.
The screen provides the following controls and information:
- Receipt / Invoice Number — Identifies the inventory receipt or vendor invoice associated with the received inventory.
- Vendor — Displays the vendor from whom the inventory was received.
- Receipt Date — Displays the date on which the inventory receipt was created or received.
- Total Items — Displays the number of inventory items included in the receipt.
- Total Amount — Displays the total purchase amount associated with the receipt.
- Status — Displays the current stage of the inventory receiving process.
- Create — Opens the inventory receive creation process.
Inventory Receive Status
The Inventory Receive workflow uses the following statuses:
| Status | Description |
|---|---|
| Pending | The receipt has been created but is waiting for approval. Stock is not yet updated as approved inventory. |
| Approved | The receipt has been approved and the received stock has been added to inventory. |
| Assigned | The approved inventory has been assigned to a Store Room. |
Create Inventory Receive
Click Create from the Inventory Receive list to start the receiving process.
The system provides two methods for creating an inventory receipt:
- Fetch from Invoice
- Manual Entry
These methods are described separately because the information is entered differently.
Fetch from Invoice
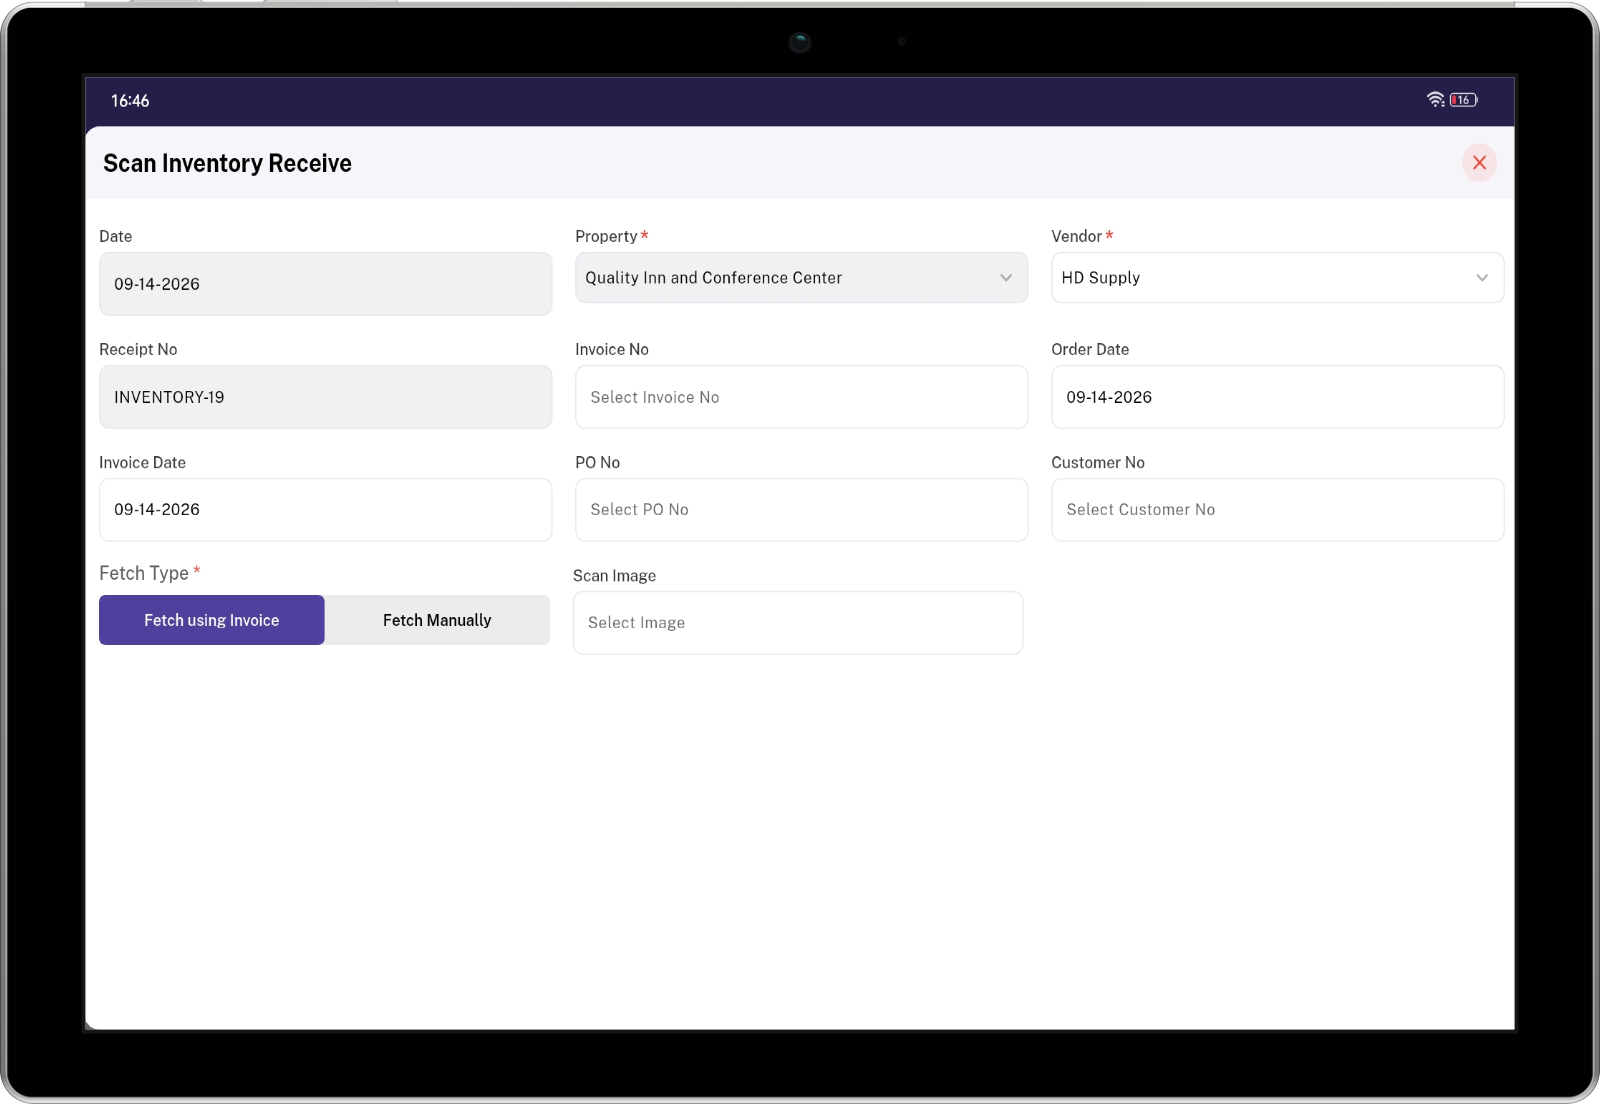
The Fetch from Invoice option allows users to upload a vendor invoice instead of manually entering every inventory item.
The system reads the uploaded invoice and extracts the available purchase information. The extracted vendor item information is then matched with the inventory item Vendor mapping configured in System.
Key Fields — Fetch from Invoice
-
Vendor — Identifies the vendor associated with the invoice. The selected vendor is used to determine the vendor-specific item information and mapping.
-
Invoice — Used to upload the vendor invoice. The invoice contains the purchase information that the system uses to extract inventory details.
-
Invoice Number — Identifies the vendor invoice. This value is used to associate the received inventory with the corresponding vendor invoice.
-
Invoice Date — Represents the date shown on the vendor invoice and helps identify when the purchase was made.
-
Item — Displays the inventory item identified from the uploaded invoice after the system processes the invoice information.
-
Vendor Item ID / Vendor Item Name — Represents the item identifier or item name provided by the vendor. The system uses the vendor item information to identify the corresponding SpendWell inventory item.
-
Purchase Quantity — Represents the quantity purchased from the vendor using the item's configured Purchase Unit.
-
Purchase Unit — Represents the unit in which the vendor supplied the item, such as Box, Case, Pack, or Each.
-
Stock Quantity — Represents the quantity that will be maintained in inventory after applying the configured stock conversion.
-
Stock Unit — Represents the unit in which the item is tracked in inventory.
-
Stock Conversion — Defines the relationship between the purchase unit and stock unit.
For example:
1 Box = 80 Pieces
If the invoice contains:
Purchase Quantity = 5 Boxes
the system calculates:
5 × 80 = 400 Pieces
Therefore:
Stock Quantity = 400 Pieces
-
Unit Price — Represents the purchase price of one purchase unit according to the vendor invoice.
-
Total Amount — Represents the total purchase value for the item based on the purchase quantity and unit price.
Invoice Item Mapping
When an invoice is uploaded, the system uses the vendor item information to identify the corresponding SpendWell inventory item.
The vendor item must be mapped through Vendor Item Assignment.
If the system cannot identify or map the item, the corresponding information is highlighted as an error and the receipt should be corrected before it can proceed.
Common validation errors include:
- Vendor Item Mapping Not Found — The vendor item has not been mapped to a SpendWell inventory item.
- Item Not Found — The extracted item cannot be matched to an existing inventory item.
- Quantity Missing — The purchase quantity could not be identified from the invoice.
- Unit Price Missing — The purchase unit price could not be identified from the invoice.
Users should resolve all required validation errors before completing the receipt.
Manual Entry
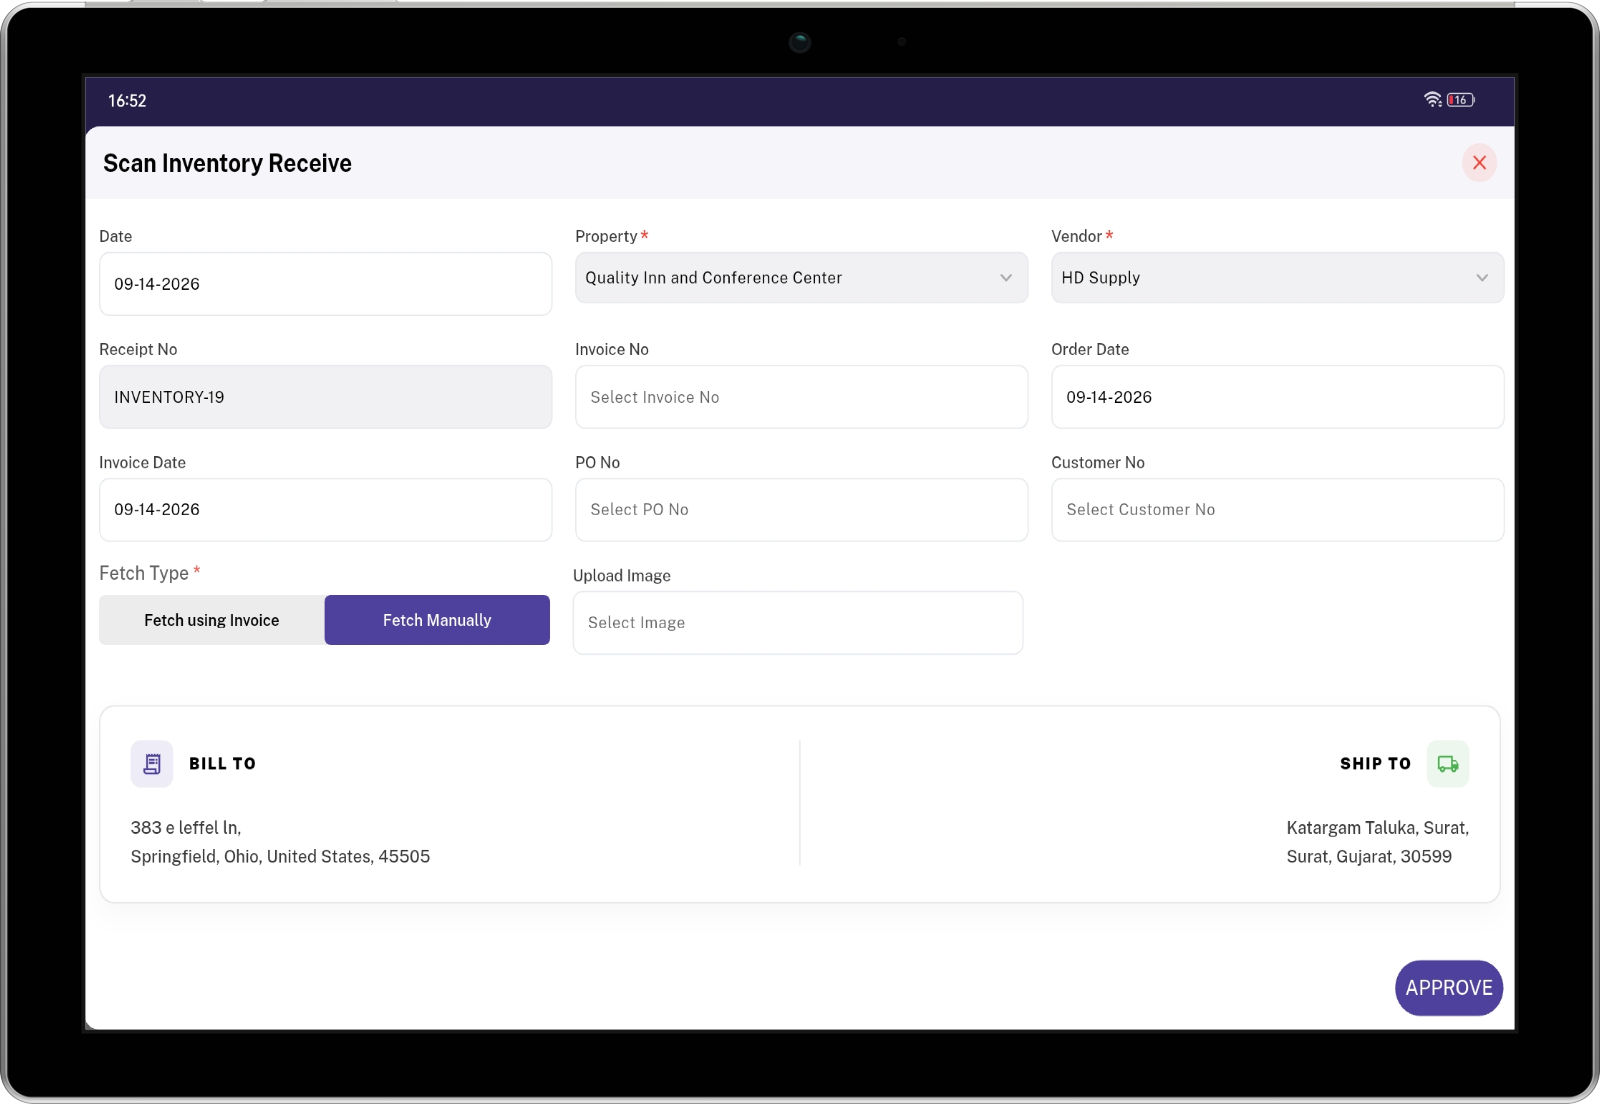
Create Inventory Receive
Create an inventory receipt by entering the receipt details, selecting the property and vendor, and providing the invoice and purchase information.
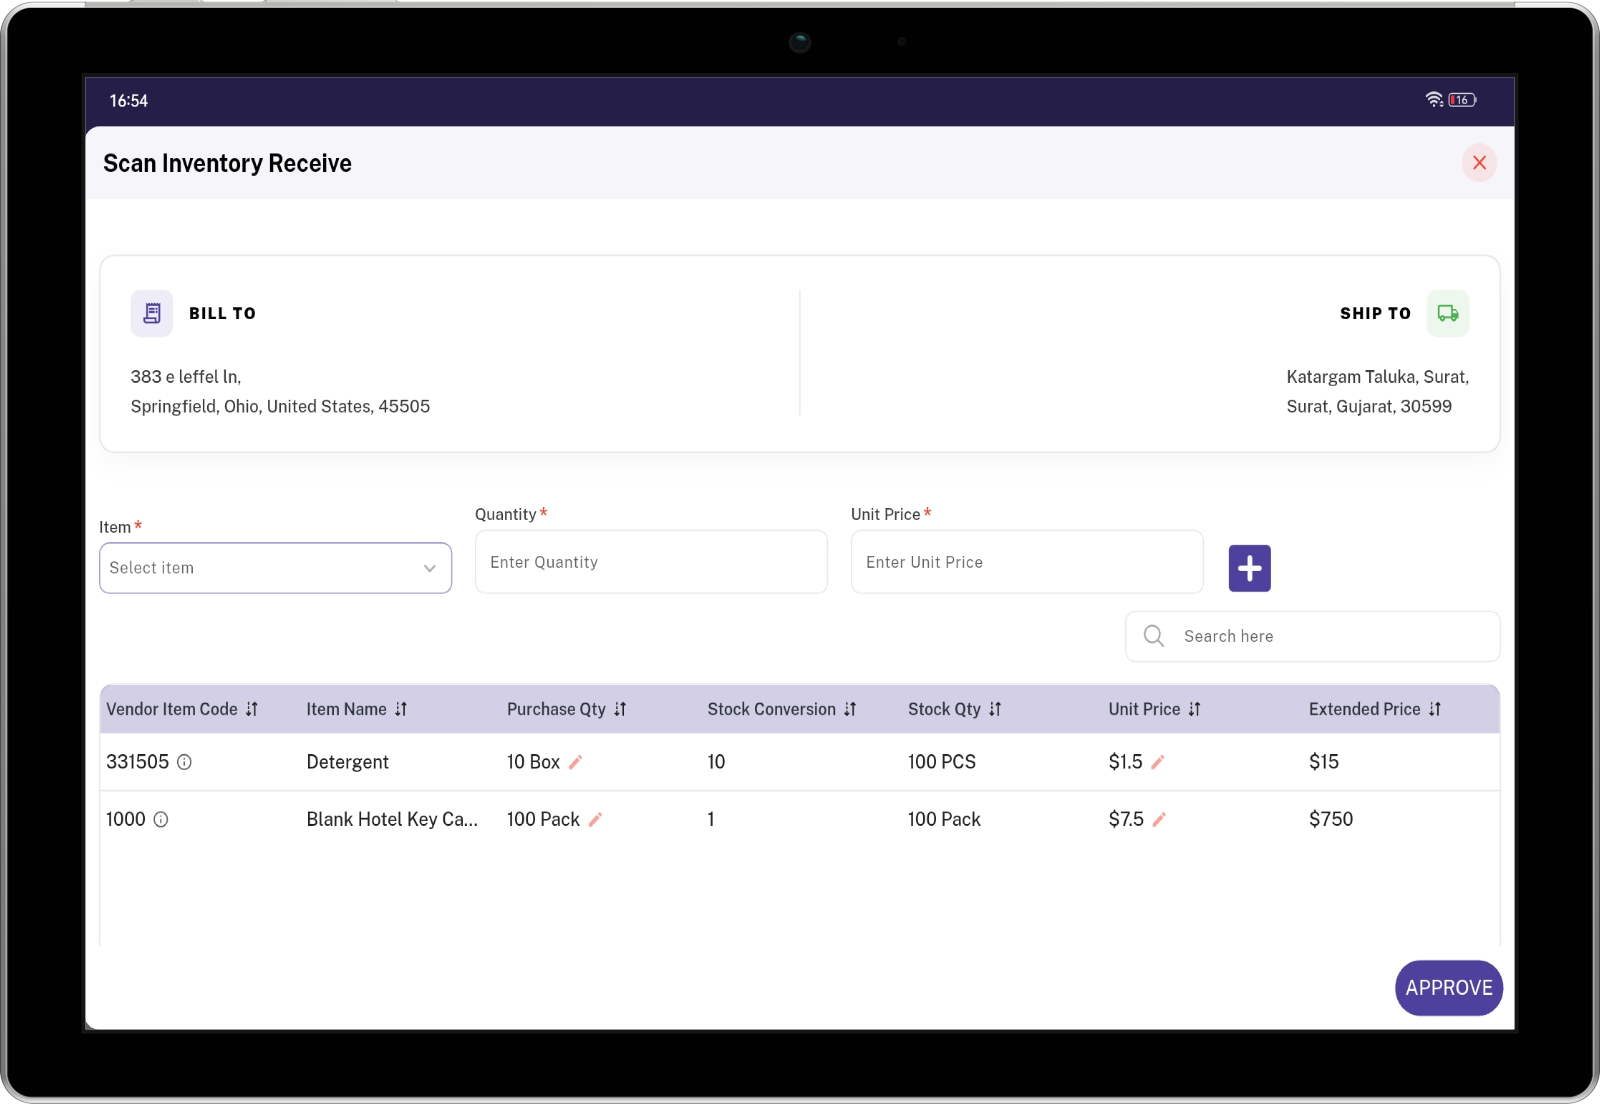
Add Inventory Line Items
Add inventory items to the receipt by selecting the item and entering the purchase quantity and unit price.
The Manual Entry option allows users to create an inventory receipt without uploading an invoice.
This method is useful when the vendor invoice is unavailable, the invoice cannot be processed automatically, or the user needs to enter the received inventory directly.
Key Fields — Manual Entry
-
Vendor — Identifies the vendor from whom the inventory was received.
-
Invoice Number — Identifies the vendor invoice associated with the inventory receipt, when applicable.
-
Invoice Date — Represents the date of the vendor invoice.
-
Item — Used to select the inventory item being received. The item is selected from the items configured for the property.
-
Purchase Quantity — Defines how many purchase units were received from the vendor.
-
Purchase Unit — Displays the unit in which the item is purchased.
-
Stock Quantity — Displays the quantity that will be maintained in inventory after applying the stock conversion.
-
Stock Unit — Displays the inventory unit used to track the item.
-
Stock Conversion — Defines how the purchase quantity is converted into the stock quantity.
-
Unit Price — Defines the purchase price for one purchase unit.
-
Total Amount — Represents the total purchase value for the entered item.
-
Add Item / Add Row — Allows the user to add the selected inventory item to the receipt and enter additional items.
Manual Item Entry Example
If an item is configured as:
- Purchase Unit: Box
- Stock Unit: Piece
- Stock Conversion: 80
and the user receives:
Purchase Quantity = 3 Boxes
the system calculates:
3 × 80 = 240 Pieces
The receipt therefore contains:
Purchase Quantity: 3 Boxes
Stock Quantity: 240 Pieces
Create and Submit Inventory Receipt
After entering the required inventory information using either Fetch from Invoice or Manual Entry, the user completes the receipt creation process.
Steps
Approve Inventory Receive

The Approve process confirms that the inventory receipt has been reviewed and that the received inventory can be added to the property's inventory stock.
Pending Status
When a receipt is created, it initially has the status:
Pending
At this stage:
- The receipt has been recorded.
- The received items can be reviewed.
- The receipt has not yet been approved.
- The approved inventory stock has not yet been updated.
Approval Details
Before approving the receipt, the user should verify:
- Vendor
- Invoice information
- Inventory items
- Purchase quantity
- Purchase unit
- Stock quantity
- Stock unit
- Stock conversion
- Unit price
- Total amount
- Item mapping and validation information
Approve Steps
- Open the Inventory Receive list.
- Locate the receipt with Pending status.
- Open the receipt.
- Review the vendor and invoice information.
- Review all inventory items and quantities.
- Verify the purchase and stock unit conversion.
- Verify the unit price and total amount.
- Resolve any validation errors, if present.
- Click Approve.
- The receipt changes from Pending to Approved.
- The approved received quantity is added to inventory stock.
Assign Inventory

After the inventory receipt is approved, the received inventory can be assigned to the appropriate Store Room.
The assignment process determines how the approved inventory should be distributed among configured store rooms.
Store room assignment can be handled automatically or manually depending on the configured Auto Assign Received Items setting.
Assignment Information
The assignment screen can use the store room's configured inventory requirements, including:
- Current Stock
- Minimum Stock Quantity
- Maximum Stock Quantity
- Required Assignment Quantity
- Store Room
- Item
- Stock Unit
Automatic Assignment
When Auto Assign Received Items is enabled, the system can calculate the required quantity for each store room and prepare the assignment automatically.
For example:
Maximum Stock Quantity = 100 Pieces
Current Stock = 40 Pieces
Required quantity:
100 − 40 = 60 Pieces
The system can therefore prepare an assignment of 60 Pieces to that store room.
Manual Assignment
When automatic assignment is not enabled, the user can review the approved inventory and assign the required quantity to the appropriate store room manually.
Assignment Steps
- Open an Approved inventory receipt.
- Click Assign.
- Review the available approved inventory.
- Review the applicable Store Room.
- Review the current stock and required stock quantity.
- Verify the quantity to be assigned.
- Adjust the assignment when manual assignment is required.
- Review the complete store room assignment.
- Click Approve if store room approval is required.
- Complete the assignment.
- The inventory receipt changes to Assigned status.
Store Room Assignment Approval
When a Store Room is configured with Approval Required, the inventory assignment must be approved before the stock assignment is finalized.
Approval Flow
Approved Inventory → Assign → Store Room Assignment → Approval → Assigned
Steps
- Open the inventory assignment for the approved receipt.
- Review the assigned store room.
- Verify the item and quantity.
- Verify that the assigned quantity is appropriate for the store room's stock requirements.
- Click Approve.
- Complete the assignment.
- The assigned inventory is recorded against the selected Store Room.
If approval is not required for the Store Room, the inventory can proceed directly through the assignment process.
Inventory Receive Workflow
The complete Inventory Receive workflow is:
Create Receipt
↓
Select Receiving Method
↓
Fetch from Invoice / Manual Entry
↓
Review Item and Quantity
↓
Pending
↓
Approve
↓
Approved
↓
Assign to Store Room
↓
Store Room Approval, if Required
↓
Assigned
Important Notes
- Inventory receipts can be created using either Fetch from Invoice or Manual Entry.
- Invoice-based receiving depends on correct Vendor Item Assignment to map vendor items to SpendWell inventory items.
- All required invoice extraction and item-mapping errors should be resolved before approval.
- Purchase Quantity represents the quantity purchased using the purchase unit.
- Stock Quantity represents the quantity maintained in inventory using the stock unit.
- Stock Conversion is used to convert the purchase quantity into the stock quantity.
- Example: 1 Box × 80 = 80 Pieces.
- A newly created receipt remains Pending until it is approved.
- Inventory should be reviewed carefully before approval because approval updates the inventory stock.
- Only approved inventory proceeds to the Store Room assignment process.
- Store Room assignment determines where the approved inventory will be stored.
- Auto Assign Received Items can be used to prepare assignments based on Store Room inventory requirements.
- Approval Required on a Store Room determines whether the assignment requires an additional approval step.
- The final Assigned status indicates that the approved inventory has been assigned to its Store Room.
- The complete process provides traceability from the original vendor receipt through approval and final Store Room assignment.