
Employee Master
Overview
The Employee Management feature provides a centralized workspace for managing the complete employee lifecycle across the property.
Employee records are organized into four status tabs:
- Active — Displays employees who are currently active and available for normal operations.
- Inactive — Displays employees who are currently inactive and not active for normal operations.
- Terminated — Displays employees whose employment has been terminated.
- All — Displays all employee records regardless of their current status.
The Employee Management workflow supports the complete employee lifecycle:
Create Employee → Active → Inactive / Terminated → Rehire if Eligible → Active
Managers can also use employee actions such as Reset Password, Terminate, Rehire, and ADP Sync directly from the employee list.
Employee Management Screen
The Employee Management screen provides a centralized list of employees with status filters and employee actions.
Employee List
The employee list includes the following information and actions:
| Column | Description |
|---|---|
| Unique employee code assigned to the |
|
| Primary phone number associated with the |
|
| Employee's registered email |
|
| Gender information recorded in the |
|
| Displays |
|
| Allows an authorized user to reset the employee's |
|
| Provides employee lifecycle actions |
|
| Allows |
- Search — Search employees by available employee information.
- Create — Create a new employee.
- Download — Export or download the employee list.
- Filter — Apply additional employee list filters.
- Status Tabs — Quickly switch between Active, Inactive, Terminated, and All employees.
Employee Status Tabs
Employee records are separated into four tabs to make employee lifecycle management easier.
Active
The Active tab displays employees who are currently active at the property.
Active employees can normally be assigned to workforce activities and other employee-related operations.
Managers can perform actions such as:
- View employee information.
- Change the employee's active/inactive status.
- Reset the employee password.
- Terminate the employee.
- Synchronize employee information with ADP.
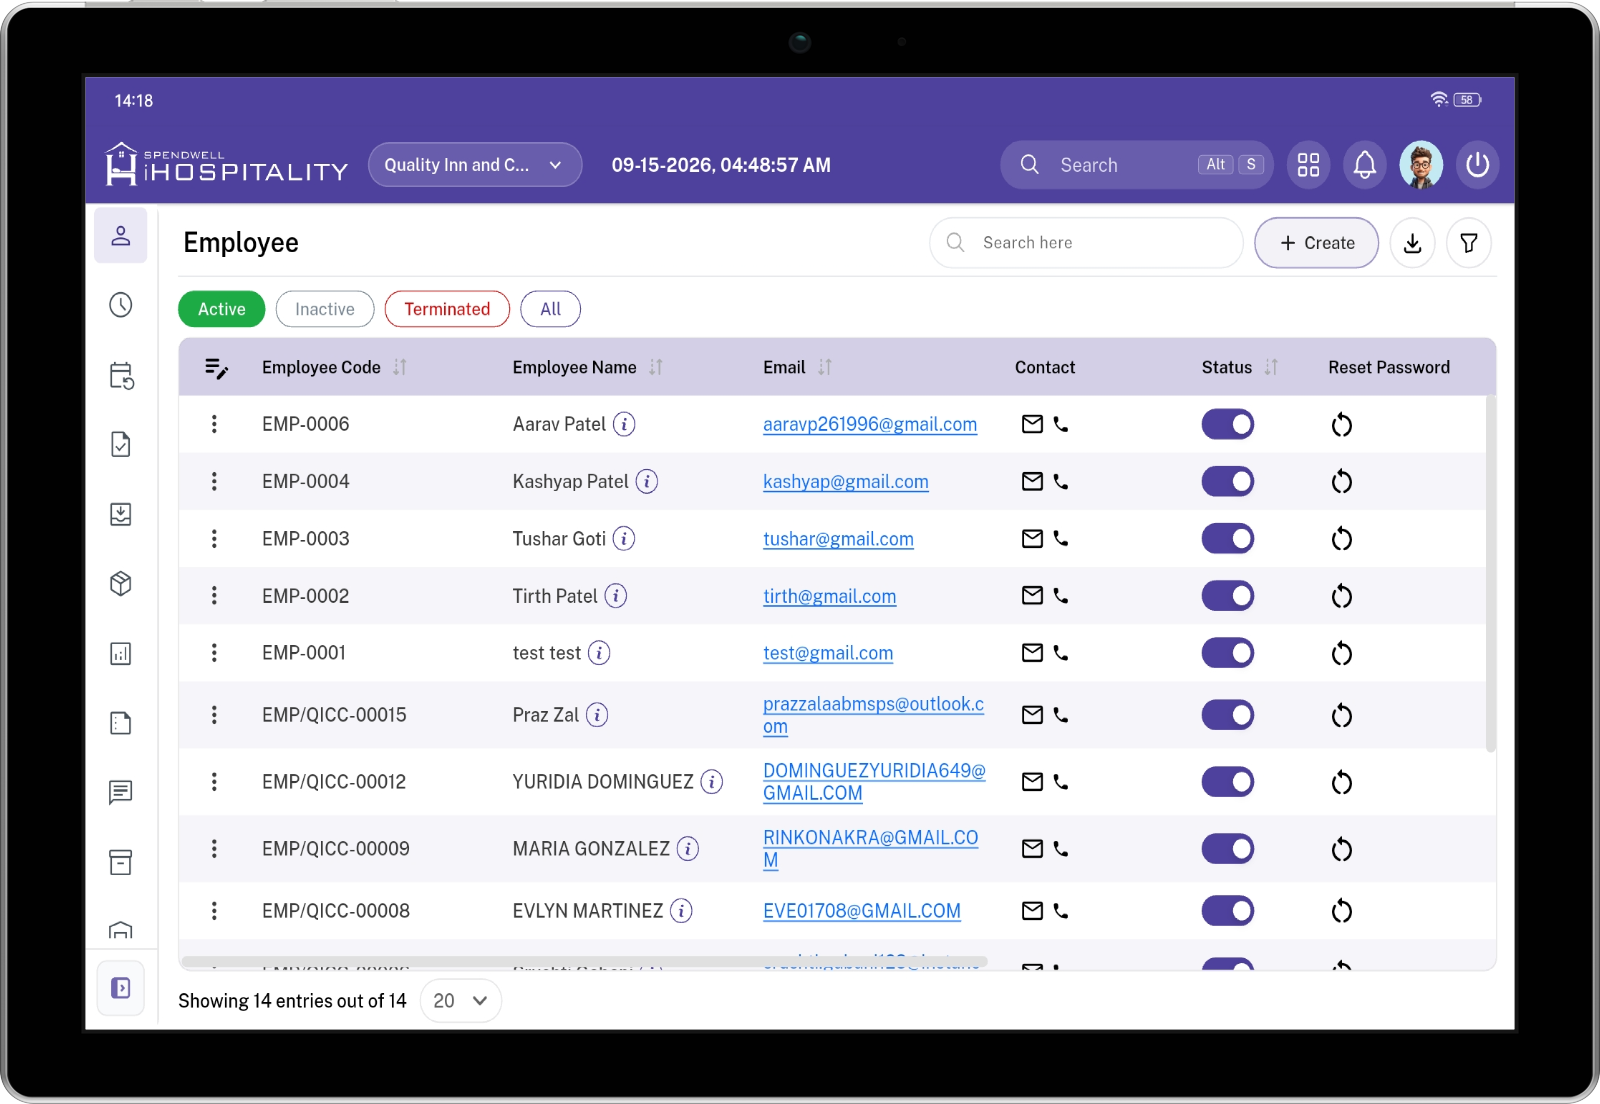
Active Employee List
The Active tab shows employees whose employment status is currently active. The Terminate action is available for employees who need to be removed from active employment.
Inactive
The Inactive tab displays employees who are currently marked as inactive.
An inactive employee remains in the system but is not considered active for normal employee operations.
Managers can use this tab to review employees who are temporarily inactive and perform the available lifecycle action based on the employee's current record.
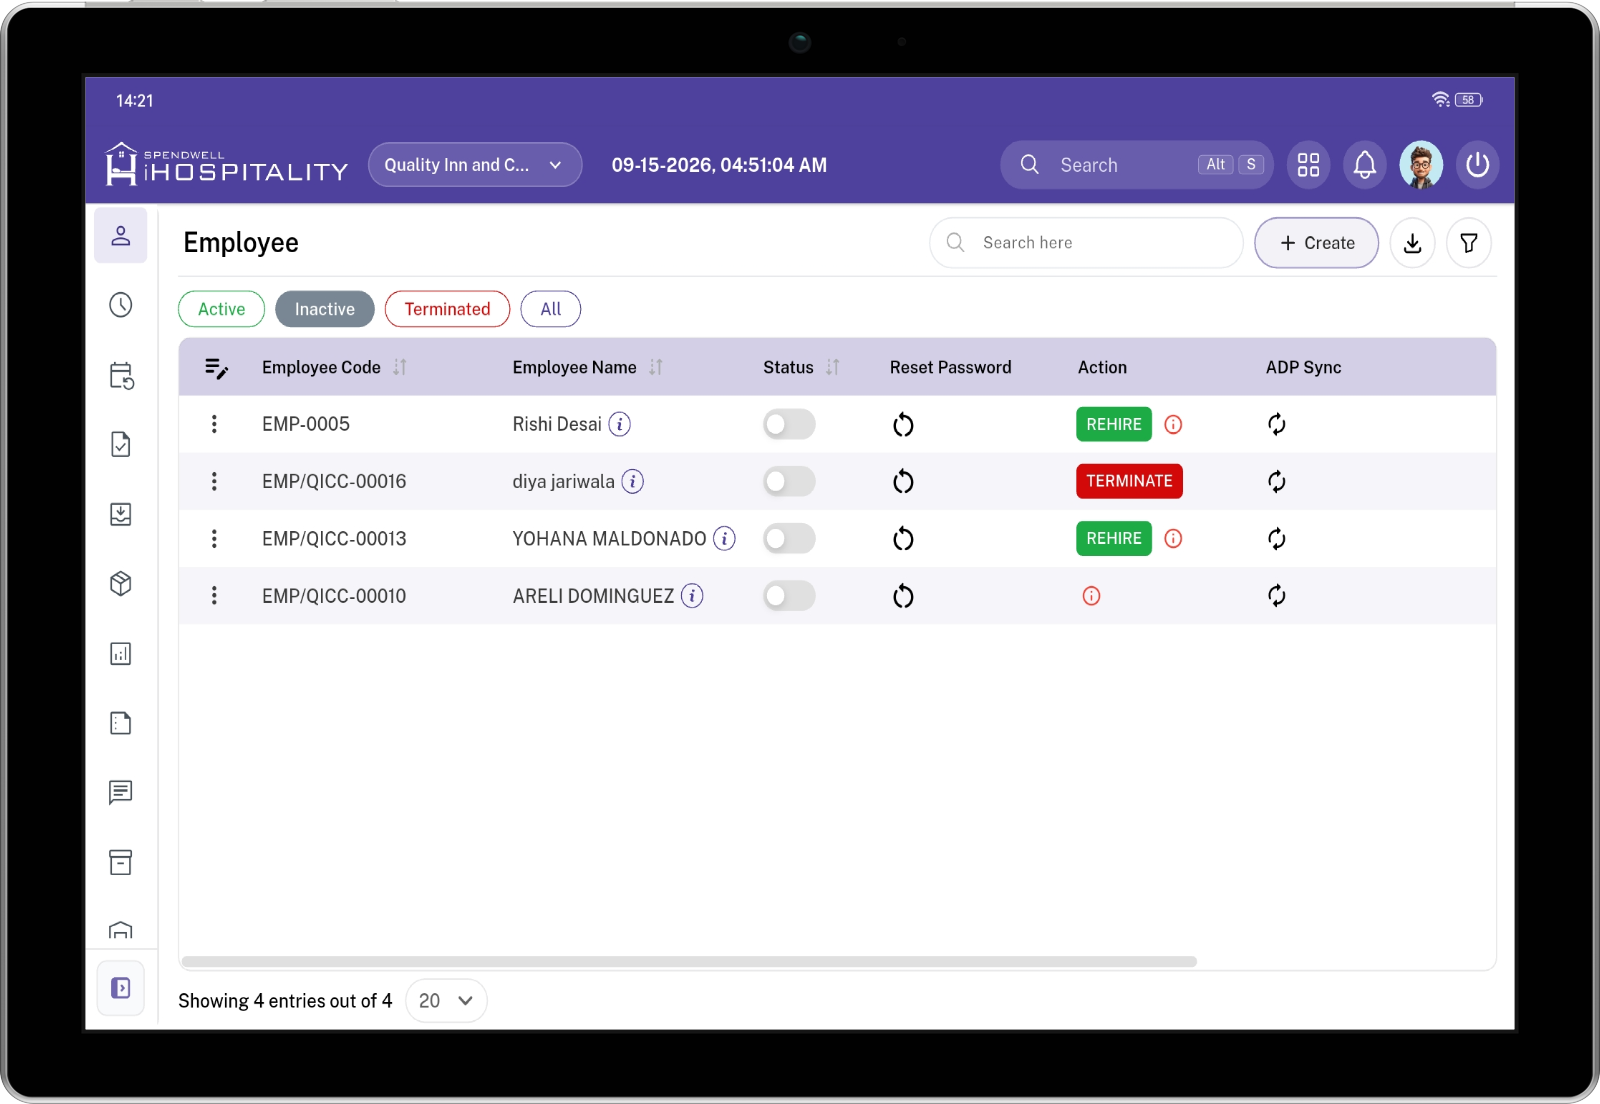
Inactive Employee List
The Inactive tab shows employees whose status toggle is disabled. Depending on the employee's record and employment history, the available action may allow the employee to be rehired or terminated.
Terminated
The Terminated tab displays employees whose employment has been terminated.
Terminated employees remain available in the system for historical reference and employee record management.
Managers can review terminated employees and, when the employee is marked as Rehire Eligible, use the Rehire action to return the employee to active employment.
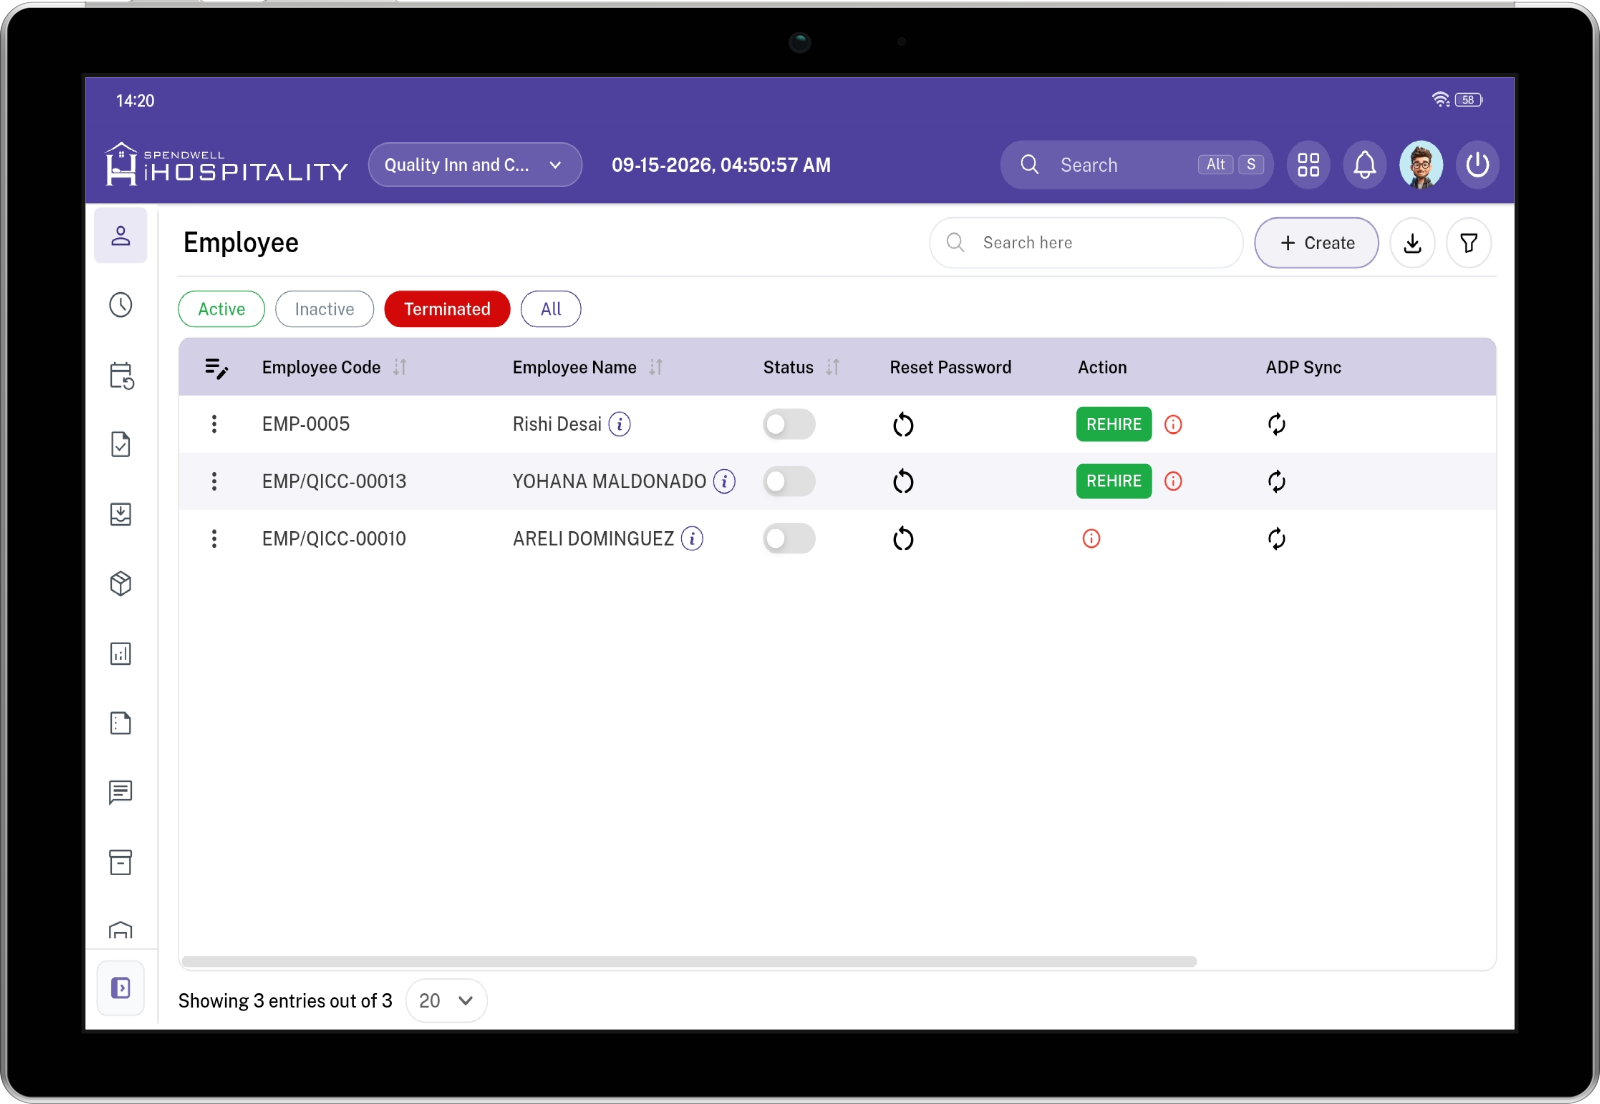
Terminated Employee List
The Terminated tab shows employees whose employment has ended.
- Rehire is displayed when the employee is eligible for rehire.
- An information indicator may be displayed when additional termination or rehire information is available.
- Employees who are not eligible for rehire cannot be rehired through the standard rehire action.
All
The All tab displays all employee records regardless of whether they are Active, Inactive, or Terminated.
This tab provides a complete employee directory and allows managers to locate an employee without first selecting a specific status.
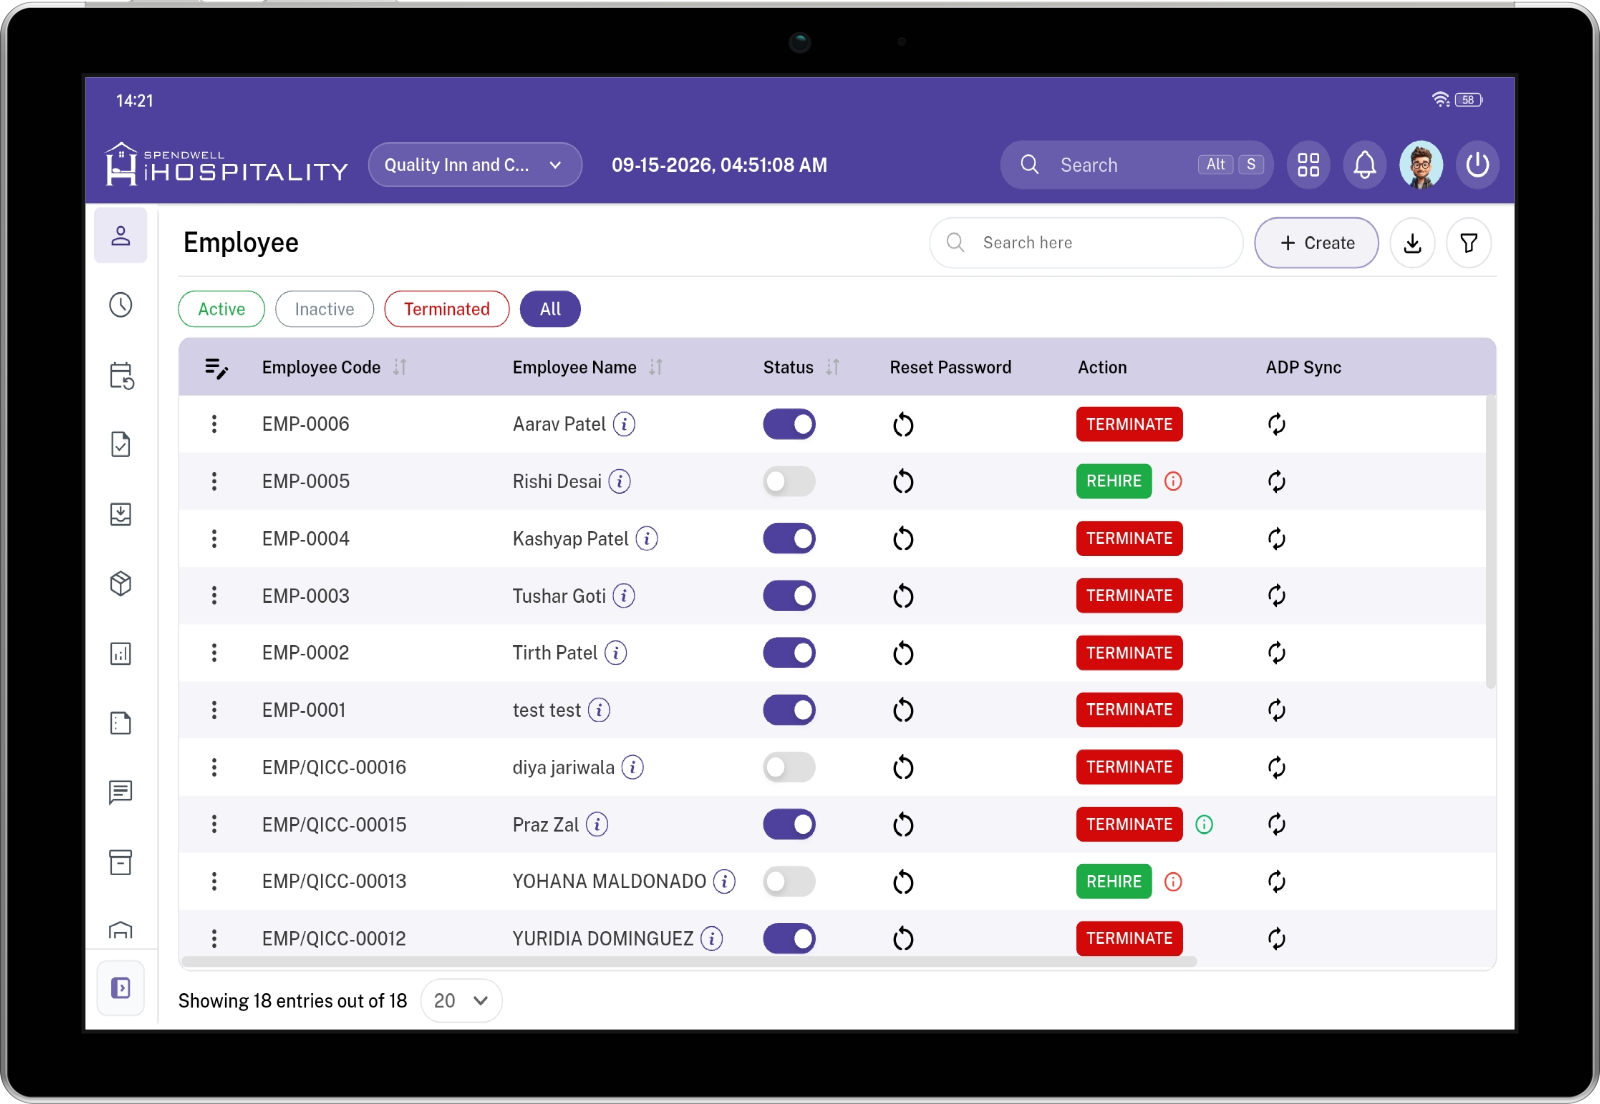
All Employee List
The All tab provides a consolidated view of employee records and their current status. Available actions are determined by the employee's current status and eligibility.
Create Employee
The Create Employee feature allows managers and authorized users to create and maintain employee records for the property.
The employee creation form is organized into the following sections:
- Employee Details
- Personal Details
- Payroll Details
- Address Details
- Identity Document
Each section captures specific information required for employee management, payroll processing, identification, and employee records.
1. Employee Details
The Employee Details section contains the employee's primary employment and system information.
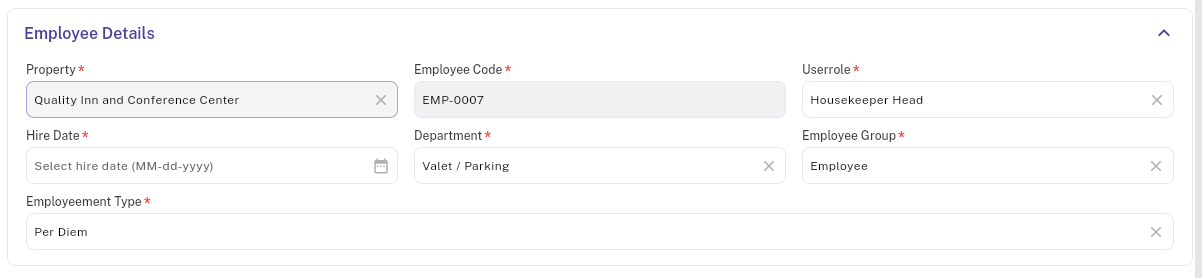
`*` are required.
| Field | Description |
|---|---|
| Property where the employee is assigned and works. | |
| Unique code used to identify the employee within the system. | |
| Defines the employee's system role and determines the permissions and features available to the employee. | |
| Department to which the employee is assigned, such as Housekeeping, Front Desk, Maintenance, or Food & Beverage. | |
| Date on which the employee officially started employment with the property. | |
| Defines the employee group used to determine applicable policies and rules, such as leave |
|
| Defines the employee's employment classification, such as |
Employee Details Screenshot
2. Personal Details
The Personal Details section captures the employee's personal and contact information.
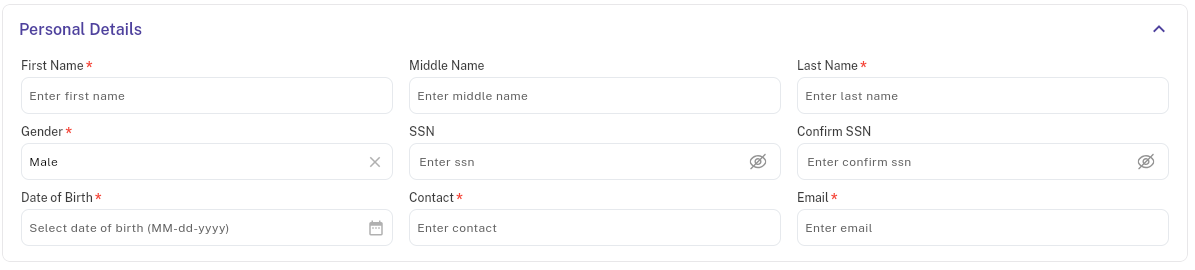
| Field | Description |
|---|---|
| Employee's first name. | |
| Employee's middle name, if applicable. | |
| Employee's last name. | |
| Employee's gender. | |
| Employee's Social Security Number (SSN) used for employee identification and applicable payroll requirements. | |
| Confirm SSN | Confirms the Social Security Number entered in the SSN field to ensure both values match. |
| Date of |
Employee's date of birth. |
| Employee's primary contact phone number. | |
The personalemail informationaddress is used for system login and to maintainsend the employee's profilewelcome email and contactpassword records.
Personalthe Detailsemployee Screenshot
is 3. Payroll Details
The Payroll Details section contains payroll, compensation, and external payroll integration information.
The fields displayed in this section may change based on the selected Payroll Type.
| Field | Description |
|---|---|
| Unique employee identifier used by the employee to log in to the iHospitality Hub. | |
| Passcode | Employee passcode used together with the Employee ID to authenticate and log in to the iHospitality Hub. | Associate |
Employee associate identifier used for payroll |
| Payroll file number or employee payroll reference |
|
| Pay Group | Defines the payroll group |
| Defines how the employee is | |
| Salary | Defines the employee's salary when Payroll Type is set to Salary. |
| Hourly Wage | Defines the employee's hourly wage when Payroll Type is set to Hourly. The total payroll amount is calculated by the system based on the employee's hourly wage and applicable worked hours according to the configured pay cycle. |
| Per Room Rate | Defines the rate paid for each completed room when Payroll Type is set to Pay By Room. This option is commonly used for contract housekeeping employees. |
Note: Pay Group and Onboarding Template are displayed only when ADP payroll configuration is enabled for the property. When ADP is not configured, these fields are not displayed.
Payroll Type
The system supports different compensation methods. Selecting the payroll type determines the applicable compensation field.
- Hourly — Employee is paid based on an hourly wage.
- Salaried — Employee is paid based on a fixed salary.
- Pay By Room — Employee is paid based on the number of rooms or room-related work completed.
3.1 Salaried Employee
When Payroll Type is set to Salaried, the employee's compensation is entered using the Salary field.
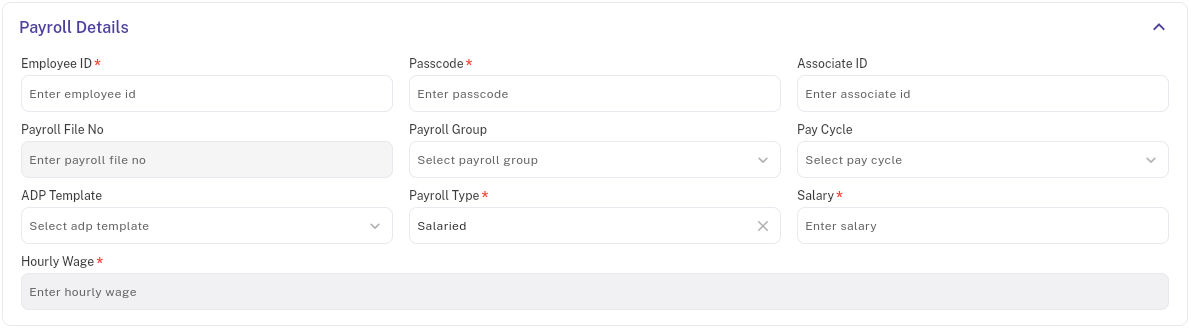
The payroll configuration can include:
- Employee ID
- Passcode
- Associate ID
- Payroll File No
PayrollPay Group- Pay Cycle
ADPOnboarding Template- Payroll Type
- Salary
- Hourly Wage
Salaried Employee Screenshot
3.2 Hourly Employee
When Payroll Type is set to Hourly, the employee's compensation is entered using the Hourly Wage field.
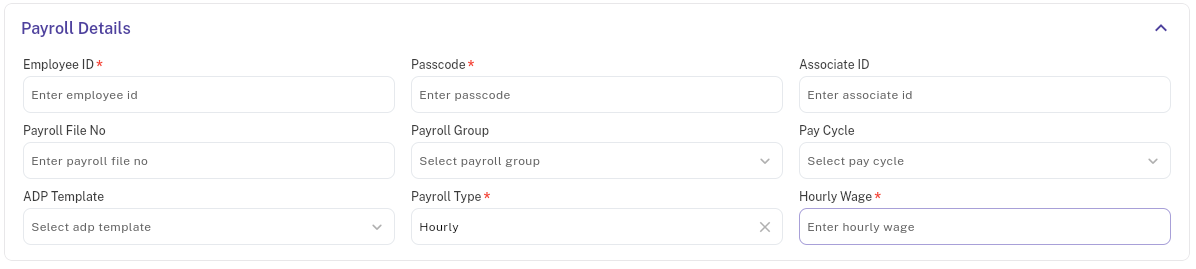
The payroll configuration can include:
- Employee ID
- Passcode
- Associate ID
- Payroll File No
PayrollPay Group- Pay Cycle
ADPOnboarding Template- Payroll Type
- Hourly Wage
Hourly Employee Screenshot
3.3 Pay By Room Employee
When Payroll Type is set to Pay By Room, the employee's compensation is entered using the Per Room Rate field.
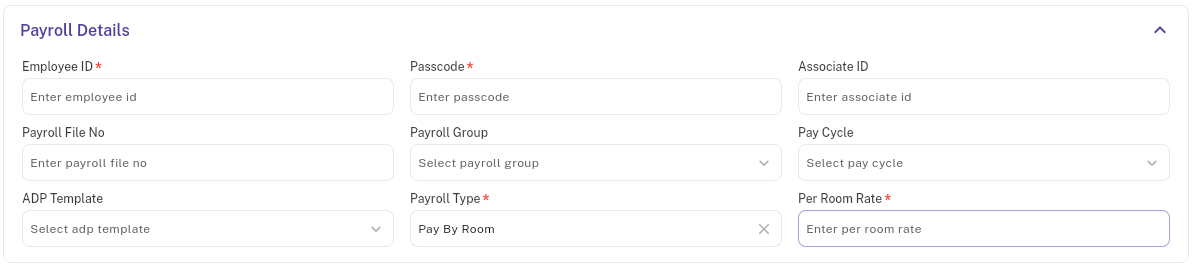
- Employee ID
- Passcode
- Associate ID
- Payroll File No
PayrollPay Group- Pay Cycle
ADPOnboarding Template- Payroll Type
- Pay Per Room
Rate
Pay By Room Employee Screenshot
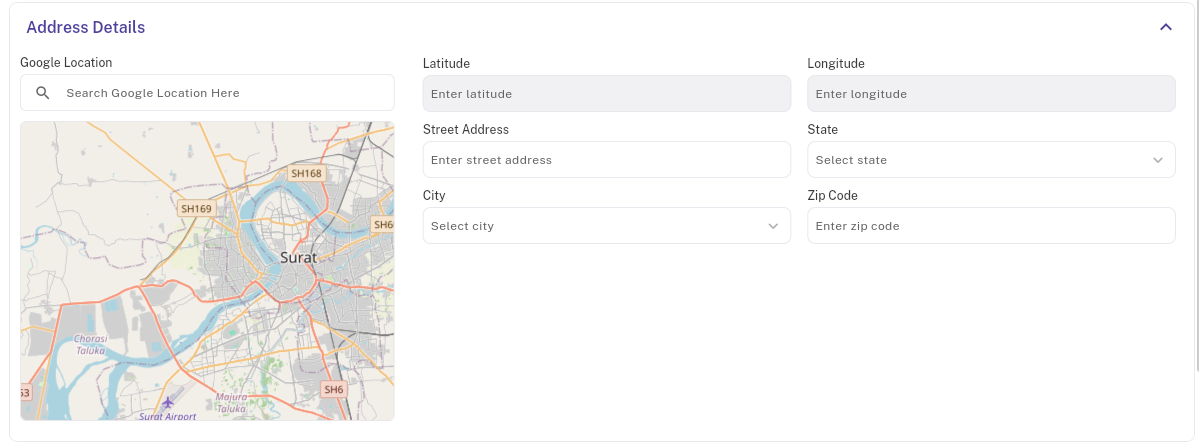
4. Address Details
The Address Details section records the employee's residential location and address information.
| Field | Description |
|---|---|
| Allows the user to search for and select the employee's location using Google Location search. Once a location is selected, the related address and location details are automatically populated. | |
| City | Automatically populated based on the selected Google Location. |
| State | Automatically populated based on the selected Google Location. |
| Latitude | Automatically populated with the geographic latitude of the selected location. |
| Longitude | Automatically populated with the geographic longitude of the selected location. |
| Zip Code | Automatically populated with the ZIP code associated with the selected |
Note: The user only needs to search for and select the location using Google Location. The Street Address, City, State, Latitude, Longitude, and Zip Code fields are automatically populated based on the selected location.
**Street Address**Employee's street address.**State**Employee's state.**City**Employee's city.**Zip Code**Employee's ZIP code.
When a location is selected throughGoogle Location, the associated geographic coordinates can be populated automatically.
Address Details Screenshot---
5. Identity Document
The Identity Document section allows authorized users to record the employee's identification document information.

| Field | Description |
|---|---|
| Driving License Image | Image of the employee's driving license maintained as an identification document |
Identity
Note: The SSN Image and
complianceFacialrequirements.Image are used for system-related purposes. The Facial Image is specifically used for face login and facial authentication.
Identity Document Screenshot---
Create Employee Actions
After entering the required employee information, the following actions are available:
| Action | Description |
|---|---|
| Saves the employee record with the entered information. | |
| Saves the current employee record and opens a new employee creation form. | |
| Clears the entered information and resets the |
Employee Creation Flow
The employee creation process follows the sequence below:
Employee Details
↓
Personal Details
↓
Payroll Details
↓
Address Details
↓
Identity Document
↓
Save Employee
The payroll compensation fields are displayed according to the selected payroll type:
Salaried → Salary
Hourly → Hourly Wage
Pay By Room → Per Room Rate
Once the employee is saved, the employee record becomes available in the employee management listing and can be managed according to the user's assigned permissions.
Employee Status Management
The employee Status toggle allows authorized users to control whether an employee is active or inactive.
Active Employee
When the status is enabled, the employee is shown as Active.
Active Status → Employee is Active
Inactive Employee
When the status is disabled, the employee is shown as Inactive.
Inactive Status → Employee is Inactive
The status toggle should be used for normal active/inactive employee management. When employment has officially ended, the employee should be processed through the Terminate Employee workflow.
Terminate Employee
The Terminate action is used when an employee's employment with the property has ended.
Selecting Terminate opens the Terminate Employee screen.
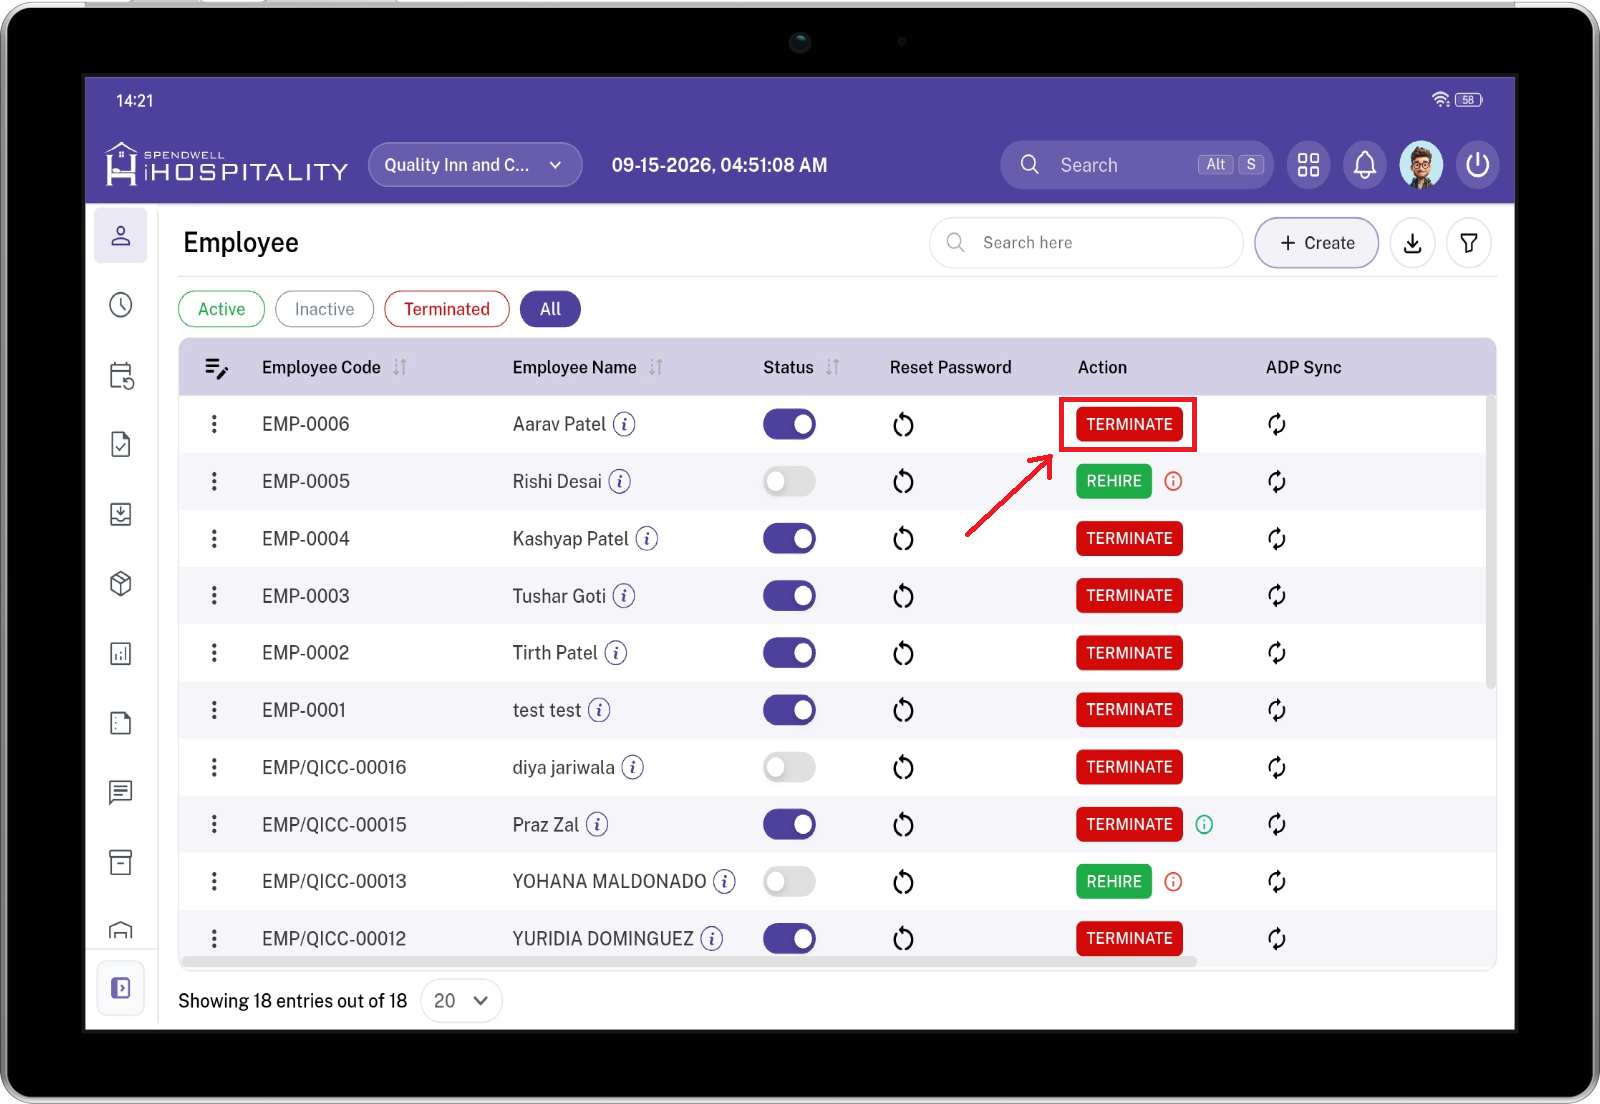
Step 1 - Select Terminate
From the employee list, click the Terminate action for the employee you want to terminate.

Step 2 - Complete Termination Form
Enter the termination date, termination type, rehire eligibility, reason, and optional notes.
Termination Information
| Field | Description |
|---|---|
| Date on which the employee's employment is terminated. | |
| Defines the type or classification of termination. | |
| Required reason for terminating the |
|
| Notes | |
| Optional additional information related to the employee's termination. |
The termination record should contain accurate information because it may be used for future employee history and rehire decisions.
- Open the employee from the Active or applicable employee list.
- Select Terminate.
- Select the Termination Date.
- Select the Termination Type.
- Select whether the employee is Rehire Eligible.
- Enter the required Reason.
- Enter optional Notes.
- Select Update.
- The employee is moved to the Terminated employee list.
Termination Workflow
Active Employee → Terminate → Enter Termination Details → Update → Terminated
Rehire Employee
The Rehire action allows an eligible terminated employee to return to active employment.
A terminated employee can only be rehired when the employee is marked as Rehire Eligible.
Selecting Rehire opens the Rehire Employee screen.
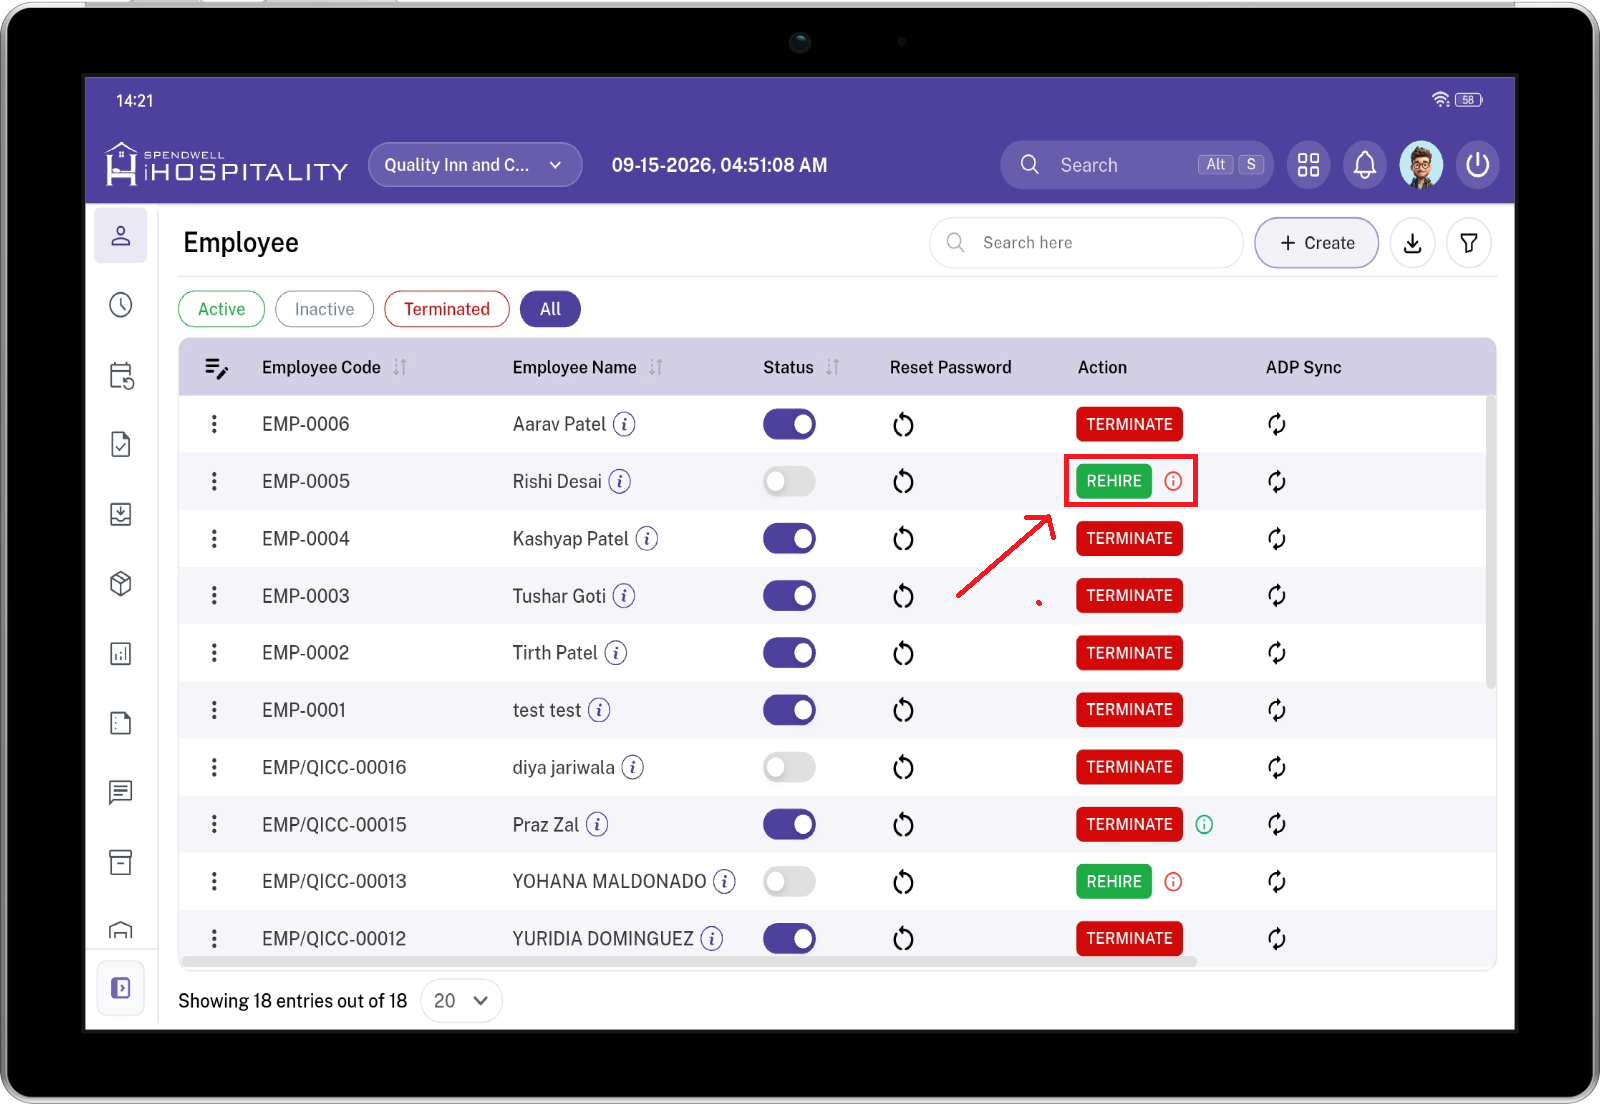
Step 1 - Select Rehire
From the employee list, click the Rehire action for the terminated employee you want to rehire.
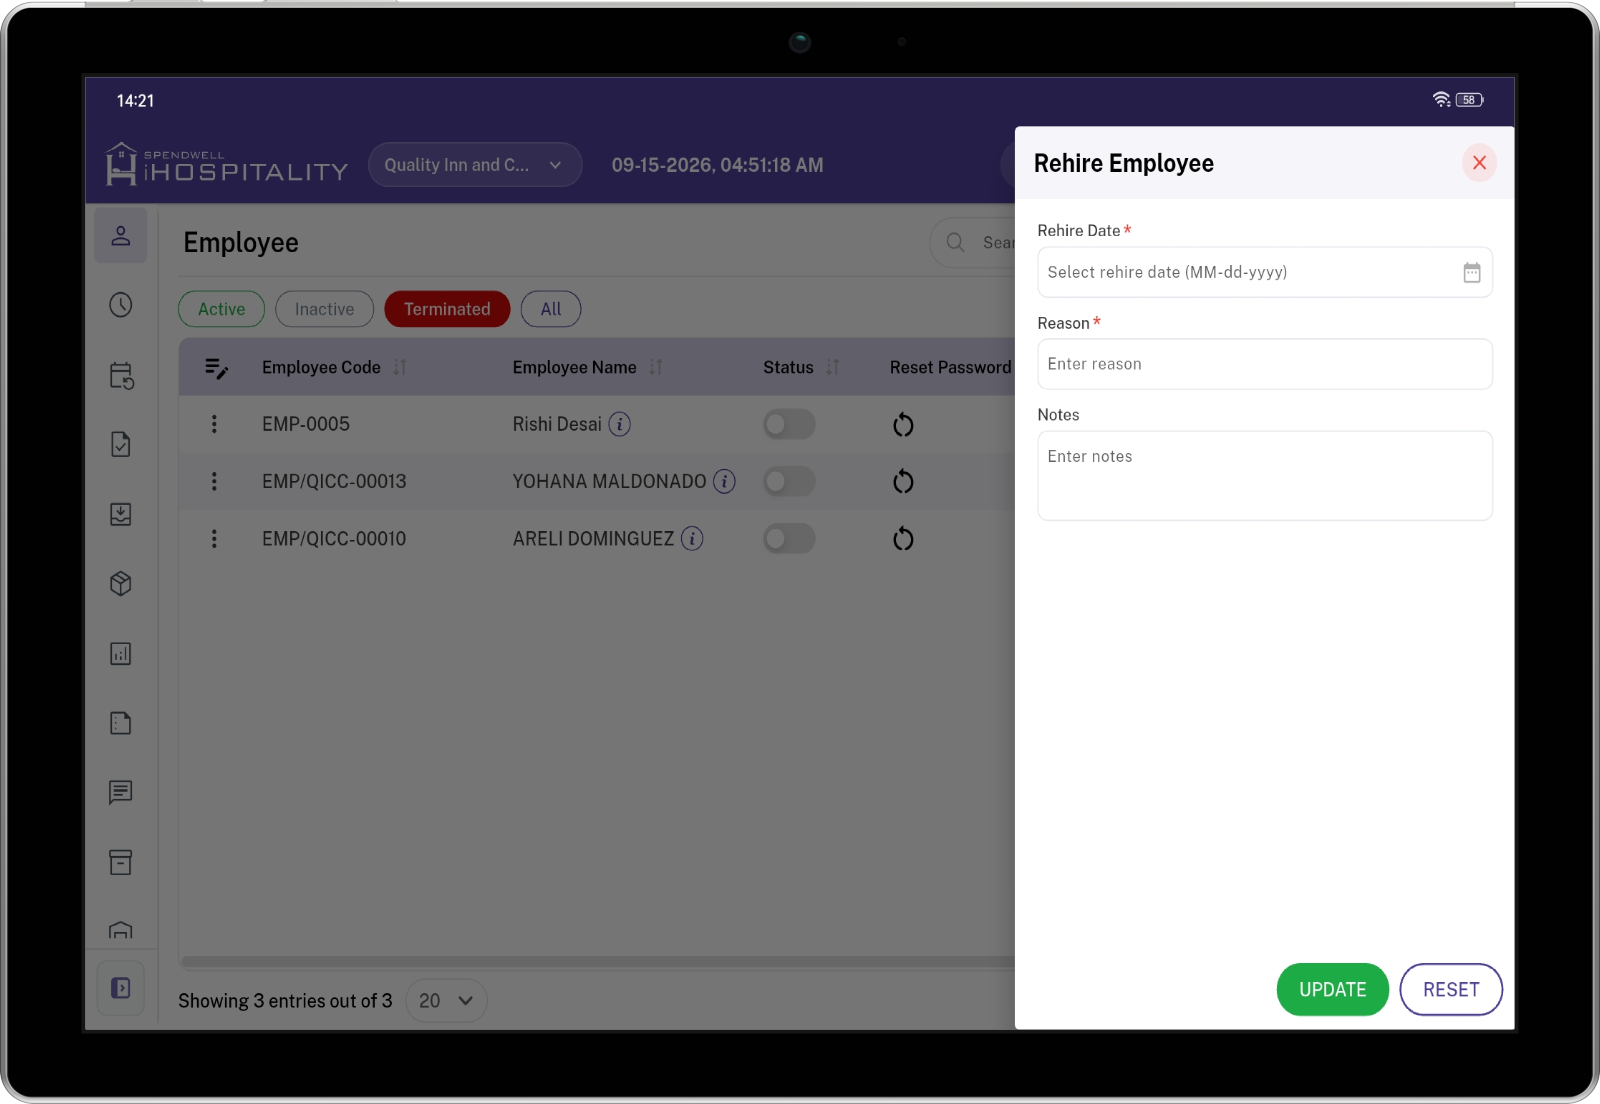
Step 2 - Complete Rehire
Review the employee rehire details and complete the rehire process to reactivate the employee.
Rehire Information
| Field | Description |
|---|---|
| Date on which the employee |
|
| Required reason for rehiring the employee. | |
| Optional additional information |
- Open the Terminated or applicable employee list.
- Locate the employee.
- Select Rehire when the employee is eligible.
- Select the Rehire Date.
- Enter the Reason.
- Enter optional Notes.
- Select Update.
- The employee is returned to the active employee workflow.
Rehire Workflow
Terminated Employee → Rehire Eligible → Rehire → Enter Rehire Details → Update → Active
Note: If an employee is not eligible for rehire, the standard Rehire action is not available. An information indicator may be displayed to provide additional employee or termination information.
Reset Employee Password
The Reset Password action allows an authorized user to create a new password for an employee.
Selecting the reset password action opens the Reset Password dialog.
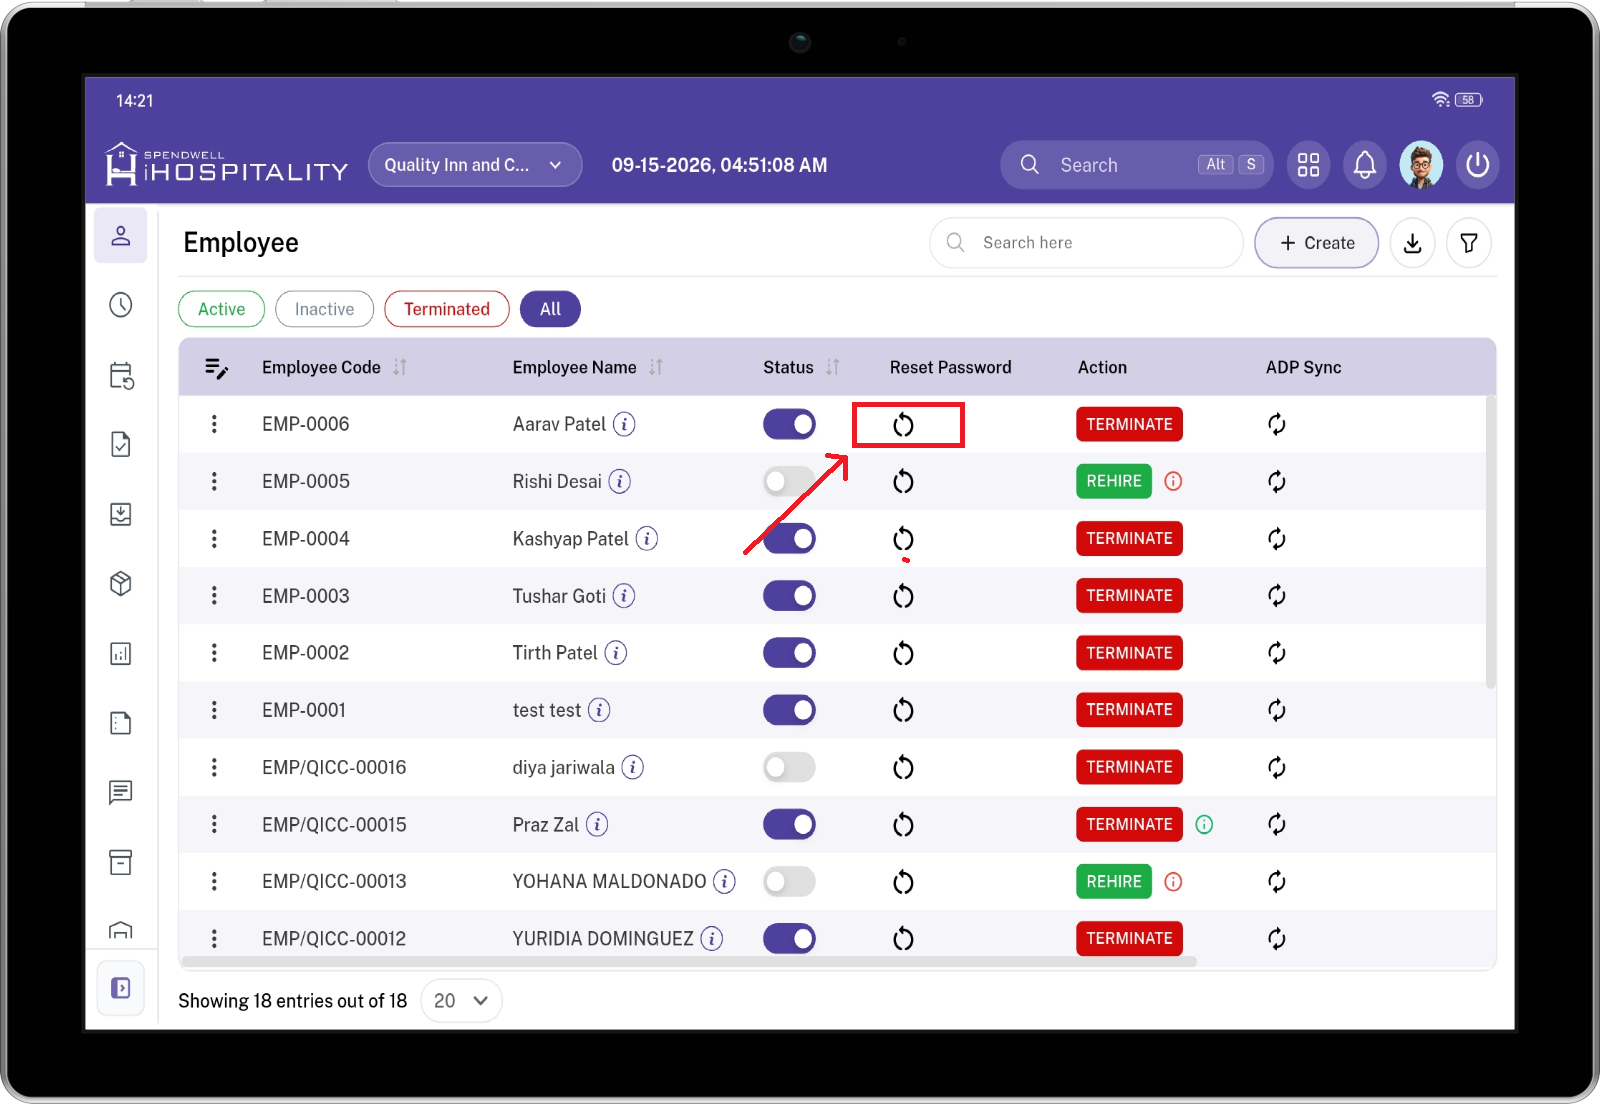
Step 1 - Select Employee and Reset Password
From the employee list, select the employee and click the Reset Password action.
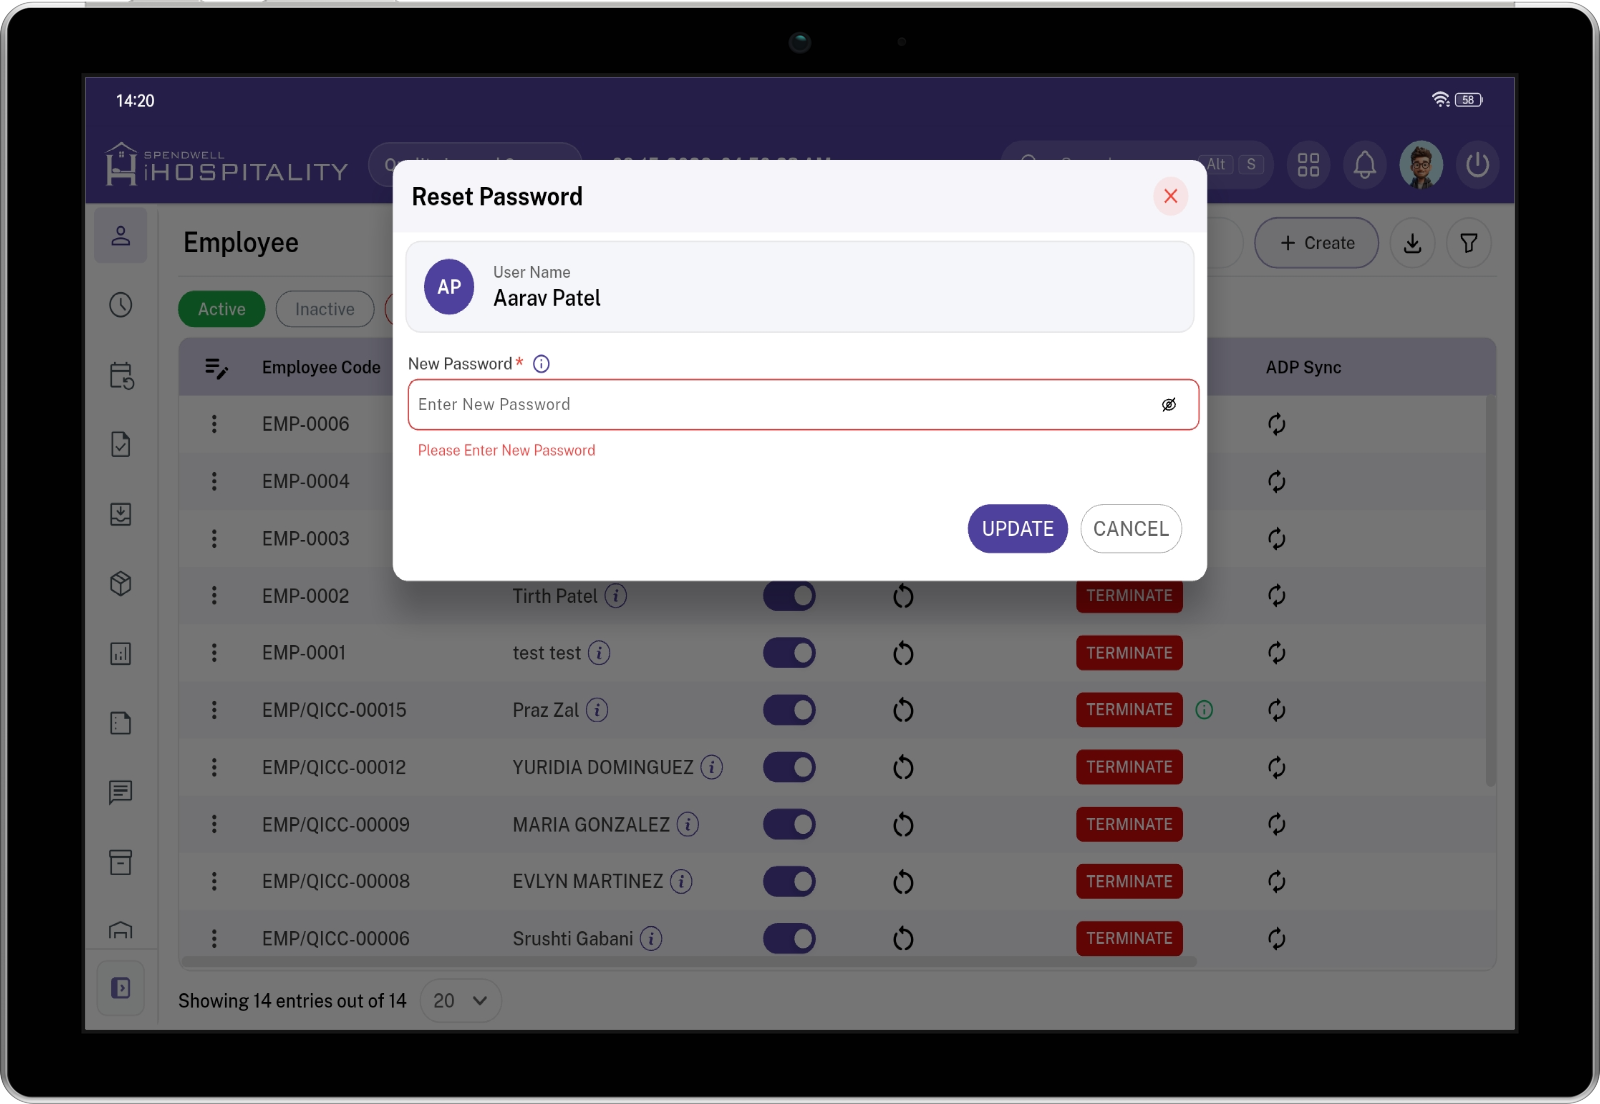
Step 2 - Reset Password
Enter the new password and confirm the password to complete the password reset process.
The dialog displays:
- User Name — Identifies the employee whose password is being reset.
- New Password — Required field for entering the new employee password.
- Locate the employee in the employee list.
- Select the Reset Password action.
- Verify the displayed employee name.
- Enter the New Password.
- Select Update.
- The employee password is updated.
If the required password field is empty, the system displays a validation message and does not update the password.
Reset Password Workflow
Employee List → Reset Password → Enter New Password → Update → Password Updated
ADP Sync
The ADP Sync action allows employee information to be synchronized with the connected ADP payroll system.
The ADP Sync action is available from the employee list.
Before synchronization, the system displays a confirmation message asking the user to confirm the sync operation.
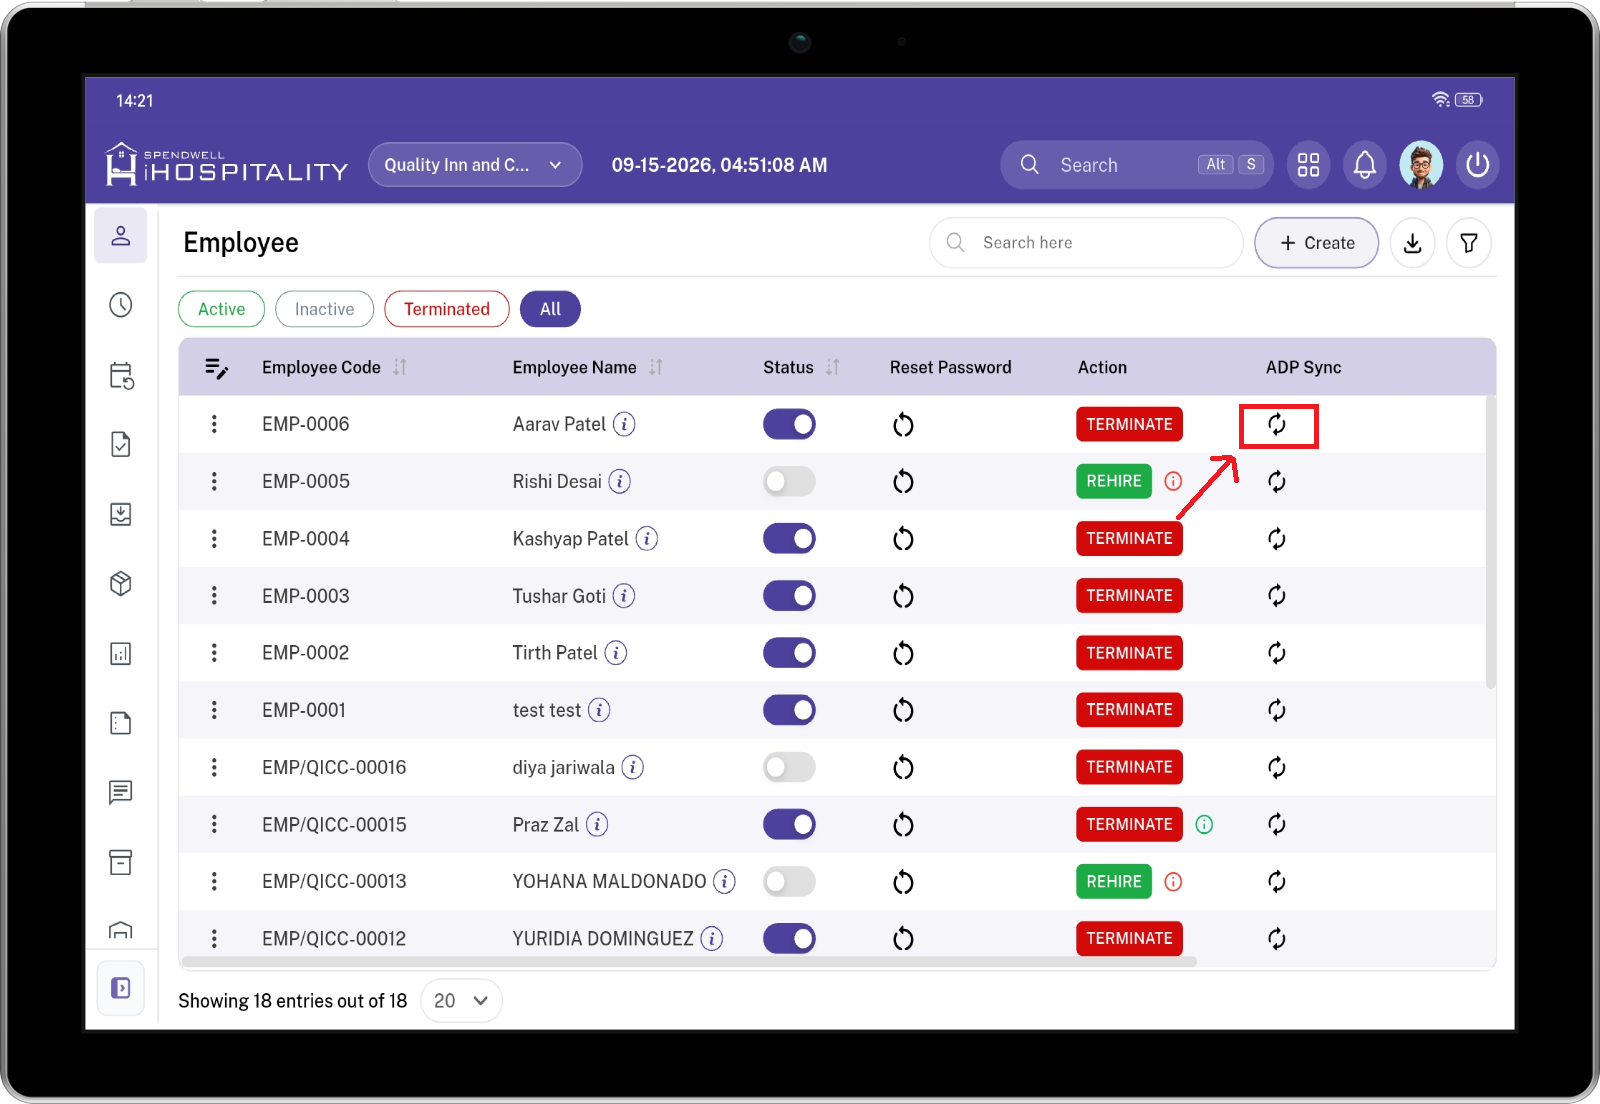
Step 1 - Select Employee with ADP](https://docs.spendwelltechsystem.com/ADP-SYNC-CONFIRMATION-SCREENSHOT-URL)
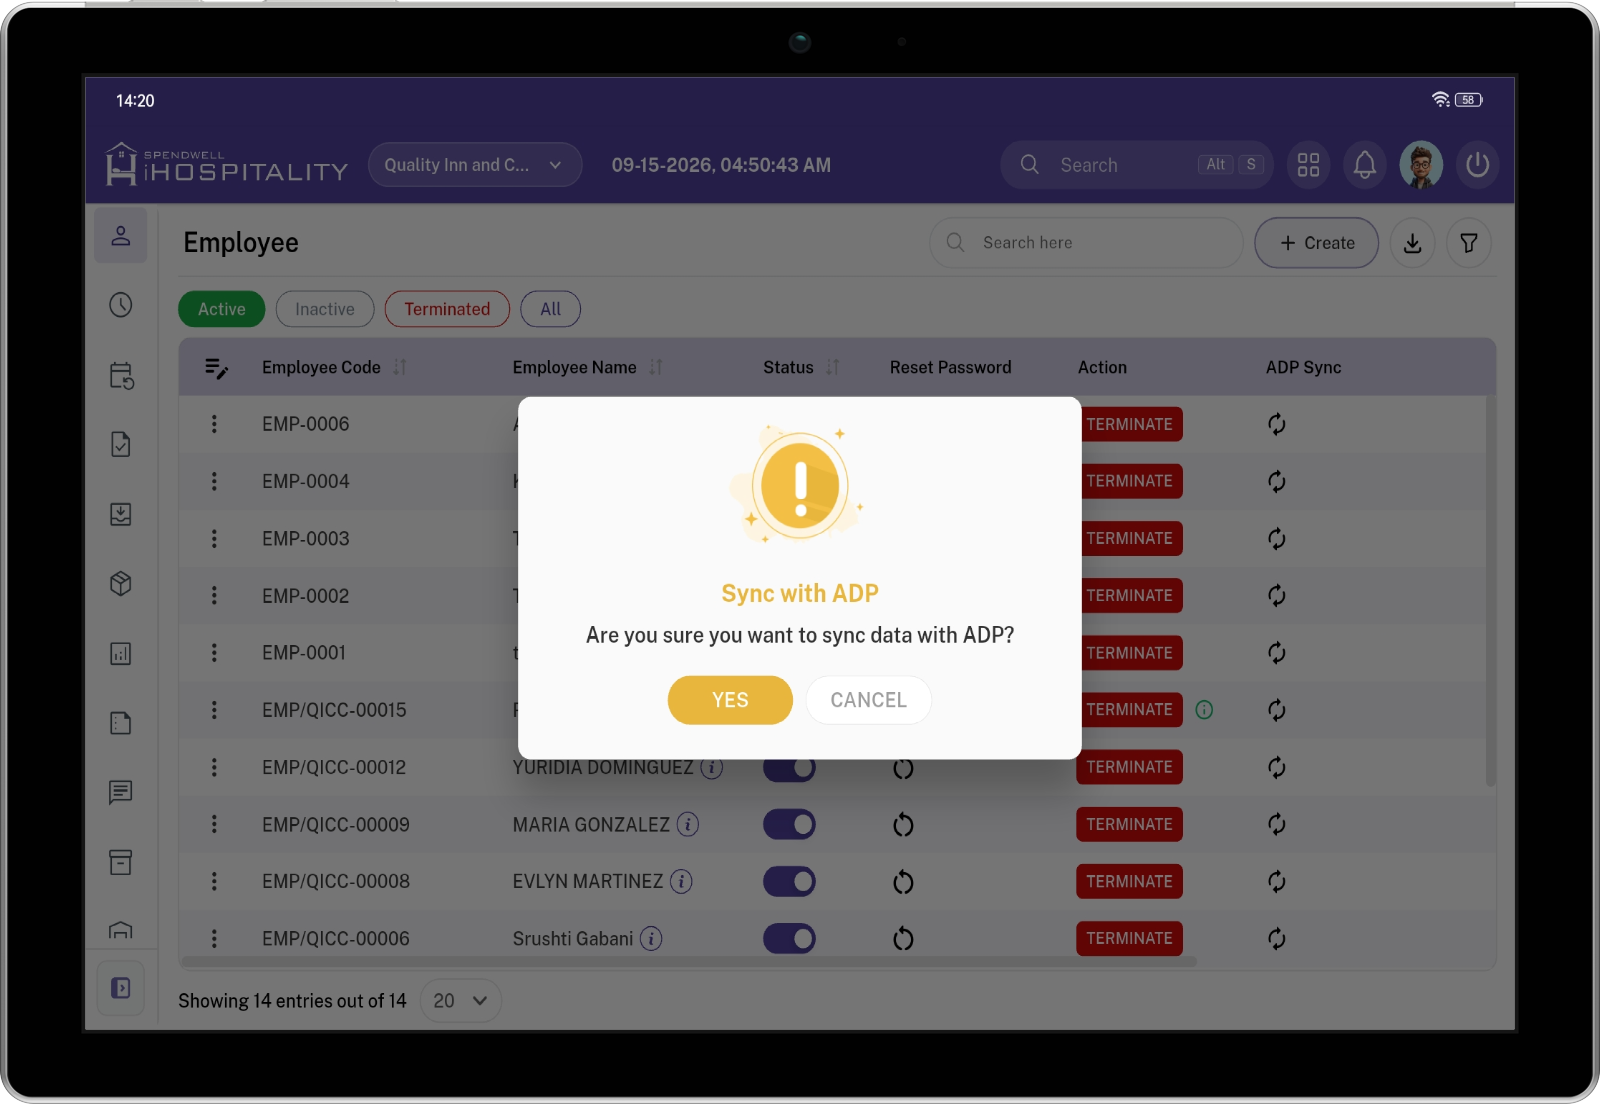
Step 2 - Confirm ADP Sync
Review the employee synchronization confirmation and click Confirm to sync the employee information with ADP.
- Locate the employee in the employee list.
- Select the ADP Sync icon.
- Review the Sync with ADP confirmation message.
- Select Yes to continue.
- Select Cancel to stop the synchronization.
- When confirmed, the system synchronizes the employee information with ADP.
ADP Sync Workflow
Employee List → ADP Sync → Confirm → Yes → Synchronize with ADP
Note: ADP synchronization should be performed after employee payroll information has been reviewed and is ready to be synchronized with the connected ADP system.
Employee Information
The information icon displayed next to an employee name can be used to access additional employee information.
Employee information can be used to review the employee record before performing actions such as:
Reset PasswordTerminateRehireADP SyncStatus changes
This helps managers verify that the correct employee record is being updated.
Employee Management Workflow
The complete employee lifecycle is:
Create Employee → Employee Active → Inactive or Terminated → Rehire if Eligible → Active
Create Employee
Create → Enter Employee Details → Enter Payroll Details → Enter Address Details → Save → Employee Created
Activate / Deactivate
Active ↔ Inactive
Managers can change an employee's active/inactive status based on the employee's current operational status.
Termination
Active → Terminate → Termination Details → Update → Terminated
Rehire
Terminated → Rehire Eligible → Rehire → Rehire Details → Update → Active
Password Reset
Employee → Reset Password → Enter New Password → Update
ADP Synchronization
Employee → ADP Sync → Confirm → Yes → ADP Synchronization
Employee Management Actions Summary
| Action | Purpose |
|---|---|
| Creates a new employee record. | |
| Changes the employee status between Active and |
|
| Terminate | |
| Allows an authorized user to |
|
| Synchronizes |
|
| Downloads the available employee list. | |
| Filters employee records based on the available filter criteria. | |
Important Notes
- Employee records are organized into Active, Inactive, Terminated, and All tabs.
- The Active tab displays currently active employees.
- The Inactive tab displays employees who are currently inactive.
- The Terminated tab displays employees whose employment has ended.
- The All tab displays employees across all statuses.
- Termination requires a Termination Date, Termination Type, Rehire Eligibility, and Reason.
- A terminated employee can be rehired only when the employee is marked as Rehire Eligible.
- Rehire requires a Rehire Date and Reason.
- Employee passwords can be reset using the Reset Password action.
- ADP synchronization requires user confirmation before the sync operation is started.
- Payroll fields may vary depending on the selected Payroll Type.
- Employee payroll and identification information should be reviewed before performing an ADP synchronization.
- Employee termination and rehire information should be maintained accurately for employee history and future workforce management.