
Profile Update
After completing the Mandatory Password Setup, the employee is taken to the Edit Profile flow.
The profile update process is divided into 5 steps:
Employee Details → Personal Details → Payroll Details → Address Details → Identity Documents → Emergency Contact Details → Tax Withholding → Select Payment Options
Tax Withholding and Select Payment Options are shown only when ADP payroll is not enabled for the property. If ADP payroll is enabled, those two steps are hidden, and the employee finishes after Emergency Contact Details.
Each step contains information that the employee should review or complete before moving to the next step.
Profile Update Steps
| Step | Section | Purpose |
|---|---|---|
| 1 | Employee Details | Review employment and organization information |
| 2 | Personal Details | Review and complete personal information |
| 3 | Payroll Details | Review and complete payroll information |
| 4 | Address Details | Add or update address information |
| 5 | Identity Documents | Provide required identity document information |
| 6 | Emergency Contact Details | Add at least one emergency contact |
| 7 | Tax Withholding | Complete Form W-4. Shown only when ADP payroll is off |
| 8 | Select Payment Options | Set up direct deposit. Shown only when ADP payroll is off |
💡 Tip: Complete each step carefully and select Save & Continue to move to the next section.
Step 1 — Employee Details
The Employee Details section displays the employee's employment and organization information.
All fields in this step are disabled and read-only. Employees can review the information but cannot edit or change these fields.
If any information is incorrect, contact your manager or administrator.
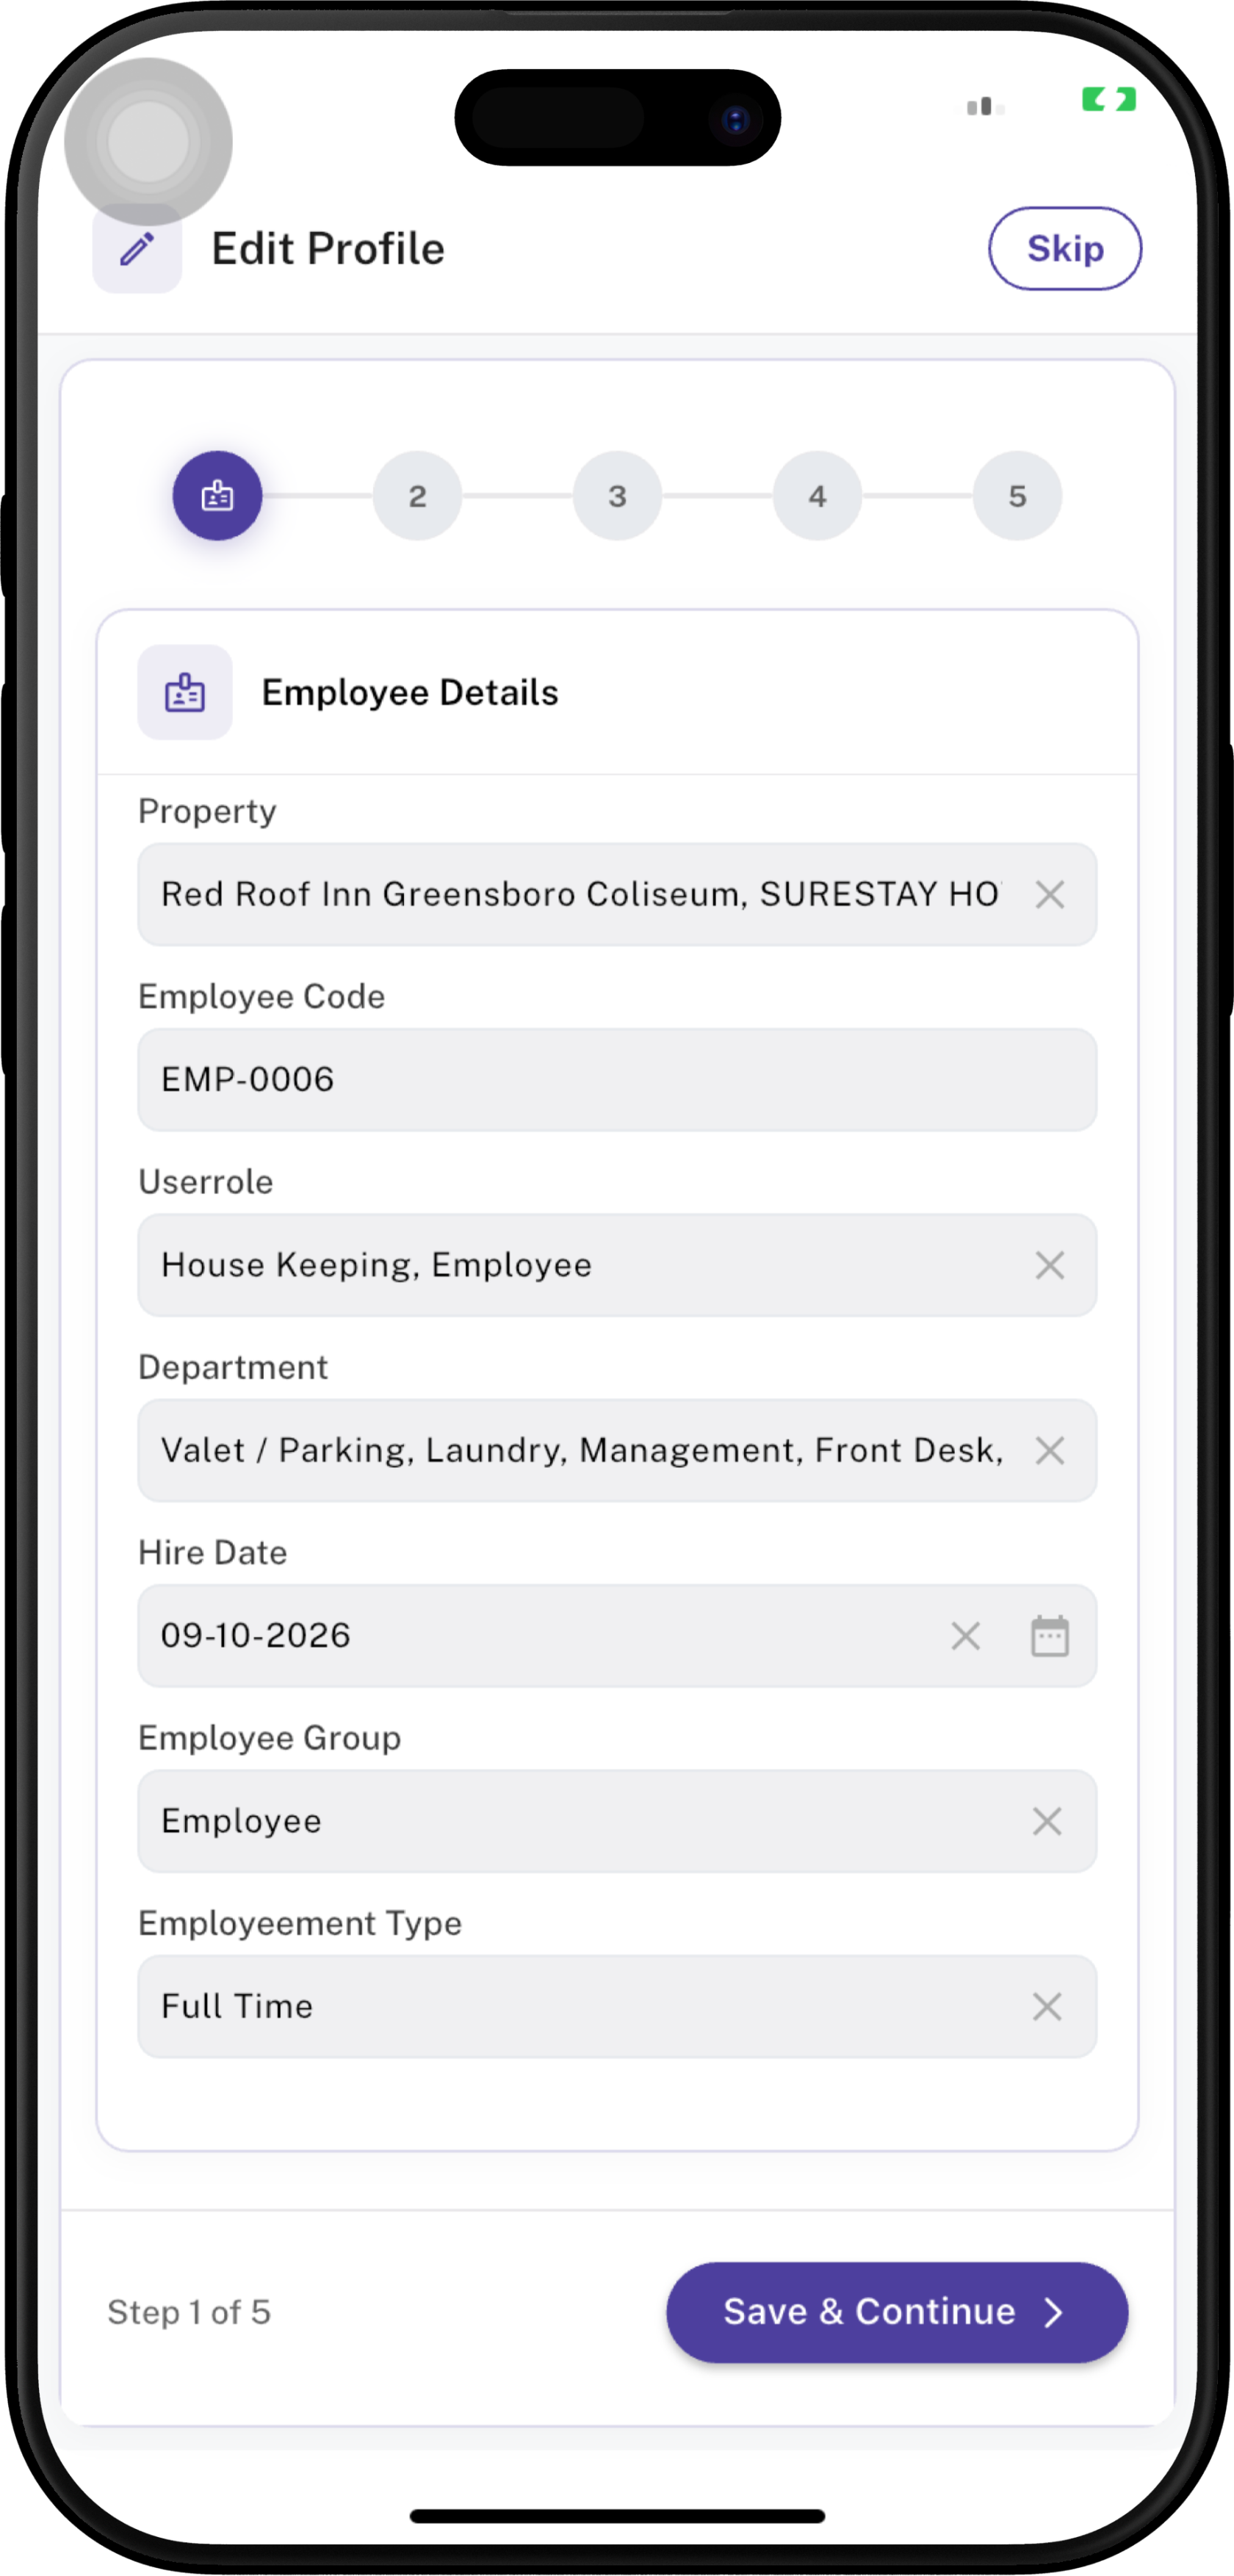
| Field | Description |
|---|---|
| Property | Displays the property where the employee is assigned. |
| Employee Code | Displays the unique employee code assigned to the employee. |
| Userrole | Displays the role assigned to the employee, such as Housekeeping or Employee. |
| Department | The department(s) associated with the employee, such as Front Desk, Laundry, Management, or Valet/Parking. |
| Hire Date | The employee's official hire/start date recorded in the system. |
| Employee Group | The employee group assigned to the employee, such as Employee. |
| Employment Type | The employee's employment classification, such as Full Time. |
▶️ Continue to the Next Step
After reviewing all Employee Details, tap Save & Continue button. ⚠️ If any Employee Details are incorrect: Contact your manager or administrator. These fields are disabled and cannot be updated by the employee.
Step 2 — Personal Details
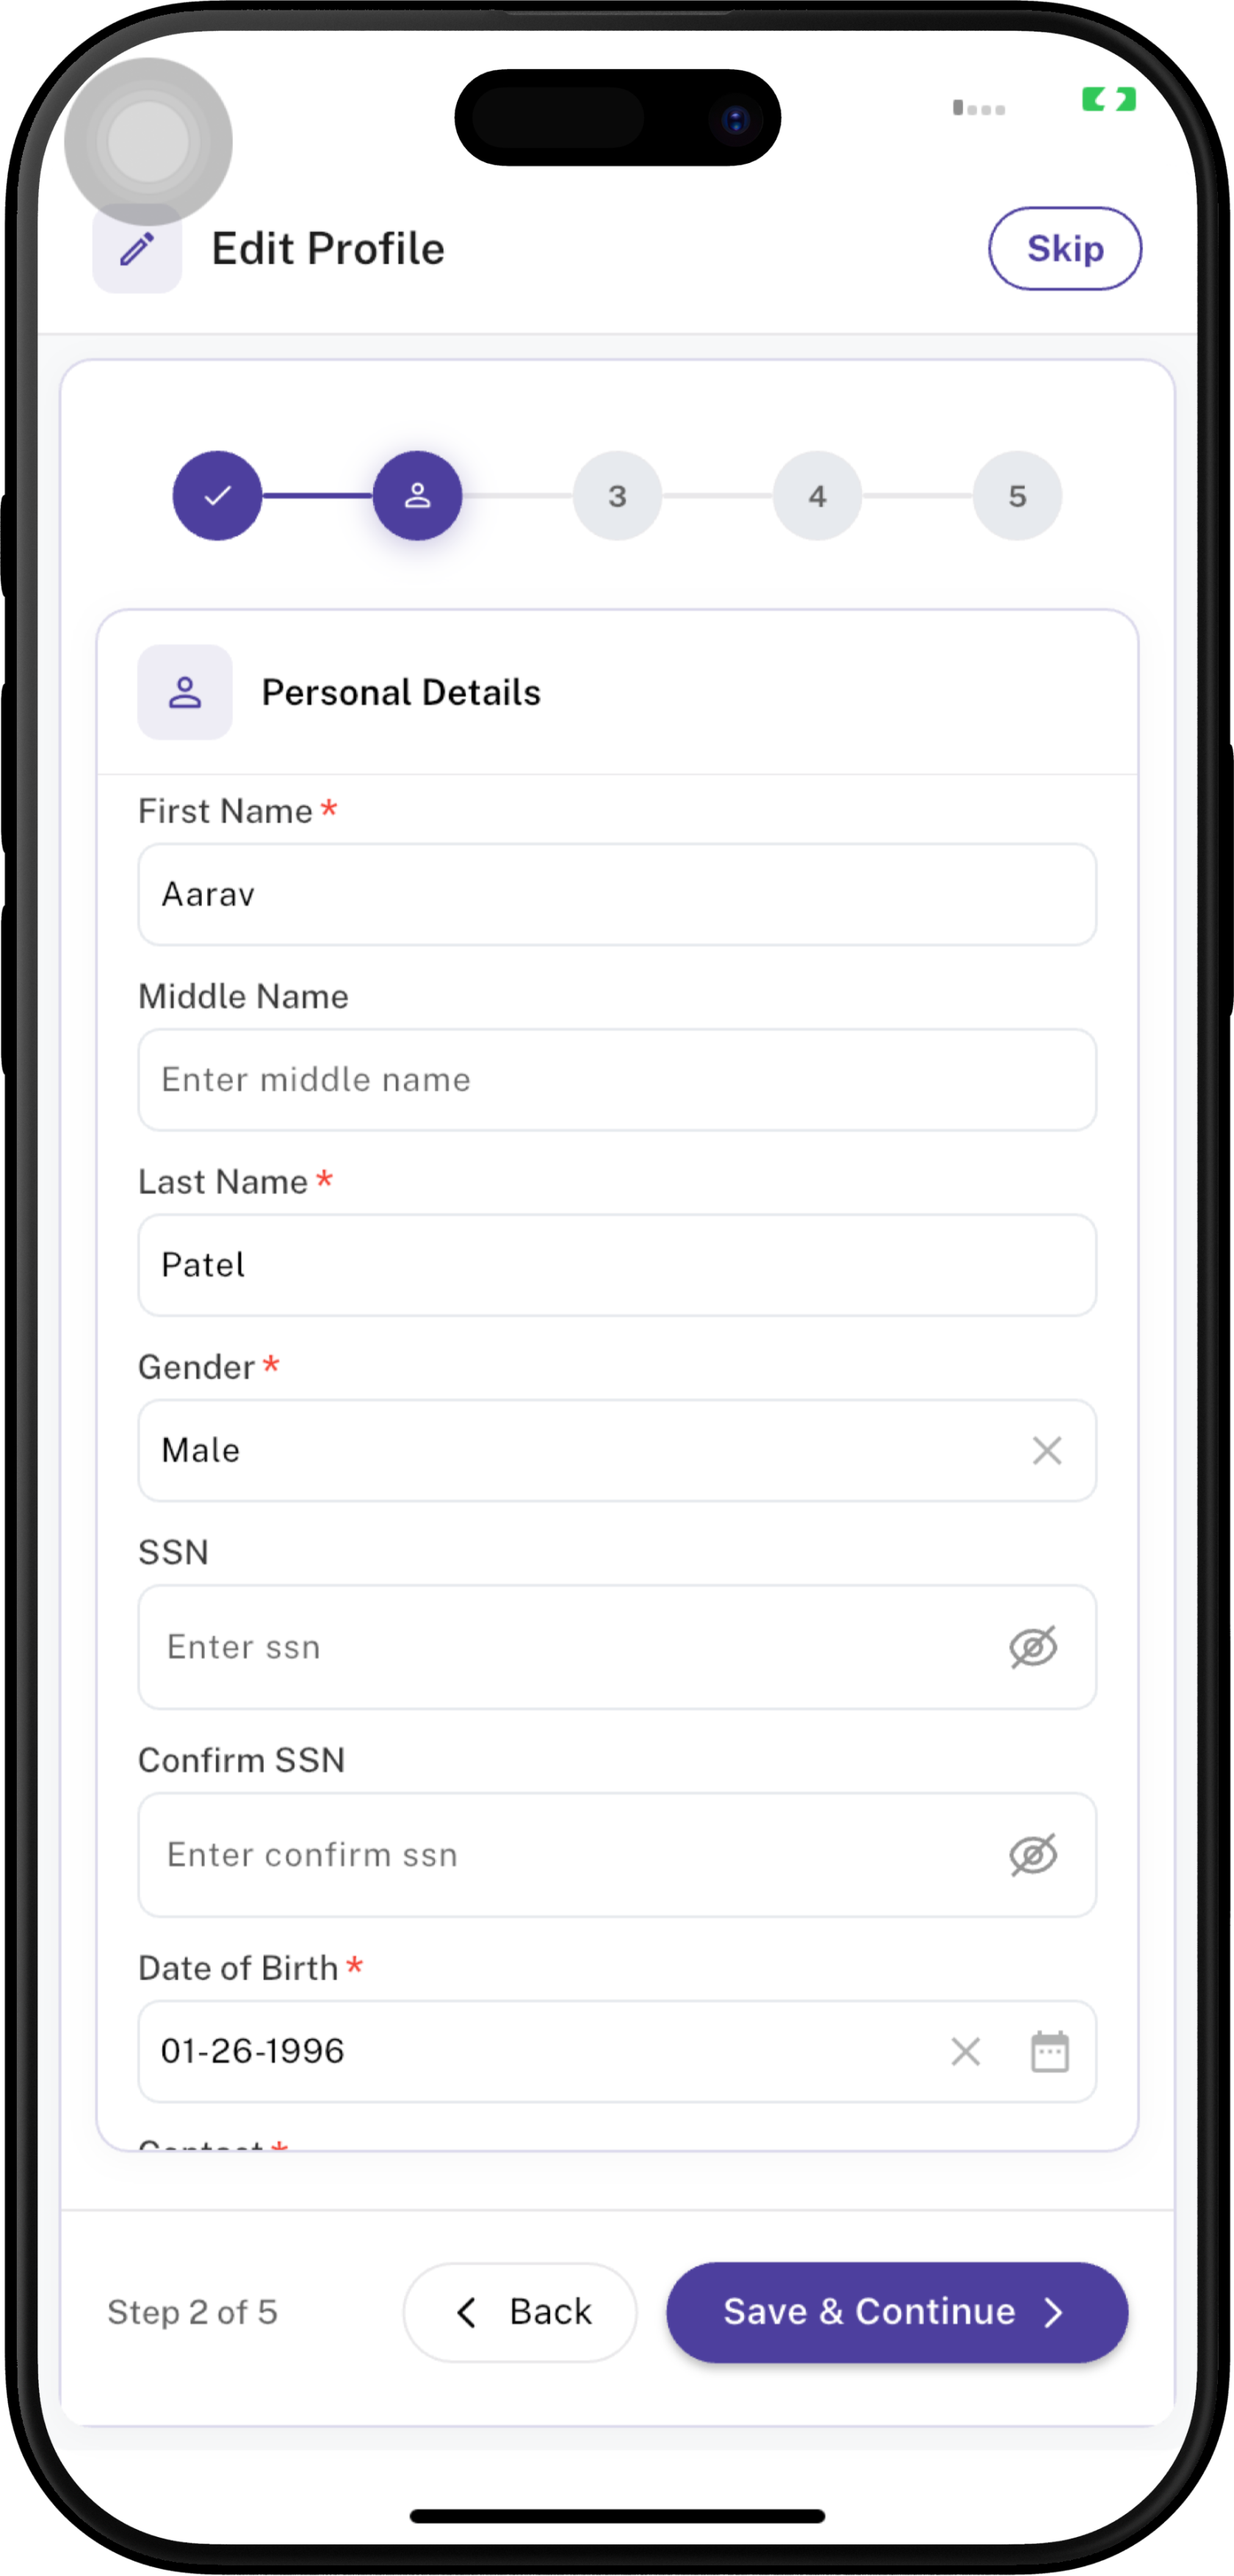
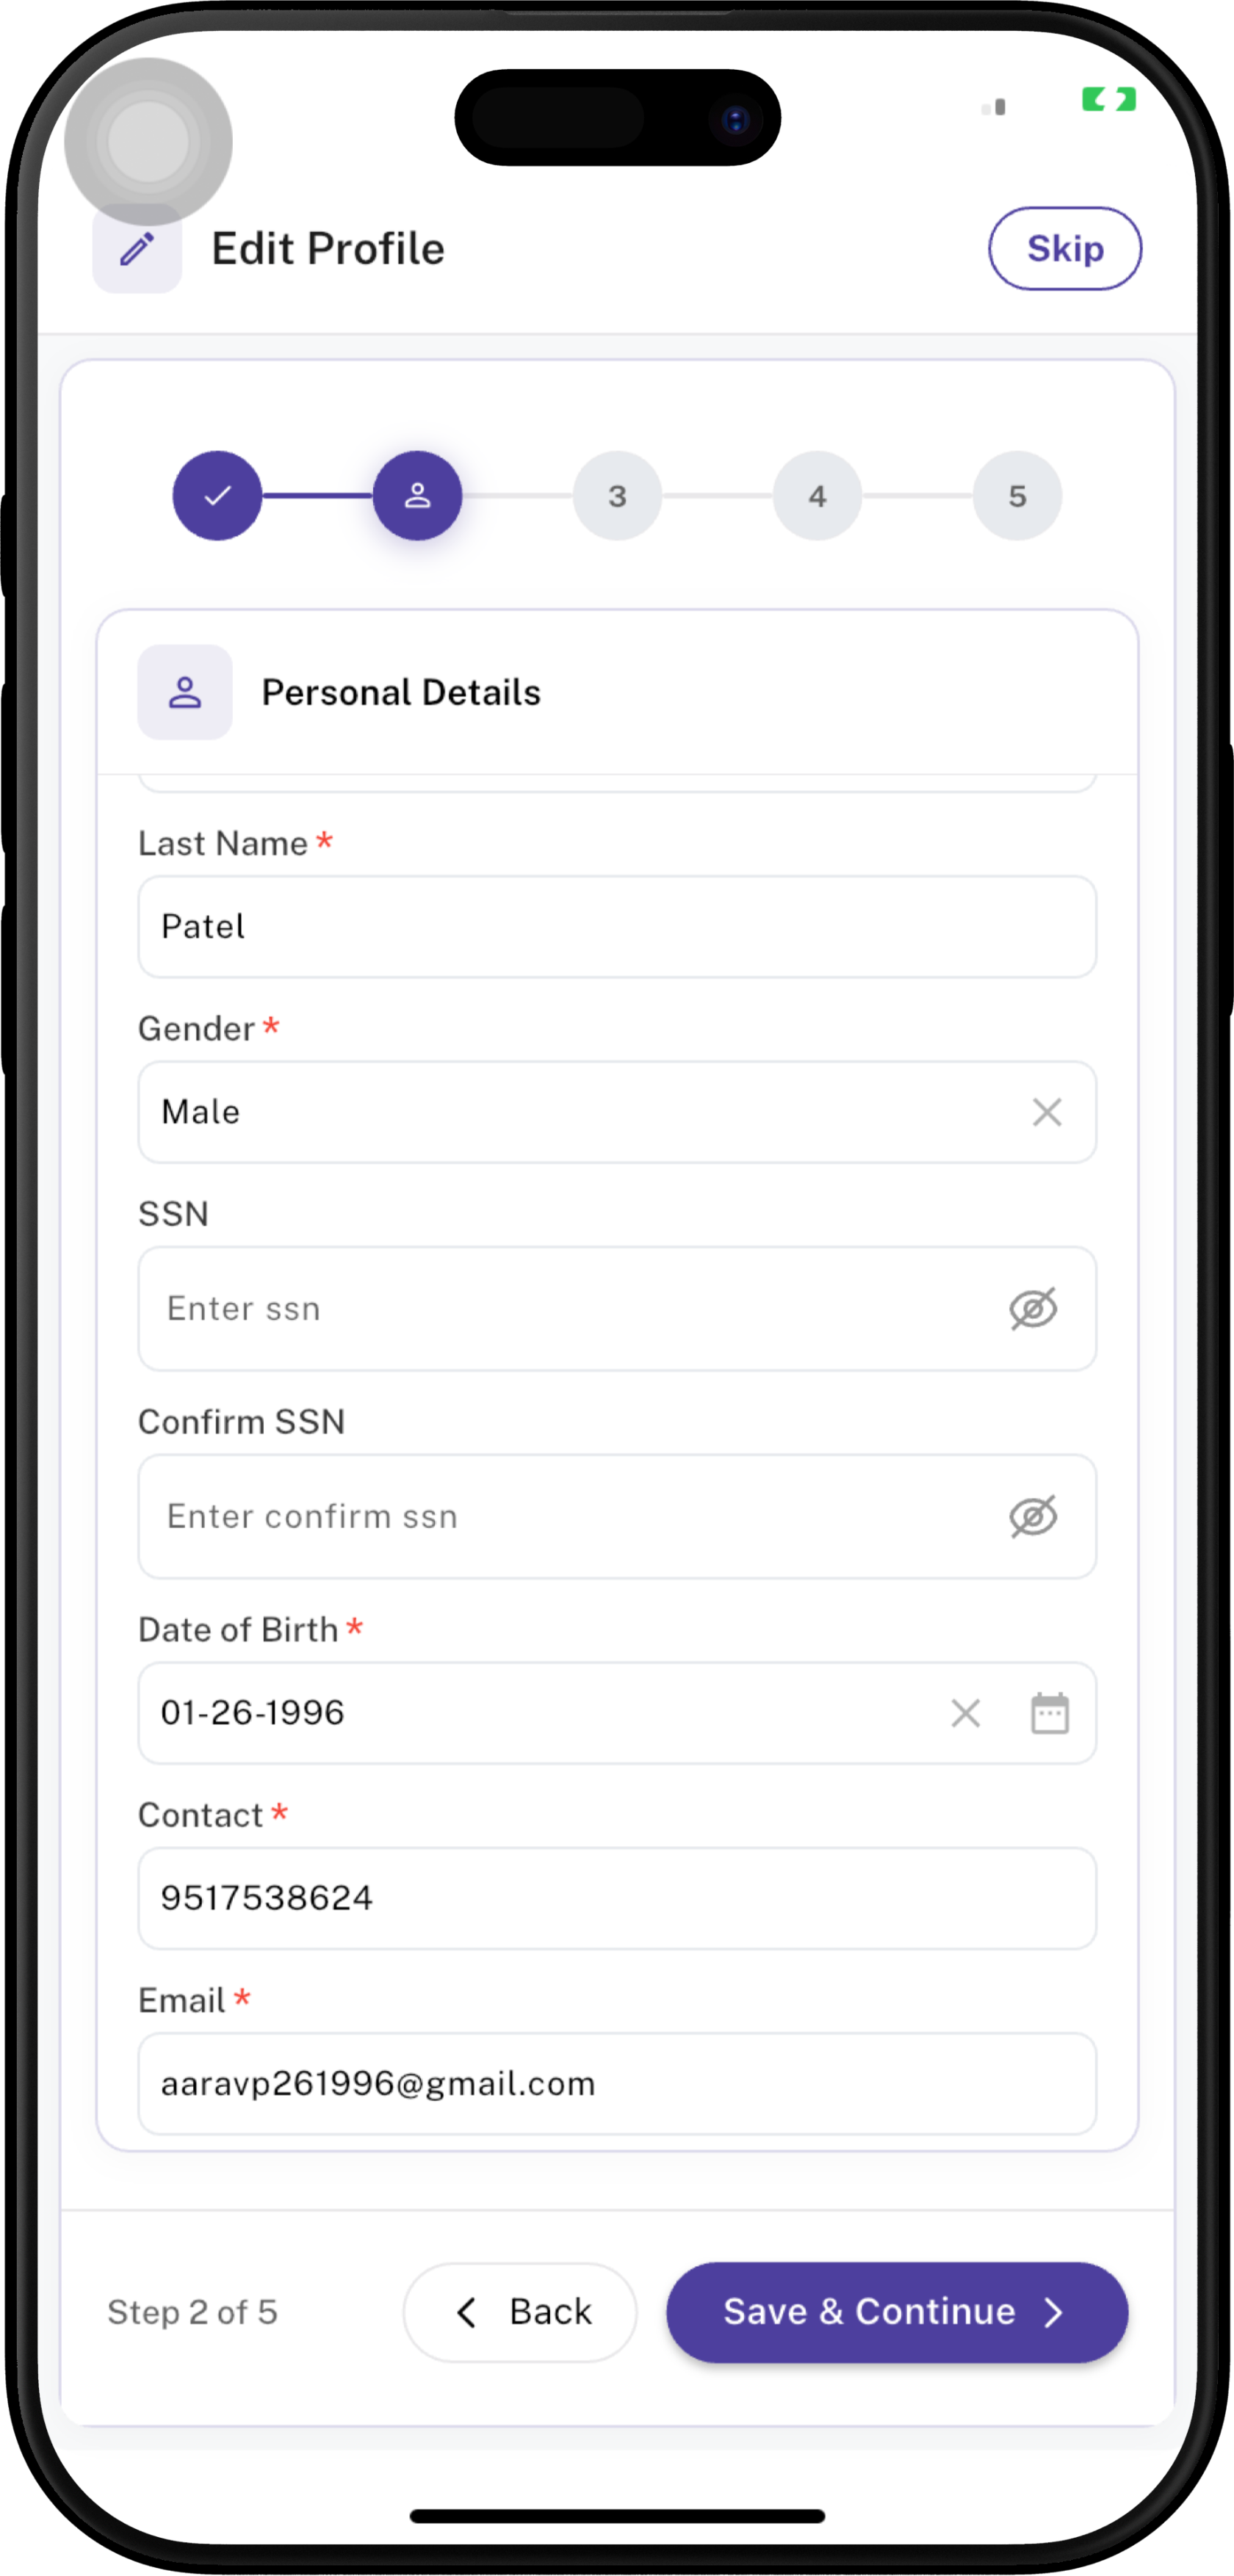
The Personal Details section contains the employee's personal information.
Some information may already be populated, while other fields may require the employee to enter or update information.
Fields marked with a red * are required.
| Field | Description | Required |
|---|---|---|
| First Name | Employee's first/given name. | ✅ Yes |
| Middle Name | Employee's middle name, if applicable. | No |
| Last Name | Employee's family/last name. | ✅ Yes |
| Gender | Employee's gender. | ✅ Yes |
| SSN | Employee's Social Security Number. | No |
| Confirm SSN | Re-enter the SSN to confirm that it was entered correctly. | No |
| Date of Birth | Employee's date of birth. | ✅ Yes |
| Contact | Employee's contact/mobile phone number. | ✅ Yes |
| Employee's registered email address. | ✅ Yes |
Step 3 — Payroll Details
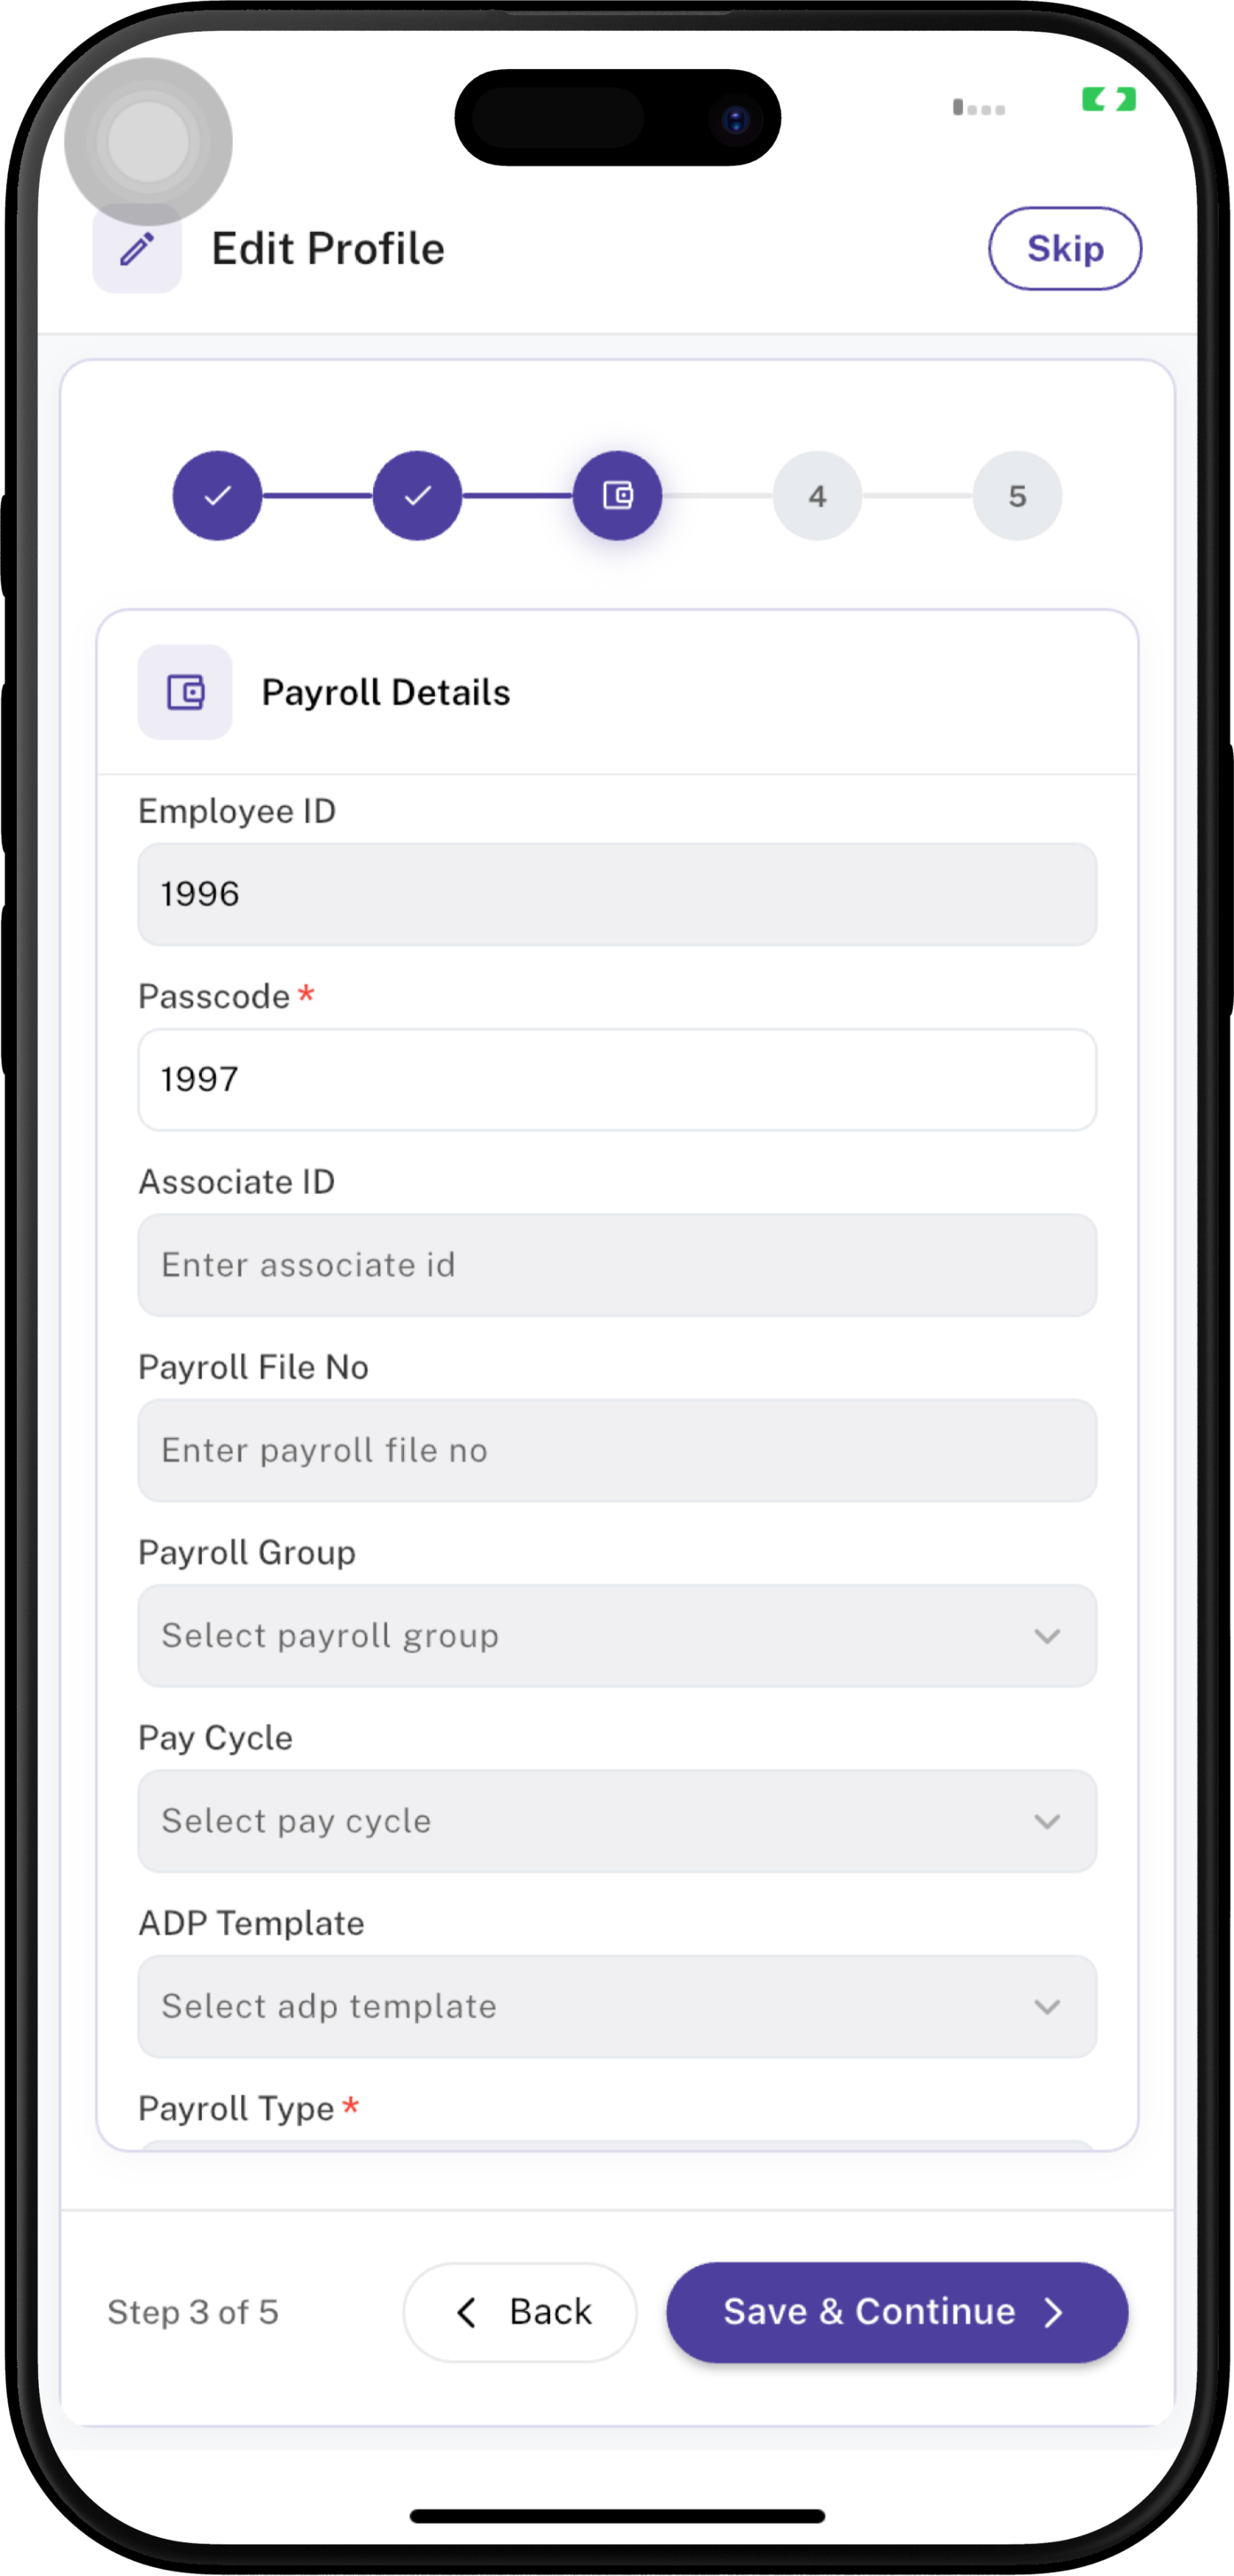
The Payroll Details section contains employee payroll and compensation information.
Fields marked with a red * are required.
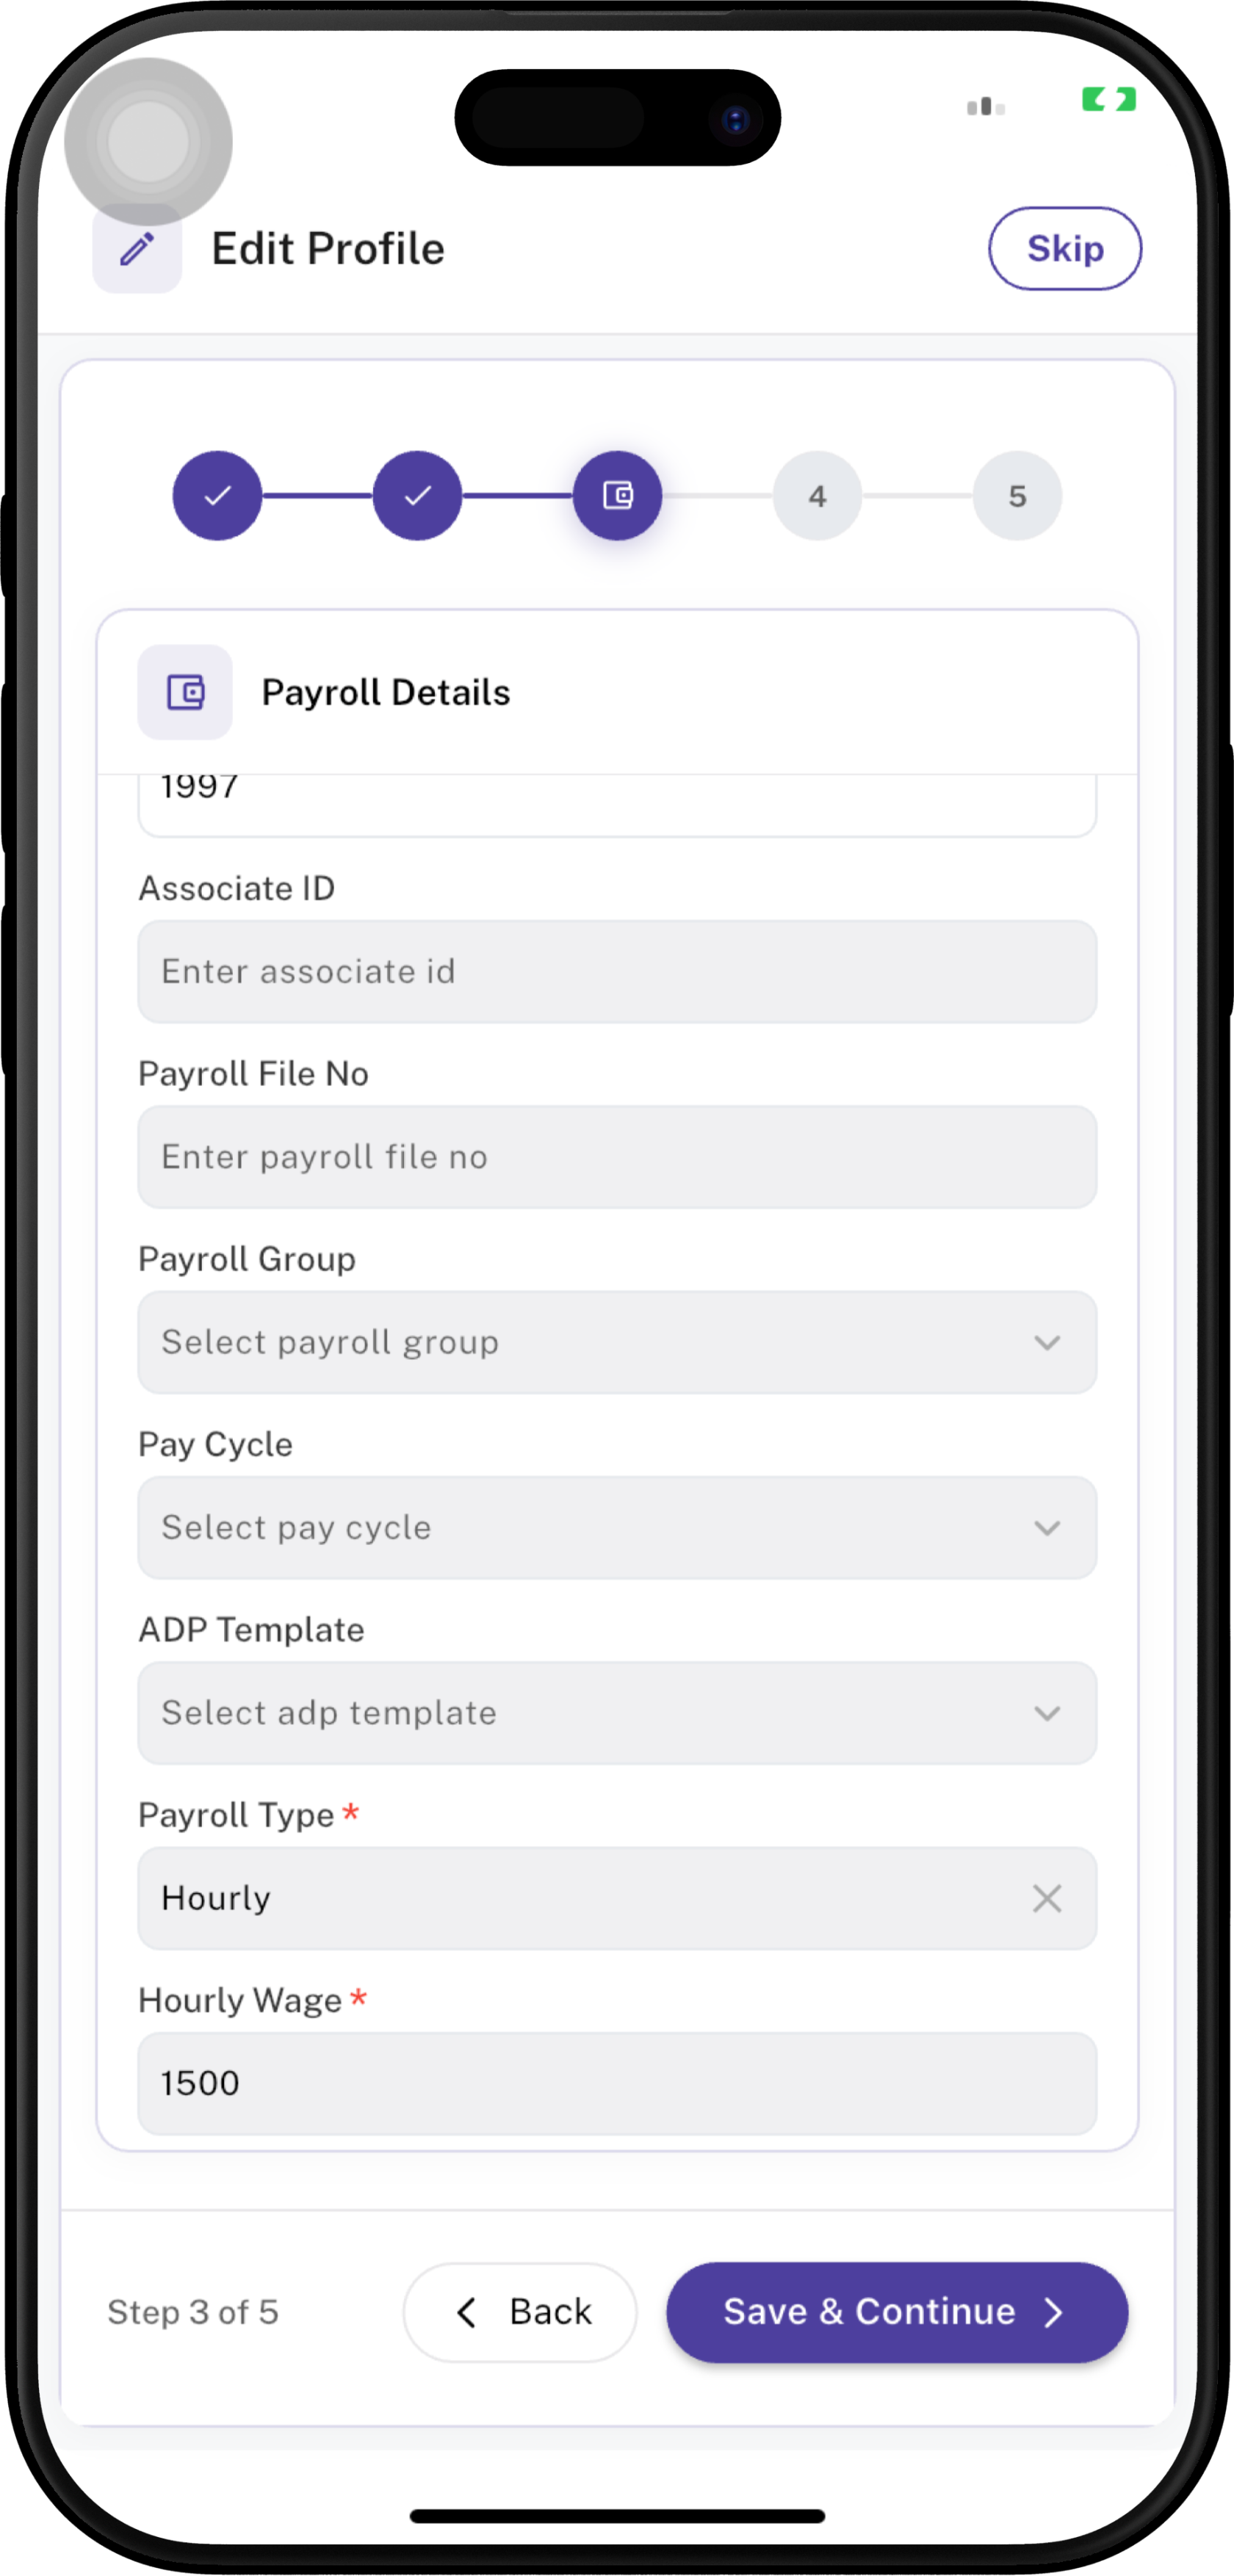
| Field | Description | Required |
|---|---|---|
| Employee ID | Employee ID to Access iHospitality Hub. | No |
| Passcode | Passcode to Access iHospitality Hub. | ✅ Yes |
| Associate ID | ADP Employee's associate identification number. | No |
| Payroll File No | ADP Payroll file/reference number associated with the employee. | No |
| Payroll Group | Selects the payroll group assigned to the employee. | No |
| Pay Cycle | Selects the frequency or cycle used to process the employee's pay. | No |
| ADP Template | Selects the applicable ADP payroll template. | No |
| Payroll Type | Specifies how the employee is paid, such as Hourly. | ✅ Yes |
| Hourly Wage | Specifies the employee's hourly wage when the payroll type is Hourly. | ✅ Yes |
🔐 Security: Keep your Employee ID & Passcode confidential and do not share it with other employees.
Step 4 — Address Details
The Address Details section is used to provide the employee's address and location information.
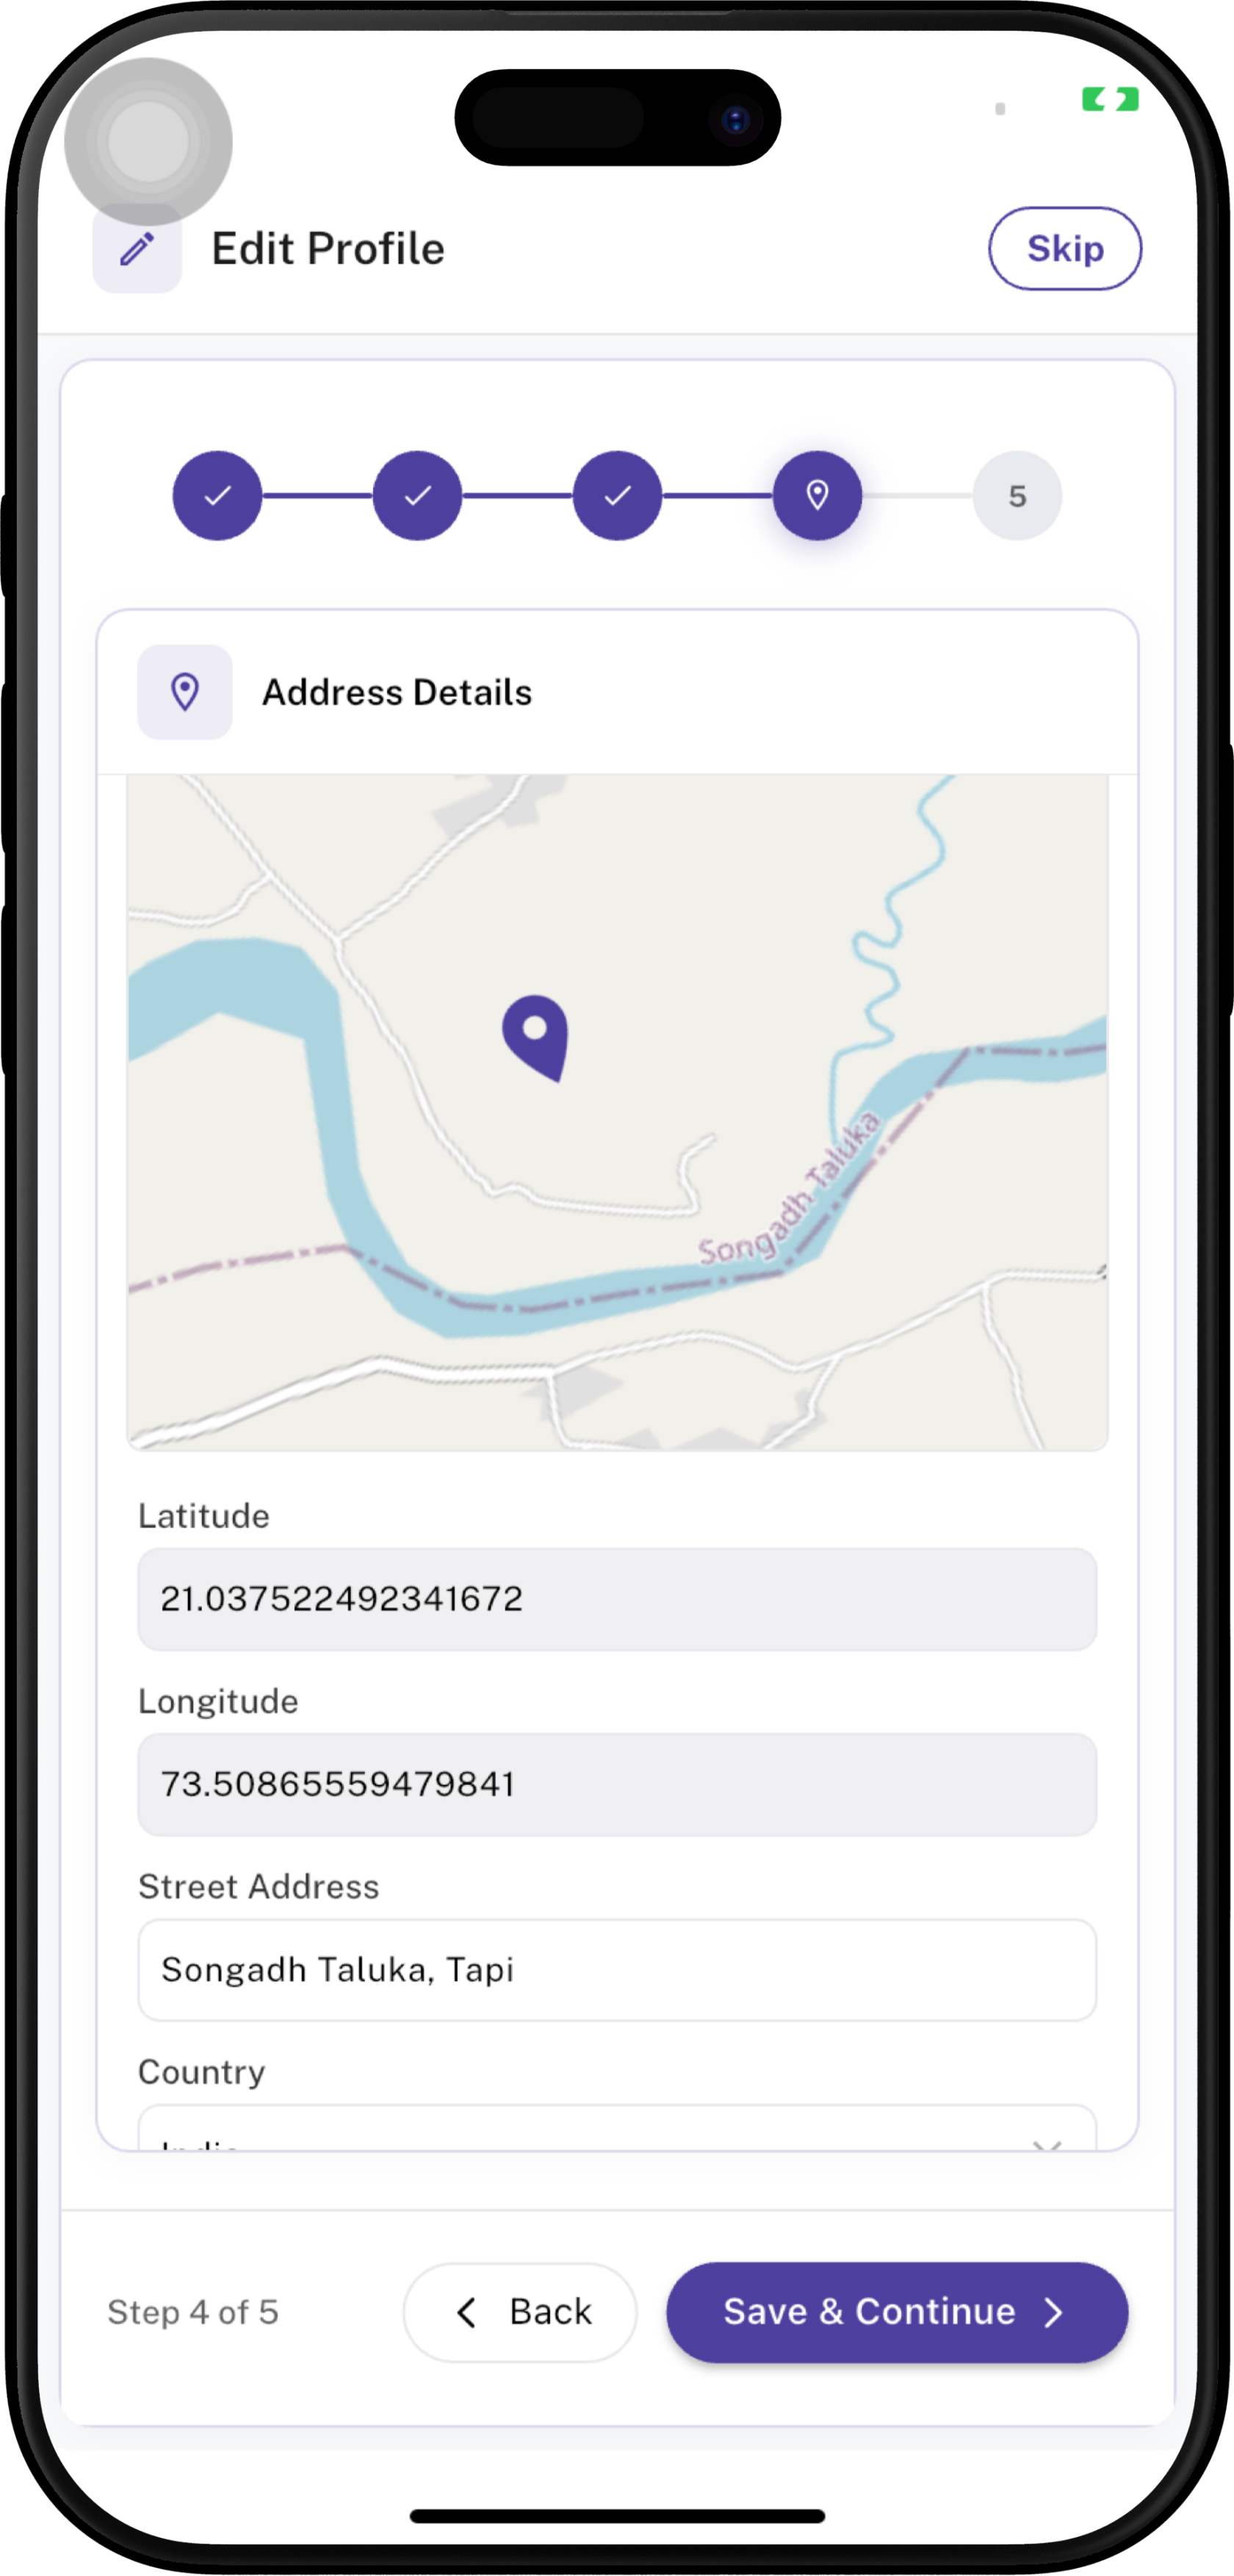
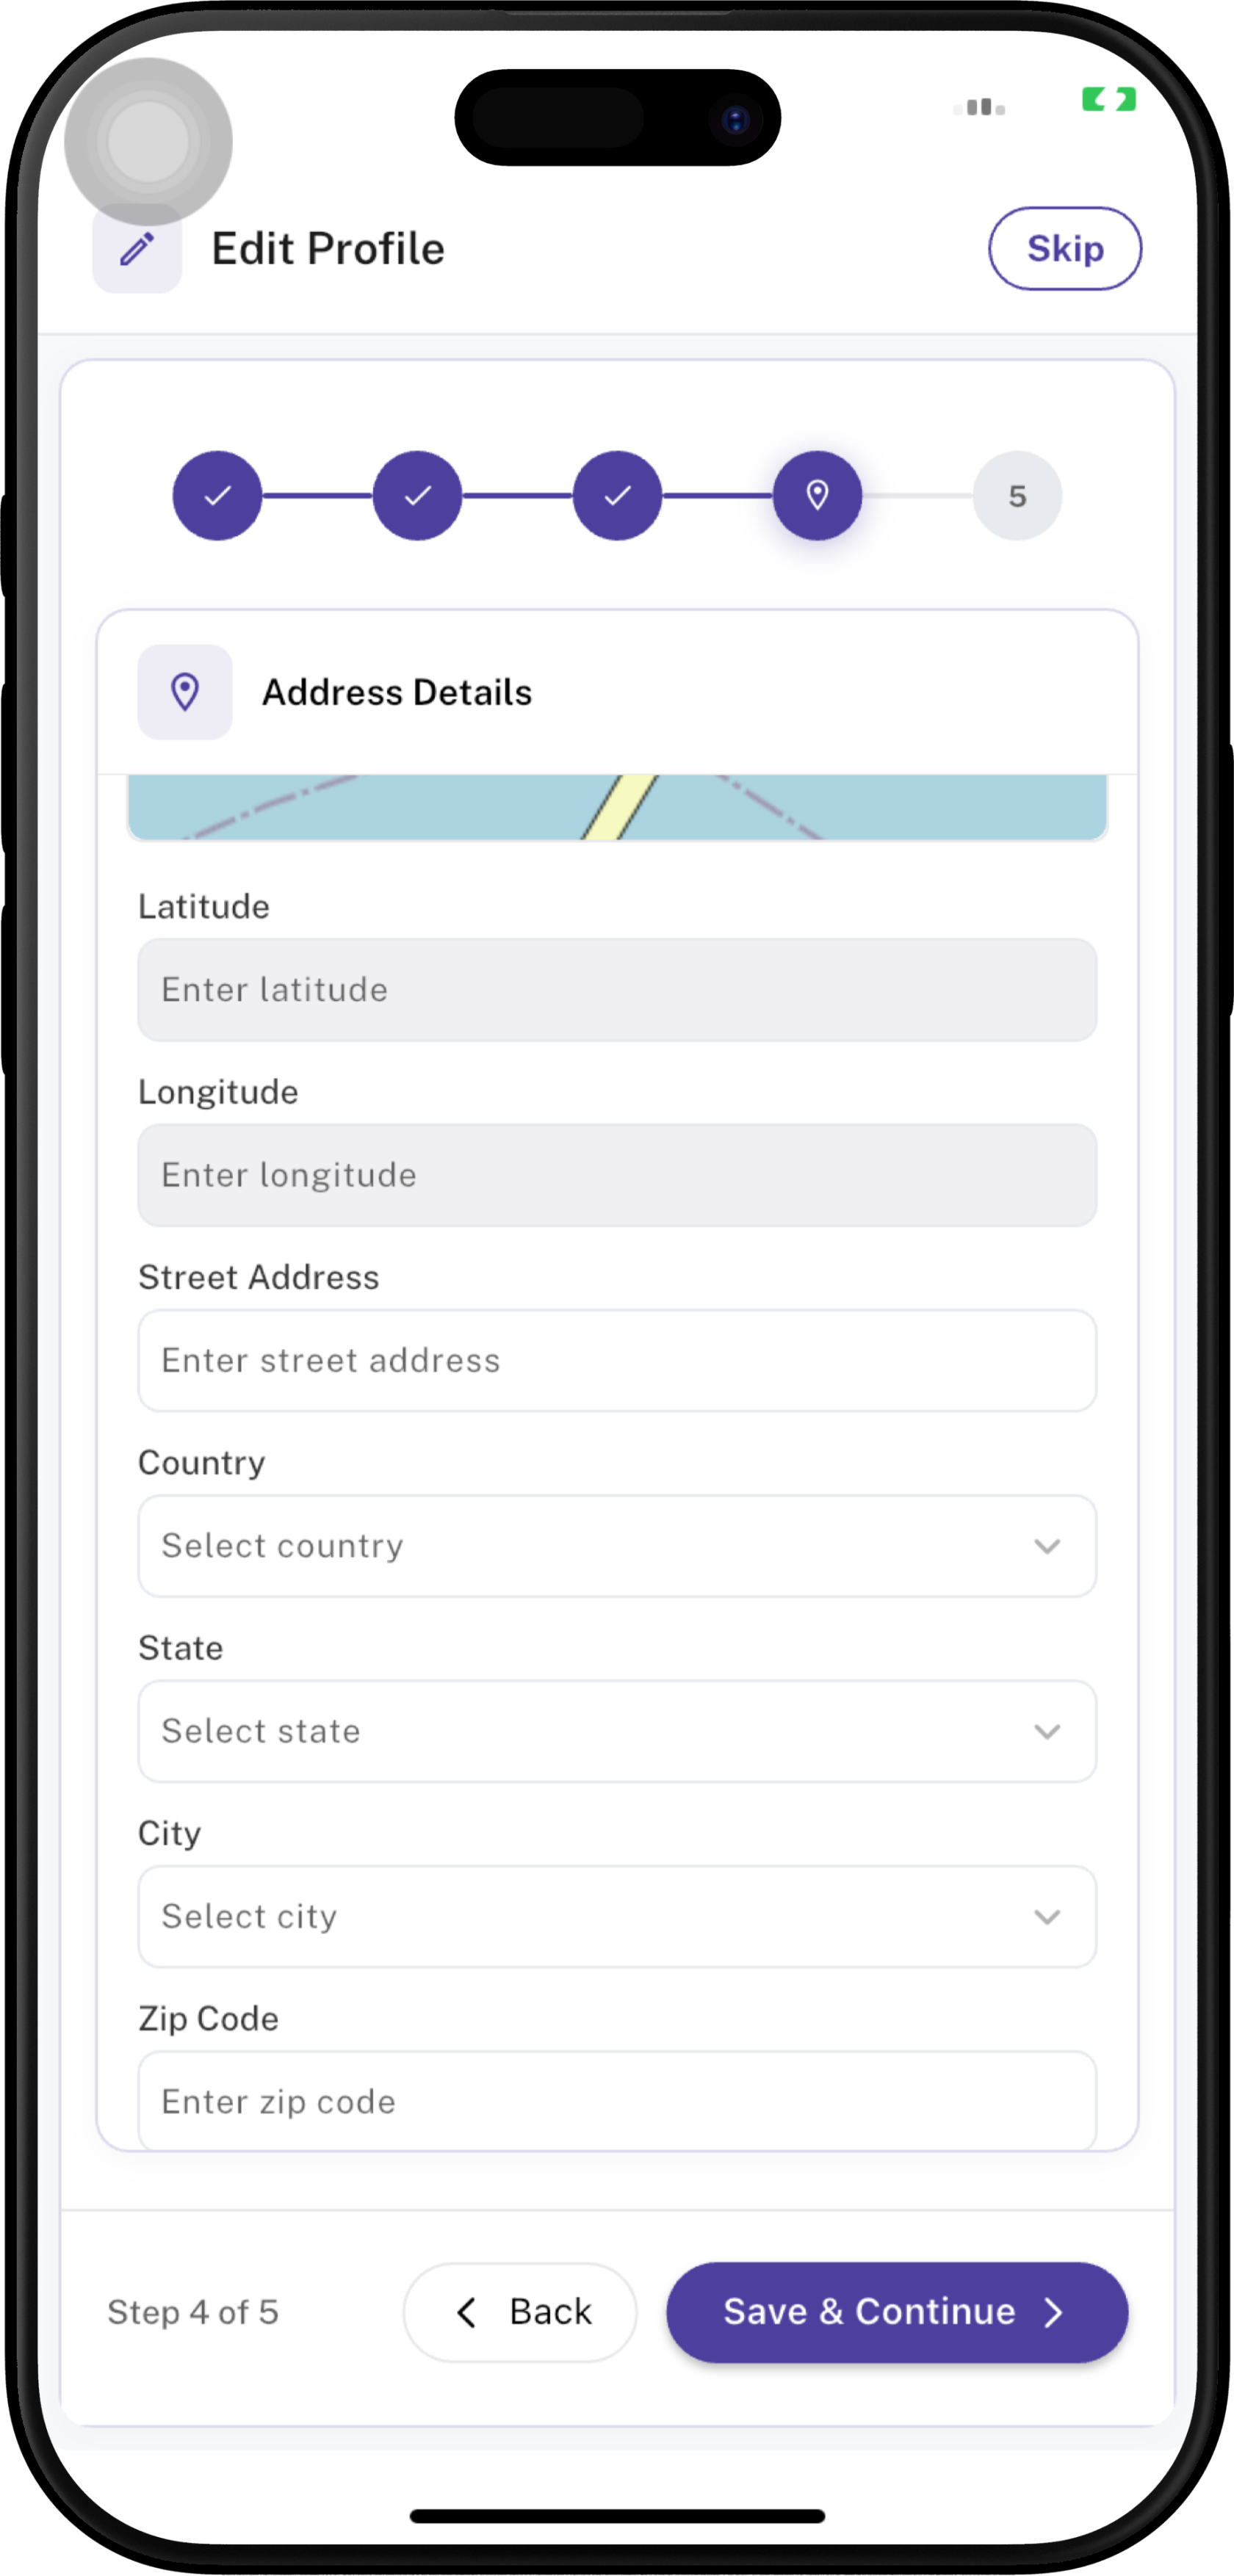
| Field | Description | Required |
|---|---|---|
| Latitude | Geographic latitude associated with the employee's address/location. | No |
| Longitude | Geographic longitude associated with the employee's address/location. | No |
| Street Address | Employee's street/residential address. | No |
| Country | Select the employee's country. | No |
| State | Select the employee's state or region. | No |
| City | Select the employee's city. | No |
| Zip Code | Enter the postal/ZIP code associated with the address. | No |
Enter or select the required information and tap Save & Continue.
Step 5 — Identity Documents
The Identity Documents section is the final step of the Profile Update process. Employees can provide the required identity information and upload the documents requested by the organization.
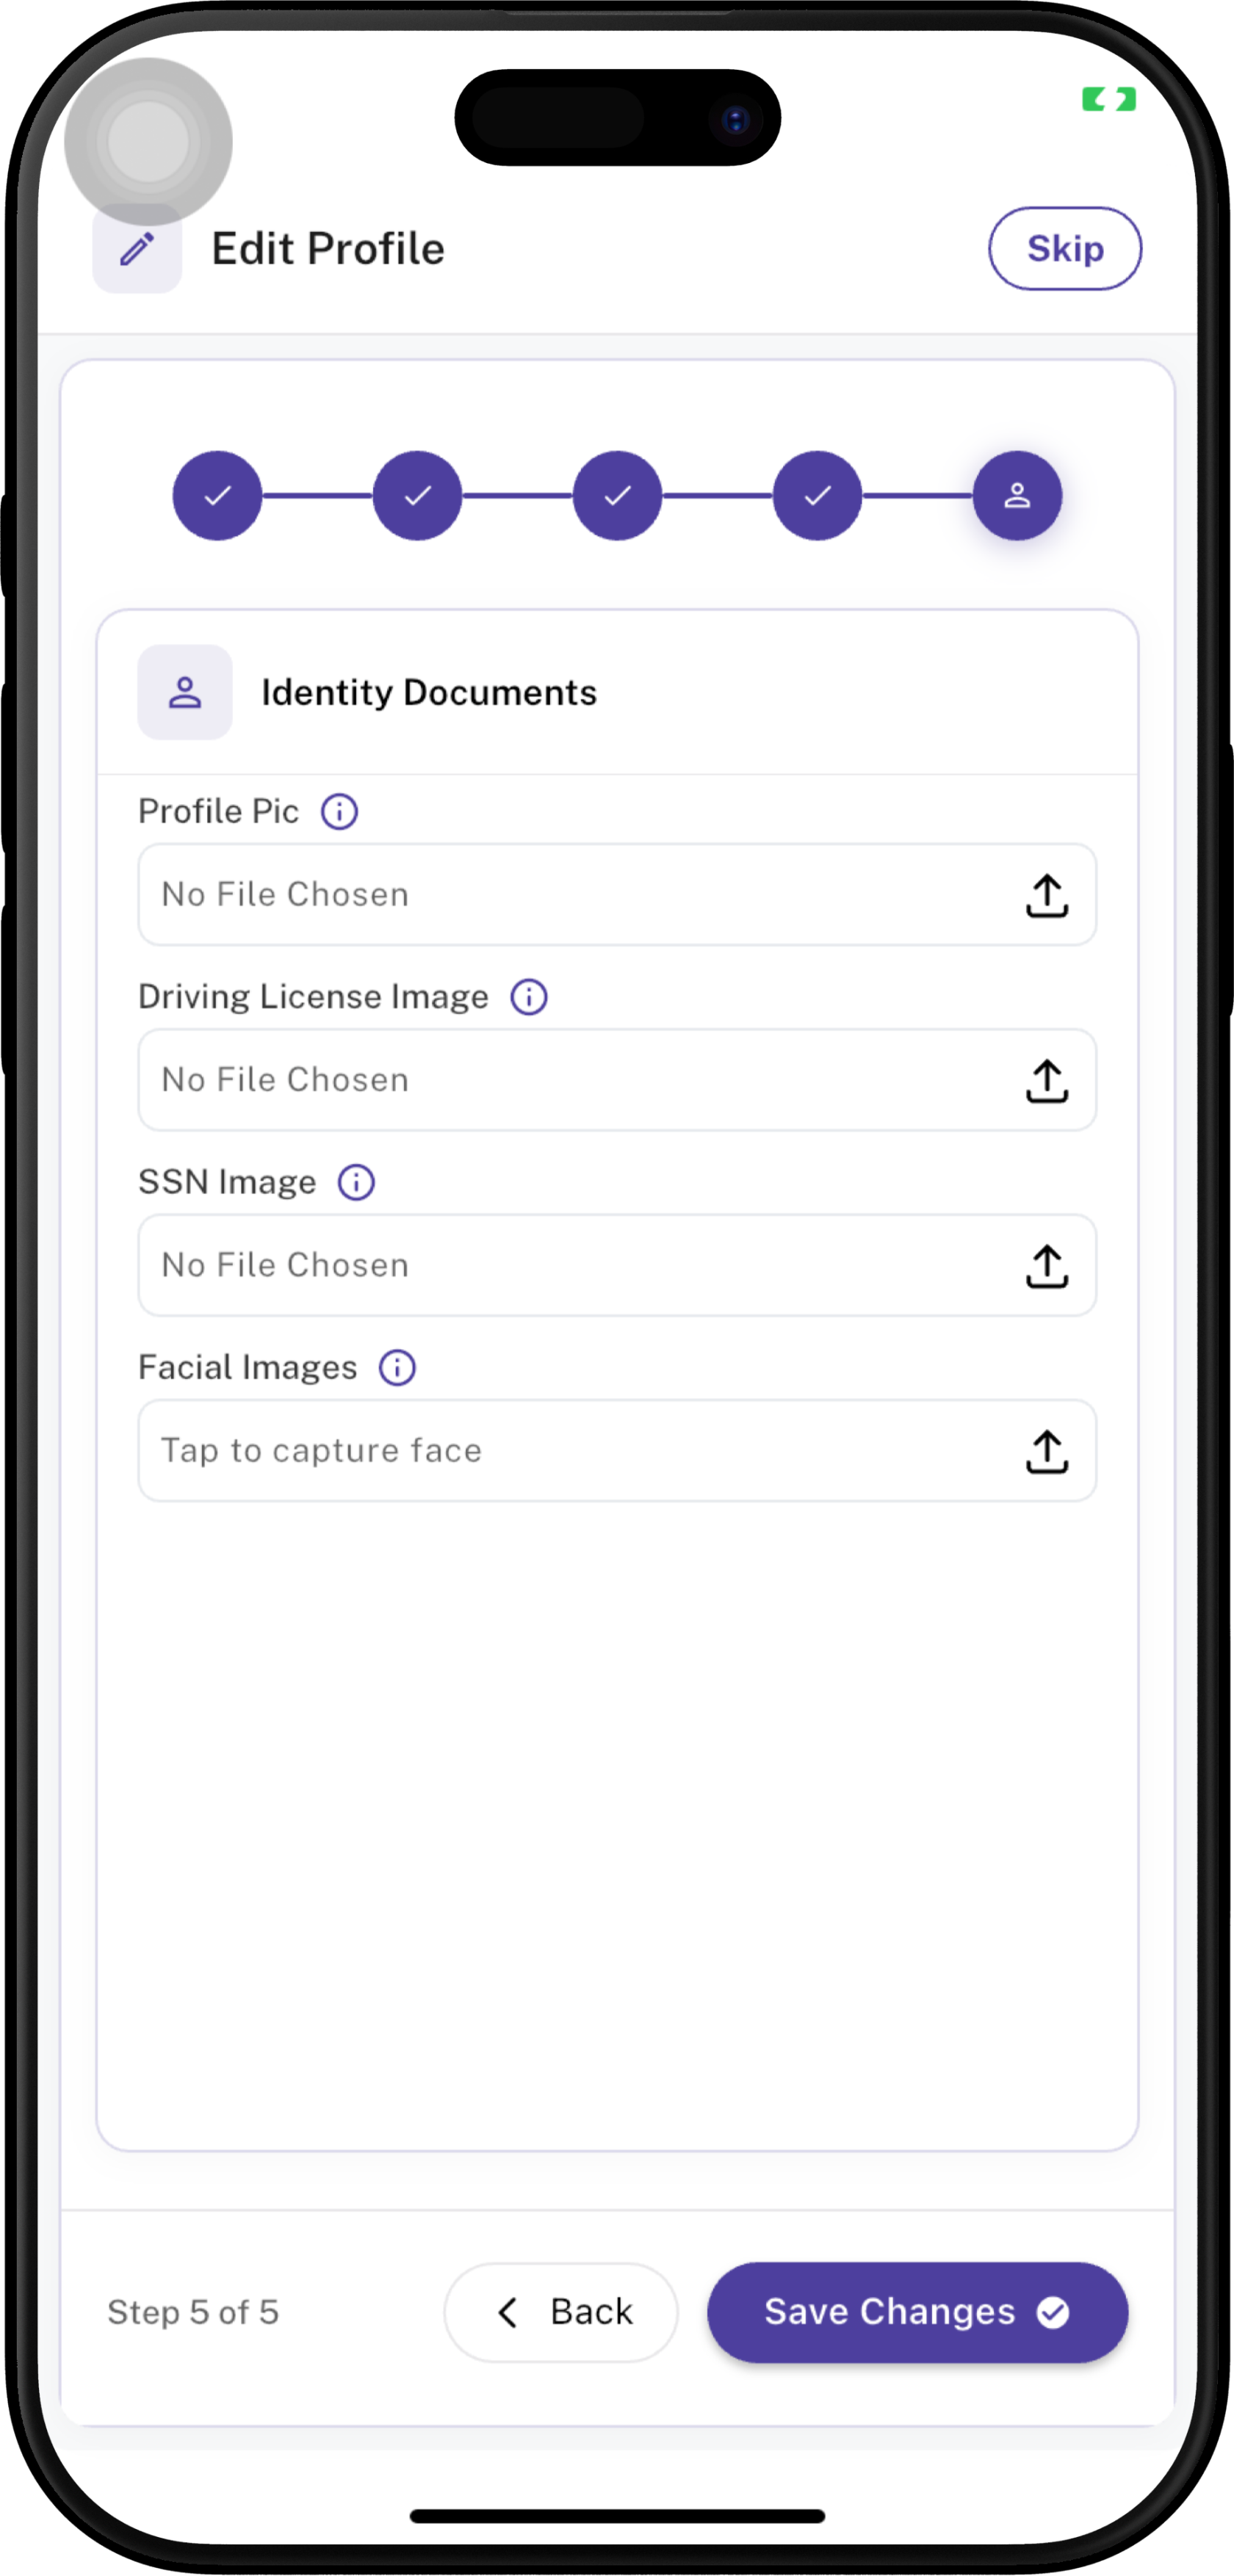
| Field | Description | Required |
|---|---|---|
| Profile Pic | Displays the employee's profile picture. | No |
| Driving License Image | Upload a clear image of the employee's driving license when required. | No |
| SSN Image | Upload the required SSN document image when requested by the organization. | No |
| Facial Images | Capture clear facial photographs for face verification and face login. | At least 2 images |
🔒 Privacy Reminder: Only upload documents requested by your organization. Make sure all uploaded images are clear and belong to the employee.
Facial Images
The Facial Images option is used to capture the employee's face for face verification and face login during application login.
⚠️ Important Requirement: Please upload at least 2 clear photographs of your face with your face clearly visible.
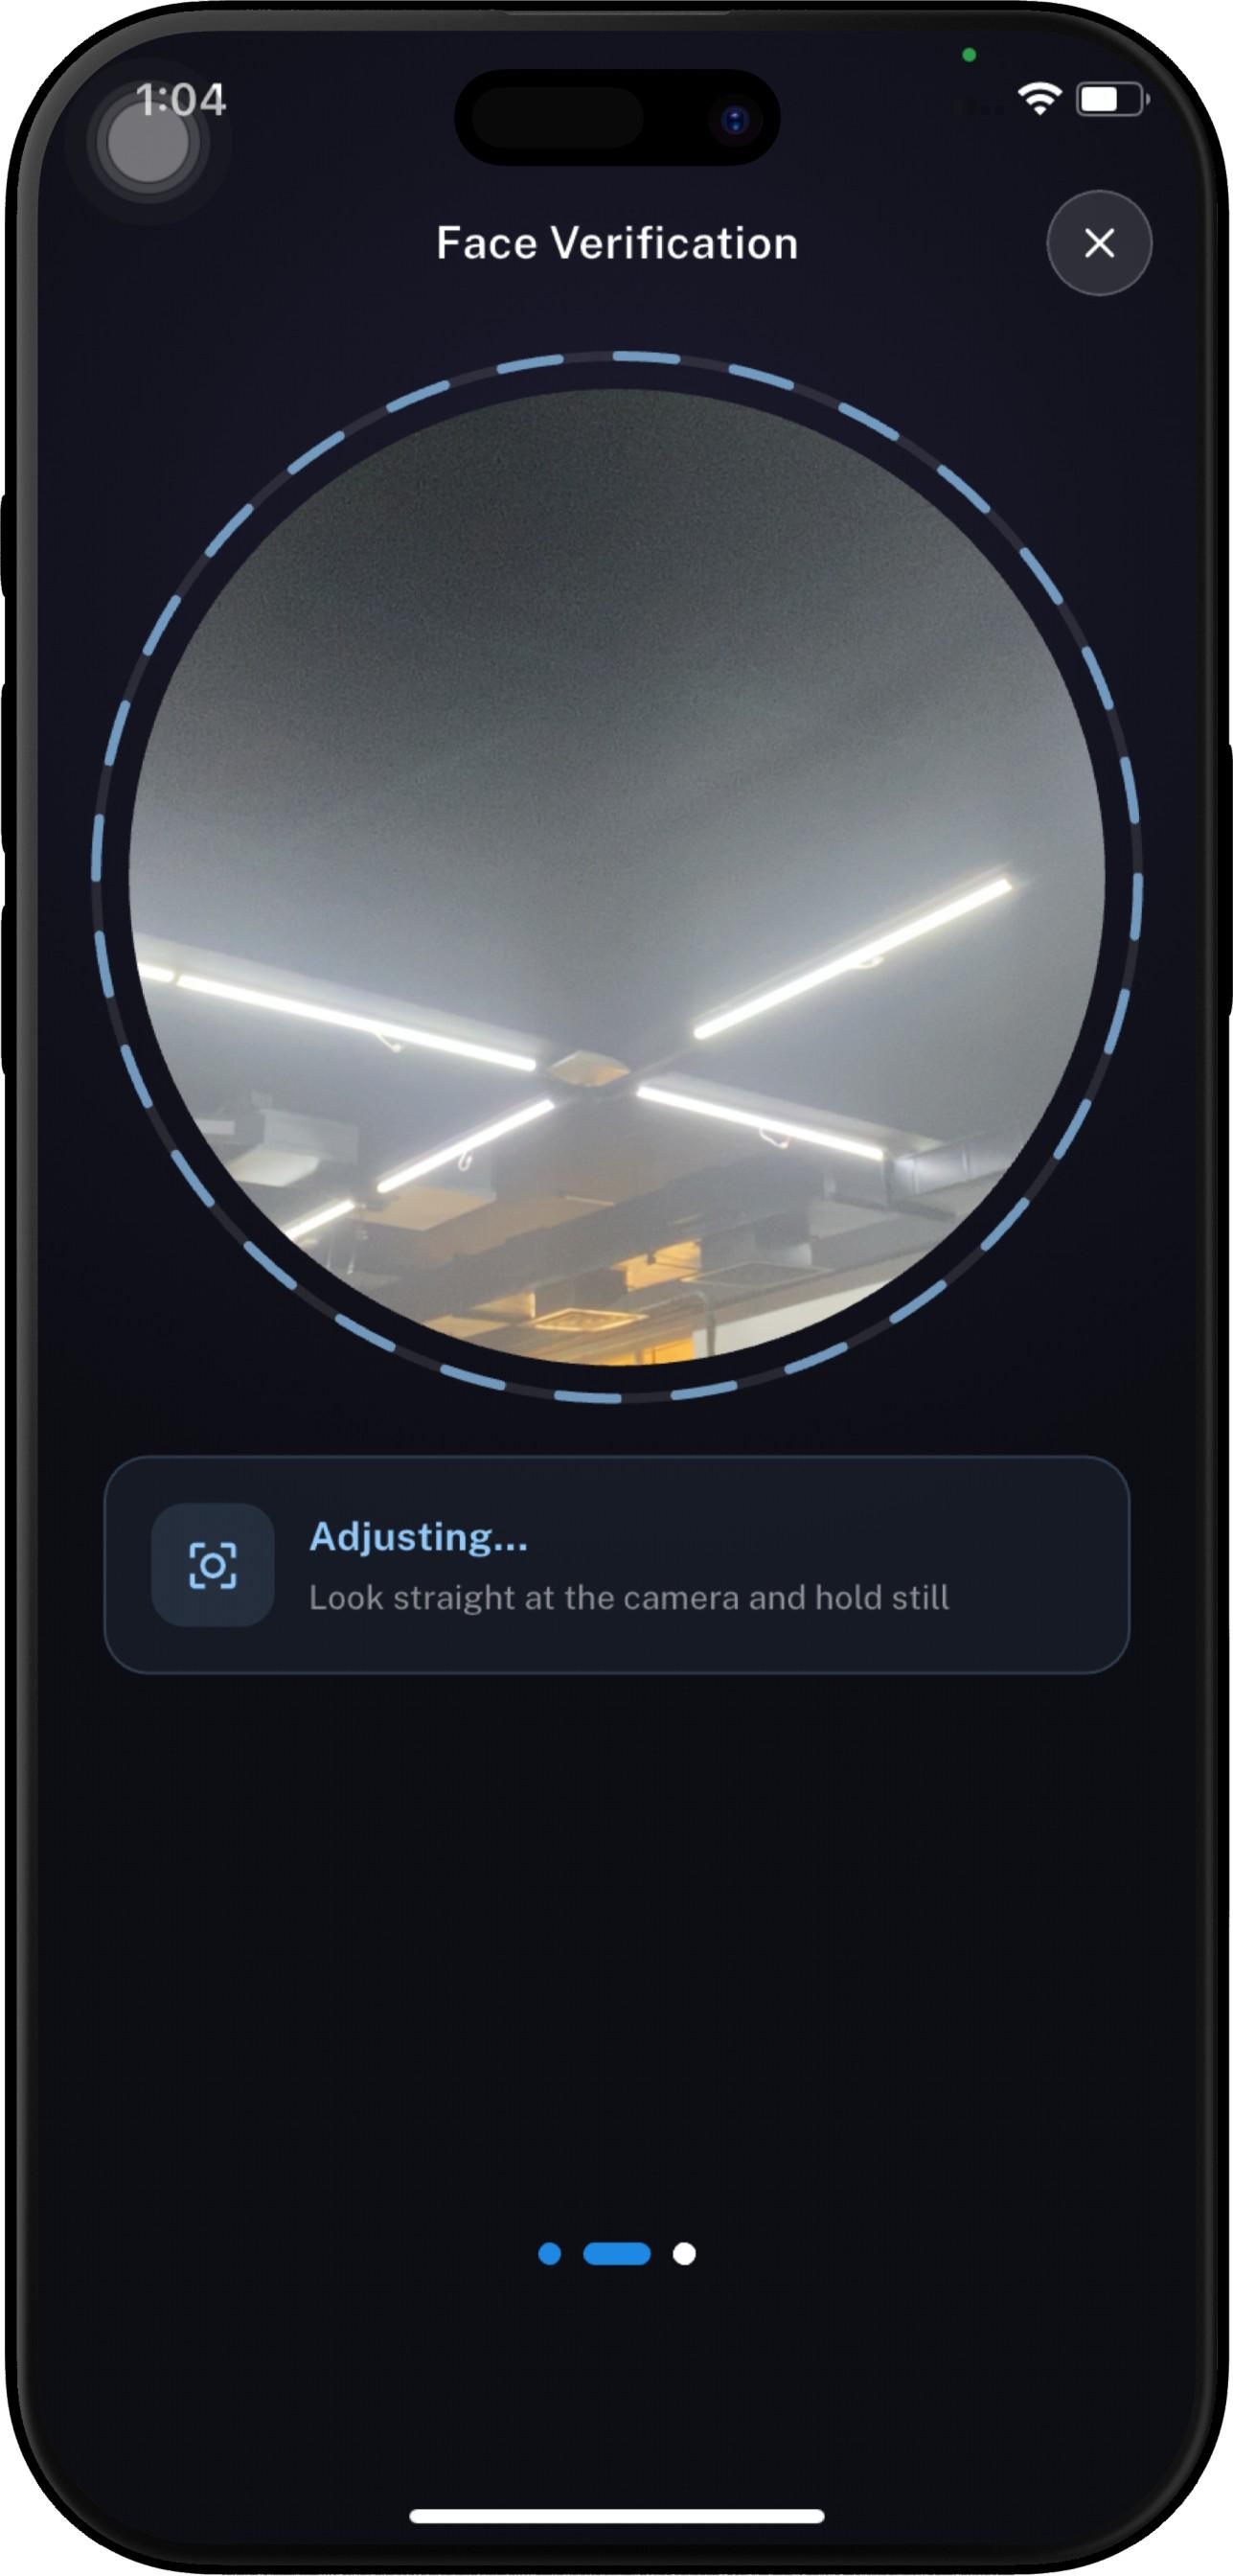
How to Capture Facial Images
- Tap Facial Images in the Identity Documents section.
- The Face Verification screen will open.
- The camera will display a circular area for face positioning.
- Position your face inside the circle.
- Make sure your entire face is clearly visible.
- Look directly at the camera and keep your face steady.
- Avoid covering your face with your hand, mask, sunglasses, or other objects.
- Make sure there is sufficient lighting and avoid strong light directly behind you.
- Capture the photograph when your face is properly positioned.
- Repeat the process until at least 2 clear facial images have been captured.
🎯 Face Login: The captured images are displayed below the Facial Images field. Review the images before completing the profile. If an image is unclear or does not show your face properly, use the Delete icon on the image and capture a new one.
At least 2 clear facial images are required to enable face login during application login. Make sure your face is clearly visible in every captured image.
Step 6 — Emergency Contact Details
The Emergency Contact Details section is used to record people the organization can contact in an emergency.
This step allows more than one contact. Enter the contact information, tap ADD, and the contact is added to the list below the form. Repeat this for each contact.
At least one emergency contact must be added before you can continue. A contact number or email that is already in the list cannot be added again.
Fields marked with a red * are required.
| Field | Description | Required |
|---|---|---|
| Contact Name | Full name of the emergency contact. | ✅ Yes |
| Relationship | How this person is related to the employee. The list shows the active relationships set up for the organization. | ✅ Yes |
| Contact No. | Phone number of the emergency contact. Enter up to 10 digits. | ✅ Yes |
| Email address of the emergency contact. | No |
After a contact is added, it appears in the table with these columns:
| Column | Description |
|---|---|
| Contact Name | Name entered for the contact. |
| Relationship | Relationship selected for the contact. |
| Contact No. | Phone number entered for the contact. |
| Email entered for the contact. Blank if none was provided. | |
| Actions | Edit loads the contact back into the form so it can be changed. Delete removes the contact from the list. |
How to add a contact
- Enter Contact Name.
- Select Relationship.
- Enter Contact No.
- Enter Email, if available.
- Tap ADD.
- Confirm the contact appears in the table.
- Repeat for any additional contacts.
- Tap Save & Continue.
How to change or remove a contact
- In the table, tap the Edit icon on the contact.
- The form fills with that contact’s details, and the button changes to UPDATE.
- Change the information and tap UPDATE, or tap CANCEL to leave the contact unchanged.
- To remove a contact, tap the Delete icon on that row.
⚠️ Required: You cannot leave this step until at least one emergency contact has been added.
When Tax Withholding and Select Payment Options appear
| Step | Section | When it is shown |
|---|---|---|
| 7 | Tax Withholding | Only when ADP payroll is not enabled for the property. |
| 8 | Select Payment Options | Only when ADP payroll is not enabled for the property. |
💡 Tip: If ADP payroll is enabled for the property, steps 7 and 8 are hidden. Federal withholding and direct deposit are then handled in ADP, and the employee completes the profile after the Emergency Contact Details section.
Step 7 — Tax Withholding
The Tax Withholding tab is shown only when ADP payroll is not enabled for the property.
This step collects the employee’s Form W-4, Employee’s Withholding Certificate. The employee walks through the questions, the app generates the completed W-4, and the employee reviews and signs it electronically.
A Download blank Form W-4 link is available at the top of the step. If a W-4 was saved earlier, VIEW SAVED TAX FORMS opens that form.
⚠️ Unsaved changes: Leaving this tab before you finish discards the answers entered in the current session. The app asks you to confirm before switching tabs.
The withholding questions are divided into 7 inner steps. Use NEXT to move forward and BACK to return. RESET clears the current answers and returns to the first question.
| Inner step | Screen | Required to continue |
|---|---|---|
| 1 | Confirm your information | Review only |
| 2 | Are you a nonresident alien? | ✅ Yes |
| 3 | Filing / marital status | ✅ Yes |
| 4 | Are you tax-exempt? | ✅ Yes |
| 5 | Multiple jobs and dependents | No. Skipped if you claim exemption. |
| 6 | Other adjustments | No. Skipped if you claim exemption. |
| 7 | Review and sign | ✅ Yes. The acknowledgement box must be checked. |
Inner step 1 — Is this information correct?
This screen shows the name, home address, and Social Security number already saved on the profile. These values are read-only.
| Field | Description | Editable |
|---|---|---|
| Your first name, middle, and last name | The employee’s name from the profile. | No |
| Your home address | The street address from Address Details. | No |
| Your Social Security number | The SSN from Personal Details. | No |
If the name or address is incorrect, contact your HR representative and have it corrected before you continue.
Inner step 2 — Are you a nonresident alien?
Select one option. You are a nonresident alien if you are not a U.S. citizen and you do not meet the green card test or the substantial presence test for the calendar year (January 1–December 31).
| Option | Description | Required |
|---|---|---|
| I'm a nonresident alien. | Select this if you are a nonresident alien. Extra IRS instructions are shown, including links to Notice 1392, Publication 519, and Form SS-5. | One option is required |
| I'm a US citizen or a resident alien. | Select this if you are a U.S. citizen or a resident alien. | One option is required |
If I'm a nonresident alien is selected, the later questions follow nonresident-alien rules:
- Filing status is set to Single or Married filing separately. The other filing statuses cannot be selected.
- I claim exemption from withholding cannot be selected. The answer is set to I do not claim exemption from withholding.
- Multiple-jobs and dependent instructions for nonresident aliens are shown on the next screens.
Inner step 3 — What is your filing/marital status?
Select the filing status that should be used on Form W-4.
| Option | Description | Required |
|---|---|---|
| Single or Married filing separately | Use this status if you file as single, or if you are married and file a separate return. This is the only status available for a nonresident alien. | One option is required |
| Married filing jointly or Qualifying surviving spouse | Use this status if you are married and file a joint return, or if you are a qualifying surviving spouse. Disabled for a nonresident alien. | One option is required |
| Head of household | Use this status only if you are unmarried and you pay more than half the cost of keeping up a home for yourself and a qualifying individual. Disabled for a nonresident alien. | One option is required |
Inner step 4 — Are you tax-exempt?
Select whether federal income tax should be withheld. Refer to the instructions on Form W-4 before choosing exemption.
| Option | Description | Required |
|---|---|---|
| I claim exemption from withholding | Select this only if both of these are true: last year you had no federal income tax liability, and this year you expect to have no federal income tax liability. A new Form W-4 is required next year. Disabled for a nonresident alien. | One option is required |
| I do not claim exemption from withholding | Federal income tax will be withheld based on the rest of the form. | One option is required |
If you claim exemption, the app skips Multiple Jobs and Other Adjustments and opens the completed W-4 for review.
Inner step 5 — Multiple Jobs or Spouse Works
Complete this step if you hold more than one job at a time, or if you are married filing jointly and your spouse also works. Withholding depends on income from all of those jobs.
Do only one of the following:
| Choice | What to do |
|---|---|
| a. IRS estimator | Use the estimator at www.irs.gov/W4App for the most accurate withholding, including Steps 3–4 of Form W-4. Use this option if you or your spouse have self-employment income. |
| b. Multiple Jobs Worksheet | Use the worksheet on Form W-4 and enter the result in Extra Withholding on the next screen. |
| c. Multiple Jobs checkbox | If there are only two jobs, select this checkbox to use the optional higher withholding table. |
| Field | Description | Required |
|---|---|---|
| Multiple Jobs | Checkbox. Select it when there are only two jobs and you want the higher withholding table. | No |
Claim Dependents
This section sets the child tax credit and the credit for other dependents. Complete it for only one job in the household when you have multiple jobs and your income will be $200,000 or less ($400,000 or less if married filing jointly). Withholding is most accurate when this is completed on the highest-paying job.
| Field | Description | Required |
|---|---|---|
| Number of qualifying children under age 17 | Number of qualifying children under age 17. The credit amount for those children is calculated beside the count. | No |
| Number of other dependents | Number of other dependents. The credit amount for those dependents is calculated beside the count. | No |
| Total dependent amount | Total of the child amount and the other-dependents amount. This field is calculated and cannot be typed. It can also reflect other credits, such as education tax credits and foreign tax credit. Adding those credits increases the paycheck and reduces any refund when the return is filed. | Calculated |
Inner step 6 — Other Adjustments
Complete Other Income and Deductions for only one job in the household, preferably the highest-paying job.
| Field | Description | Required |
|---|---|---|
| Other Income | Other income you expect this year that will not already have tax withheld, such as interest, dividends, and retirement income. Do not include income from any job. Entering an amount here increases withholding. | No |
| Deductions | Amount from the Form W-4 Deductions Worksheet when you expect to claim deductions other than the basic standard deduction, including itemized deductions, student loan interest, and IRAs. If this is left blank, the standard deduction is applied. | No |
| Extra Withholding | Additional tax to withhold from each pay period. Entering an amount reduces the paycheck and either increases the refund or reduces tax owed. | No |
Inner step 7 — Review and sign
The completed Form W-4 is shown on the screen. Scroll through the entire form. Print completed form prints the generated PDF.
| Field | Description | Required |
|---|---|---|
| Acknowledgement | Check the box to declare, under penalties of perjury, that the certificate is true, correct, and complete, and to provide an electronic signature. The form is not valid until this box is checked and Save & Continue is tapped. | ✅ Yes |
Continue to the next step
- Review the generated Form W-4.
- Check the acknowledgement box.
- Tap Save & Continue.
The completed W-4 is saved with the profile, and the flow moves to Select Payment Options.
Step 8 — Select Payment Options
The Select Payment Options tab is shown only when ADP payroll is not enabled for the property.
This step sets up direct deposit. Pay can be sent to one bank account or split across more than one checking or savings account.
The screen shows each saved account and an Add bank account card.
| Item | Description |
|---|---|
| Reveal account details | Turn this on to show the full account number. While it is off, only the last four digits are shown. |
| Account # | The account number, masked unless Reveal account details is on. |
| Deposit Amount | How much of each paycheck goes to that account: 100.0% for Everything, a dollar amount for a specified amount, or a percent for a percentage of pay. |
| Edit | Opens that account so it can be changed. |
| Delete | Asks for confirmation, then removes the account. |
| Add bank account | Starts the direct-deposit setup for a new account. |
Add or edit a bank account
Direct deposit sends pay to an existing checking or savings account. Adding or editing an account has 4 steps: Routing Number → Account Number → Account Type → Review.
Tap NEXT to move forward, BACK to return, and CANCEL to leave without saving the account. On the last step, tap ADD for a new account or SAVE when editing an existing account.
A sample check image is shown on the routing-number and account-number screens so the numbers can be read from a check.
Account step 1 — Routing Number
| Field | Description | Required |
|---|---|---|
| Routing Number | The bank’s 9-digit routing number, usually the first group of numbers on a check. It must be exactly 9 digits and a valid routing number. | ✅ Yes |
| Confirm Routing Number | Re-enter the routing number. It must match Routing Number. | ✅ Yes |
Account step 2 — Account Number
| Field | Description | Required |
|---|---|---|
| Account Number | The bank account number. Digits only, 4 to 17 digits. | ✅ Yes |
| Confirm Account Number | Re-enter the account number. It must match Account Number. | ✅ Yes |
Account step 3 — Account Type
| Field | Description | Required |
|---|---|---|
| Account Type | Checking or Savings. | ✅ Yes |
| Everything | Deposit the full net pay into this account. The deposit amount is shown as 100%. | One deposit option is required |
| Specified Amount | Deposit a fixed dollar amount into this account. Partial Net appears and is required. The amount must be greater than 0 and less than 100,000,000. | One deposit option is required |
| Percentage of Pay | Deposit a percentage of net pay into this account. Percent appears and is required. The percent must be greater than 0 and less than 100. | One deposit option is required |
| Use this account for bonus pay only | When selected, this account is used only for bonus pays. It is not used for a bonus amount paid in a regular payroll. | No |
| Priority # | The order used when pay is split. A lower number is paid first. This field appears only for Specified Amount or Percentage of Pay, and only when Use this account for bonus pay only is not selected. It must be greater than 0. | ✅ Yes, when it is shown |
Changing the deposit option clears Partial Net, Percent, and Priority # so the new option can be entered again.
Account step 4 — Review
The screen shows the account type (Checking or Savings), routing number, account number, and the amount per paycheck.
| Field | Description | Required |
|---|---|---|
| I've double-checked my account number | Turn this on after you confirm the routing number and account number are correct. | ✅ Yes |
| I agree to the terms and conditions | Turn this on to authorize the employer, or its payroll provider, and the bank to deposit the indicated net pay into this account on each pay date, and to recover any funds deposited in error. Open terms and conditions to read the full authorization before agreeing. | ✅ Yes |
Both switches must be on before ADD or SAVE is available.
- Net pay, or the selected portion of it, may be deposited into the account on each pay date.
- Funds deposited by mistake may be returned to the employer or payroll provider.
- The deposit may not be credited until 5:00 pm on the pay date shown on the check voucher.
- The employee is responsible for confirming that wages are deposited into the correct account on each pay date.
Complete payment setup
- Add each bank account and confirm it appears on the payment screen.
- Review the deposit amount on each account.
- Tap Save Changes.
The profile update is completed successfully.
🔐 Security: Keep routing numbers, account numbers, and the direct-deposit authorization private. Use Reveal account details only when you need to confirm an account, then turn it off.