
Profile Update
After completing the Mandatory Password Setup, the employee is taken to the Edit Profile flow.
The profile update process is divided into 5 steps:
Employee Details → Personal Details → Payroll Details → Address Details → Identity Documents
Each step contains information that the employee should review or complete before moving to the next step.
Profile Update Steps
| Step | Section | Purpose |
|---|---|---|
| 1 | Employee Details | Review employment and organization information |
| 2 | Personal Details | Review and complete personal information |
| 3 | Payroll Details | Review and complete payroll information |
| 4 | Address Details | Add or update address information |
| 5 | Identity Documents | Provide required identity document information |
💡 Tip: Complete each step carefully and select Save & Continue to move to the next section.
Step 1 — Employee Details
The Employee Details section displays the employee's employment and organization information.
All fields in this step are disabled and read-only. Employees can review the information but cannot edit or change these fields.
If any information is incorrect, contact your manager or administrator.
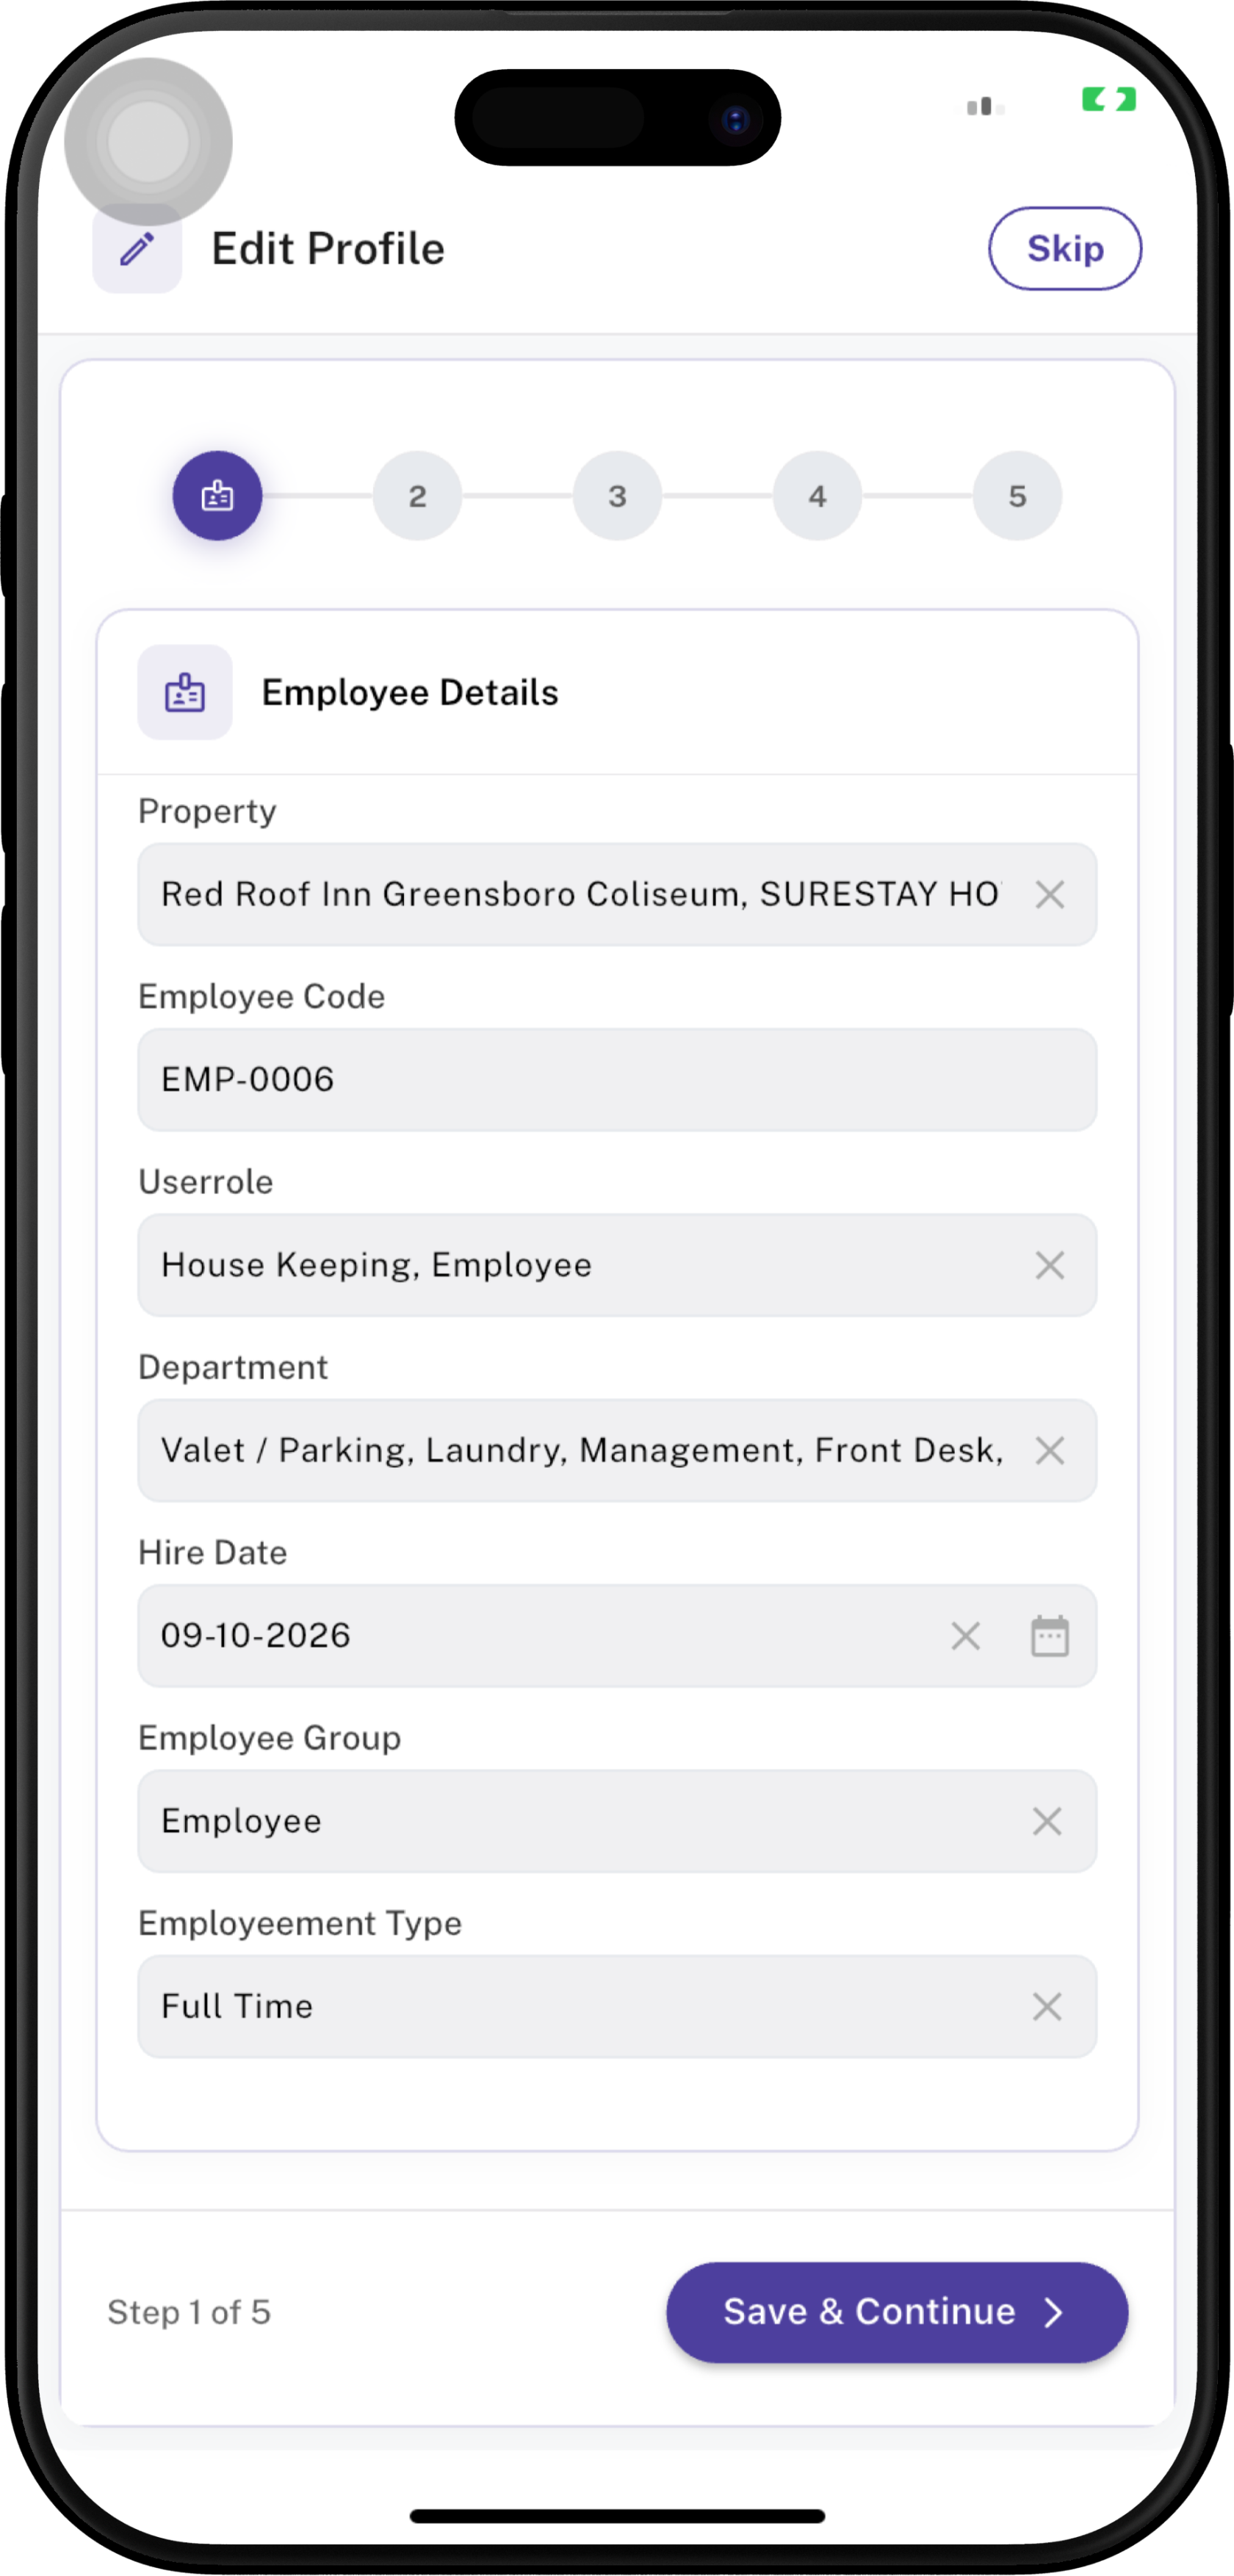
| Field | Description |
|---|---|
| Property | Displays the property where the employee is assigned. |
| Employee Code | Displays the unique employee code assigned to the employee. |
| Userrole | Displays the role assigned to the employee, such as Housekeeping or Employee. |
| Department | The department(s) associated with the employee, such as Front Desk, Laundry, Management, or Valet/Parking. |
| Hire Date | The employee's official hire/start date recorded in the system. |
| Employee Group | The employee group assigned to the employee, such as Employee. |
| Employment Type | The employee's employment classification, such as Full Time. |
▶️ Continue to the Next Step
After reviewing all Employee Details, tap Save & Continue button. ⚠️ If any Employee Details are incorrect: Contact your manager or administrator. These fields are disabled and cannot be updated by the employee.
Step 2 — Personal Details
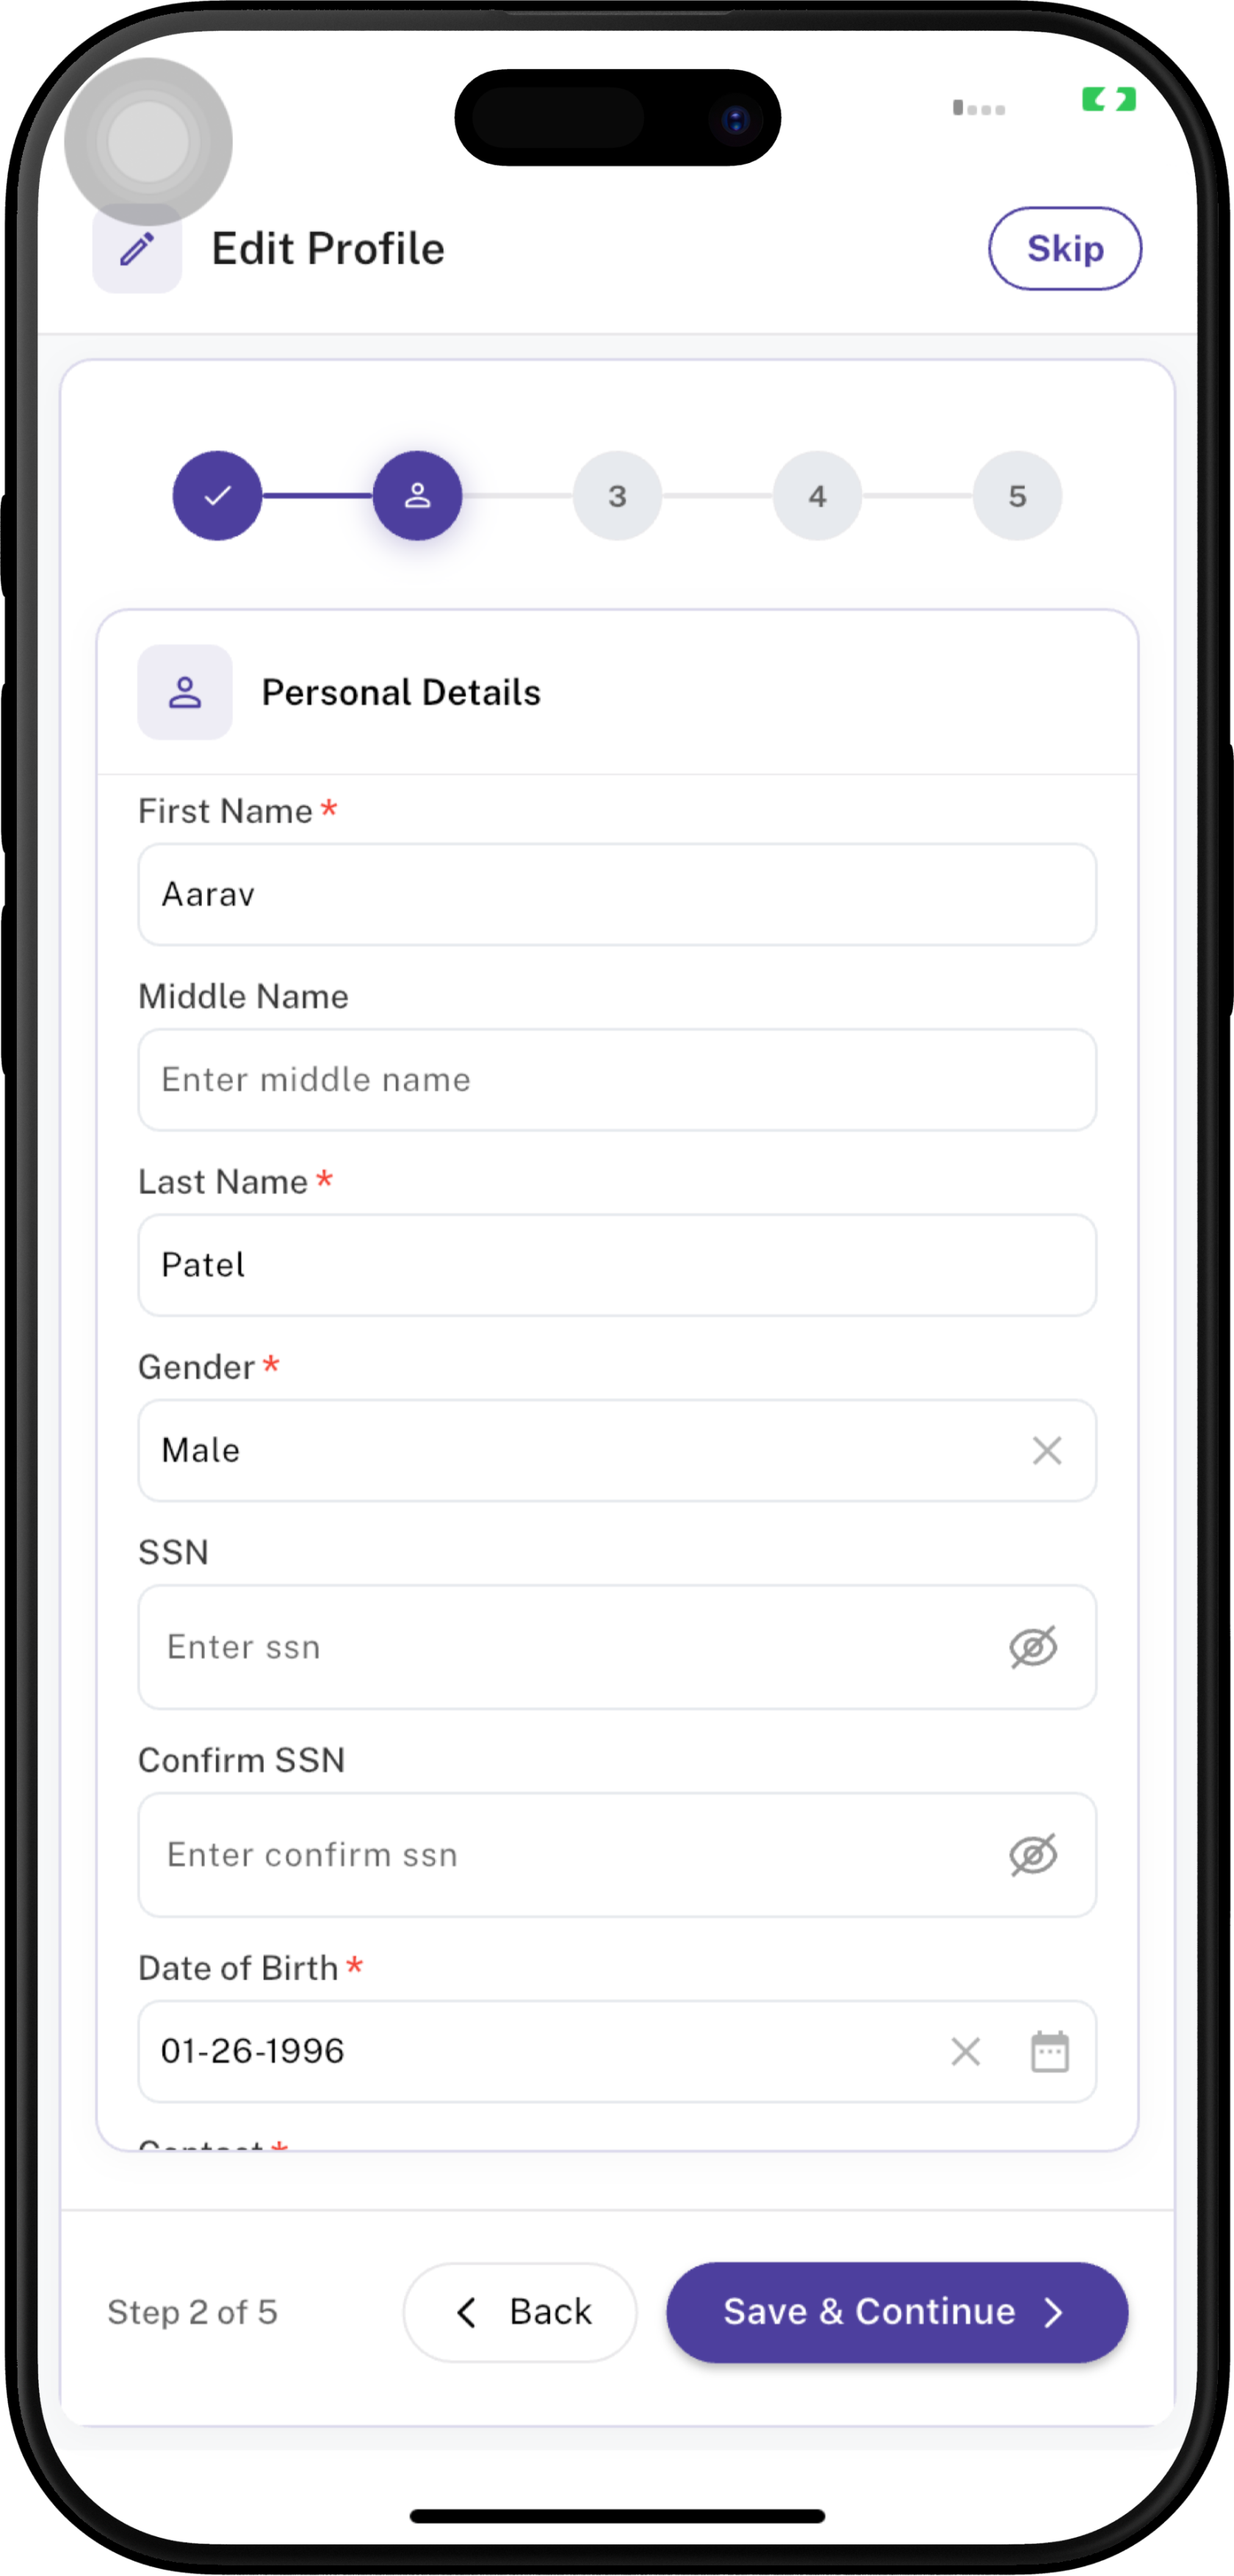
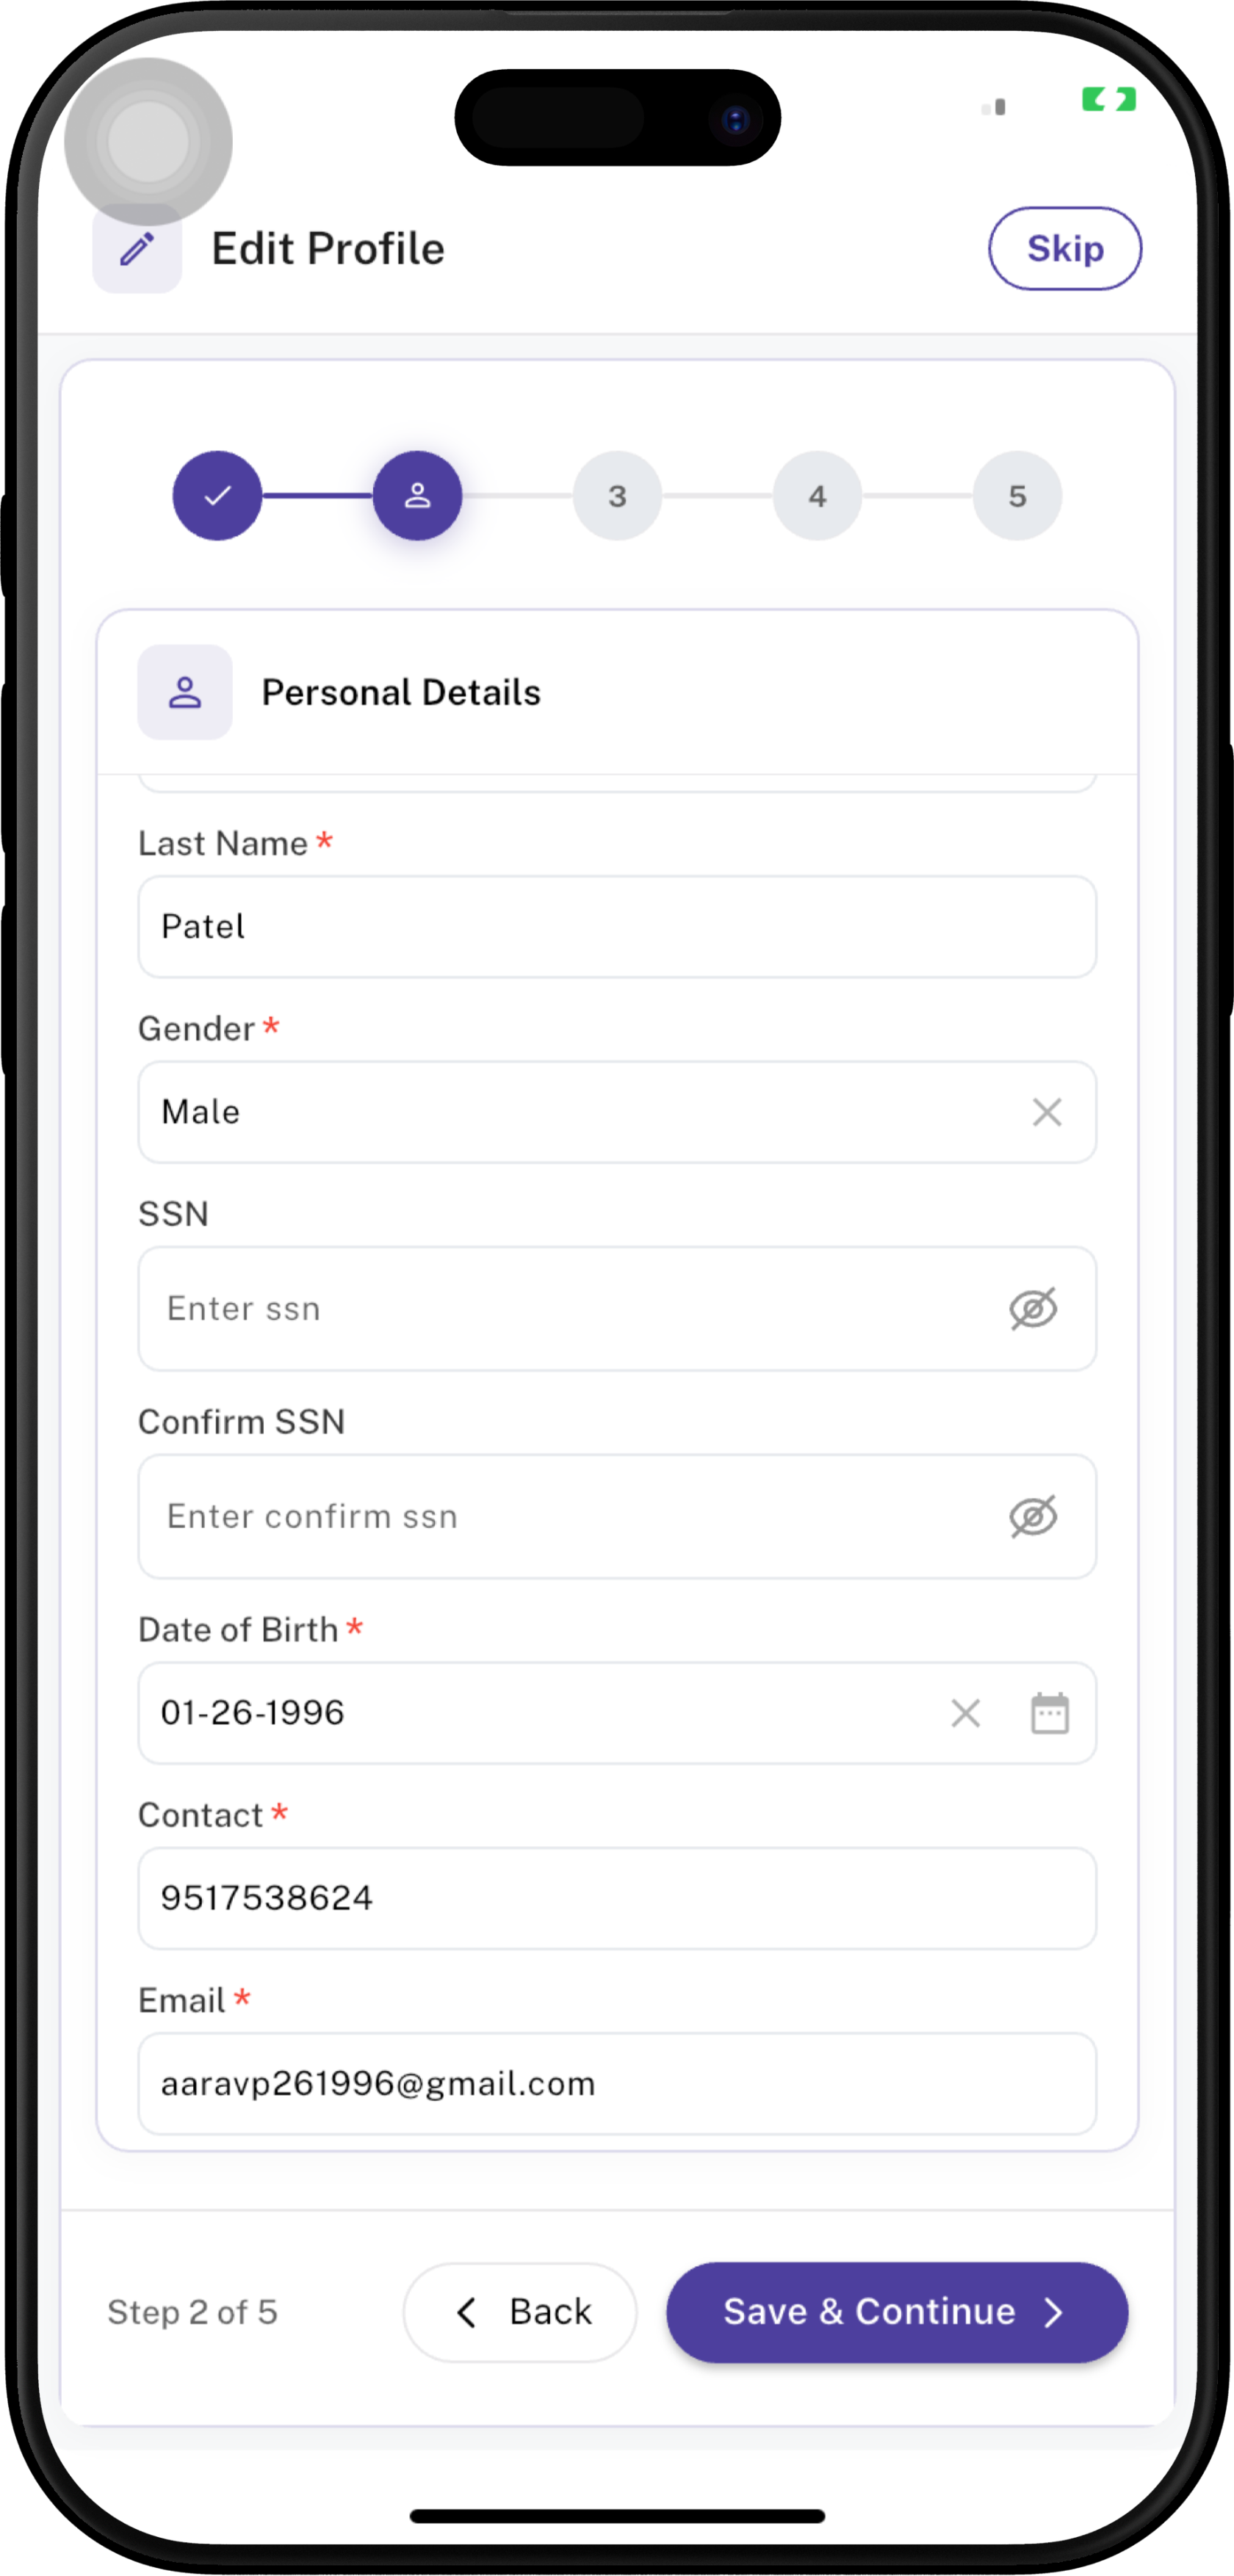
The Personal Details section contains the employee's personal information.
Some information may already be populated, while other fields may require the employee to enter or update information.
Fields marked with a red * are required.
| Field | Description | Required |
|---|---|---|
| First Name | Employee's first/given name. | ✅ Yes |
| Middle Name | Employee's middle name, if applicable. | No |
| Last Name | Employee's family/last name. | ✅ Yes |
| Gender | Employee's gender. | ✅ Yes |
| SSN | Employee's Social Security Number. | No |
| Confirm SSN | Re-enter the SSN to confirm that it was entered correctly. | No |
| Date of Birth | Employee's date of birth. | ✅ Yes |
| Contact | Employee's contact/mobile phone number. | ✅ Yes |
| Employee's registered email address. | ✅ Yes |
Step 3 — Payroll Details
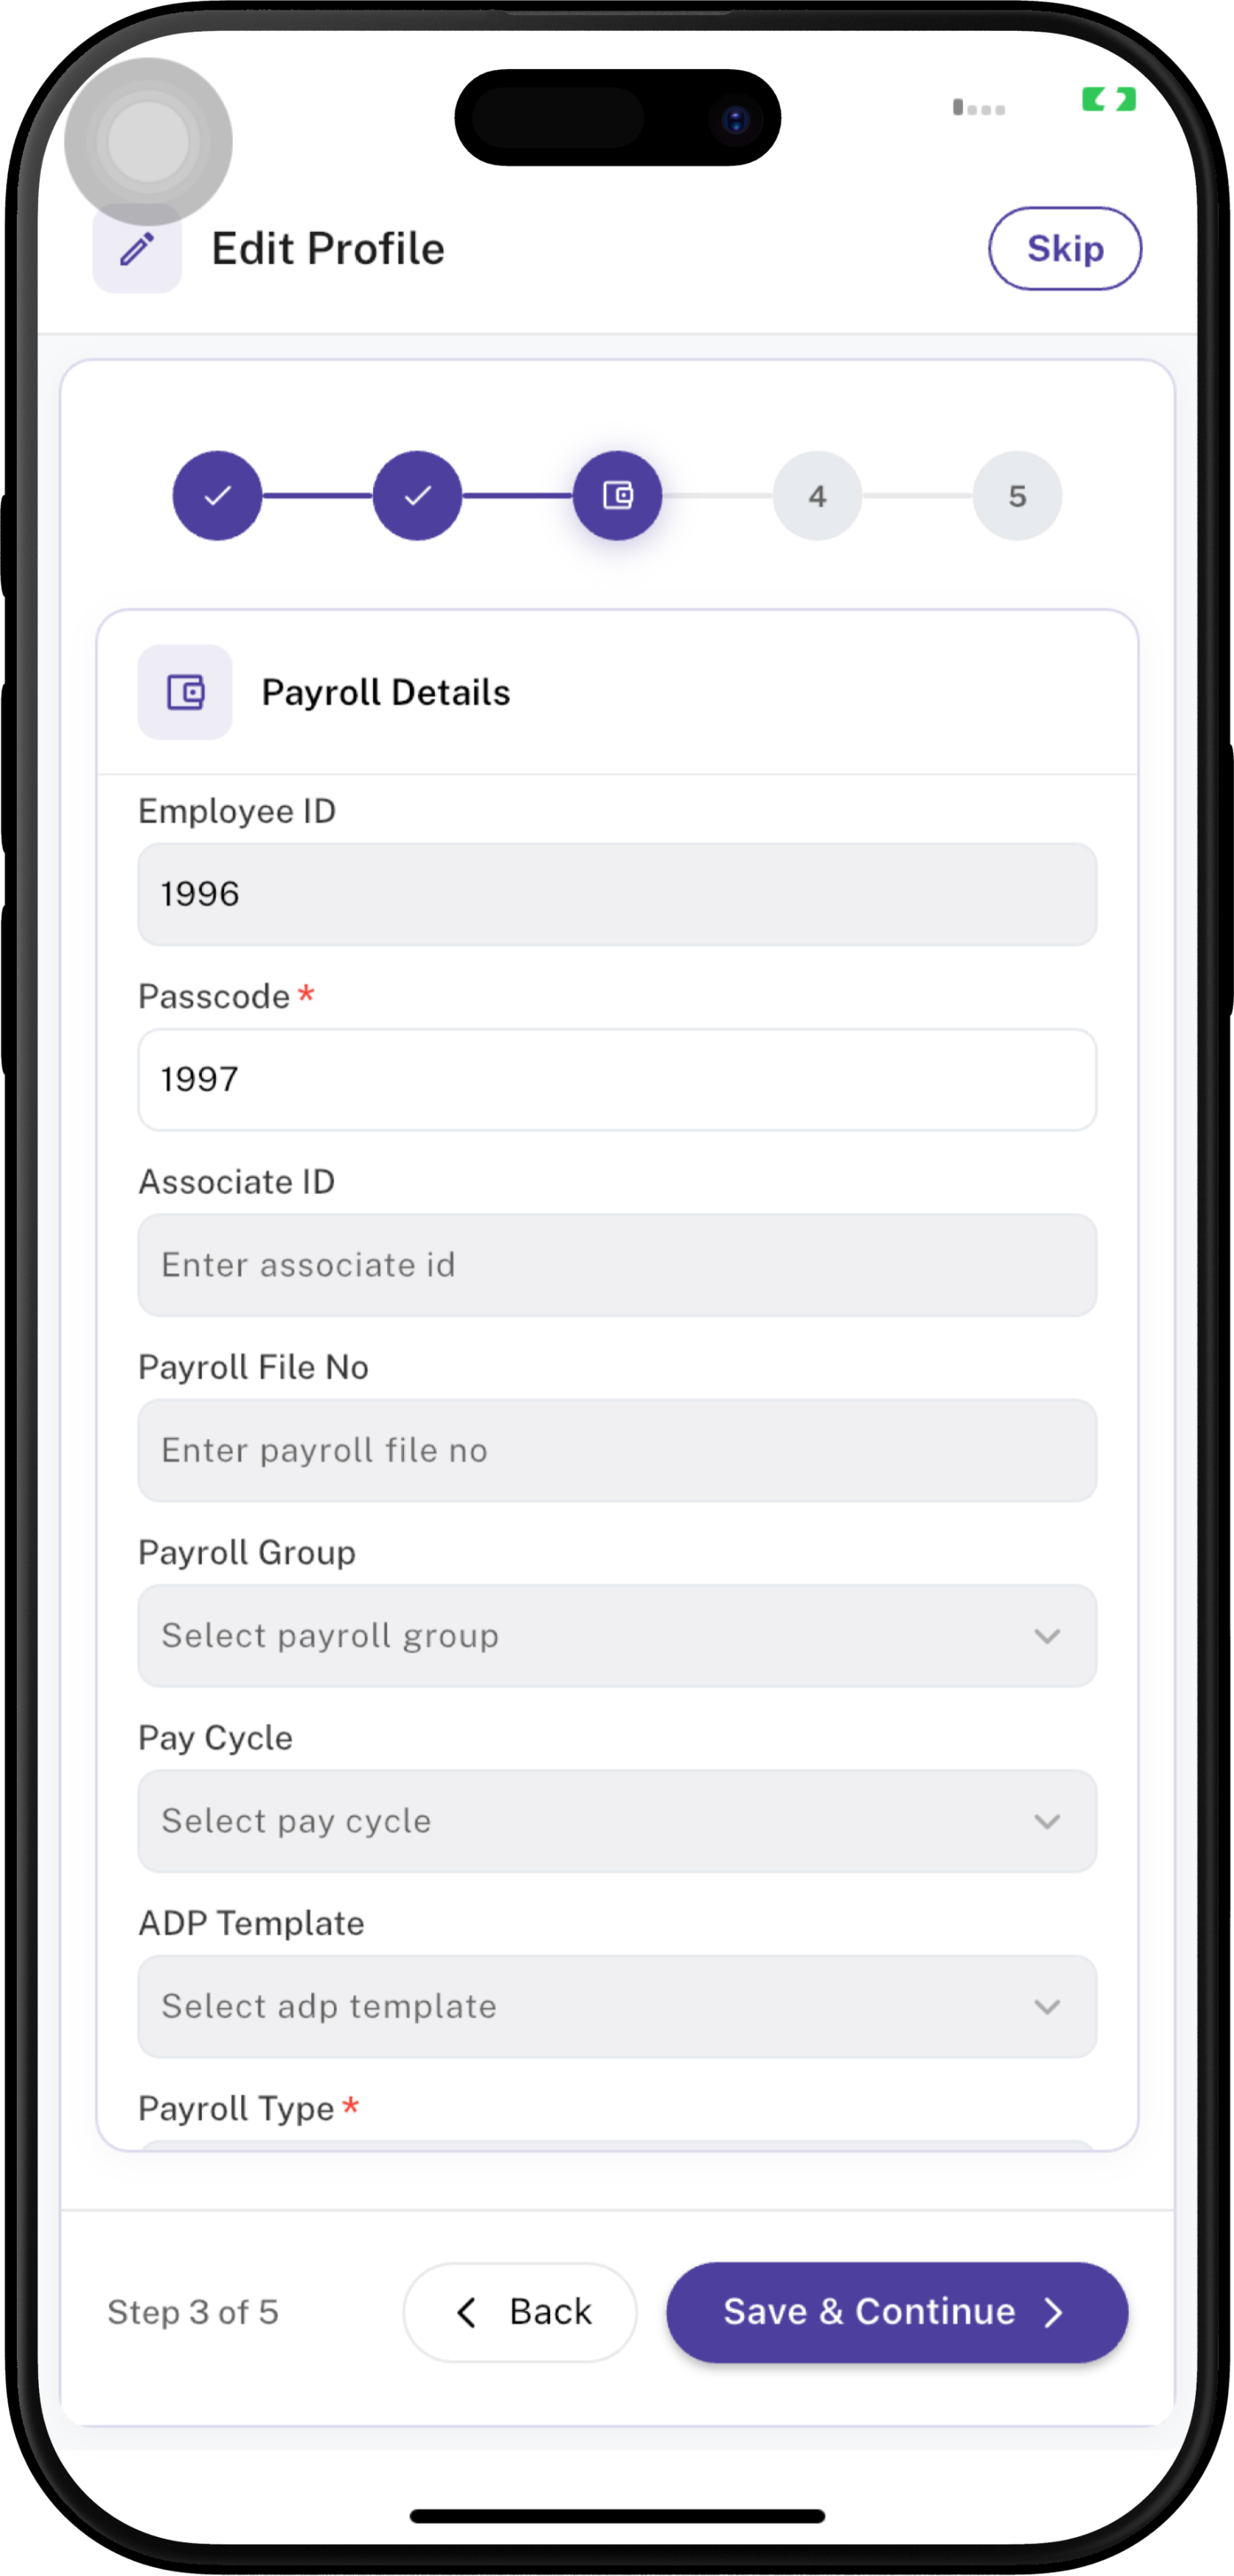
The Payroll Details section contains employee payroll and compensation information.
Fields marked with a red * are required.
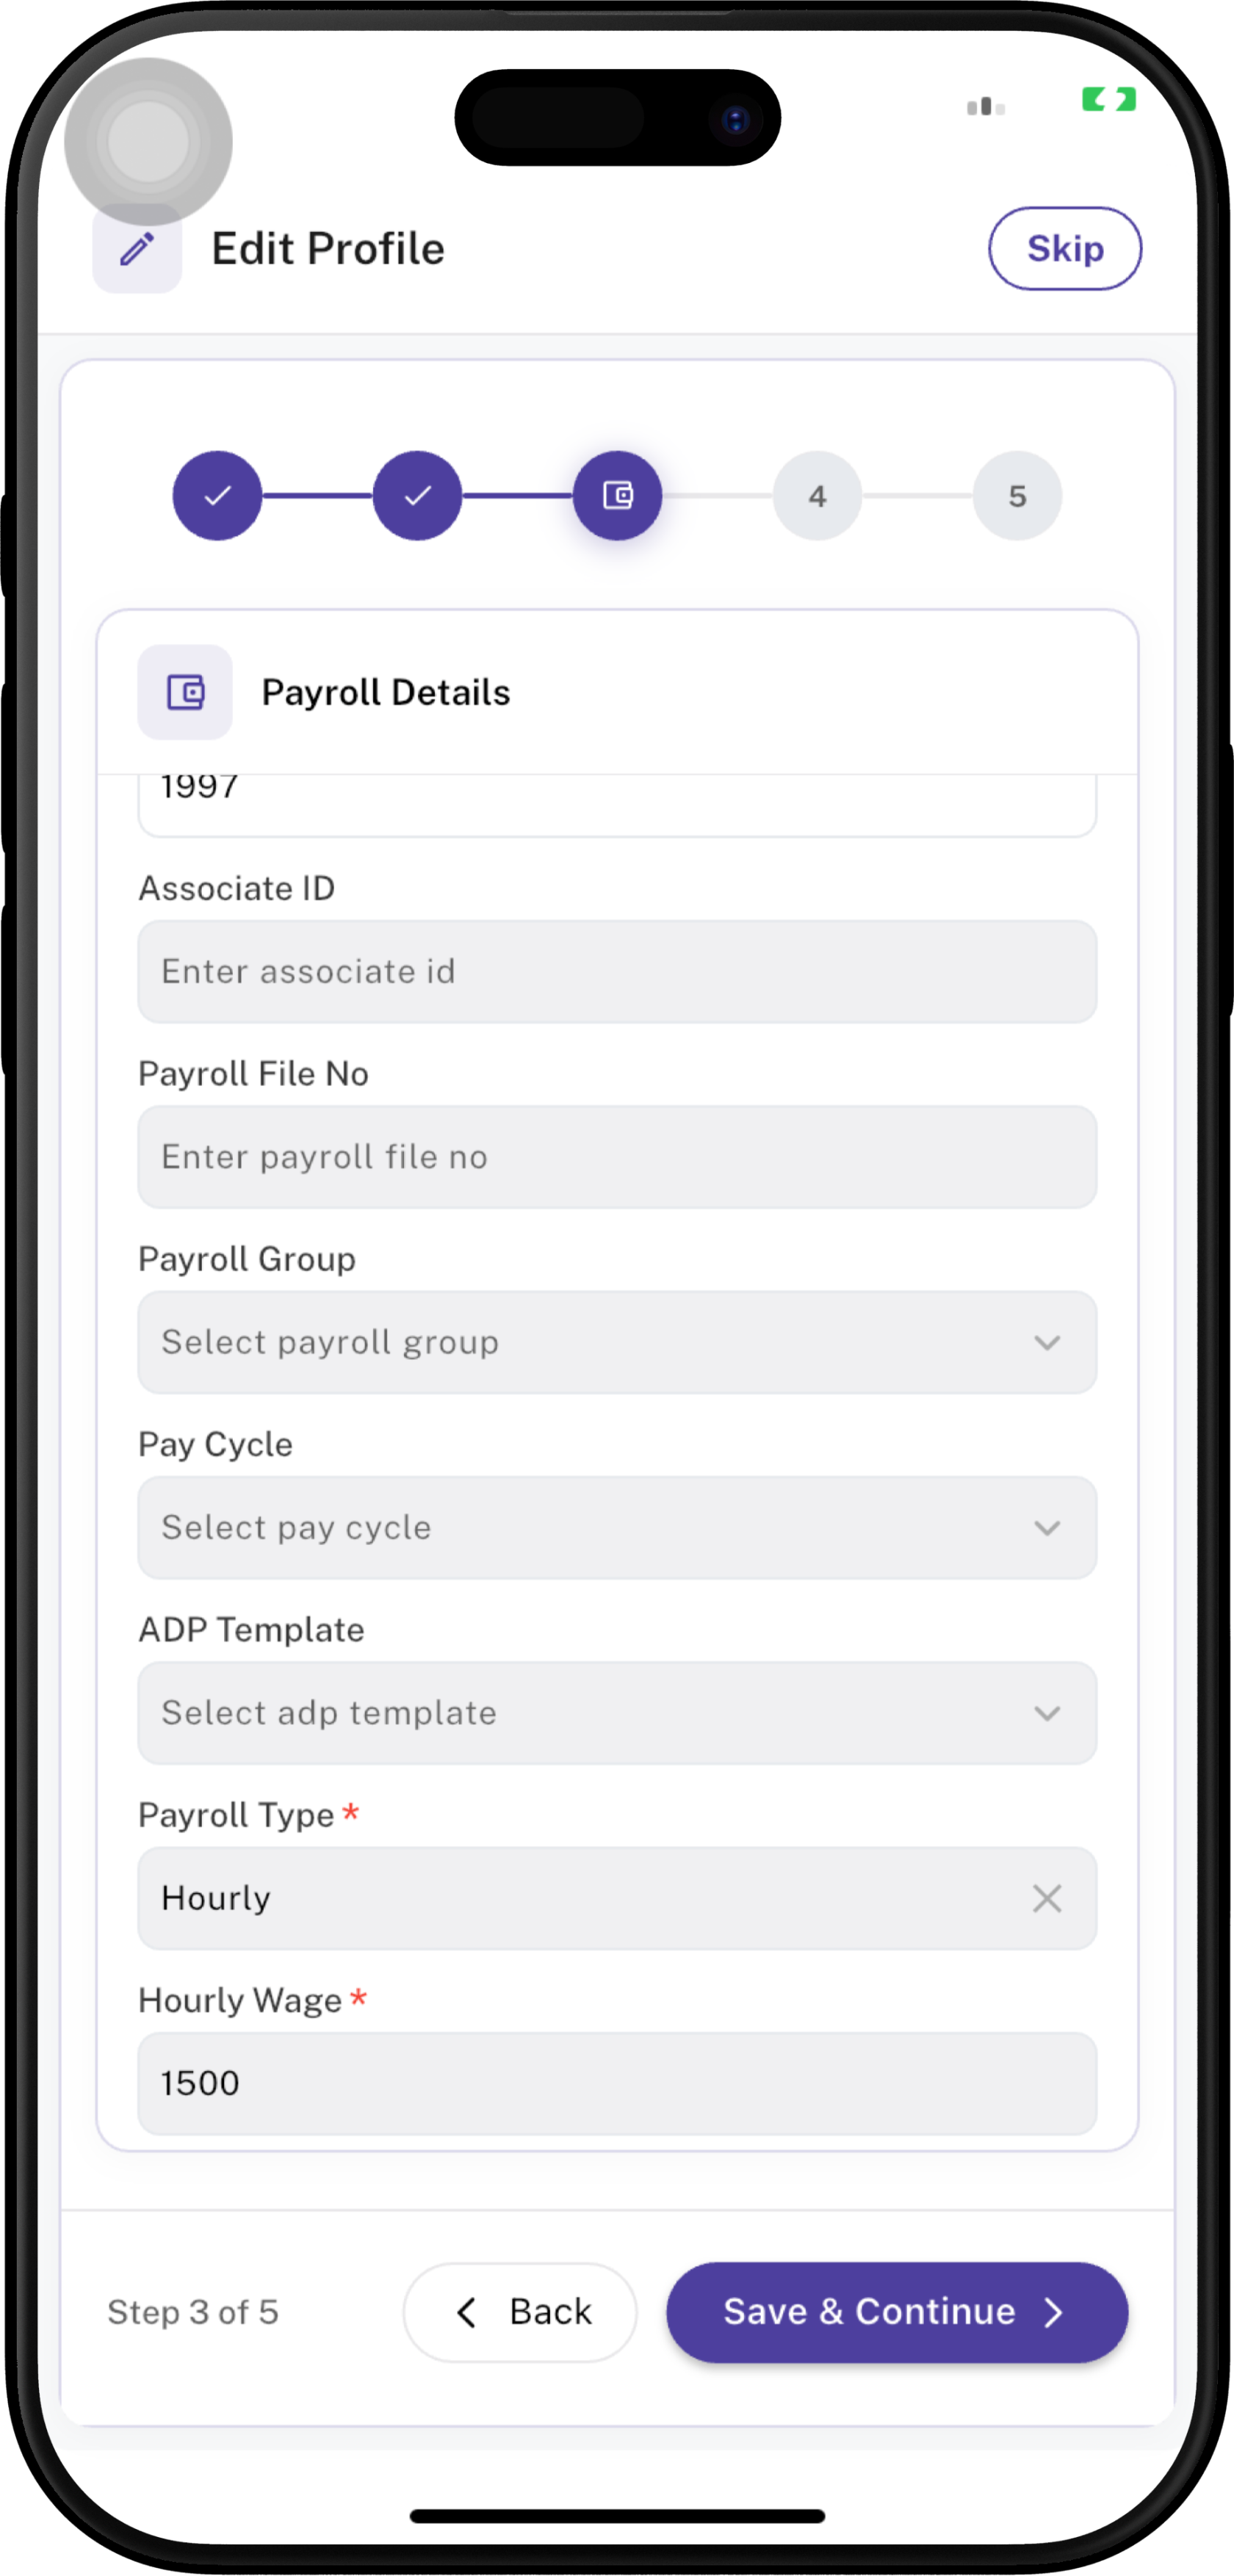
| Field | Description | Required |
|---|---|---|
| Employee ID | Displays the employee's payroll/system employee ID. | No |
| Passcode | Employee passcode used for the applicable system authentication. | ✅ Yes |
| Associate ID | Employee's associate identification number, if applicable. | No |
| Payroll File No | Payroll file/reference number associated with the employee. | No |
| Payroll Group | Selects the payroll group assigned to the employee. | No |
| Pay Cycle | Selects the frequency or cycle used to process the employee's pay. | No |
| ADP Template | Selects the applicable ADP payroll template. | No |
| Payroll Type | Specifies how the employee is paid, such as Hourly. | ✅ Yes |
| Hourly Wage | Specifies the employee's hourly wage when the payroll type is Hourly. | ✅ Yes |
🔐 Security: Keep your Employee ID & Passcode confidential and do not share it with other employees.
Step 4 — Address Details
The Address Details section is used to provide the employee's address and location information.
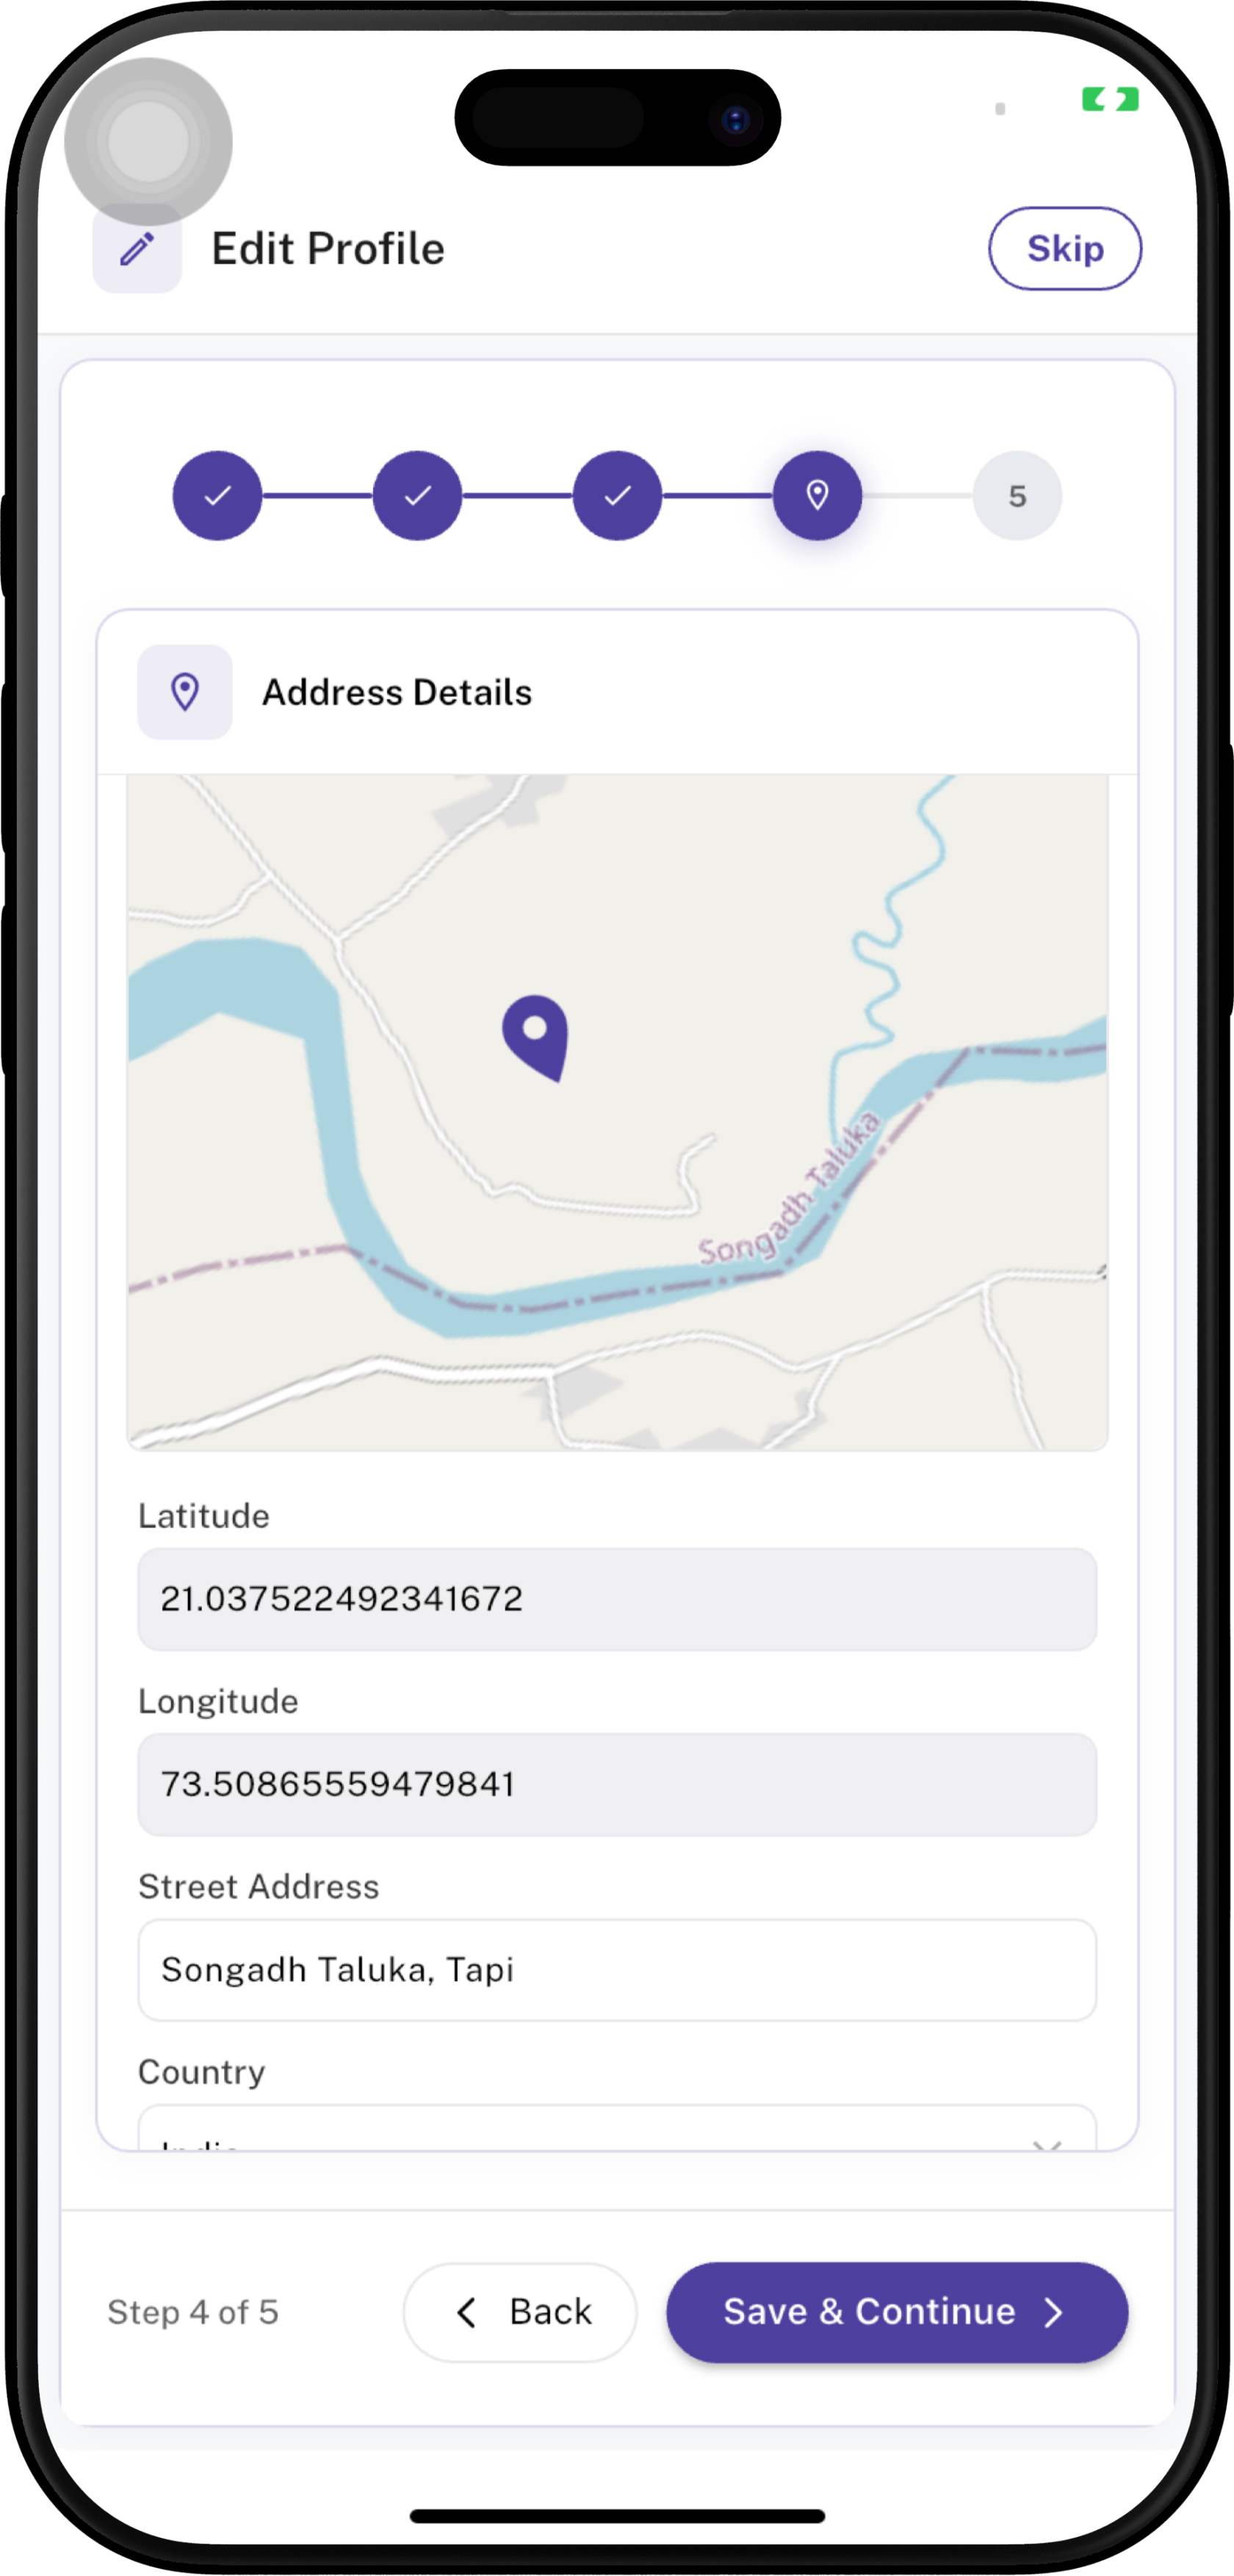
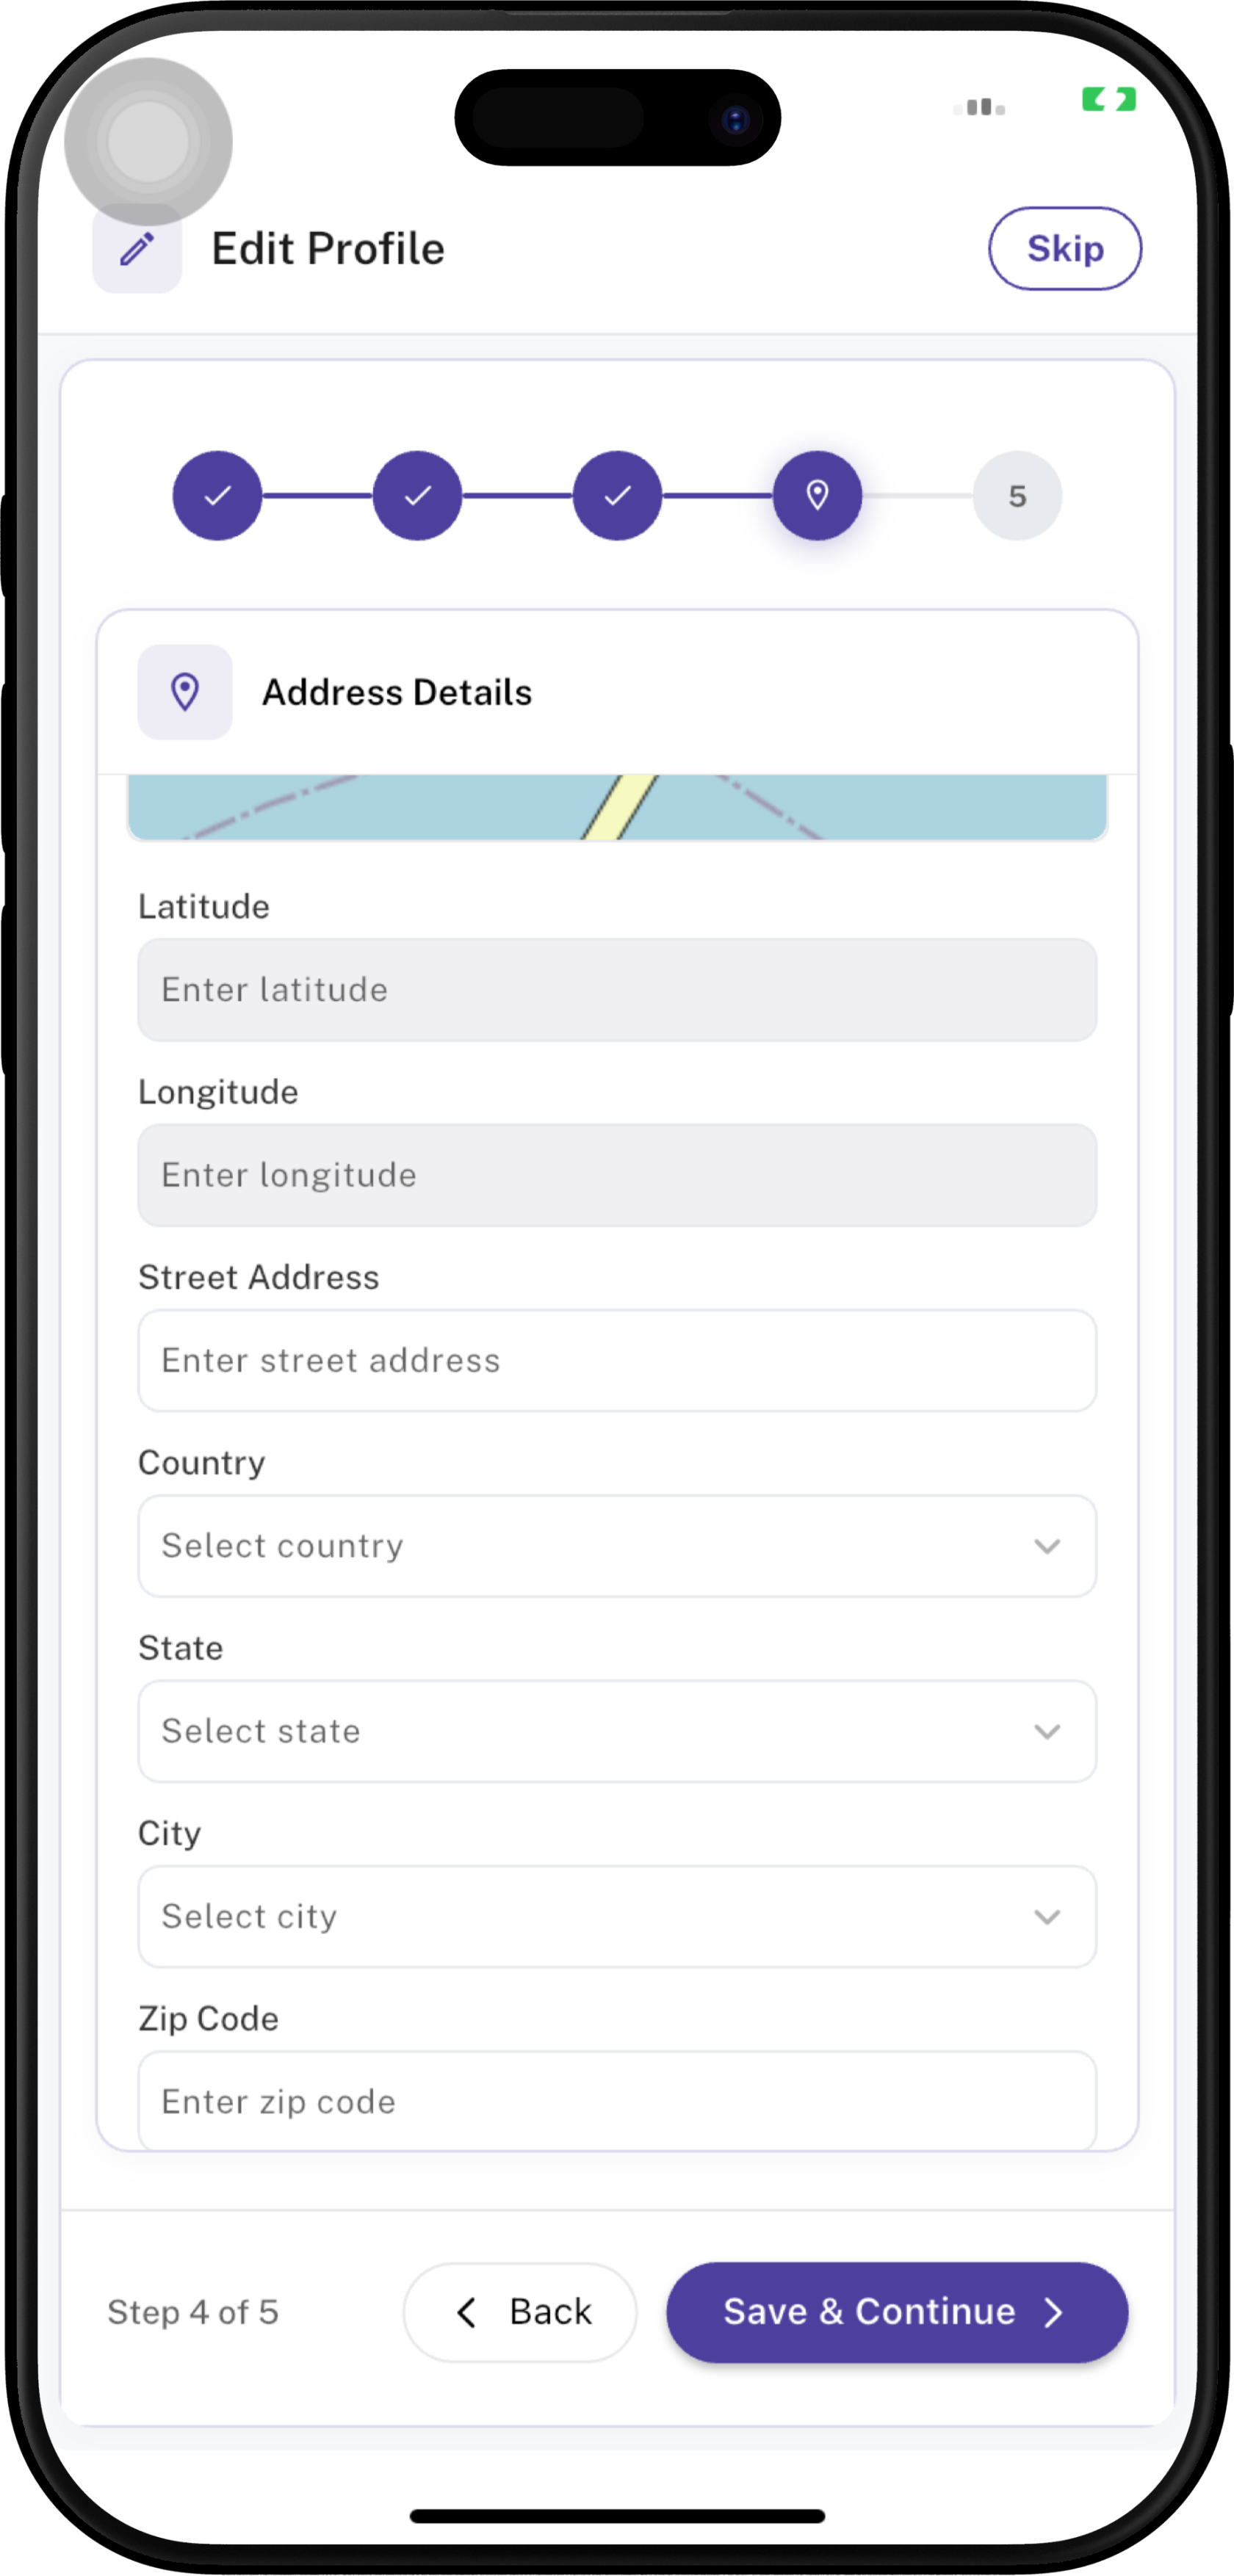
| Field | Description | Required |
|---|---|---|
| Latitude | Geographic latitude associated with the employee's address/location. | No |
| Longitude | Geographic longitude associated with the employee's address/location. | No |
| Street Address | Employee's street/residential address. | No |
| Country | Select the employee's country. | No |
| State | Select the employee's state or region. | No |
| City | Select the employee's city. | No |
| Zip Code | Enter the postal/ZIP code associated with the address. | No |
Enter or select the required information and tap Save & Continue.
Step 5 — Identity Documents
The Identity Documents section is the final step of the Profile Update process. Employees can provide the required identity information and upload the documents requested by the organization.
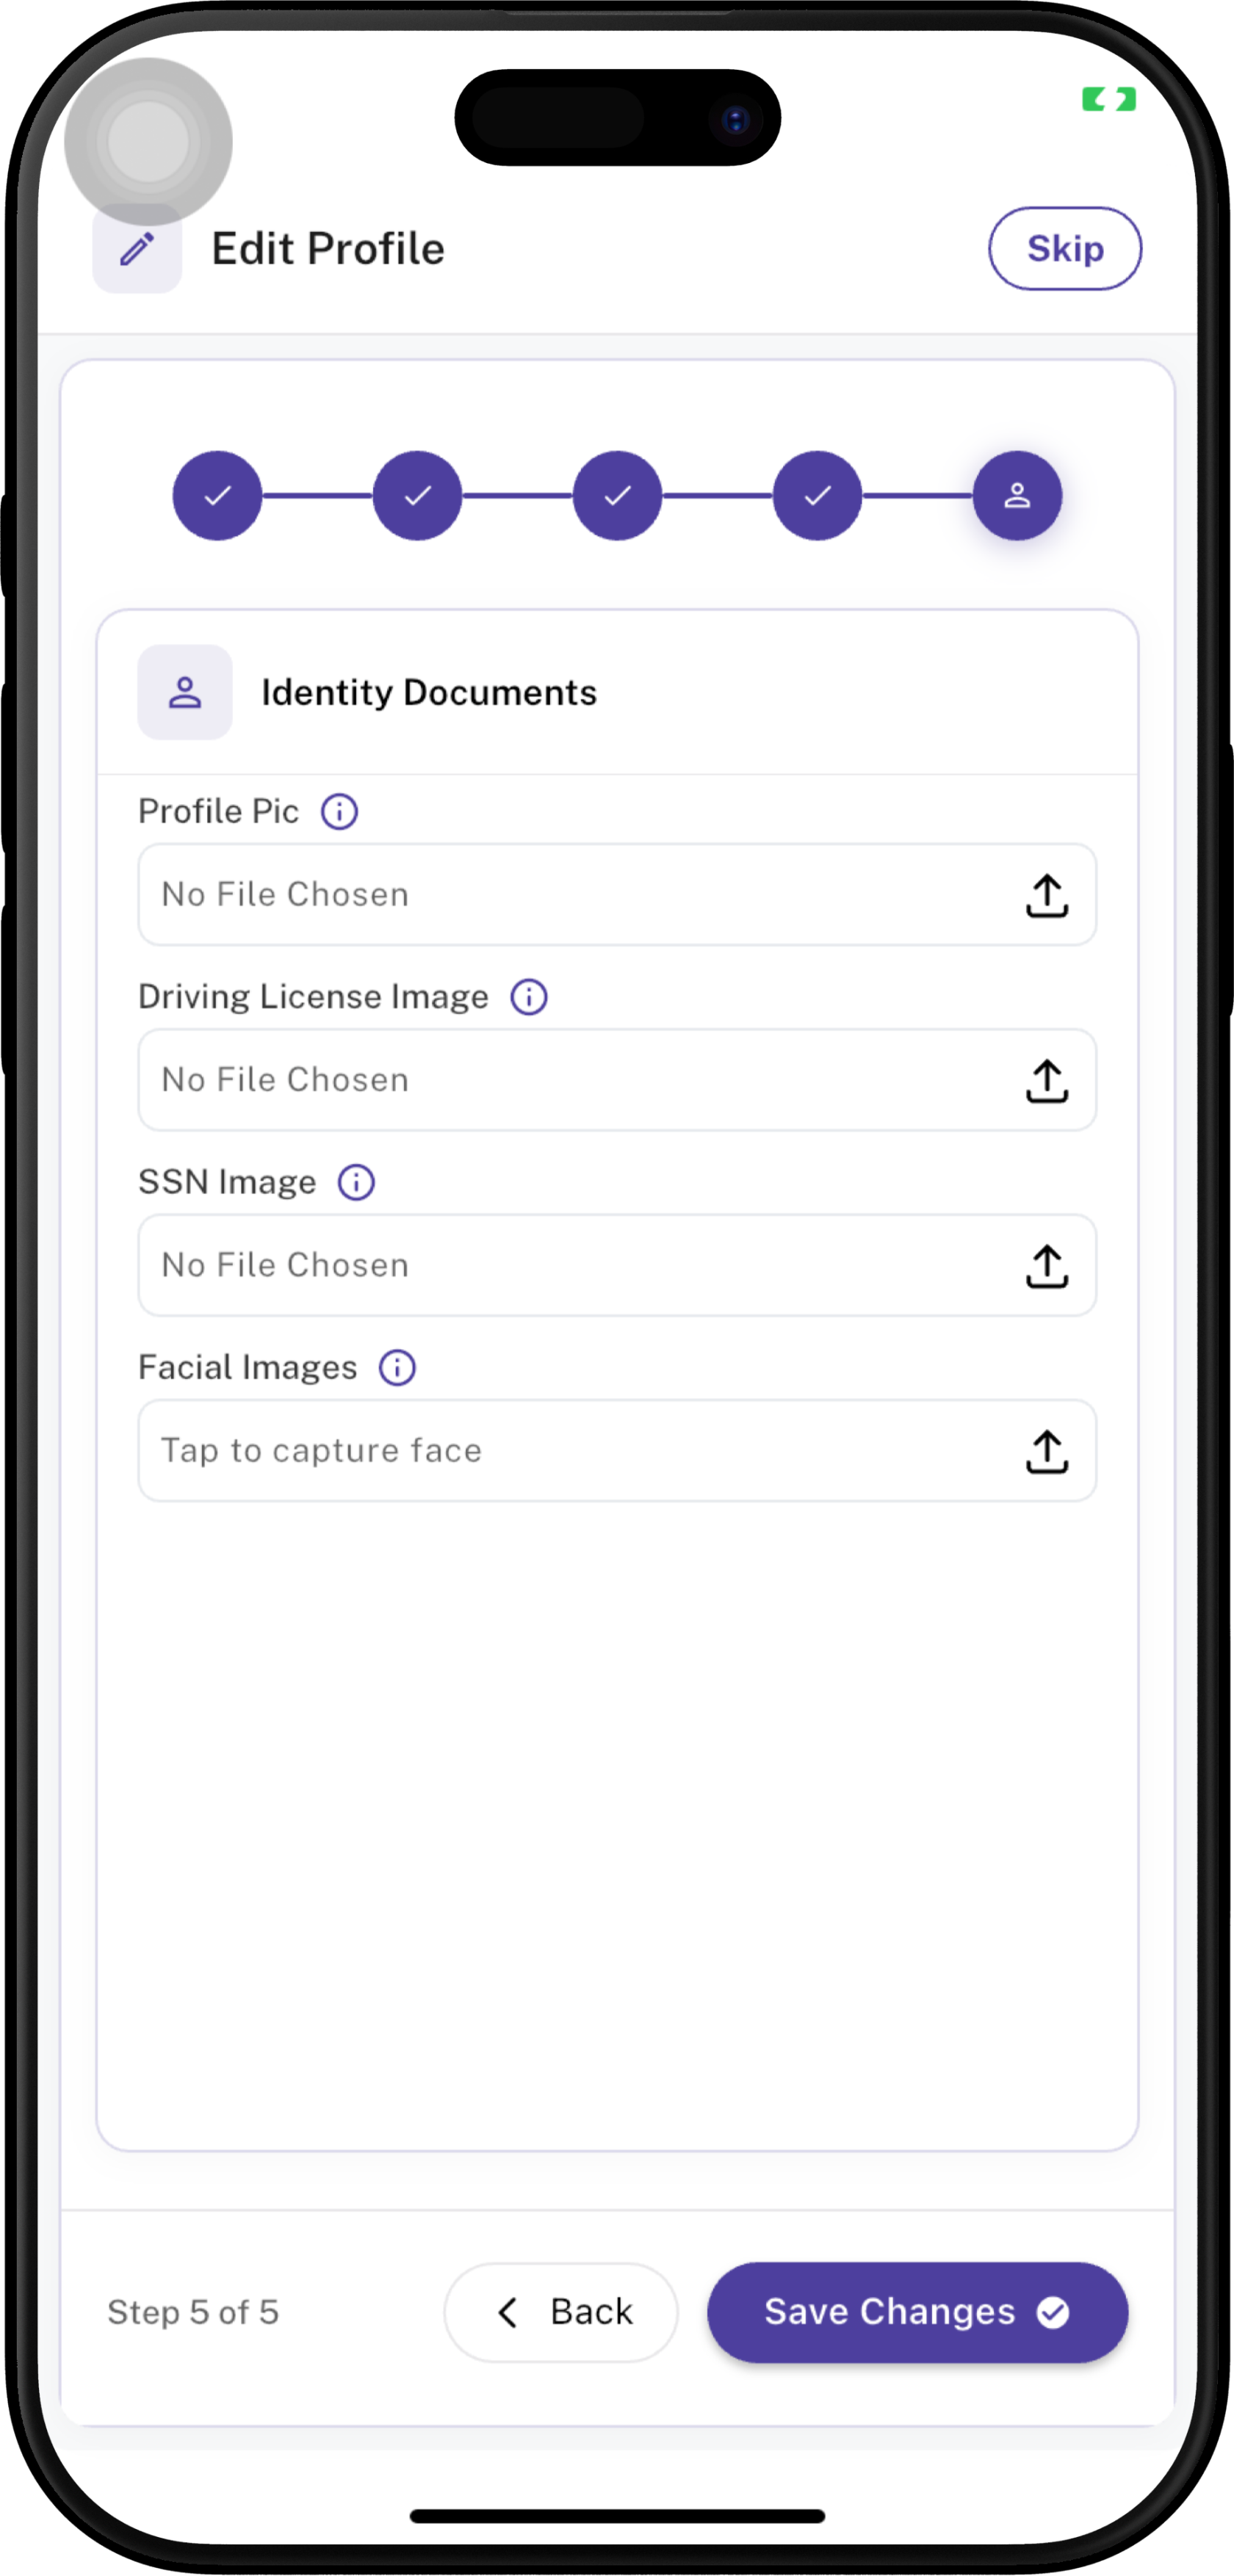
| Field | Description | Required |
|---|---|---|
| Profile Pic | Displays the employee's profile picture. | No |
| Driving License Image | Upload a clear image of the employee's driving license when required. | No |
| SSN Image | Upload the required SSN document image when requested by the organization. | No |
| Facial Images | Capture clear facial photographs for face verification and face login. | At least 2 images |
🔒 Privacy Reminder: Only upload documents requested by your organization. Make sure all uploaded images are clear and belong to the employee.
Facial Images
The Facial Images option is used to capture the employee's face for face verification and face login during application login.
⚠️ Important Requirement: Please upload at least 2 clear photographs of your face with your face clearly visible.
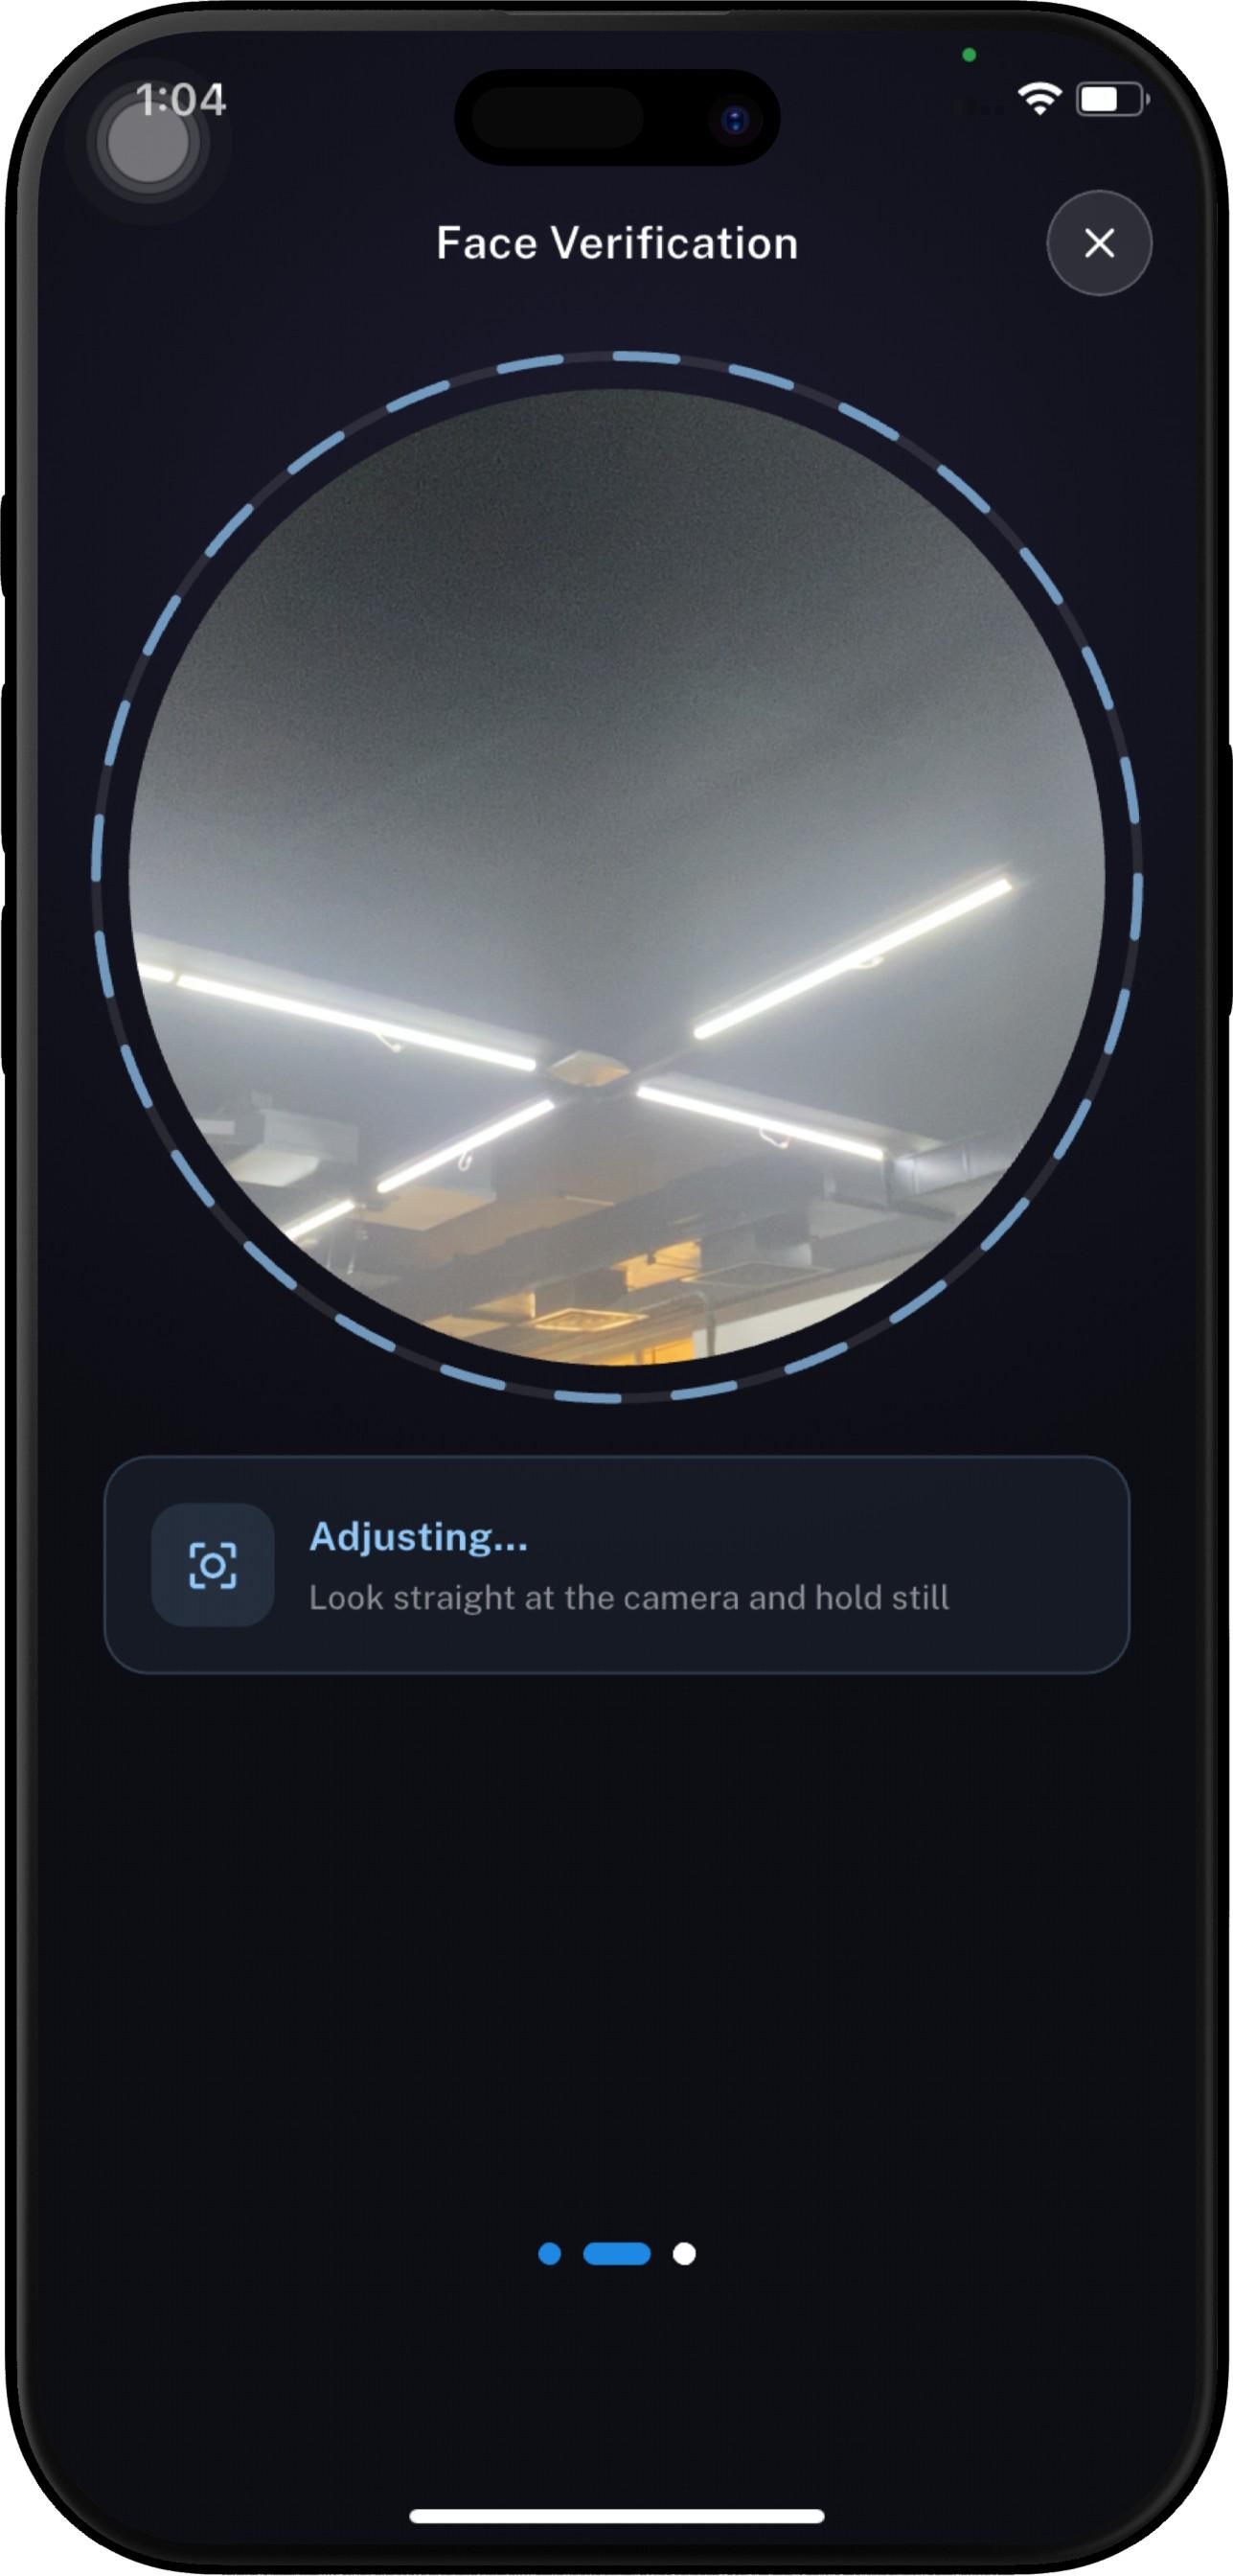
How to Capture Facial Images
- Tap Facial Images in the Identity Documents section.
- The Face Verification screen will open.
- The camera will display a circular area for face positioning.
- Position your face inside the circle.
- Make sure your entire face is clearly visible.
- Look directly at the camera and keep your face steady.
- Avoid covering your face with your hand, mask, sunglasses, or other objects.
- Make sure there is sufficient lighting and avoid strong light directly behind you.
- Capture the photograph when your face is properly positioned.
- Repeat the process until at least 2 clear facial images have been captured.
🎯 Face Login: The captured images are displayed below the Facial Images field. Review the images before completing the profile. If an image is unclear or does not show your face properly, use the Delete icon on the image and capture a new one.
At least 2 clear facial images are required to enable face login during application login. Make sure your face is clearly visible in every captured image.
▶️ Complete Profile Update
After reviewing all Identity Documents and confirming that at least 2 clear facial images have been captured:
Review all information entered in the Identity Documents section.
Confirm that the facial images are clear and recognizable.
Confirm that all required documents have been provided.
Tap Save Changes.
The profile update process is completed successfully.