
Lost & Found
1. Lost Items
The Lost Items feature allows staff to:
- Report a lost item for a guest.
- Add or select the guest associated with the lost item.
- Select where the item was lost.
- Set the priority of the request.
- Upload images of the lost item.
- Track open and closed lost-item tickets.
- Start, pause, and continue work on a ticket.
- Mark an item as Found or Not Found.
- Add a found request when an item is found.
- Add a reason when an item is not found.
- Review the ticket history in the Log Book.
Add a Lost Item
From the Lost Item listing, select the + button to create a new lost-item request.
On the New Lost Request screen, first add the guest details.

Overview2.1 Select the Guest Category
The LostGuest & Found module on the iHospitality Hub enables staff to report guest lost-item claims and to record and manage items recovered on property. Both workflows are completed directly from a shared kiosk device, with each report or record time-stamped and attributed to the employee who created it.
This module only appears on hubs whereLost & FoundCategorywassectioncheckedprovidesunderthreeHub Modules, and only for employees whoseUser RolehasCan iHospitality Hub Loginenabled — see theiHospitality Hub – Setuppage.
Lost & Found Screen
After signing in and tapping Lost & Found, the employee sees two options.
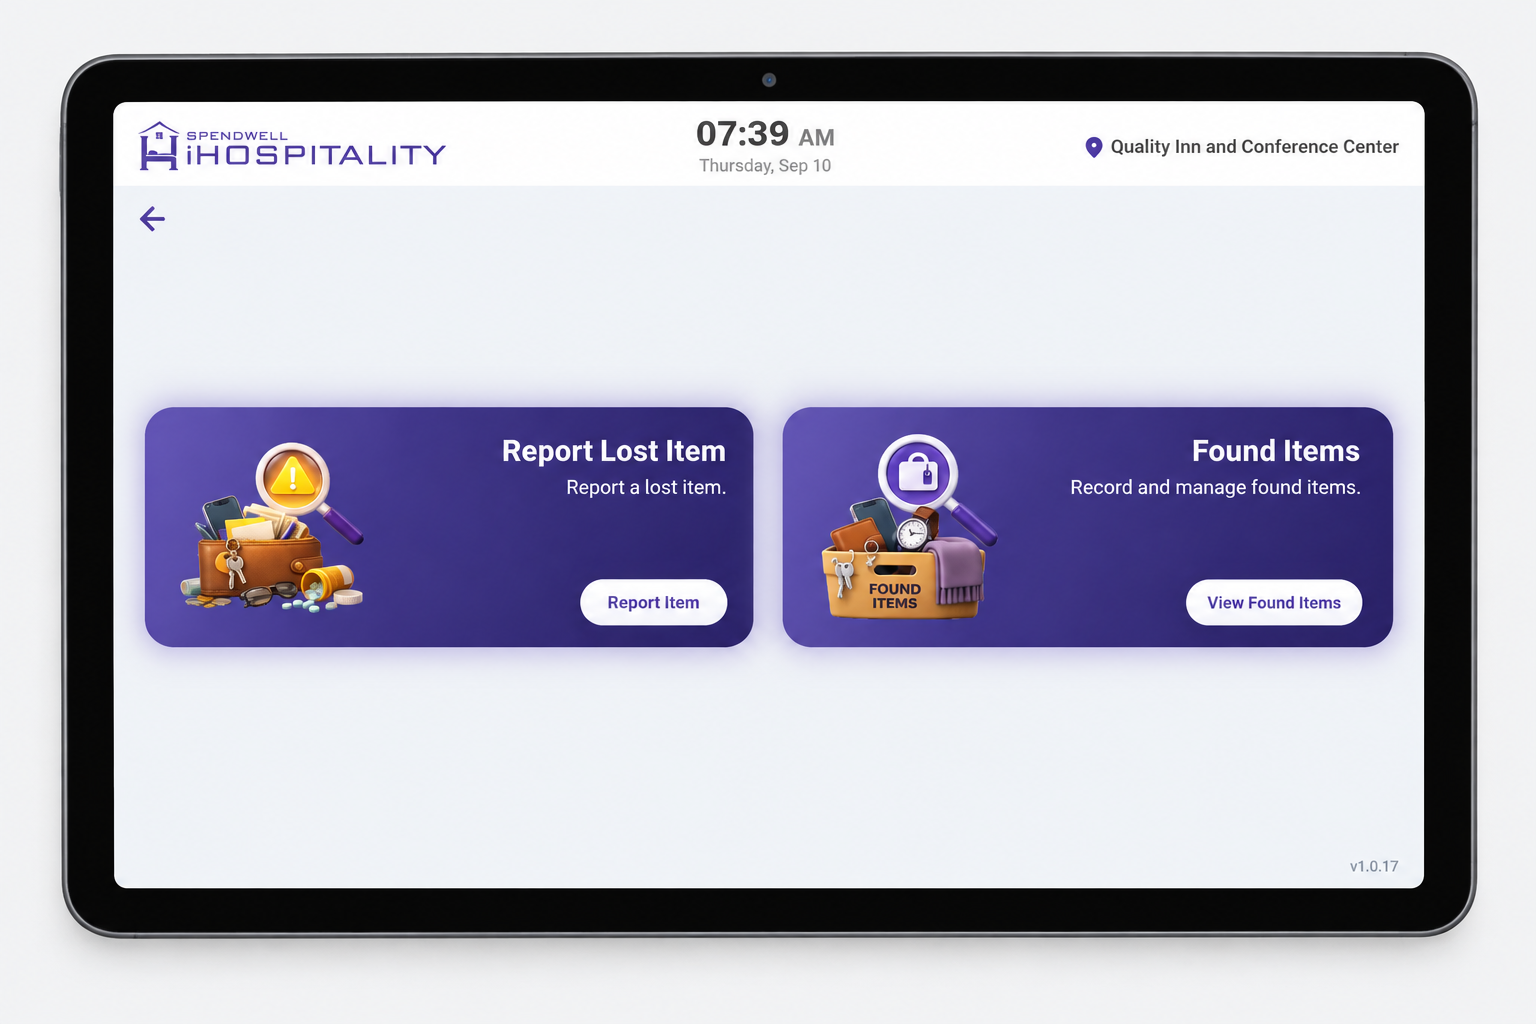
What this screen means: pick Report Lost Item when a guest has lost something, or Found Items to log or manage an item that's been found.options:
| Option | |
|---|---|
| Add Guest | Use this when the guest is not available in the existing guest list and must be added manually. |
Select the category that matches the guest's current status.
Report2.2 LostIn-House ItemGuest
Lost Item List
TappingWhen ViewIn-House Foundis Itemsselected:
- Select Room Number
-equivalent.forThis is a required field. - Select Guest. This is a required field.
- Select the guest associated with the lost
reportsitem. - Continue to the lost-item details.
LostRequired Itemfields: listRoom —Numbereveryand Select Guest.
2.3 Check Out Guest
When Check Out is selected:
- Select the appropriate guest from the available checked-out guest records.
- Complete the guest selection/details required by the form.
- Continue to enter the lost-item information.
Use this option when the lost item reportis loggedreported for the property.
2.4 Add GuestWhen | |
New Lost Request Form
Tap + Create (or Report Item from the Lost & Found screen) to log a new lost item report.manually.
Guest information
| Field | Required | Description |
|---|---|---|
| Yes | ||
| Yes | Enter the guest's contact number. | |
| No | ||
Fields marked with * are required.
After entering the information, select SAVE to save the guest details.
Select RESET to clear the entered information and start again.
3. Select the Lost Location
For an in-house guest, selecting a room opens the Room Selection screen.

Room Selection
- Use the Search field to find a room quickly.
- Use the available category/property filters when required.
- Expand the required floor.
- Select one or more rooms where the item may have been lost.
- The selected-room count is shown at the bottom.
- Review the selected room numbers.
- Select Save to confirm the room selection.
- Select Close to leave the screen without confirming the selection.
Multiple rooms can be selected when the item may have been lost in more than one location.
4. Enter Lost Item Details
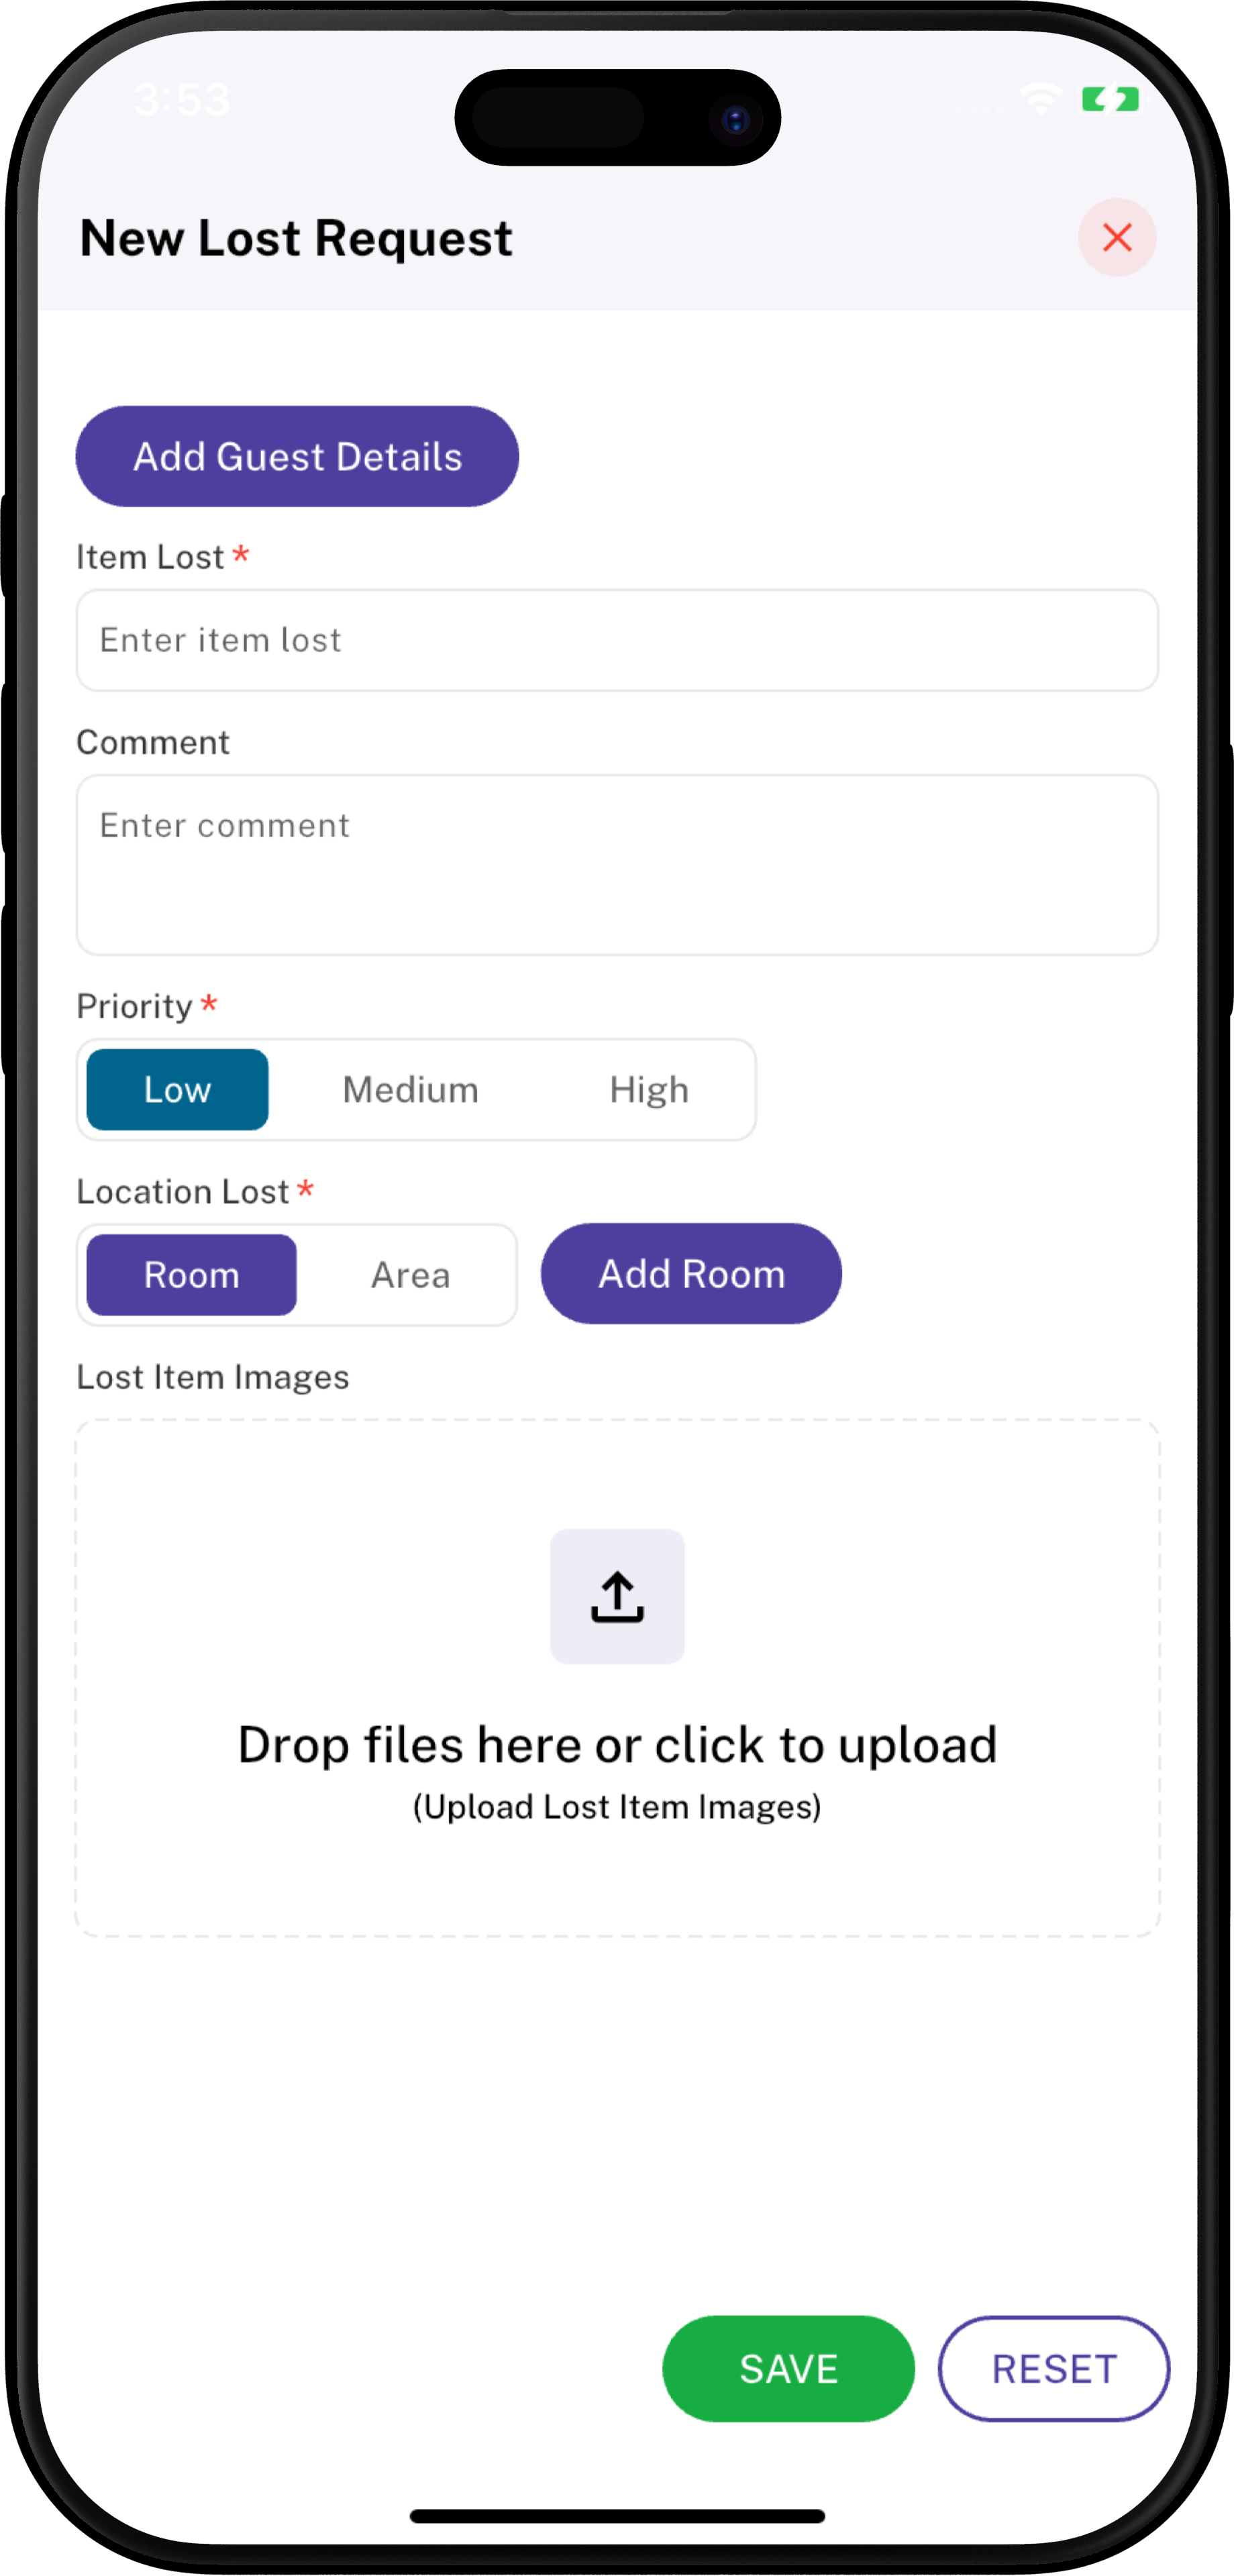
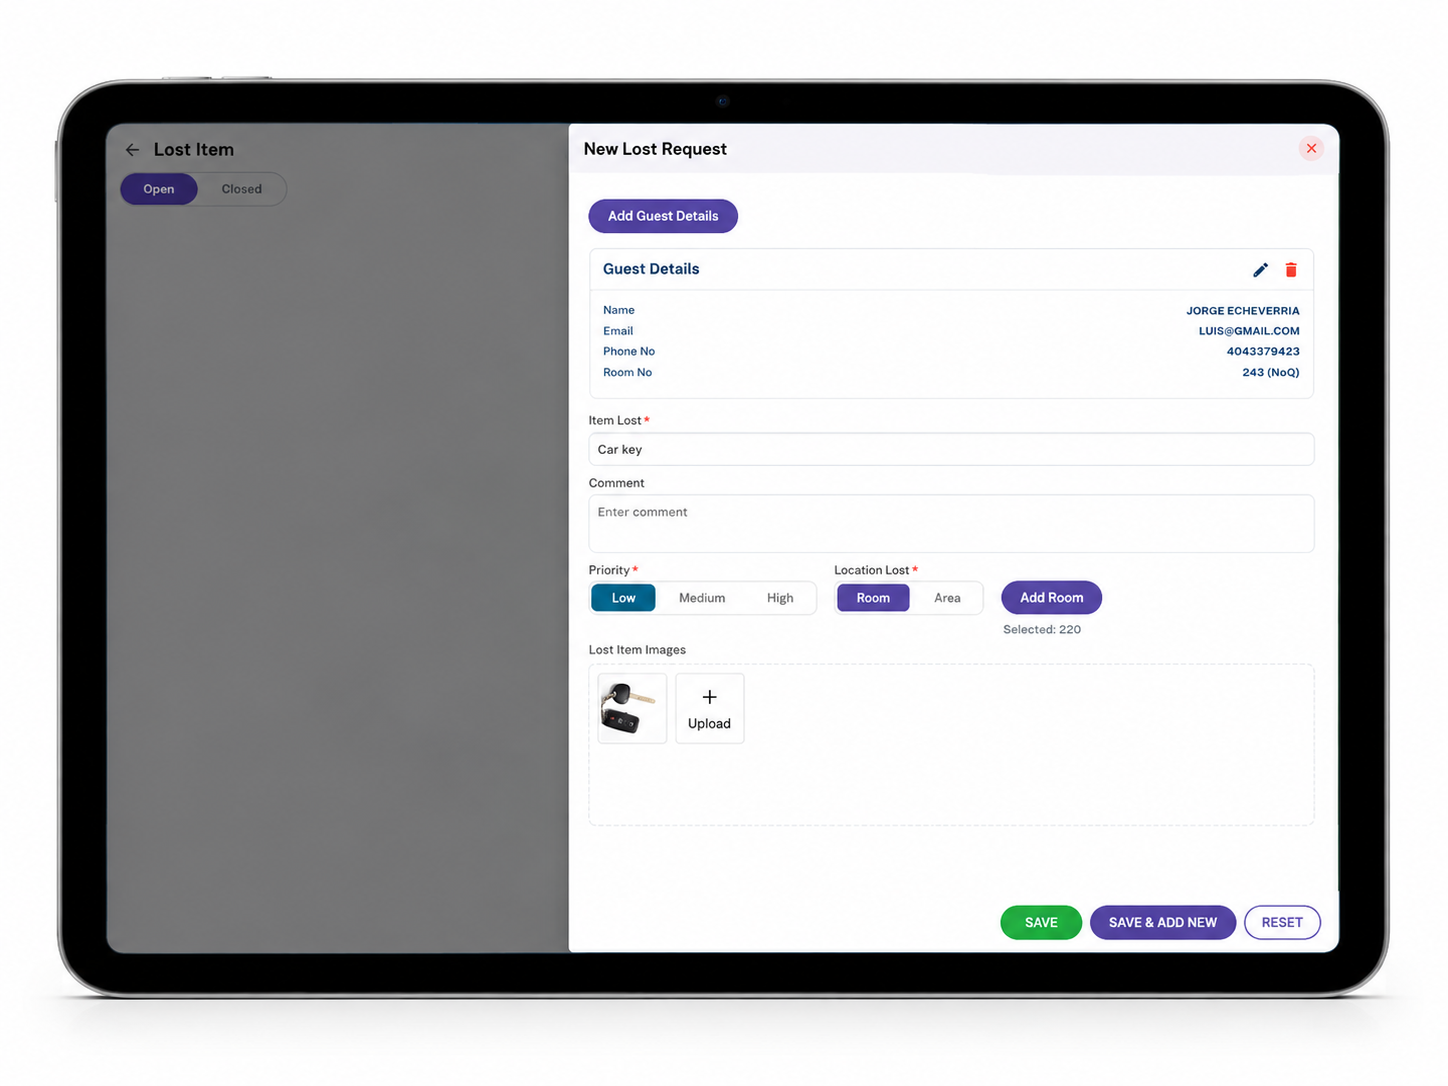
After adding the guest and location, complete the New Lost Request form.

4.1 Item Lost
Item Lost * is required.
Enter the name or description of the item that was lost.
Example: Car Key
4.2 Comment
Use Comment to add additional information about the lost item.
Examples:
- Description of the item.
- Where the guest believes it was lost.
- Any useful identifying information.
- Additional instructions for the team.
This field is optional unless your property's process requires it.
4.3 Priority
Priority * is required.
Choose one:
- Low – Item has lower urgency.
- Medium – Item requires normal attention.
- High – Item requires immediate or higher-priority attention.
4.4 Location Lost
Location Lost *
Choose:
- Room
or– The item was lost in a guest room. - Area
—–thenThe item was lost in a common or specific property area.
Add Room
When Room is selected, use Add Room to selectopen the specificroom room/area.selector Theand selectionchoose appearsthe asapplicable "Selected:room(s).
4.5 Lost Item Images
Use the item, or a reference photo, via + Upload.
Steps
From the Lost & Found screen, tapReport Item(or+ Createfrom the Lost Item list).TapAdd Guest Detailsand fill in the guest's Name, Email, Phone No, and Room No.Enter theItem Lostand an optionalComment.Select thePriority.SelectRoomorAreaunderLocation Lost, then tapAdd Roomto choose the specific location.Upload a photo underLost Item Imagesifuploadavailable.area to attach images that help identify the lost item.You can:
- Drag and drop files into the upload area.
TapSelect the upload area to choose files from the device.
Add clear images whenever they are available.
4.6 Save or Reset
At the bottom of the form:
- SAVE – Creates/saves the lost-item request.
- RESET – Clears the entered form information.
Make sure all required fields are completed before selecting SAVE.
(or
5. Lost Item Listing
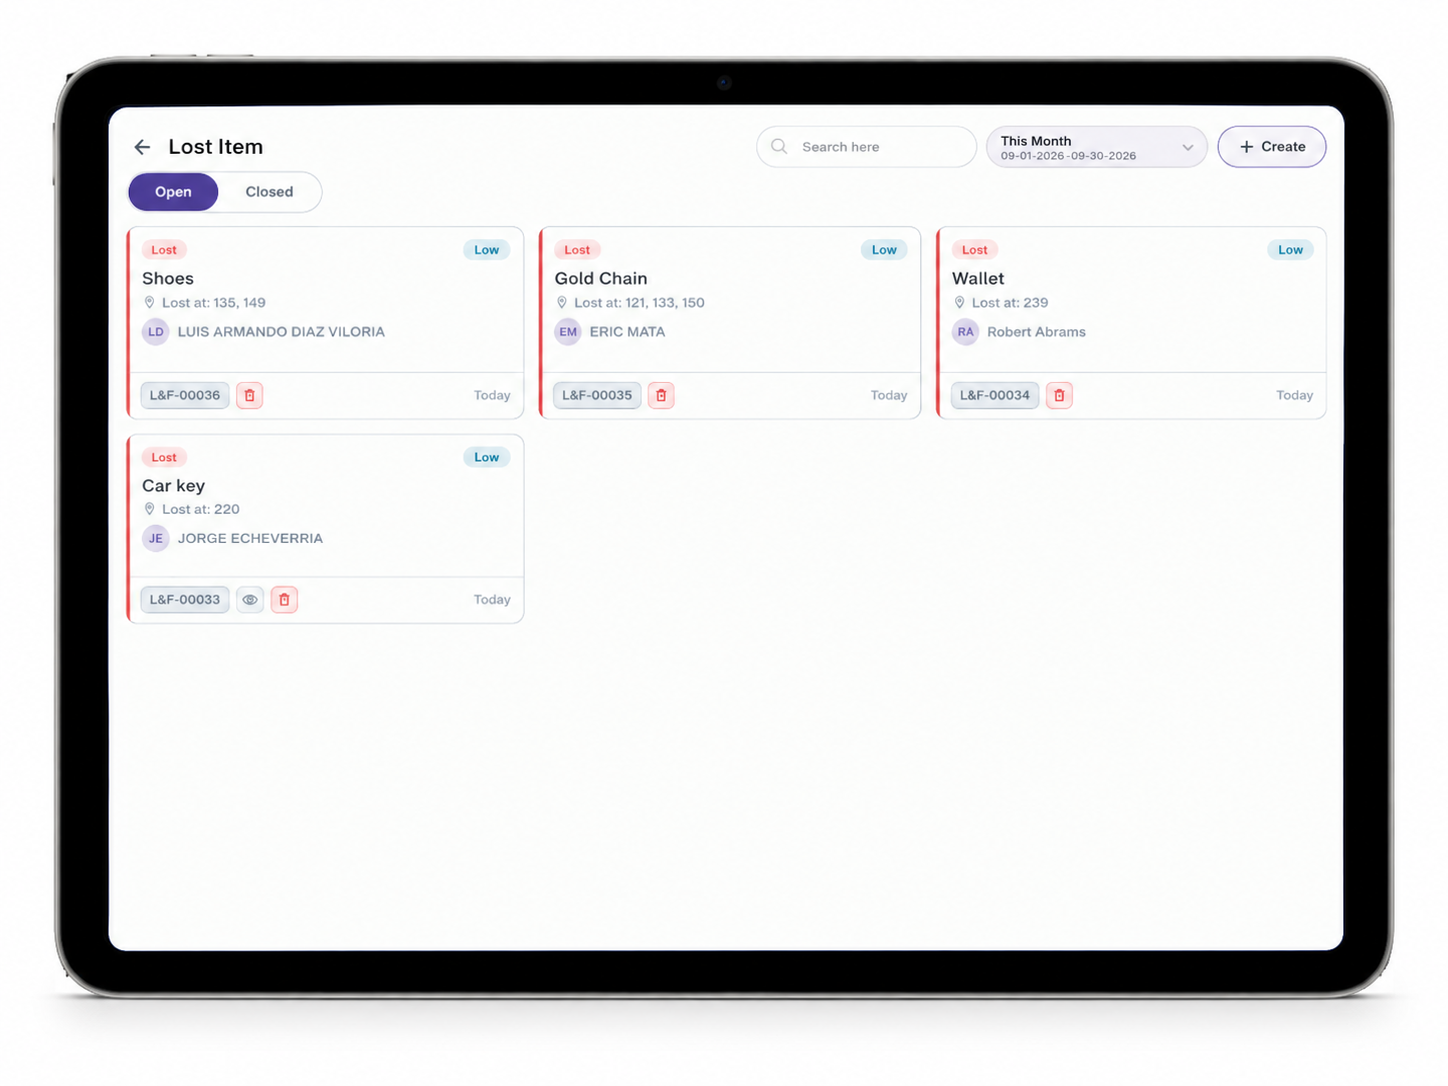
After saving, the request appears in the
SAVELost&ItemADDlisting.NEW
The listing provides two ticket views:
- Open
- Closed
5.1 Open Tickets
The Open tab shows lost-item tickets that are still being worked on.
An open ticket can contain information such as:
- Lost-item status.
- Item name.
- Lost location.
- Guest name.
- Priority.
- Ticket number.
- Ticket date/status.
Use the eye/view action on a ticket to open its details.
5.2 Closed Tickets
Select Closed to
logviewanotherticketsreportthatimmediately).have already been completed.A lost-item ticket is closed after the item is:
- Found, or
5.3 Search
Use the Search here field to find a ticket quickly.
Search can be used to locate the relevant lost-item record instead of manually checking every ticket.
5.4 Date Filter
Use the date filter to restrict the listing to a specific date or date range.
This is useful when:
- Reviewing today's lost items.
- Checking historical requests.
- Finding a ticket from a known reporting date.
6. Lost Item Details
Select the View/Eye icon on a ticket to open the Lost Item Details screen.

The details screen contains two tabs:
- Details
- Log Book
7. Details Tab
The Details tab displays the complete information for the lost-item ticket.
7.1 Ticket Information
The ticket section displays:
- Ticket No. – Unique reference number for the request.
- Date – Date the request was created.
- Category – Indicates whether the request is for a lost item.
- Item Name – Name of the lost item.
- Priority – Priority assigned to the request.
- Comments – Additional information entered while reporting the item.
7.2 Guest Details
The Guest Details section shows the guest associated with the ticket.
Typical information includes:
- Guest name.
- Contact number.
The guest information links the lost-item request to the correct guest.
7.3 Location Lost
The Location Lost section displays the room or area selected during ticket creation.
If multiple rooms were selected, all selected locations are displayed.
7.4 Lost Item Images
The Lost Item Images section displays uploaded images of the item.
Use these images to help identify the item while investigating the request.
7.5 Comment
The Comment area can contain additional notes related to the investigation or ticket.
8. Start Working on a Lost Item
From the Lost Item Details screen, select Start.
Starting the ticket indicates that the lost-item request is now being worked on.
Once work has started, the available actions can be used to control the investigation.
9. Pause and Continue
Pause
Select Pause when work on the ticket needs to be temporarily stopped.
Use this when:
- The investigation is waiting for information.
- The item cannot currently be located.
- The task needs to be temporarily suspended.
Continue
Select Continue to resume a paused ticket.
The ticket remains open until it is completed as Found or Not Found.
10. Mark Item as Found
When the lost item is located, select Found.
The item should then be processed through the Found ItemsRequest flow.
NewFound flow
Open Ticket → Start → Investigate → Found → Add Found Request Form→ Save/Complete → Ticket Closed
When the item is found:
- Open the lost-item ticket.
- Select Found.
- Add the required Found Request details.
- Complete and save the found request.
- The lost-item ticket is then closed.
The found request provides the record that the item was recovered.
11. Mark Item as Not Found
If the item cannot be located, select Not Found.
A reason must be entered before the ticket can be completed.
Not Found flow
TapOpen ViewTicket → Start → Investigate → Not Found Items→ Add Reason → Save → Ticket Closed
Steps:
- Open the lost-item ticket.
- Select Not Found.
- Enter the reason explaining why the item could not be found.
- Review the reason.
- Select Save.
- The ticket is closed.
The reason provides a record of the outcome of the investigation.
12. Ticket Status Flow
The overall lost-item process is:
Add Lost Item
      ↓
Add / Select Guest
      ↓
Select Lost Location
      ↓
Enter Item Details
      ↓
Upload Images (if available)
      ↓
SAVE
      ↓
Open Ticket
      ↓
START
      ↓
Investigate
   ↙       ↘
Pause     Continue
   ↓
Resume Investigation
      ↓
  ┌───────────────┐
  │   Outcome?    │
  └───────────────┘
       ↙       ↘
    FOUND    NOT FOUND
      ↓          ↓
Add Found      Add Reason
Request           ↓
      ↓          SAVE
Complete           ↓
      ↓        Ticket Closed
Ticket Closed
13. Log Book
Select the Log Book fromtab on the Lost &Item Details screen to review the ticket history.
The Log Book acts as a timeline/log for the ticket.
It can be used to track the sequence of activities performed on the request, such as:
- Ticket creation.
- Ticket started.
- Ticket paused.
- Ticket continued/resumed.
- Investigation updates.
- Found or Not Found
screen,outcome. - Found
+requestCreateactivity. - Reason entered for a Not Found outcome.
- Ticket closure.
The Log Book provides an activity history so staff can understand what happened to logthe aticket newlyand foundwhen.
14. Quick Reference
| Add Room | ||
| SAVE | Save the guest or lost-item request | |
| RESET | Clear entered form information | |
| Open | View active lost-item tickets | |
| Closed | View completed lost-item tickets | |
| Search | Find a ticket quickly | |
| Date Filter | Filter tickets by date/date range | |
| View/Eye | Open ticket details | |
| Start | Begin working on a ticket | |
| Pause | Temporarily stop work | |
| Continue | Resume a paused ticket | |
| Found |
||
| Log Book |
15. ·End-to-End SAVE & ADD NEW · RESET
Steps
Summary
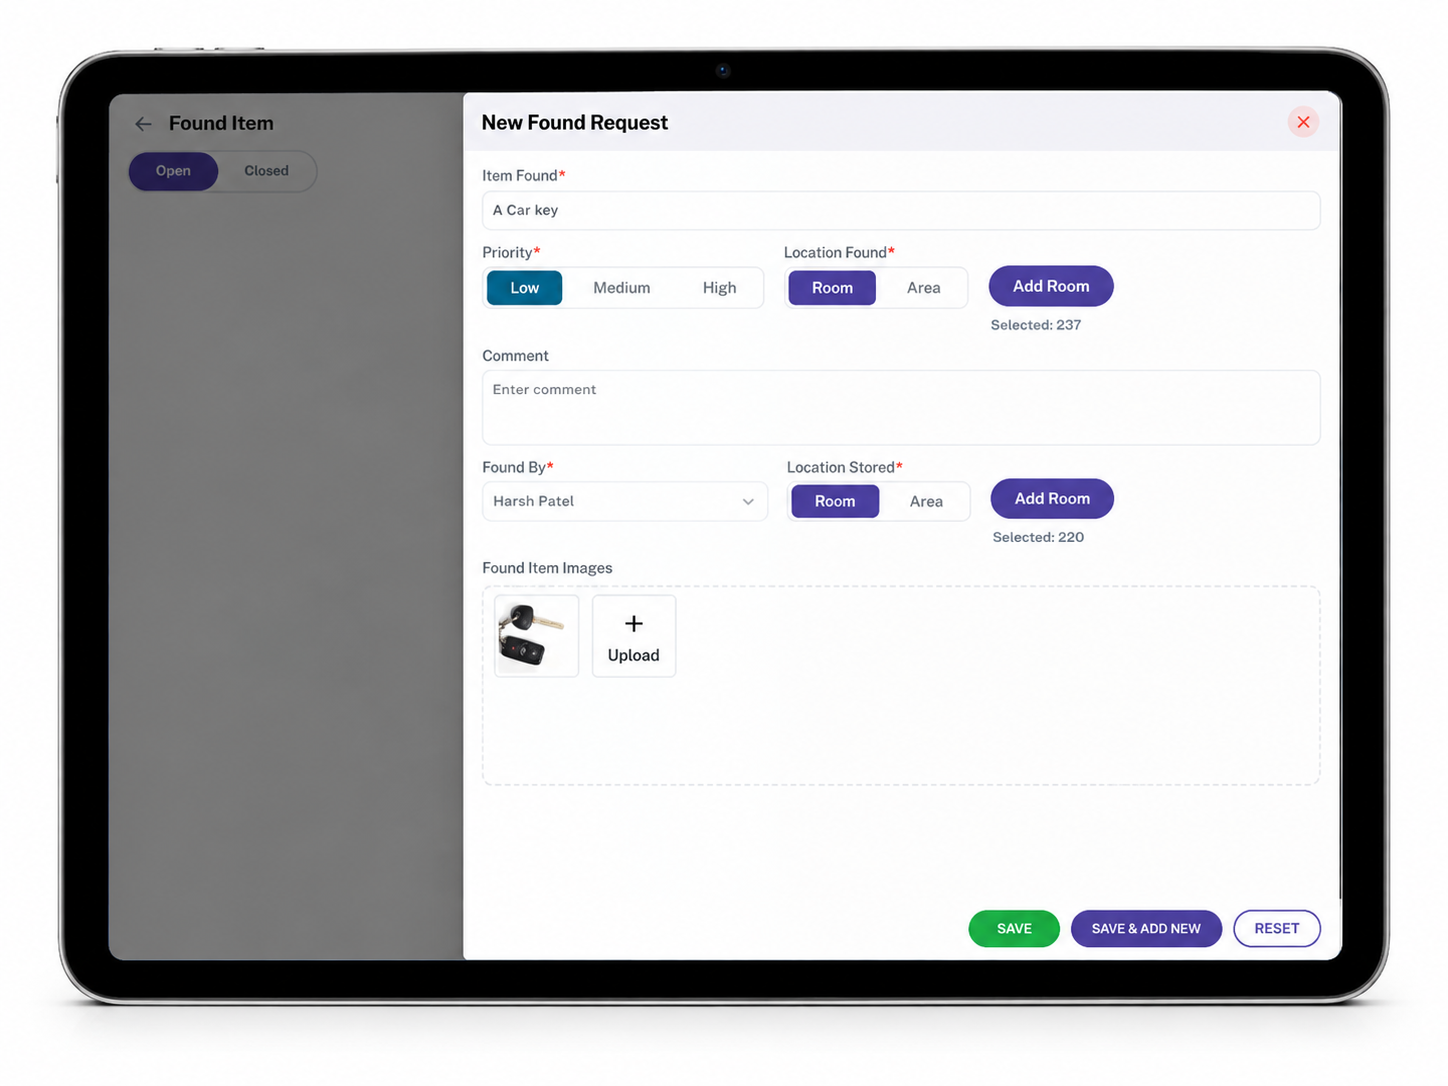
FromOpentheLost& Found screen, tapView Found Items, then+ Create.Enter theItemFoundand select aPriority.- Select
RoomorAreaunderLocation Found, thenAdd Room+ tochoosecreate a request. - Add or select the
specificguest:- In-House
- Check Out
- Add Guest
- Select the lost location.
- Enter
antheoptionallost item name. - Add comments if required.
- Select the priority.
- Upload lost-item images if available.
- Select
CommentSAVE. SelectFindwhothefoundrequestit underinFoundOpenBytickets.- Open the ticket using View/Eye.
- Select
RoomStartorAreaunderLocation Stored, thenAdd Roomto choose where it's being kept.. UploadUseaPausephotoandunderContinue when required.- If the item is found, select Found and complete the Found
Item ImagesRequestif available.. TapIfSAVE(orSAVE & ADD NEWto log anotherthe itemimmediately).is
found,
Theselect Not Found,Itemslist itself (Open/Closed tabs, cards, search, date filter) is expected to follow the same layout as the Lost Item list above — to be confirmed against the live screen before publishing.
Workflow
Reportenter a lost item:
Employee taps Lost & Found → Report Item → Add Guest Details → Enter Item Lost, Priority, Location Lost → (optional photo) → SAVE
Log a found item:
Employee taps Lost & Found → View Found Items → + Create → Enter Item Found, Priority, Location Found, Found By, Location Stored → (optional photo) → SAVE
Important Notes
Alostreport is tied to the guest who reported it (Guest Details); afoundreport is tied to the employee who found it (Found By) — they capture different information because they start from different situations.Found Itemstracks two separate locations —Location Found(where it turned up)reason, andLocation StoredSave(where it's being kept now) — don't confuse the two when logging a found item..- The completed ticket moves to
eyeClosed. - Use Log Book
ontoa Lost Item card opens that report's full details; not every card shows it, which may depend on whetherreview thereporttickethastimelineadditionalanddetailactivityto view.history. Thismodule only appears on hubs whereLost & Foundwas checked underHub Modules— see theiHospitality Hub – Setuppage.