
Employee Onboarding Process
Overview
The employee onboarding process ensures that a new employee is created by the manager, receives the required login credentials at your email address, and completes the first-time setup, and finishes the onboarding process before using the Employee App and iHospitality Hub (KDS).
Onboarding Flow
Manager Adds Employee → Welcome Email Sent → Language Selection → Employee App Login → Change Password → iHospitality Hub Login → Change iHospitality Hub Passcode → Complete Onboarding → Start Using the System
Step 1 --- Manager Adds the Employee
The manager first creates the employee profile in the system.
The manager enters the required employee information, including:
- Employee Name
- Email Address
- Employee Code
- Passcode
- Other required employee details
The Employee Code and Passcode are used to access iHospitality Hub (KDS).
Note: Make sure the employee's email address is correct because
Thethe welcome email and Employee App login details will be sent to this address.
Step 2 --- Welcome Email Is Sent to the Employee
After the manager adds the employee, the system sends a welcome email to Thethe employee's registered email address.
The email provides the information required to get started.
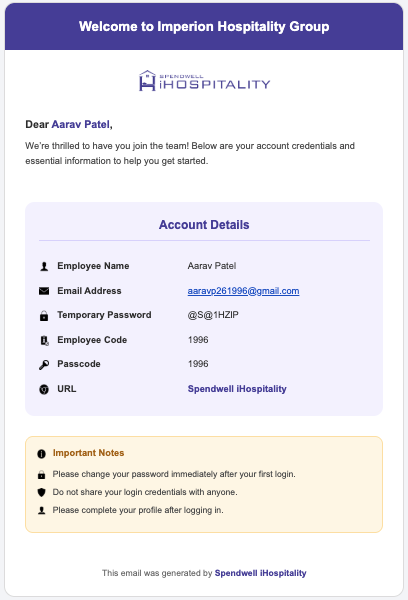
Welcome Email Contains
| **Employee | Identifies the employee |
| **Email | Used to log in to the Employee App |
| **Temporary | Used for the first Employee App login |
| **Employee | Used for iHospitality Hub (KDS) |
| Used for iHospitality Hub (KDS) |
Important Credential Difference
- Employee App: Email Address + Temporary Password
- iHospitality Hub (KDS): Employee Code + Passcode
Important: The temporary password must be changed after the employee's first Employee App login. The iHospitality Hub passcode must also be changed as part of the initial setup.
Step 3 --- Select Your Language
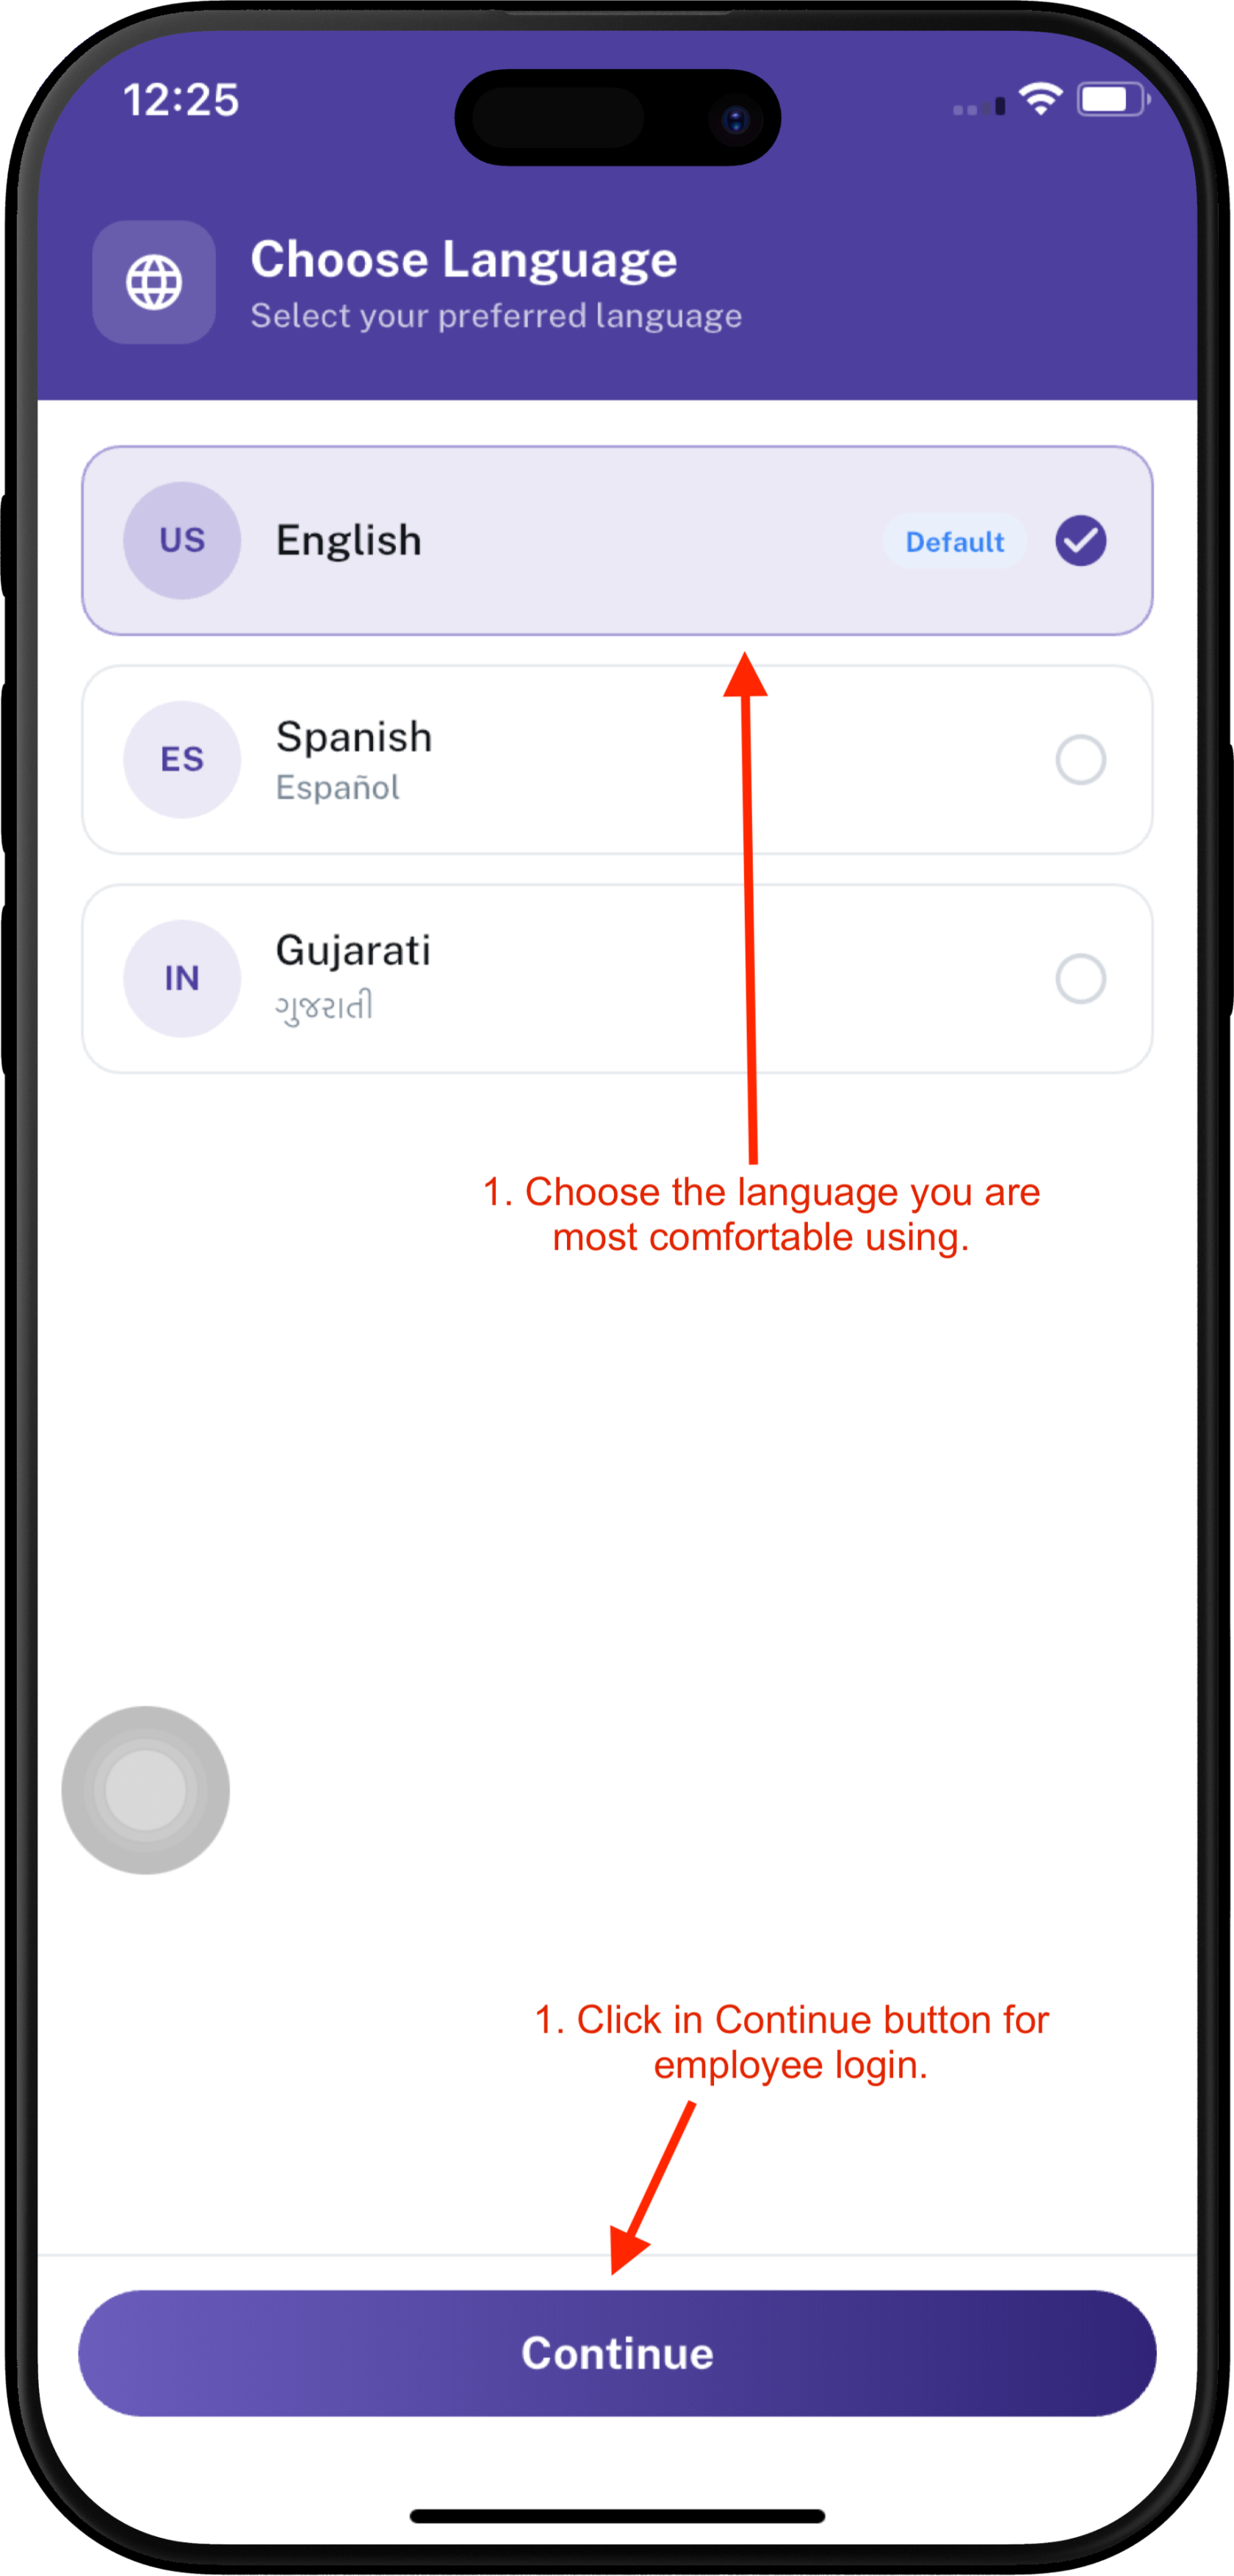
Before logging in to the Employee App, choose the language you are most comfortable using.
- Open the Employee App.
- Select your preferred language from the available language options.
- Continue to the Employee App login screen.
Note: Choose the language you are most comfortable with. The selected language will be used throughout the Employee App where supported.
Step 4 --- Log In to the Employee App
After selecting your preferred language, log in to the Employee App using one of the available login methods.
The Employee App provides three ways to log in:
- Email Address + Password
- Face Login
- Email OTP
1. Login with Email Address and Password
Use the email address and temporary password provided in the welcome email.
- Enter your registered Email Address.
- Enter your Password.
- Tap SIGN IN button.
- If this is your first login, you may be required to change the temporary password.
Login Credentials
| **Email | Employee's registered email address |
| **Temporary | Temporary password received in the welcome email |
Screenshot
---
2. Login with Face
If Face Login is available and has been set up for the employee, the employee can use facial recognition to access the Employee App.
- Select Face Login on the login screen.
- Position your face within the camera area.
- Follow the on-screen instructions.
- Once your face is successfully verified, you will be logged in to the Employee App.
Note: Face Login requires the necessary device permissions and must be configured before it can be used.
Screenshot
---
3. Login with Email OTP
You can also log in using a One-Time Password (OTP) sent to your registered email address.
- Select Login with Email OTP.
- Enter your registered Email Address.
- Tap Send OTP.
- Check your email for the OTP.
- Enter the OTP in the Employee App.
- Tap Verify or Login to access the Employee App.
Important: The OTP is valid for a limited time. Use the latest OTP received in your email.
Screenshot
---
Login Options Summary
| **Login | **Required |
|---|---|
| **Email + | Registered email address + password |
| **Face | Registered face + device camera permission |
| **Email | Registered email address + OTP received by email |
Note: Use the login method available to you on the Employee App. For the first login, use the temporary password provided in the welcome email if you are using Email + Password login.
Step 4 --- Change the Temporary Password
After the first login, the employee is required to change the temporary password.
The employee should:
- Enter the temporary password.
- Create a new secure password.
- Confirm the new password.
- Save the changes.
Important: The temporary password should not continue to be used after the first login.
Screenshot
<!-- INSERT IMAGE: Change temporary password -->
Image:
<br>{=html}<br>{=html}<br>{=html}<br>{=html}<br>{=html}
Step 5 --- Log In to iHospitality Hub (KDS)
The employee uses the Employee Code and Passcode provided in the welcome email to access iHospitality Hub (KDS).
KDS Login Credentials
Field Description
Employee Code Employee code provided by the manager Passcode Initial passcode provided for iHospitality Hub (KDS)
Screenshot
<!-- INSERT IMAGE: iHospitality Hub (KDS) login -->
Image:
<br>{=html}<br>{=html}<br>{=html}<br>{=html}<br>{=html}
Step 6 --- Change the iHospitality Hub Passcode
During the initial setup, the employee must change the initial iHospitality Hub passcode.
The employee should:
- Enter the current passcode.
- Create a new passcode.
- Confirm the new passcode.
- Save the changes.
Important: The initial passcode provided during onboarding should not be used after it has been changed.
Screenshot
<!-- INSERT IMAGE: Change iHospitality Hub passcode -->
Image:
<br>{=html}<br>{=html}<br>{=html}<br>{=html}<br>{=html}
Step 7 --- Complete the Employee Onboarding Process
After updating the login credentials, the employee must complete the onboarding process.
The employee should review and complete all required onboarding information shown in the Employee App.
This may include:
- Personal/profile information
- Required employee details
- Availability
- Other organization-required onboarding information
Complete all required fields and submit the onboarding information.
Screenshot
<!-- INSERT IMAGE: Employee onboarding process -->
Image:
<br>{=html}<br>{=html}<br>{=html}<br>{=html}<br>{=html}
Step 8 --- Employee Is Ready to Use the System
Once onboarding is completed, the employee can use the available Employee App features according to their role and permissions.
These may include:
- Add Leave
- Log Registration / Attendance
- Lost & Found
- Pay Slip
- Housekeeping Tracker
- Scheduling
- My Availability
- Inventory Receive
Screenshot
<!-- INSERT IMAGE: Employee App home/dashboard -->
Image:
<br>{=html}<br>{=html}<br>{=html}<br>{=html}<br>{=html}
Credential Summary
System Login Information Initial Setup
Employee App Email Address + Change temporary Temporary Password password after first login
iHospitality Hub Employee Code + Change initial passcode (KDS) Passcode during setup
Security Reminder: Employees should keep their login credentials confidential and should not share passwords or passcodes with others.
Complete Onboarding Checklist
- Manager adds employee
- Employee receives welcome email
- Employee logs in to the Employee App using Email Address + Temporary Password
- Employee changes the temporary password
- Employee logs in to iHospitality Hub (KDS) using Employee Code + Passcode
- Employee changes the iHospitality Hub passcode
- Employee completes the onboarding process
- Employee is ready to use the available system features