
Chat
The Chat module provides a simple and convenient way for employees and managers to communicate within the organization. Users can search for employees, start conversations, view recent chats, check unread messages, and communicate through groups or channels.
Chat Module Overview
The Chat module allows users to:
- Search for employees and start a conversation.
- Send messages to employees or managers.
- View recently active or added conversations.
- Identify unread messages using unread counts.
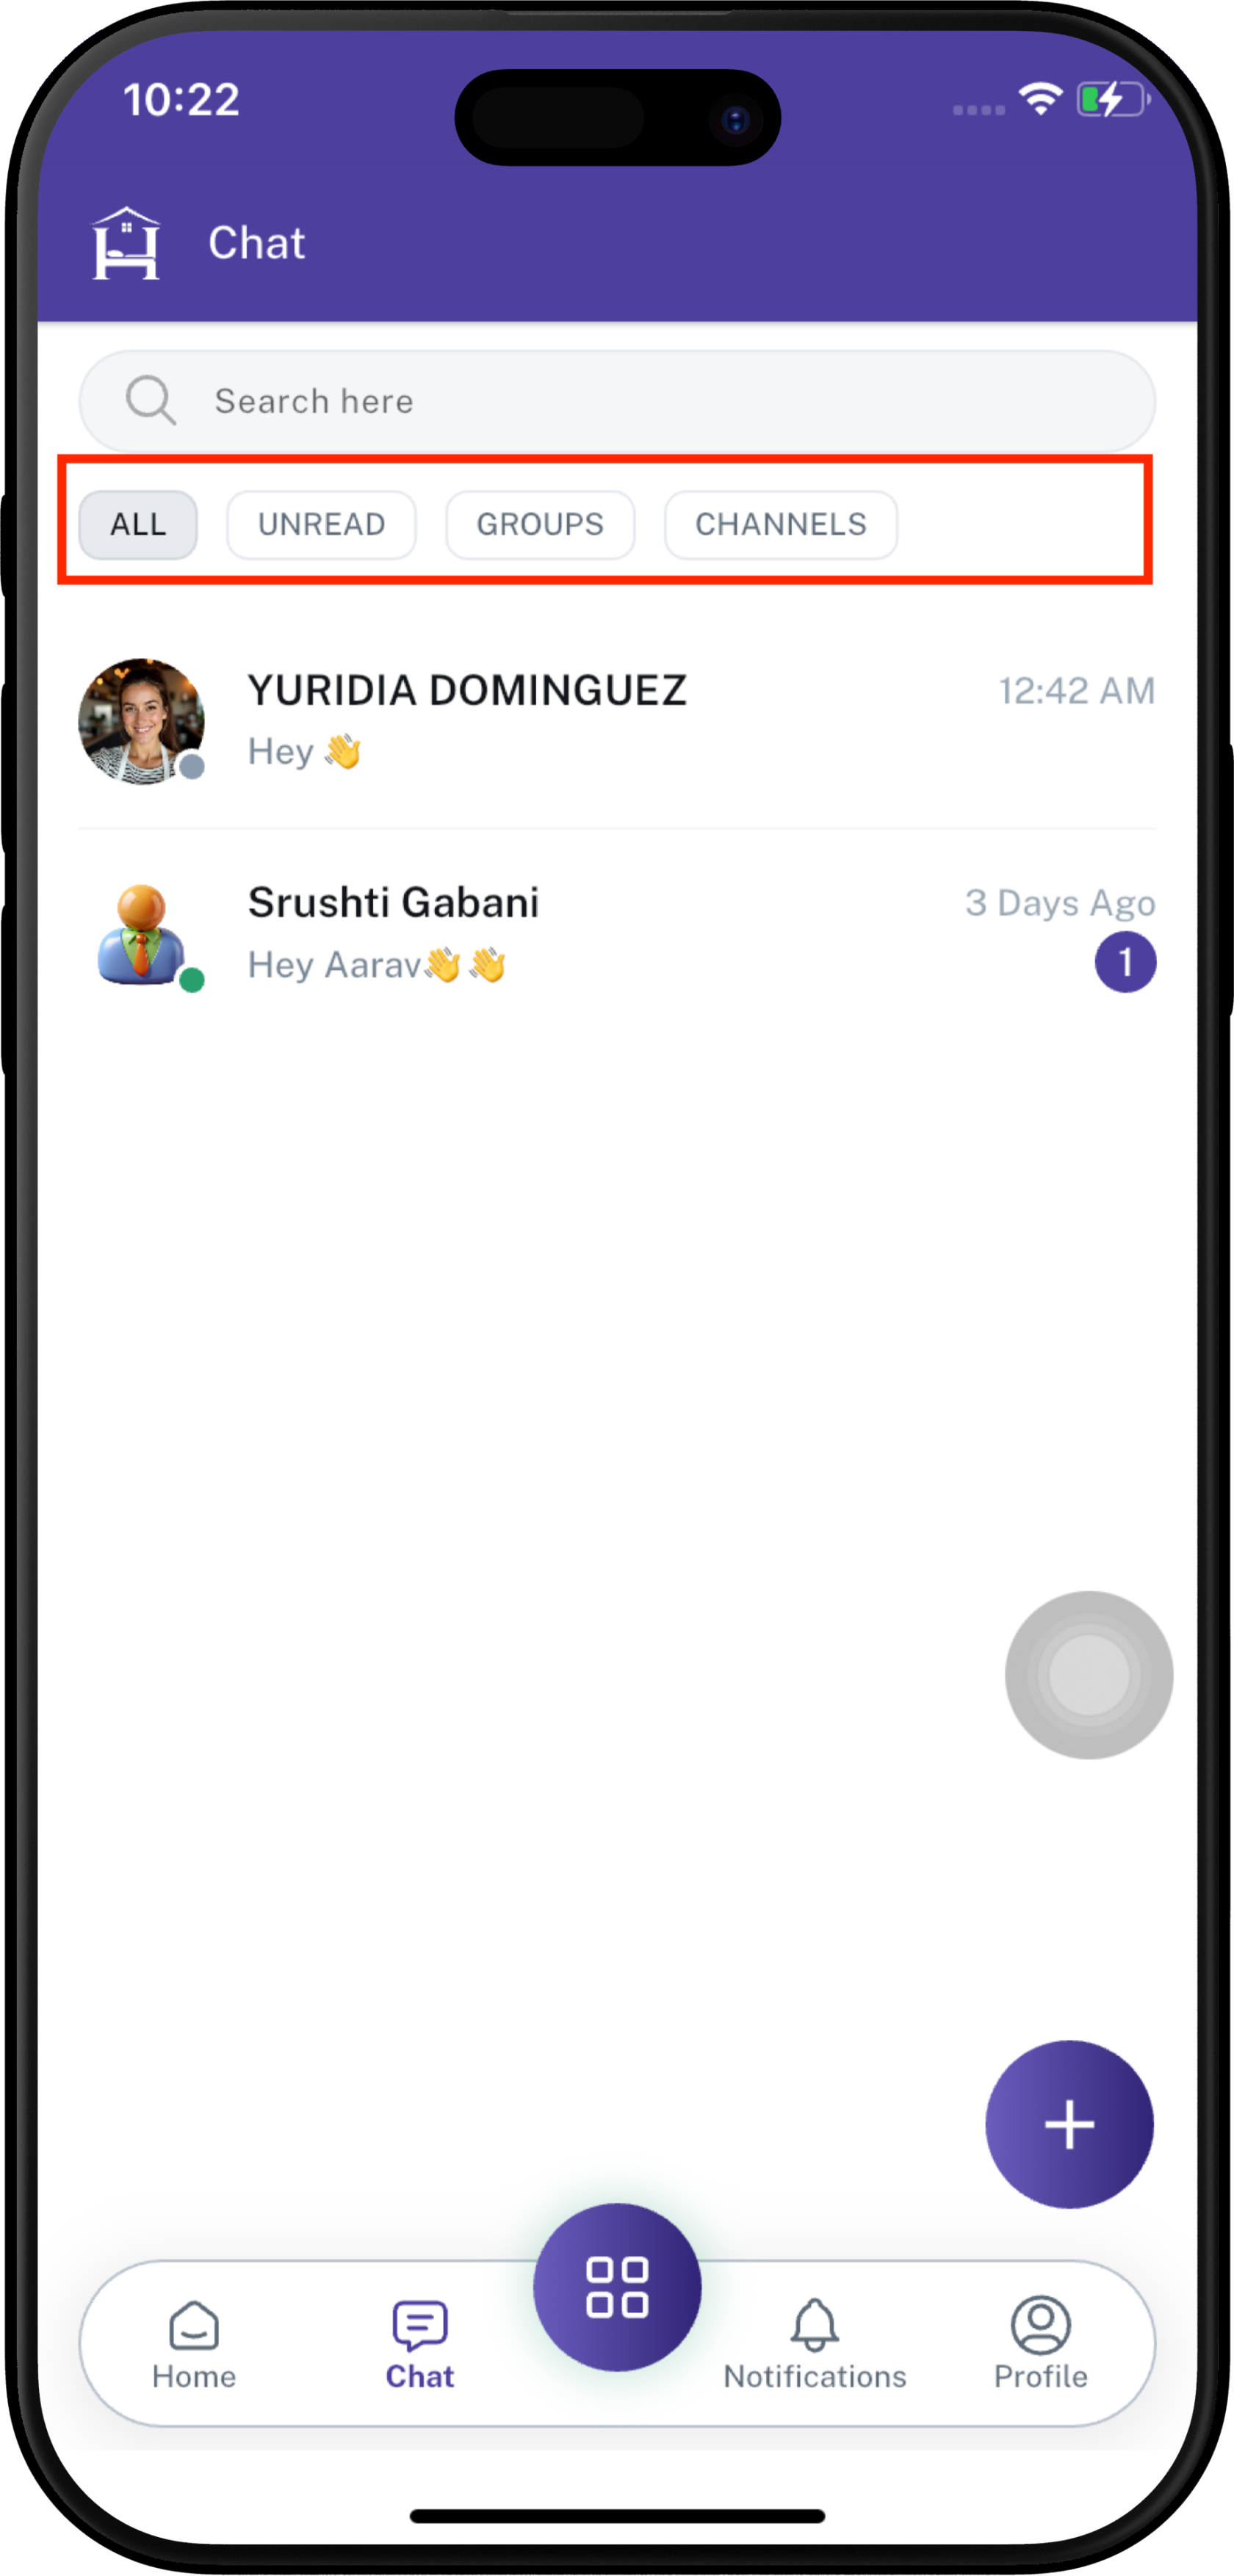
- Filter chats by All, Unread, Groups, or Channels.
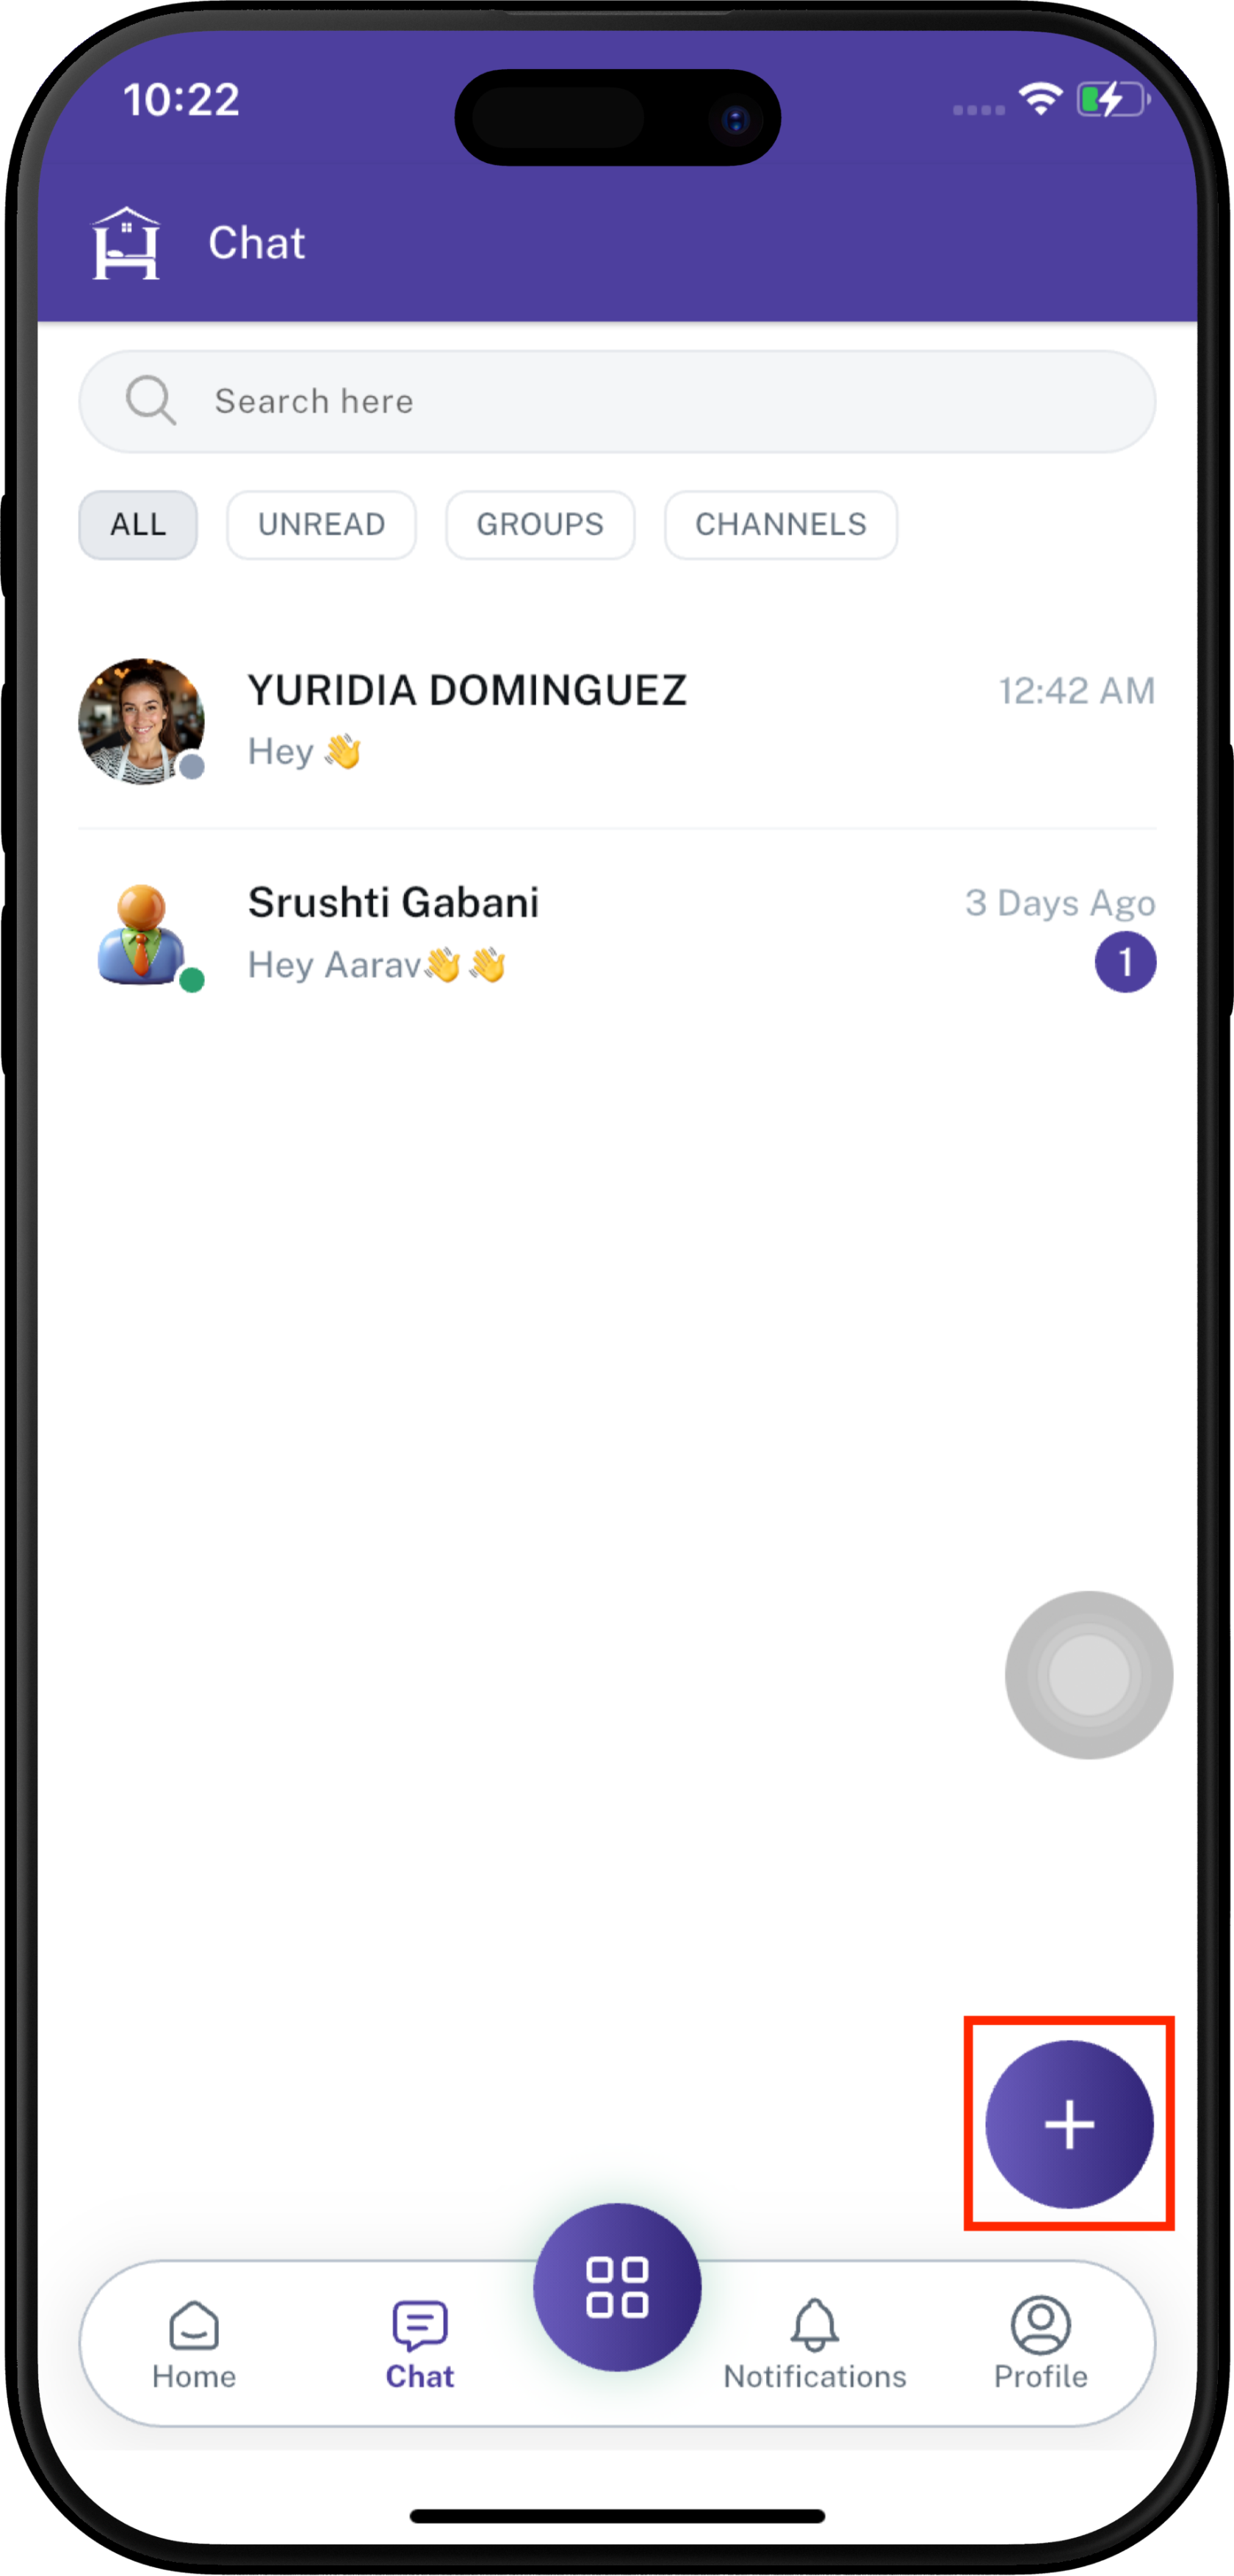
- Create a new Group or Channel using the + button.
- Quickly access Chat from the bottom navigation.
Open the Chat Module
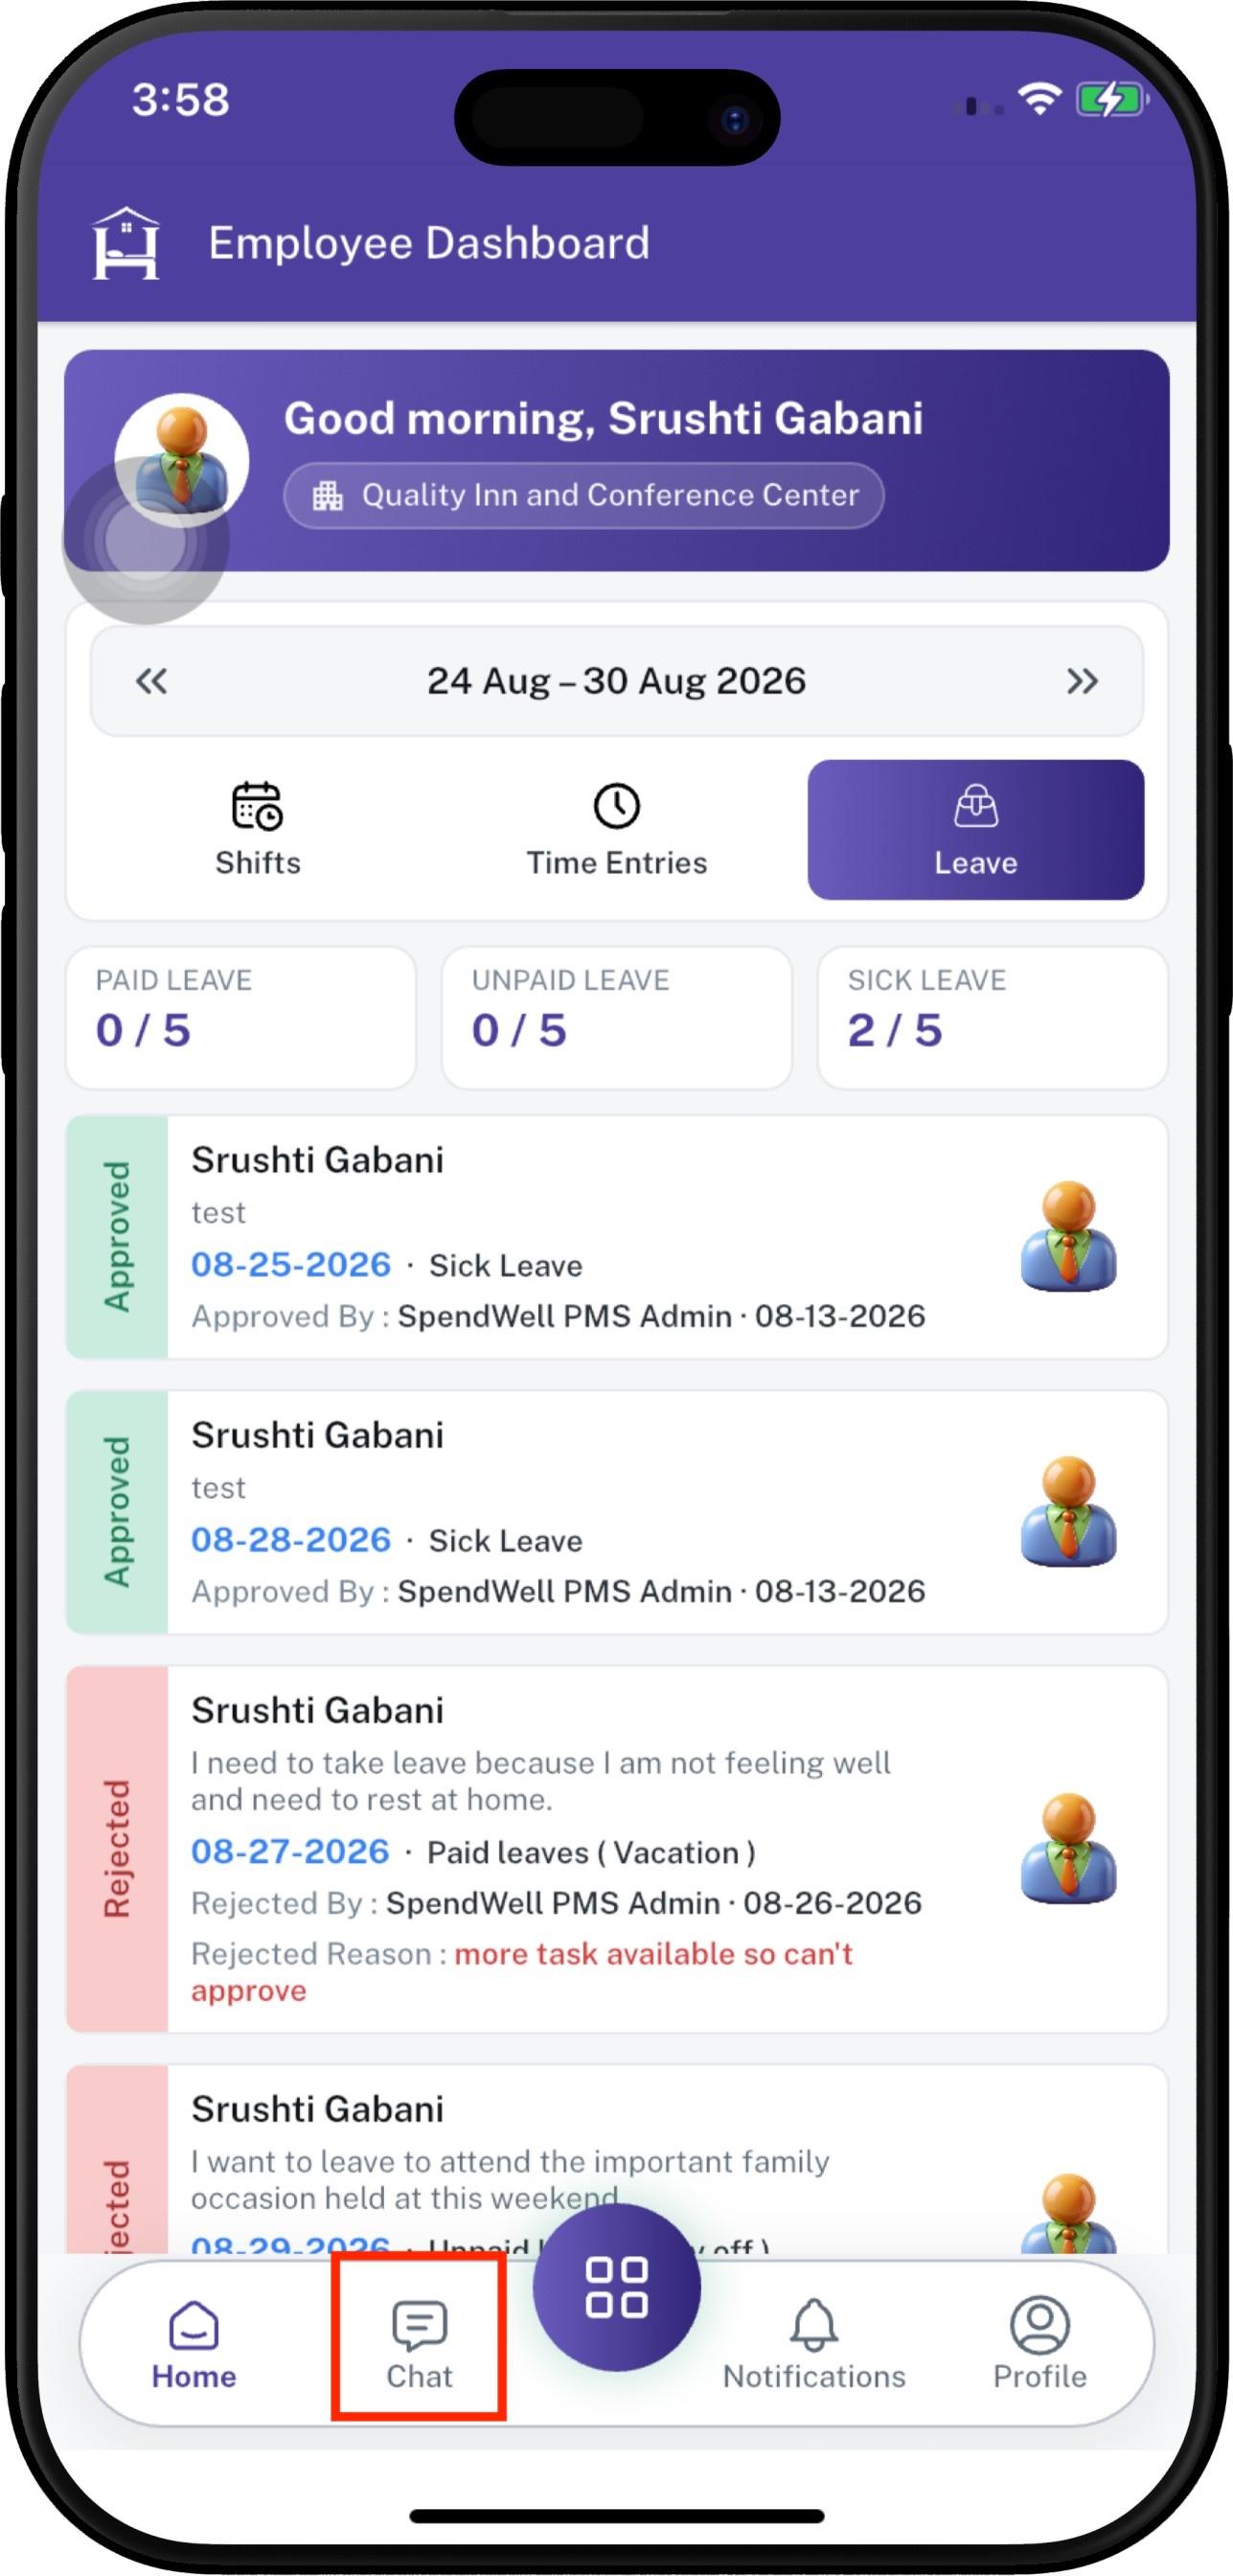
From the Employee App, tap Chat in the bottom navigation bar.
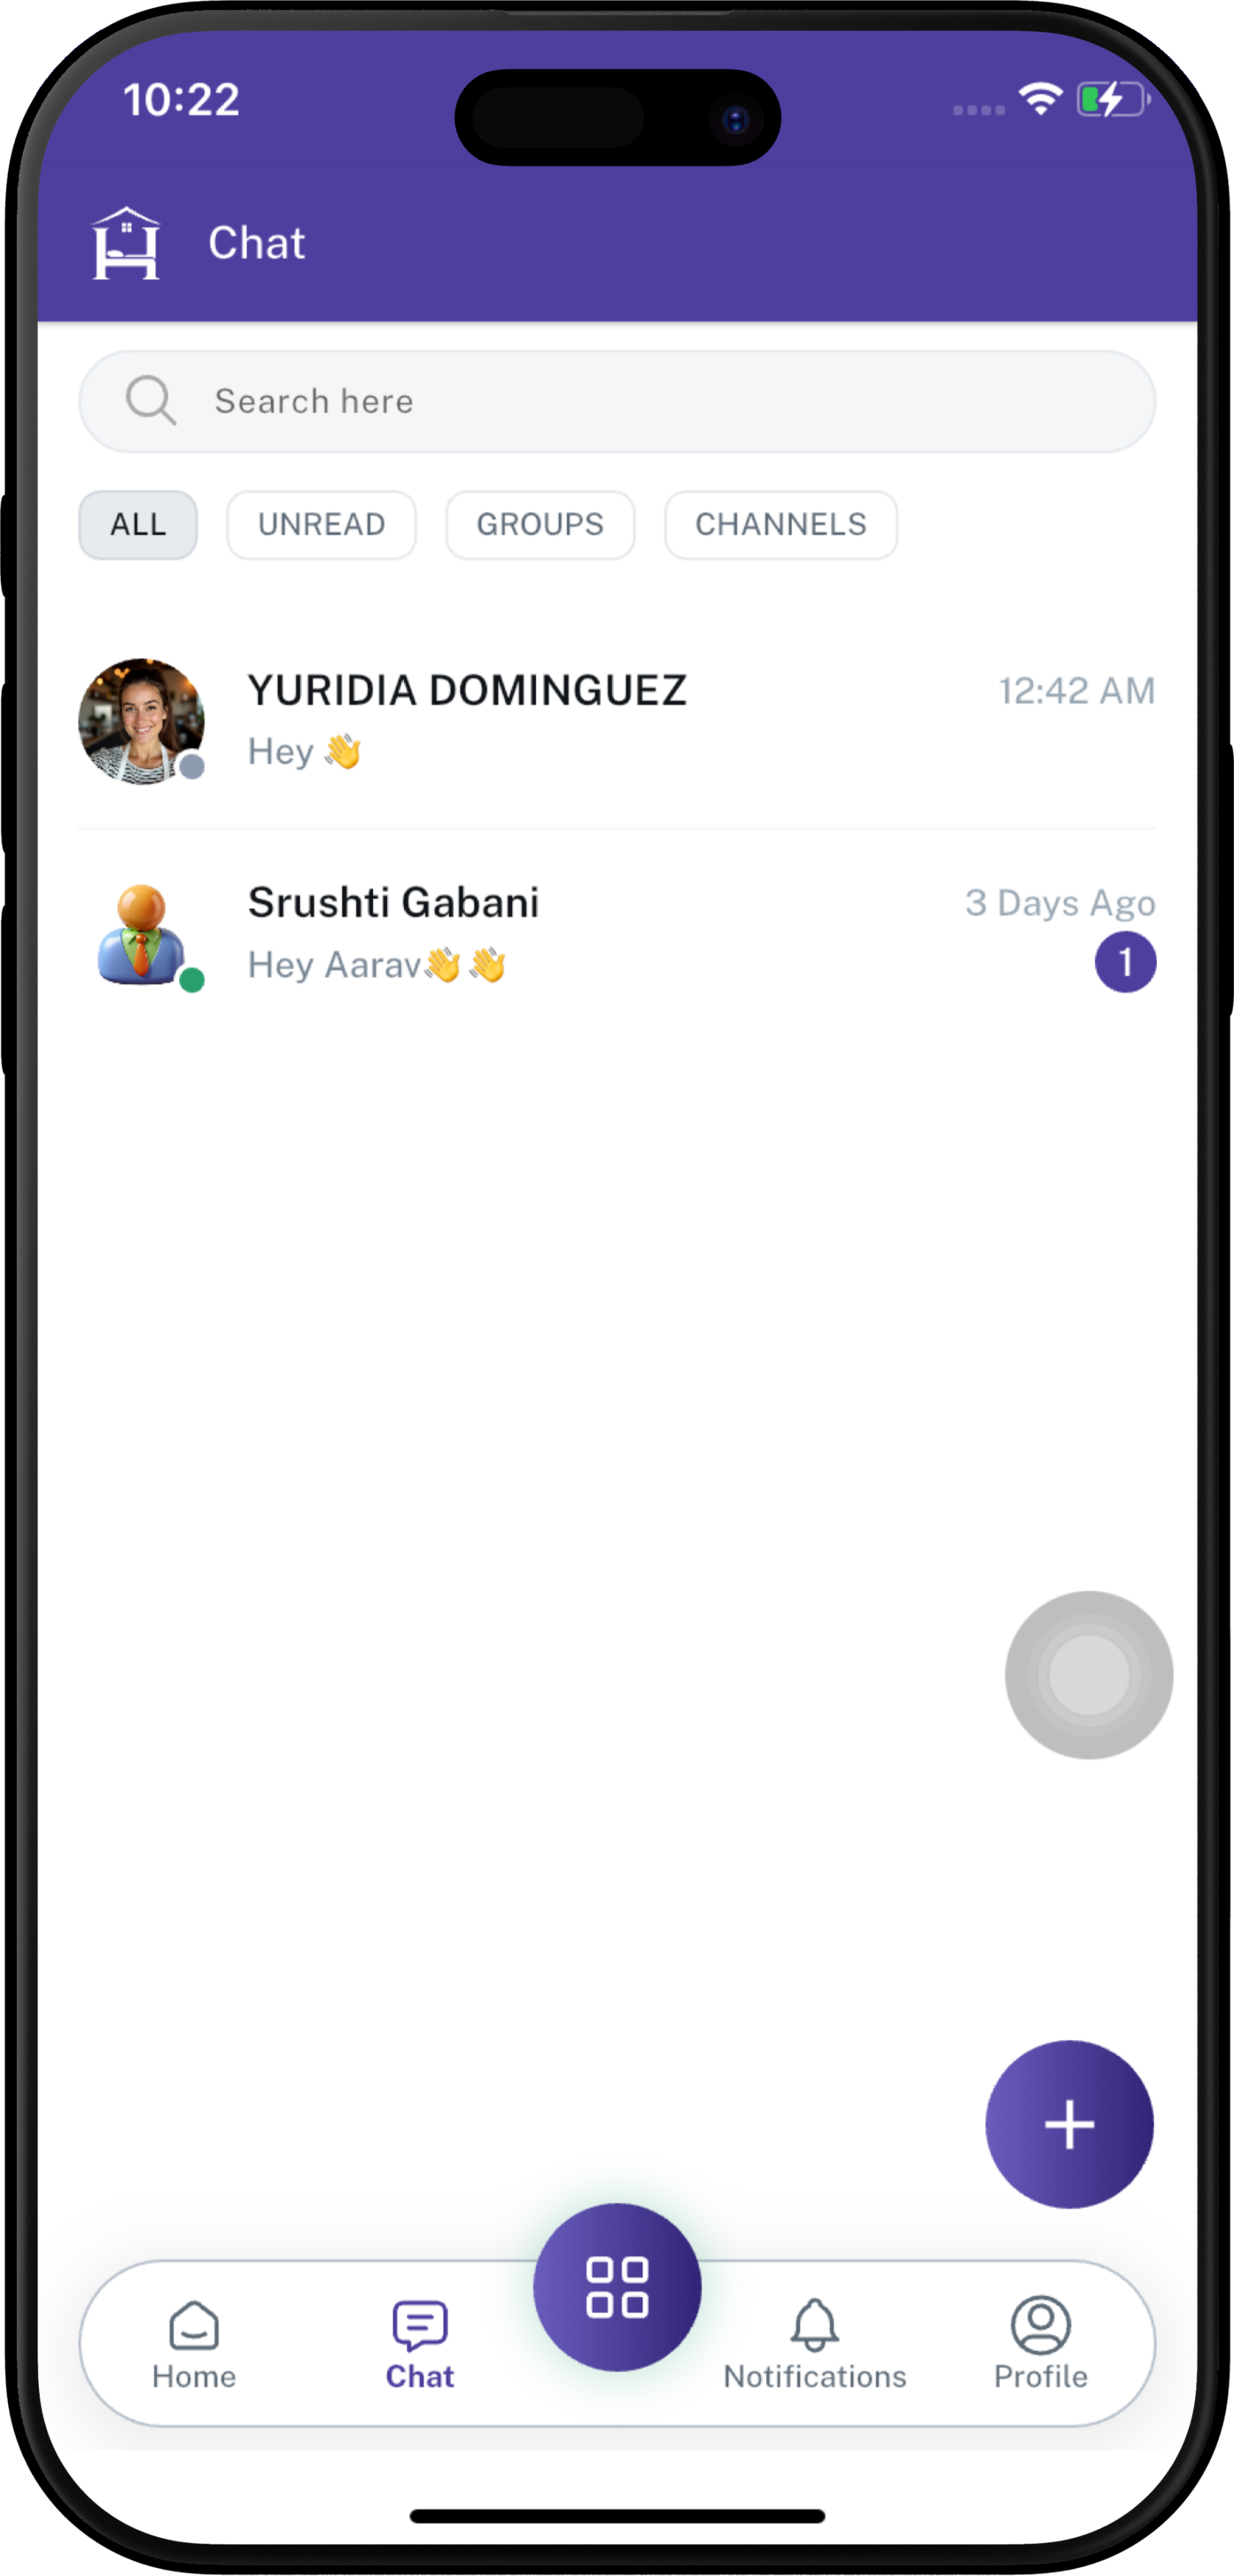
The Chat screen displays the search bar, chat filters, recent conversations, and options for creating a new group or channel.
Search for an Employee
Use the Search bar at the top of the Chat screen to find an employee.
To search for an employee:
- Tap the Search field.
- Enter the employee's name or relevant search text.
- Review the matching employee results.
- Select the employee you want to communicate with.

View Recent Chats
The Chat screen displays recently active conversations.
Each conversation can show information such as:
- Employee or group name.
- Profile image.
- Latest message preview.
- Message time or date.
- Online/availability indicator.
- Unread message count, when applicable.
Recent conversations are displayed so users can quickly continue an existing discussion.
Chat Filters
All - The All filter displays the available conversations.
Unread Messages - The Unread filter helps users quickly find conversations containing unread messages.
Groups - The Groups filter allows users to find group conversations separately from individual chats.
Channels - The Channels filter allows users to view available communication channels.
Create a New Group or Channel
To start a new group or channel, tap the + button on the Chat screen.
Select New Group or New Channel
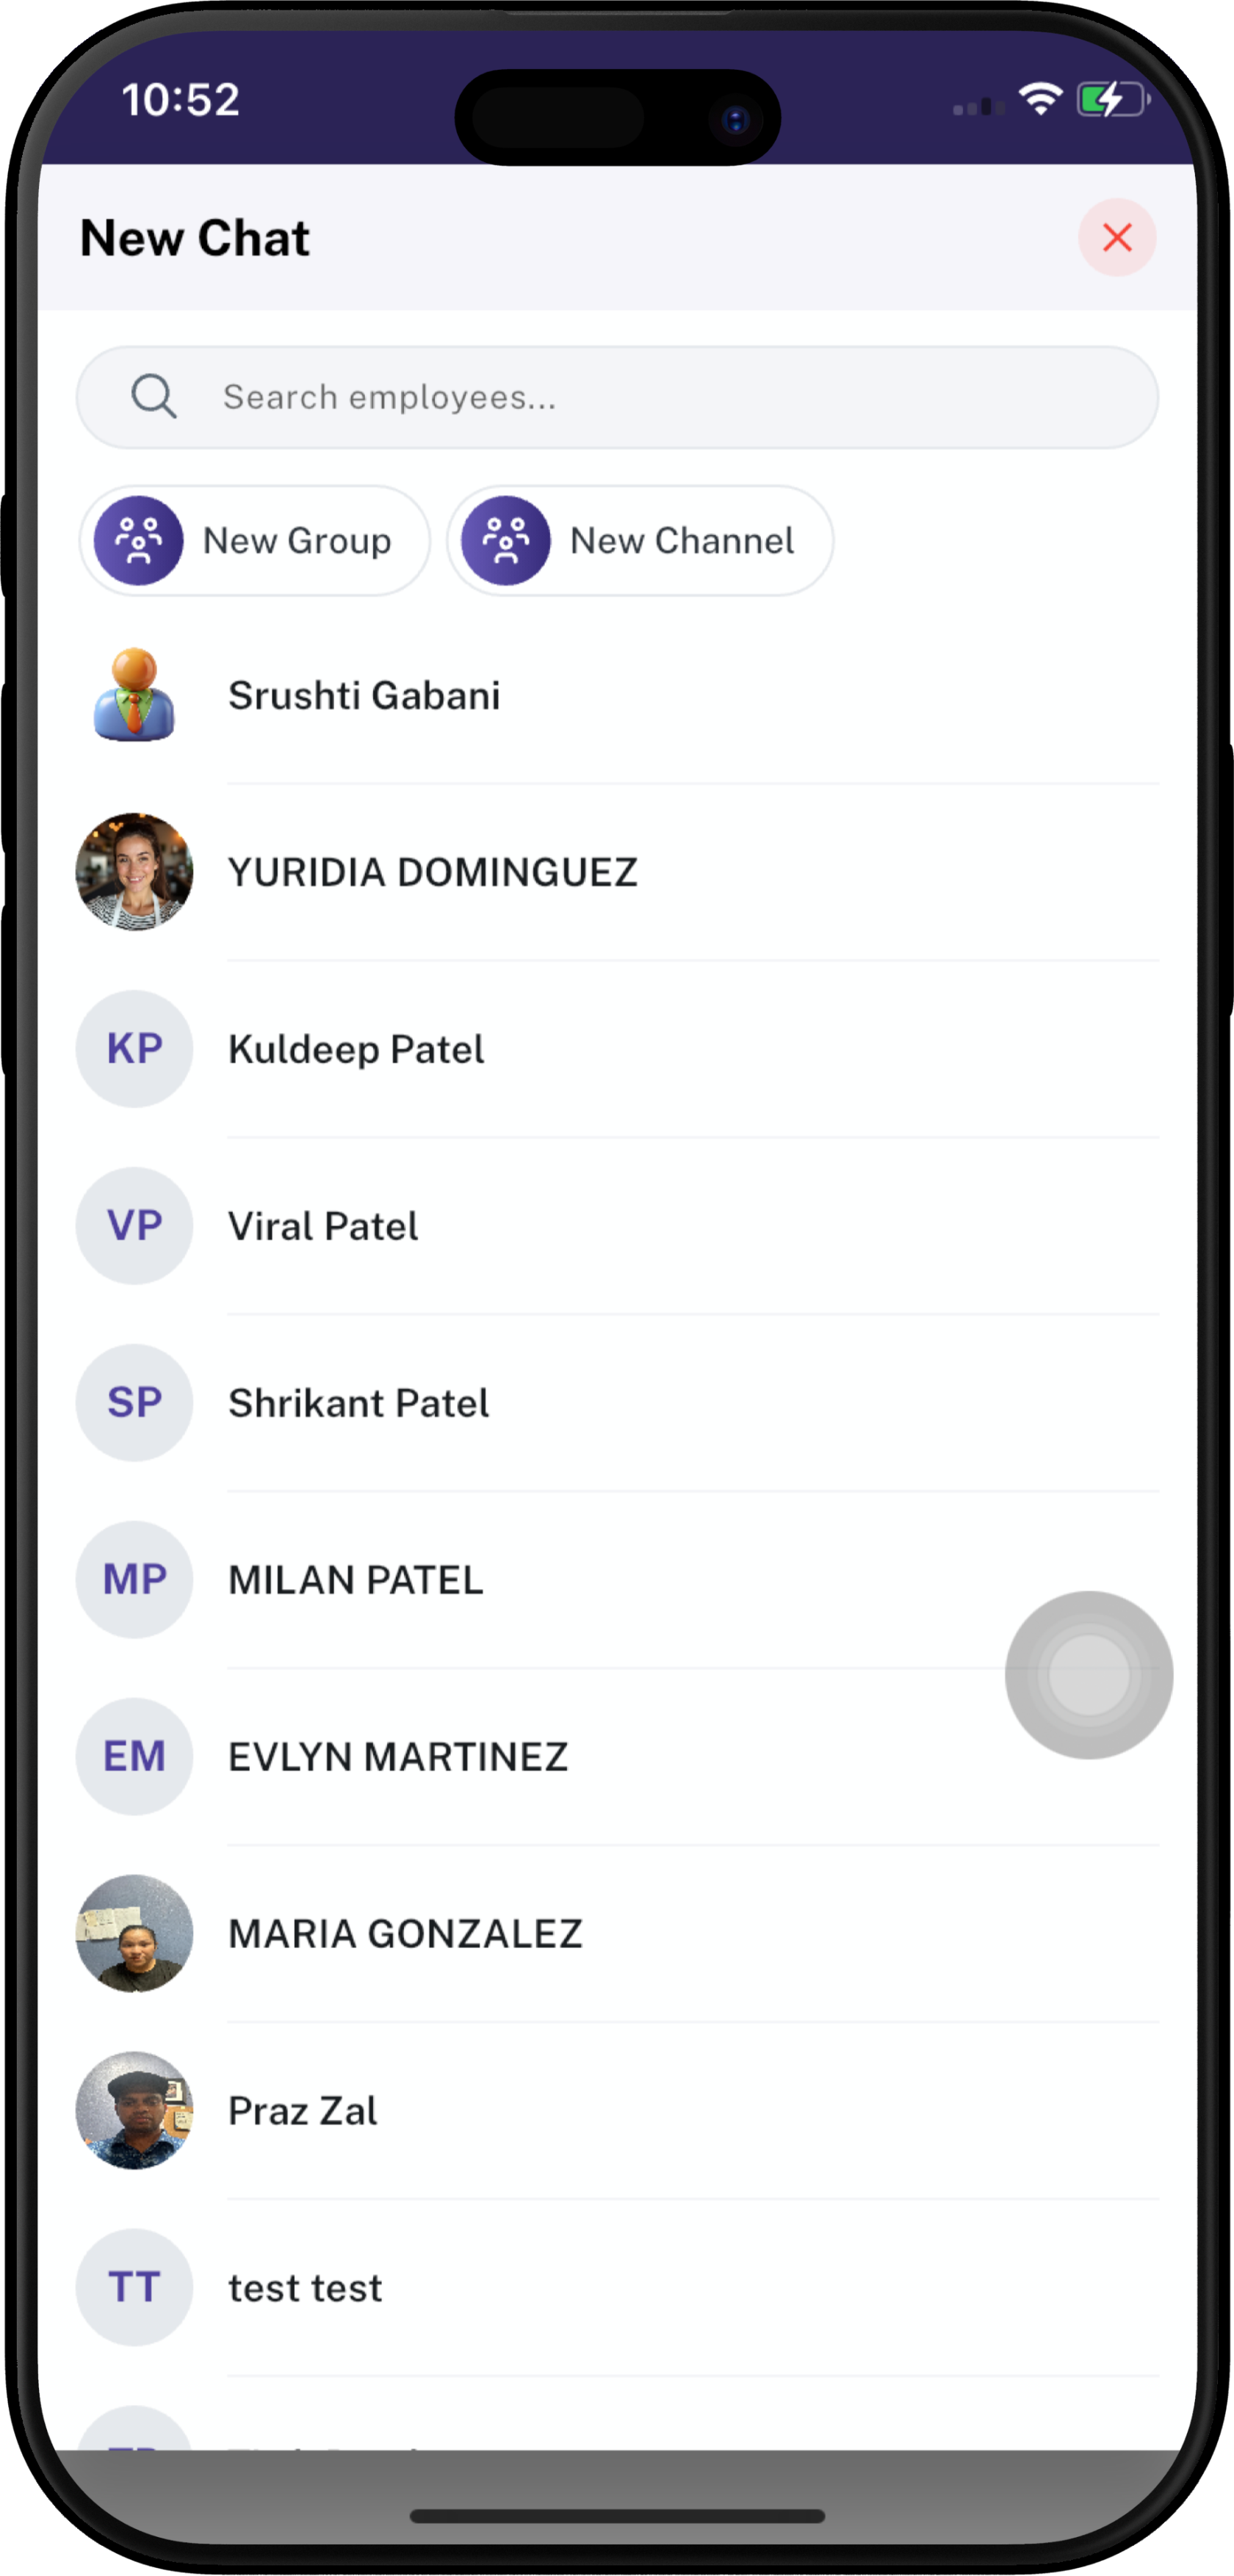
After tapping the + button, the New Chat screen opens.
You can choose between:
- New Group — Create a group for communication with multiple employees.
- New Channel — Create a channel for organized communication and information sharing.
You can also use the Search employees field to find employees.
1. Add New Group
If you select New Group, the New Group screen opens.
Enter the required group information:
- Add Photo — Add a photo for the group.
- Group Name — Enter the name of the group. This is a required field.
- Description — Enter a description explaining the purpose of the group.
- Only Admin Can Message — Enable this option if only group administrators should be allowed to send messages.
- Tap Next to continue.
After entering the group details, the Add Members screen opens.
- Use Search employees to find employees.
- Select the employees you want to add to the group.
- Selected employees are highlighted and displayed in the Selected count.
- Review the selected members.
- Tap Create to create the group.
- Tap Cancel if you want to stop the process.
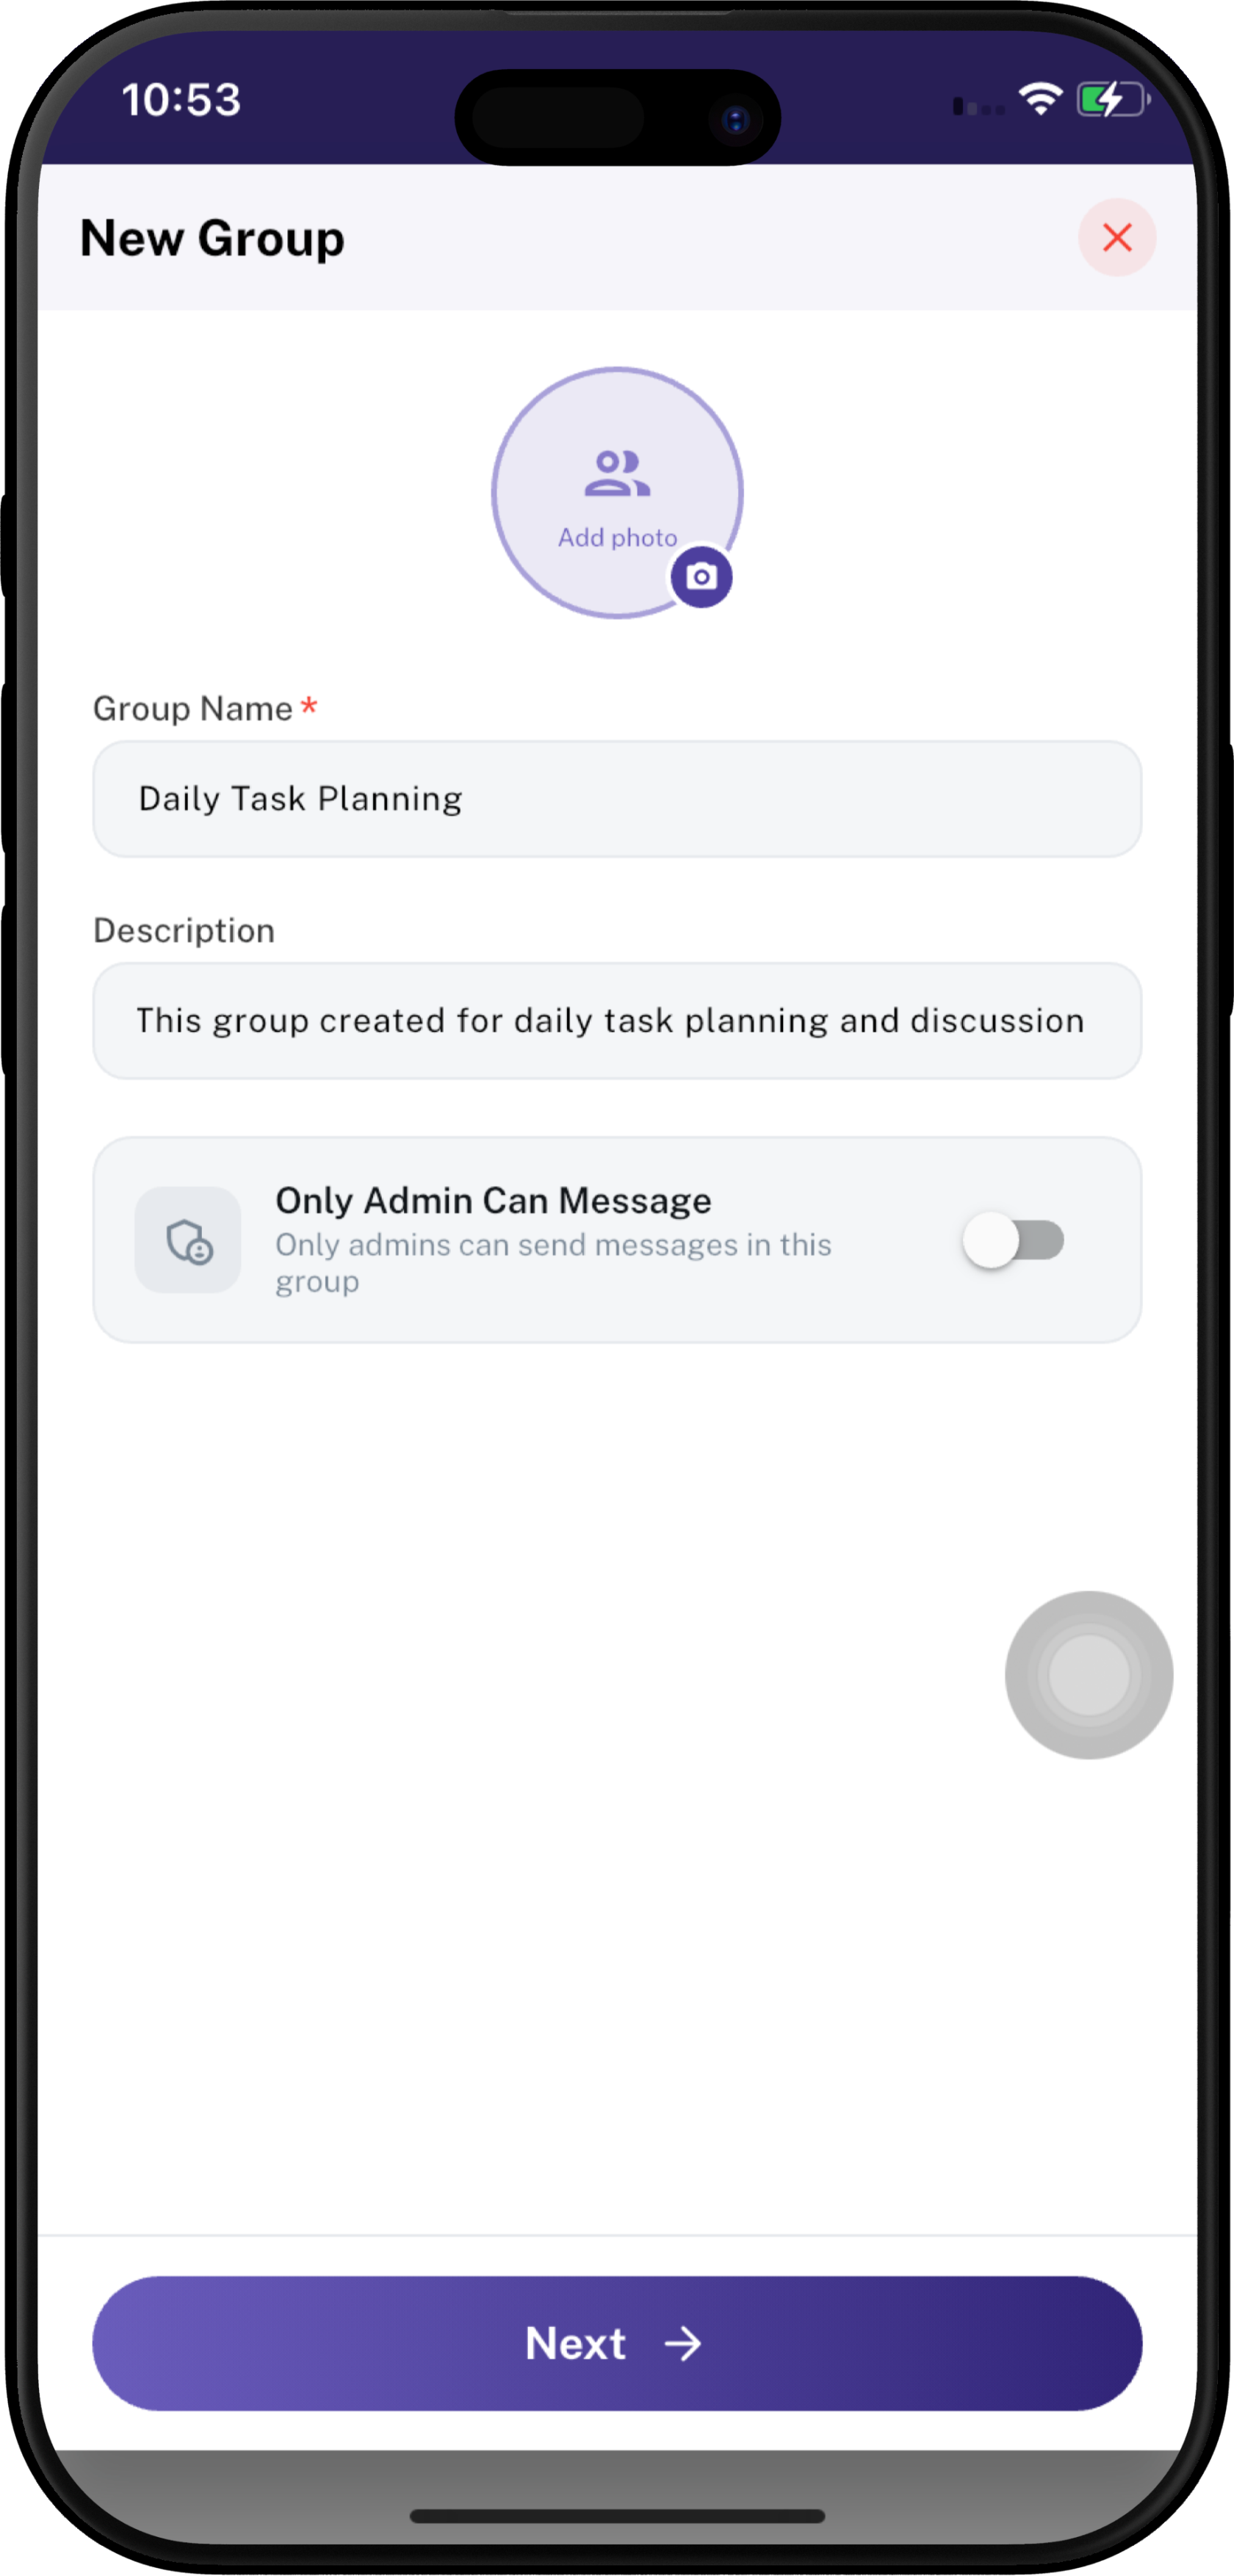
Step 1: Add Group Details
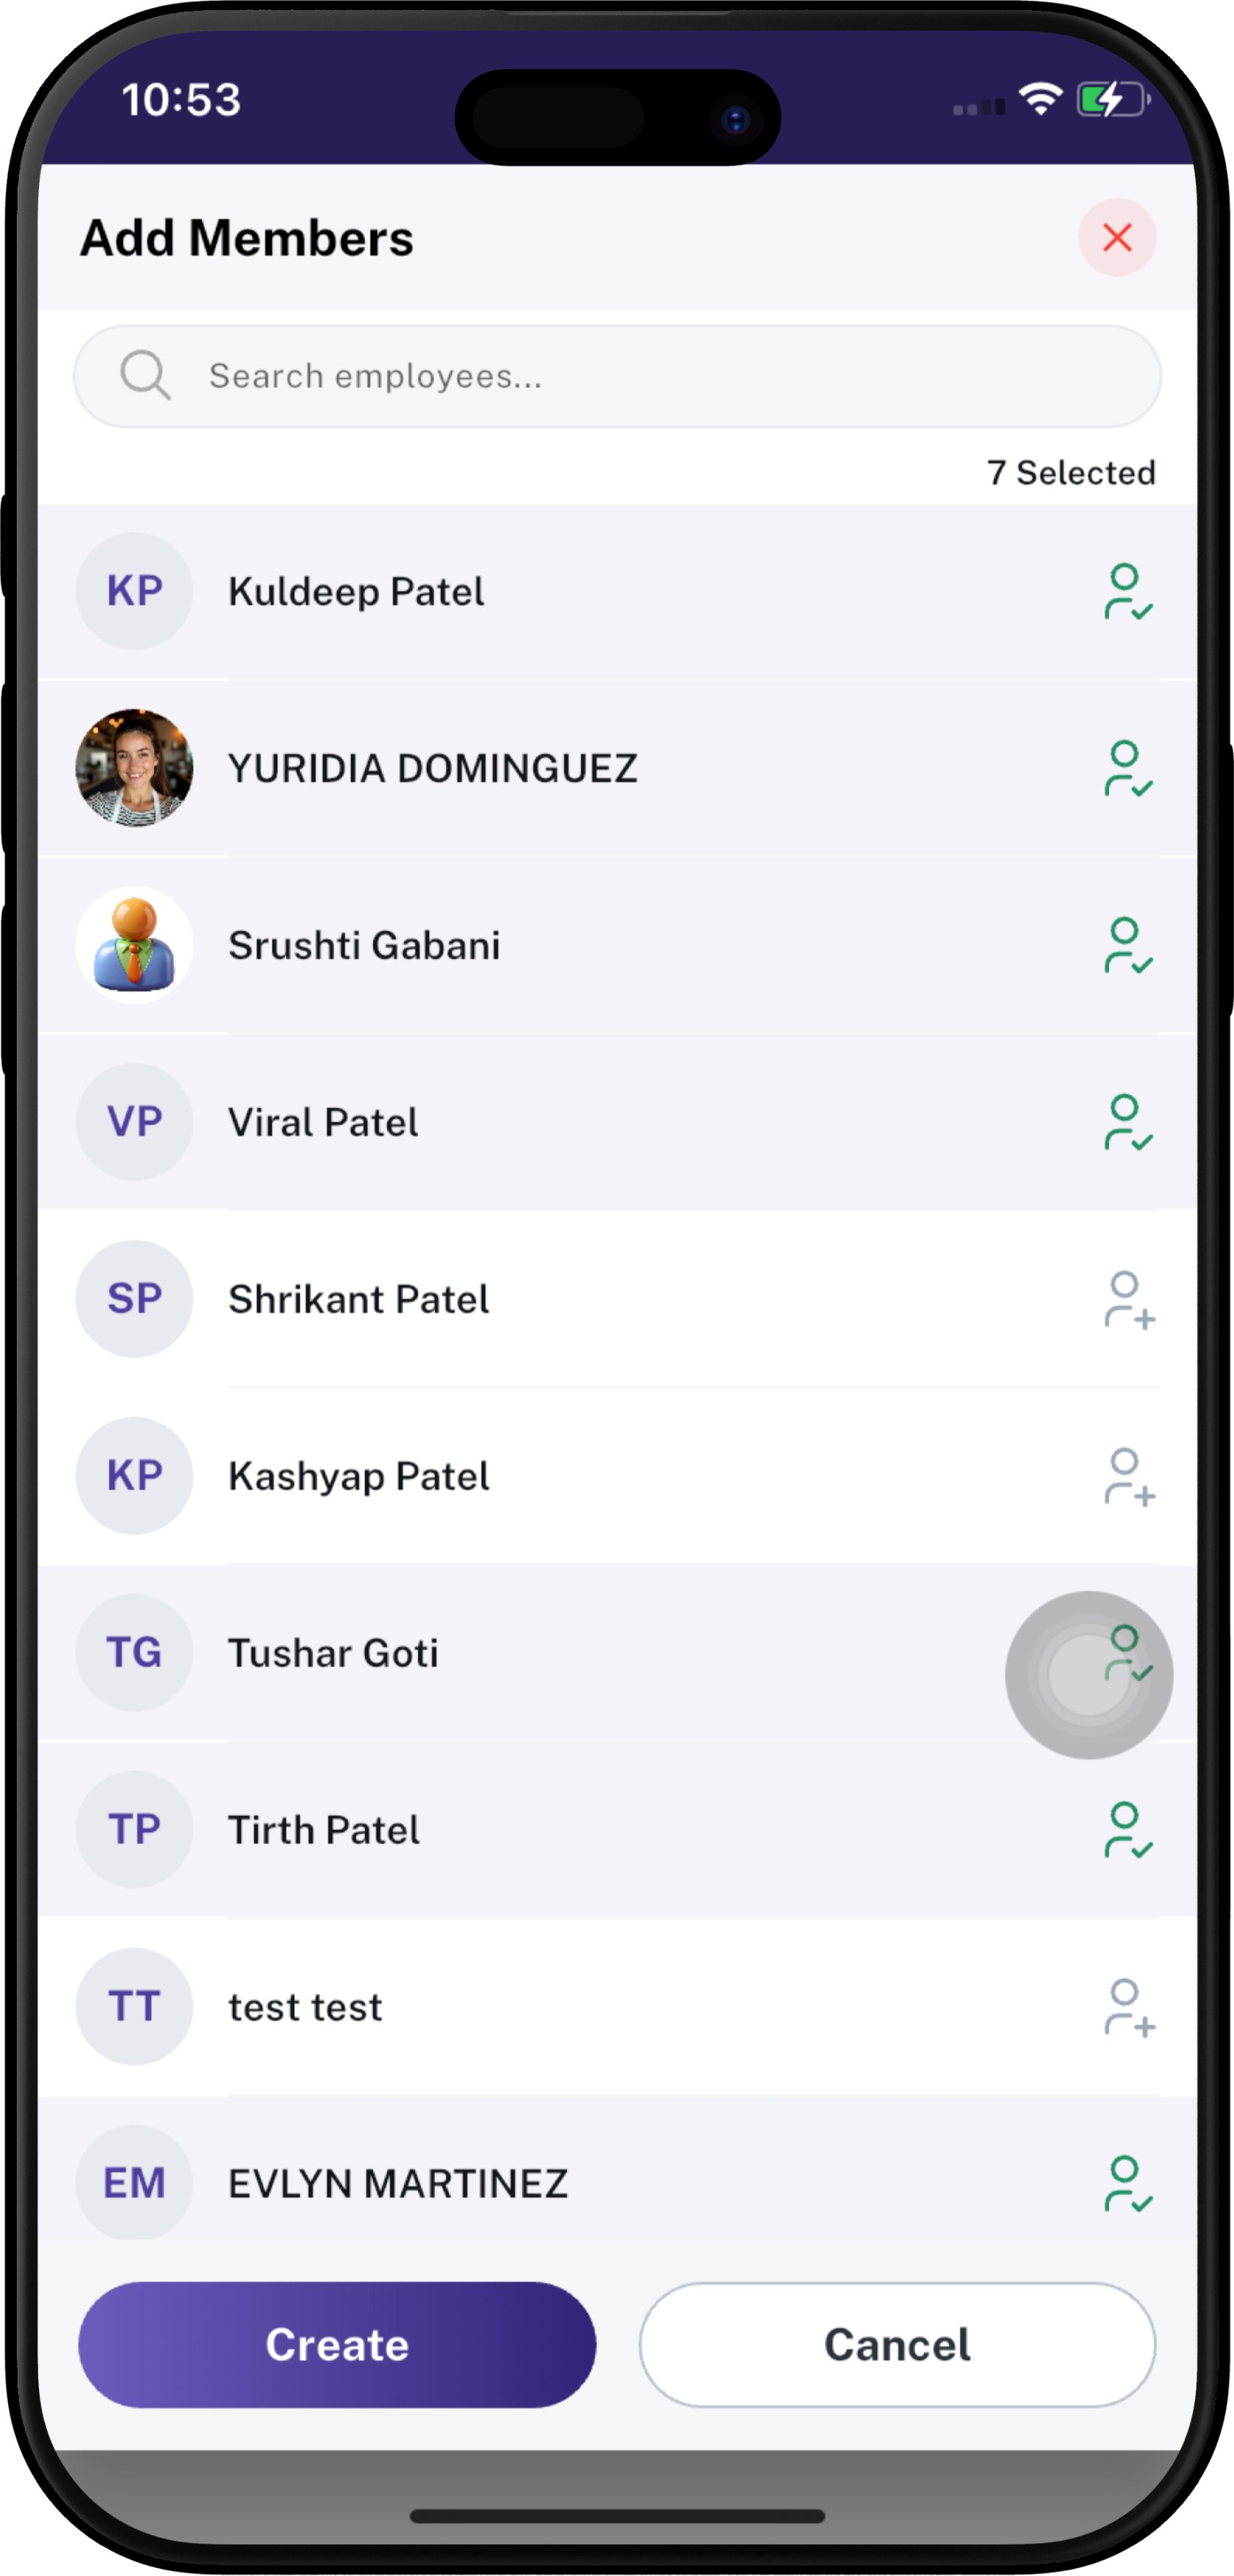
Step 2: Add Group Members
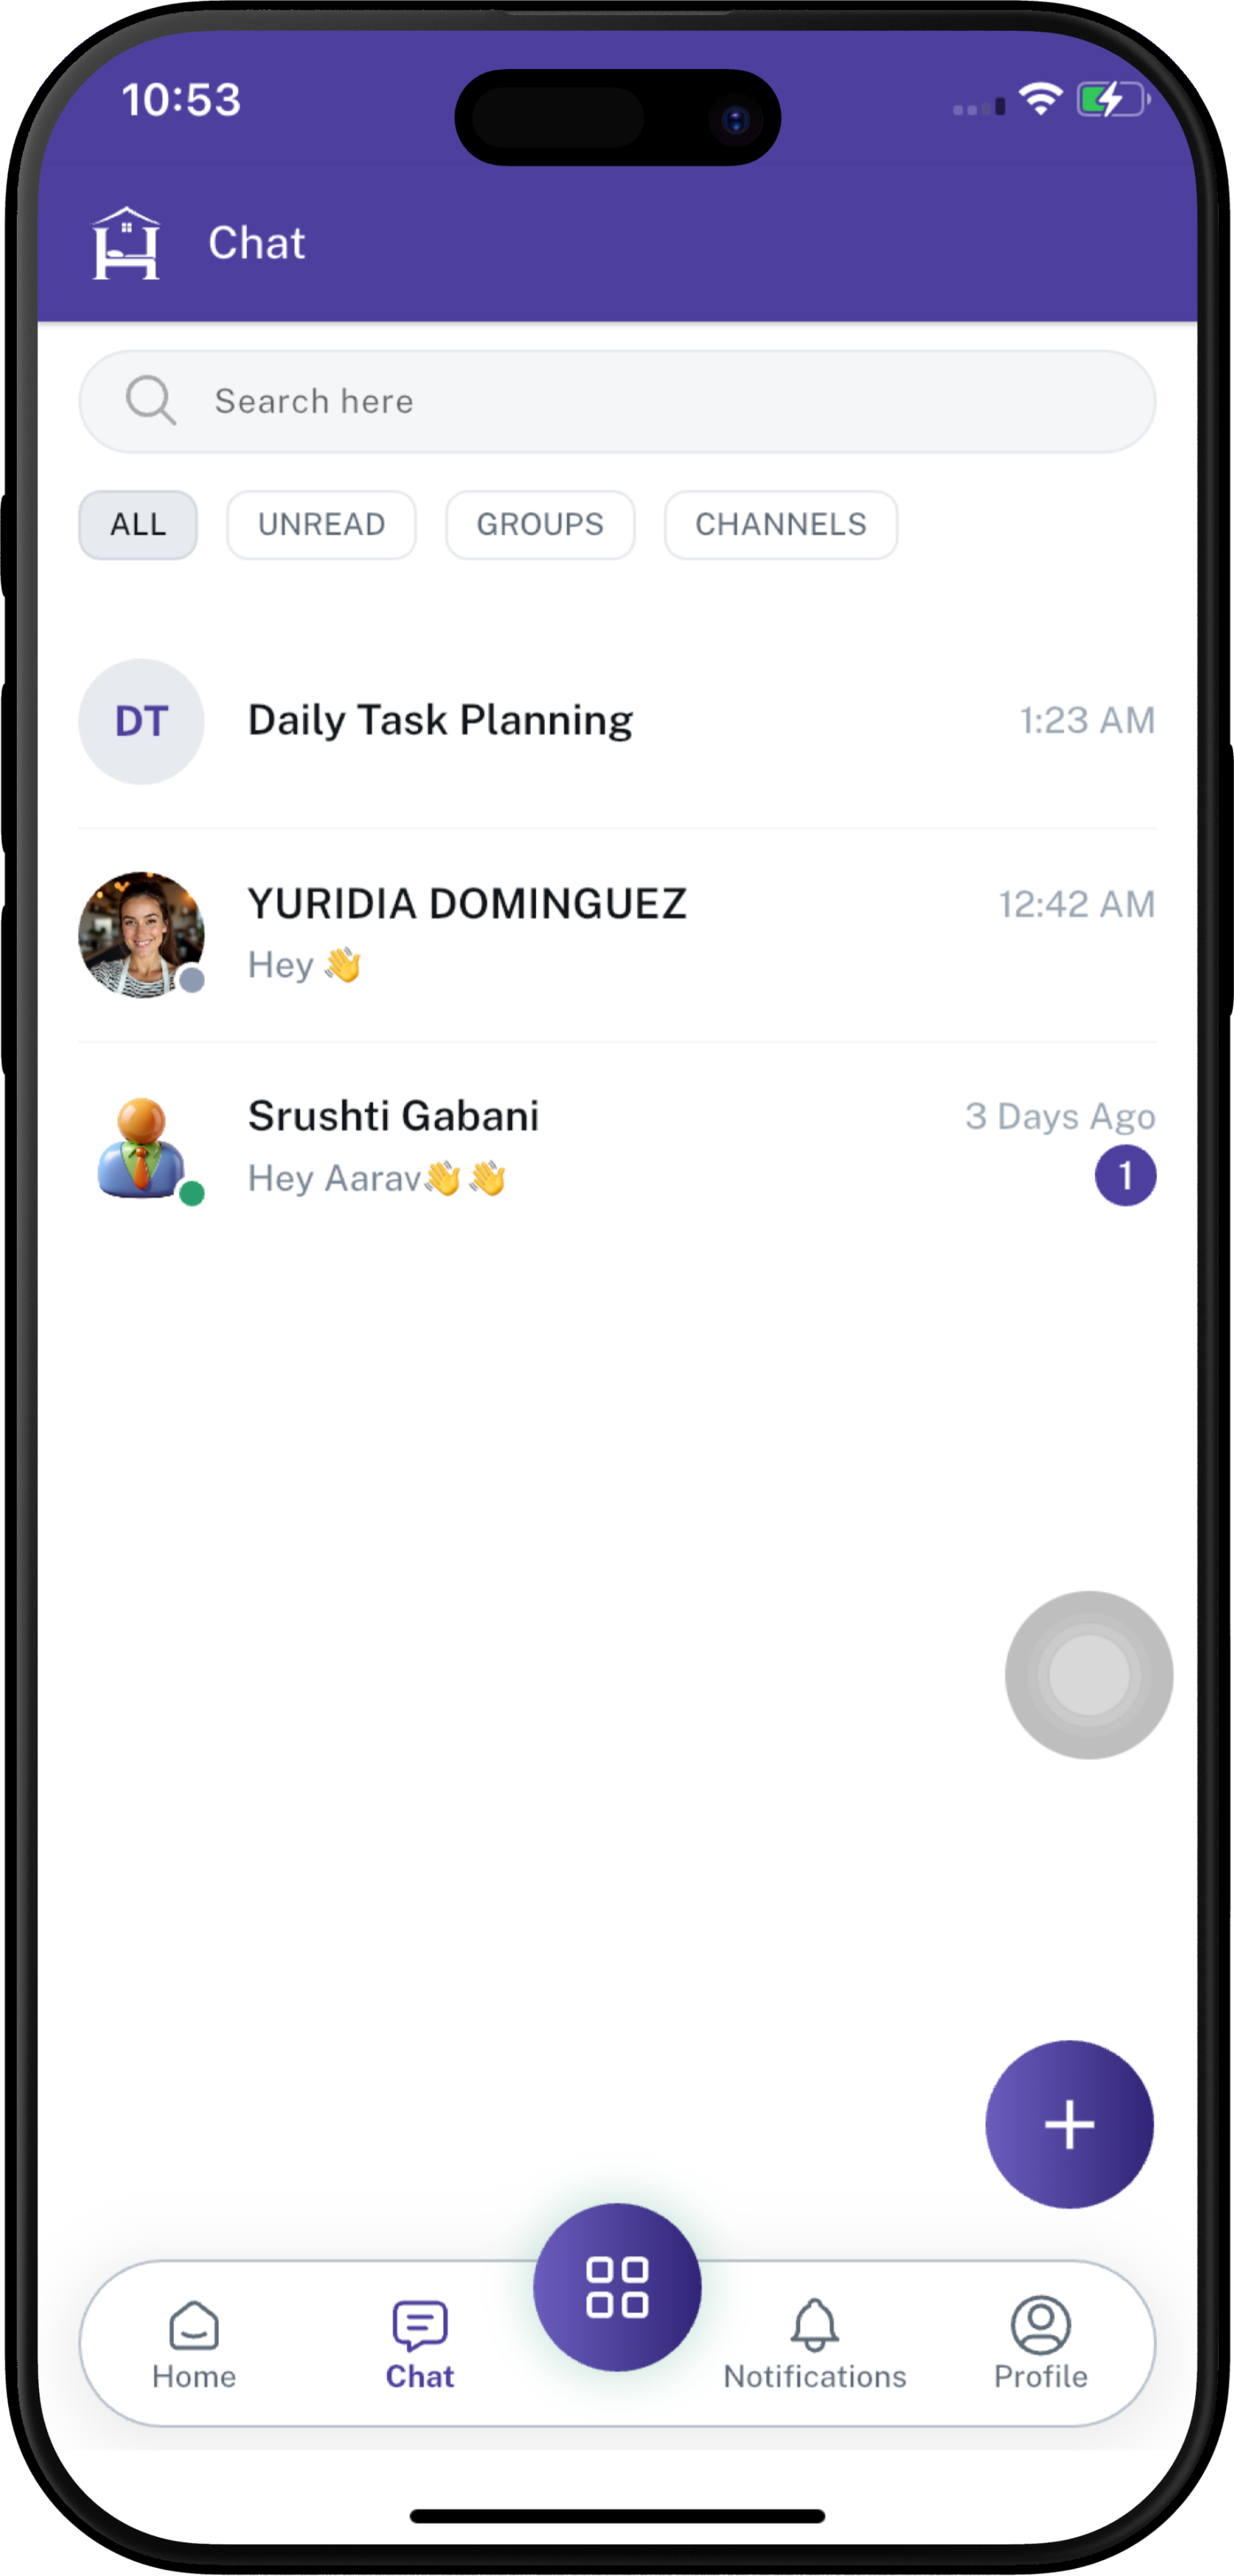
Step 3: Showing New Group
2. Add New Channel
If you select New Channel from the New Chat screen, the New Channel screen opens.
Enter the required channel information:
- Add Photo — Add a photo for the channel.
- Channel Name — Enter the channel name. This is a required field.
- Description — Enter a description explaining the purpose of the channel.
- Tap Next to continue.
After entering the channel details, the Add Members screen opens.
- Use Search employees to find employees.
- Select the employees you want to add to the channel.
- Selected employees are highlighted and displayed in the Selected count.
- Review the selected members.
- Tap Create to create the channel.
- Tap Cancel if you want to stop the process.
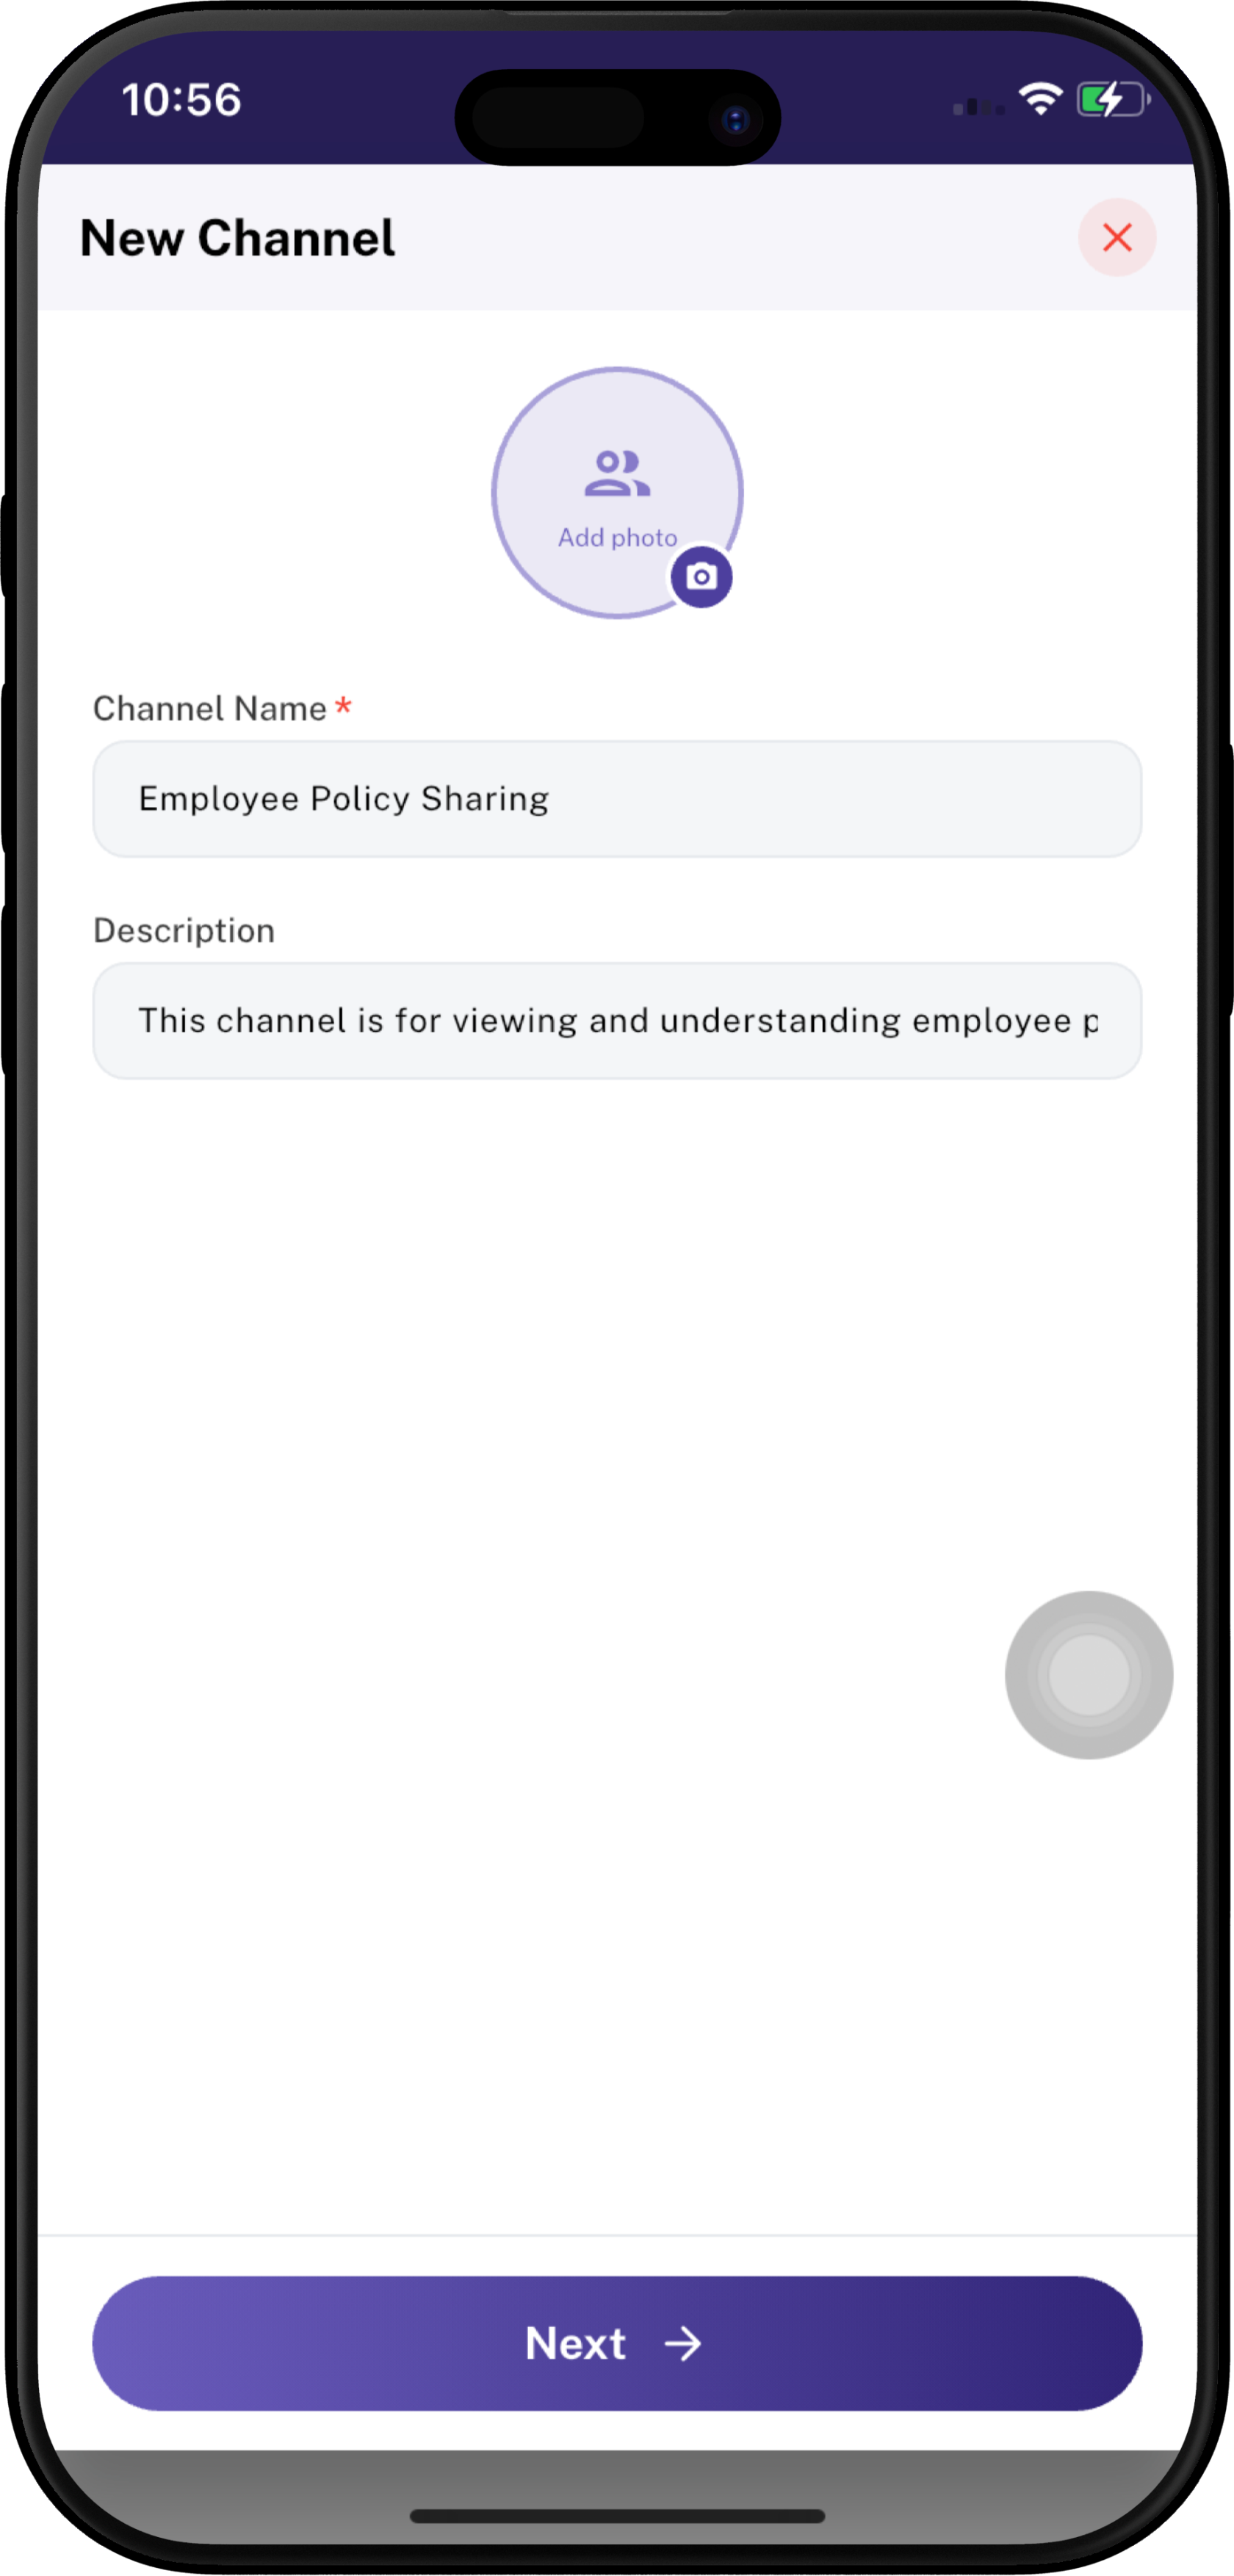
Step 1: Add Channel Details
Step 2: Add Channel Members
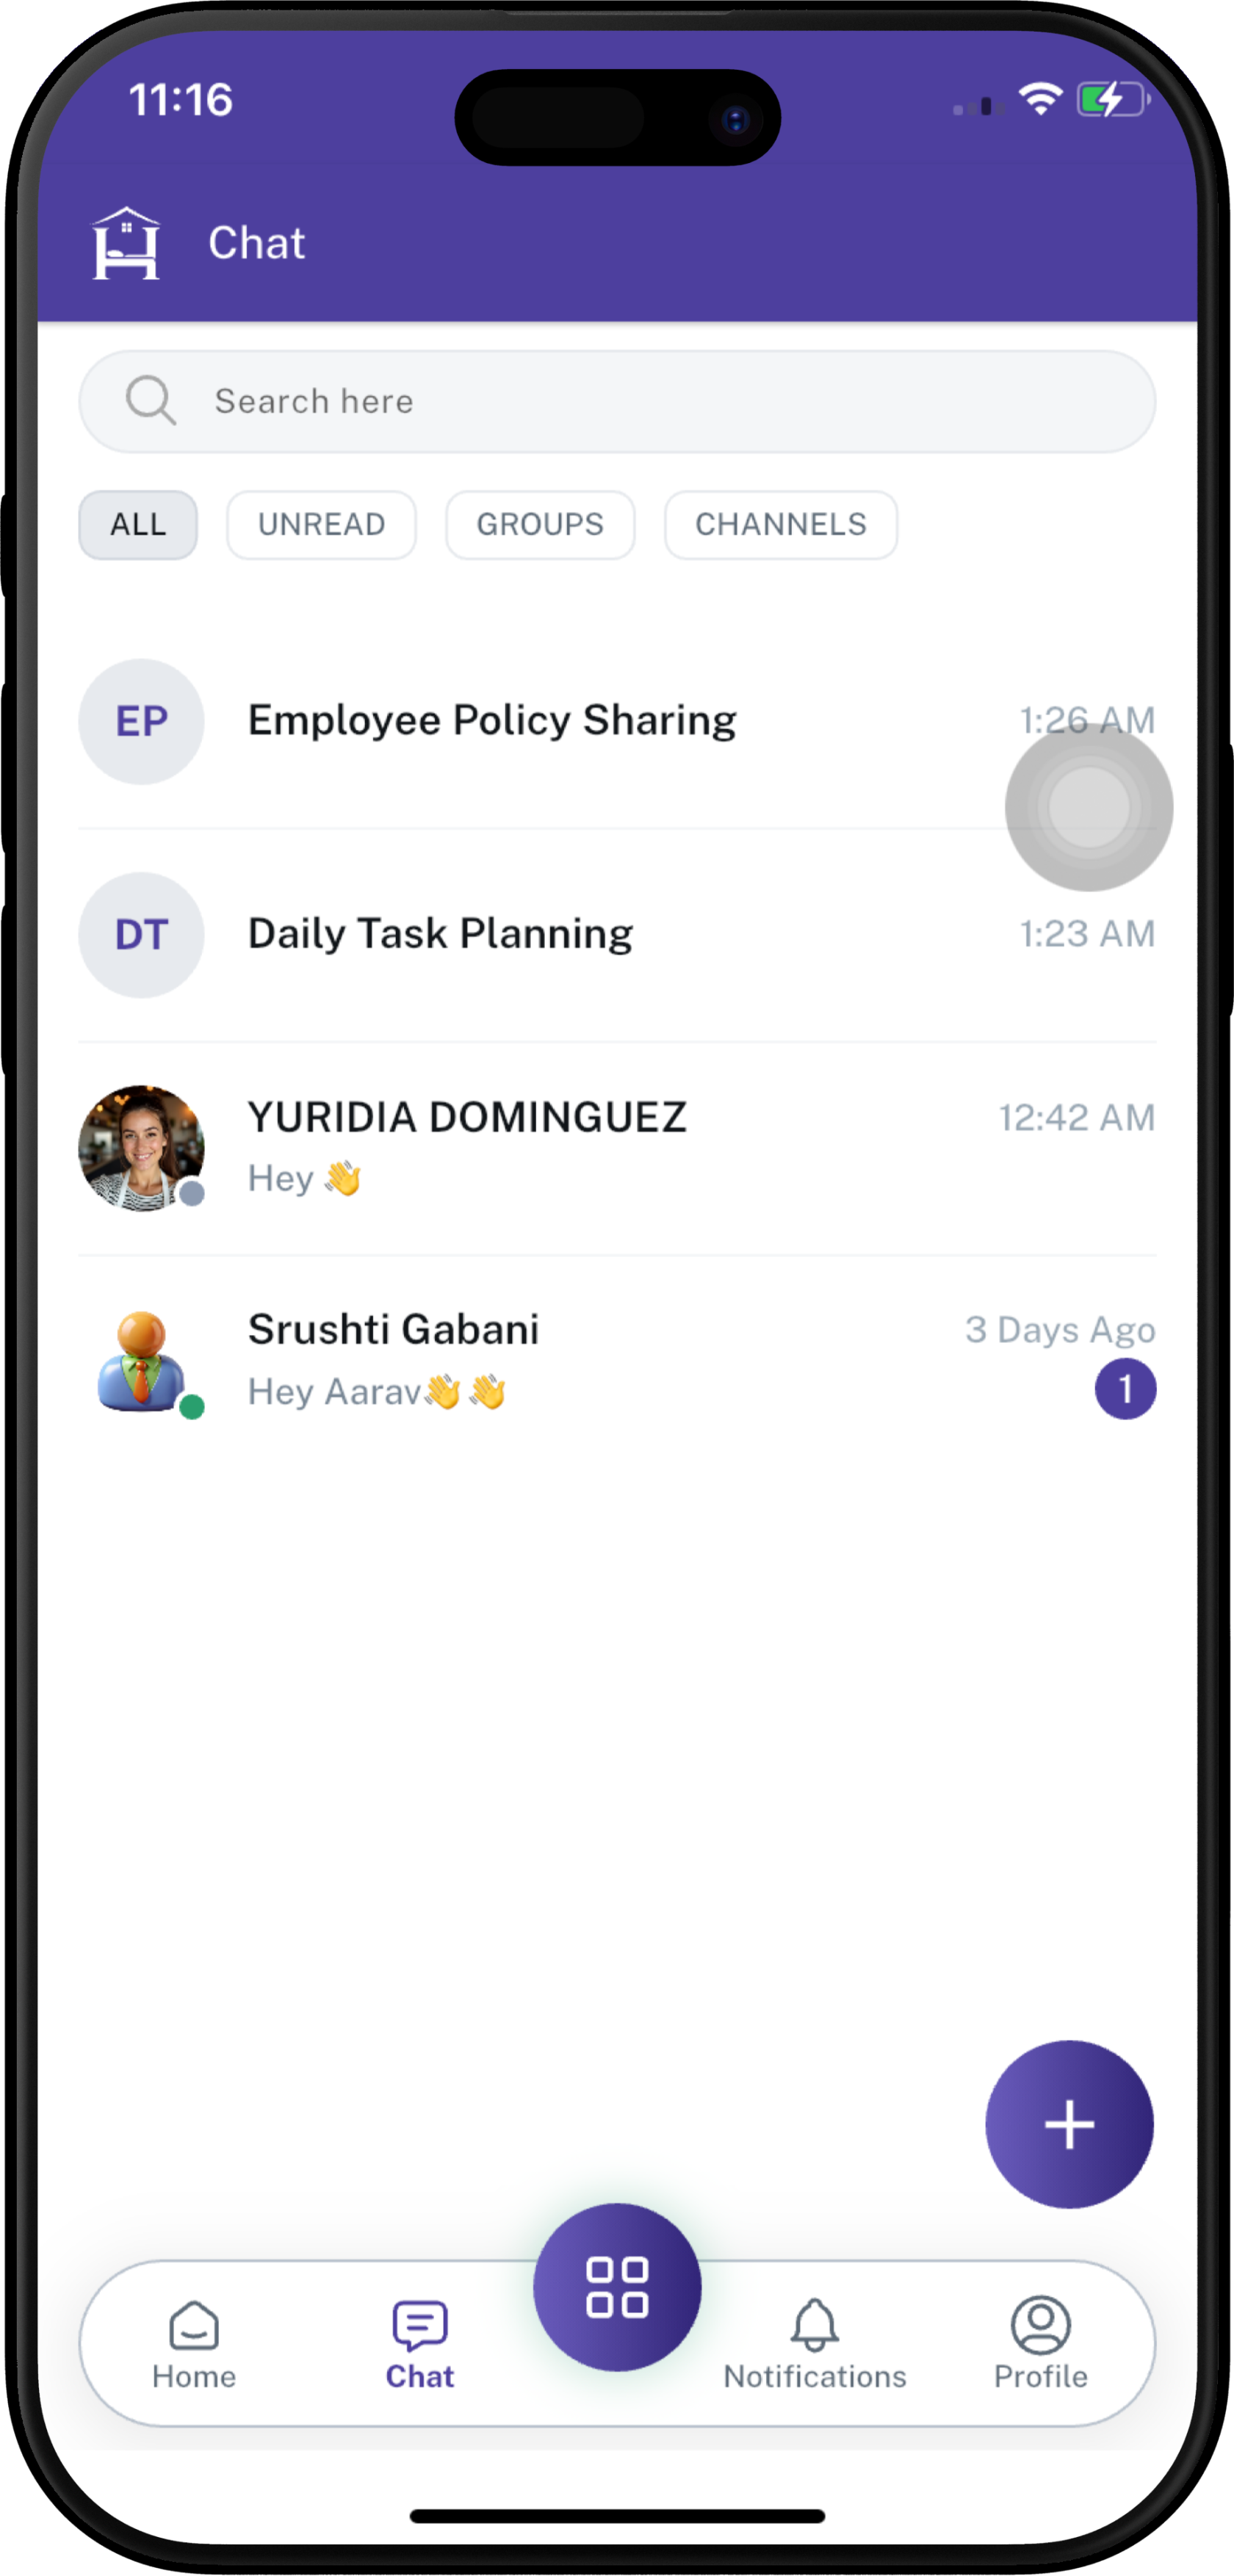
Step 3: Showing New Channel
Group Details and Management
After creating a group, users can open the group and access Group Info to view group details and manage members. Management options depend on the user's permissions.
Open Group Info
- Open the group conversation.
- Tap the group name or the ⋮ menu in the top-right corner.
- Select Contact Info.
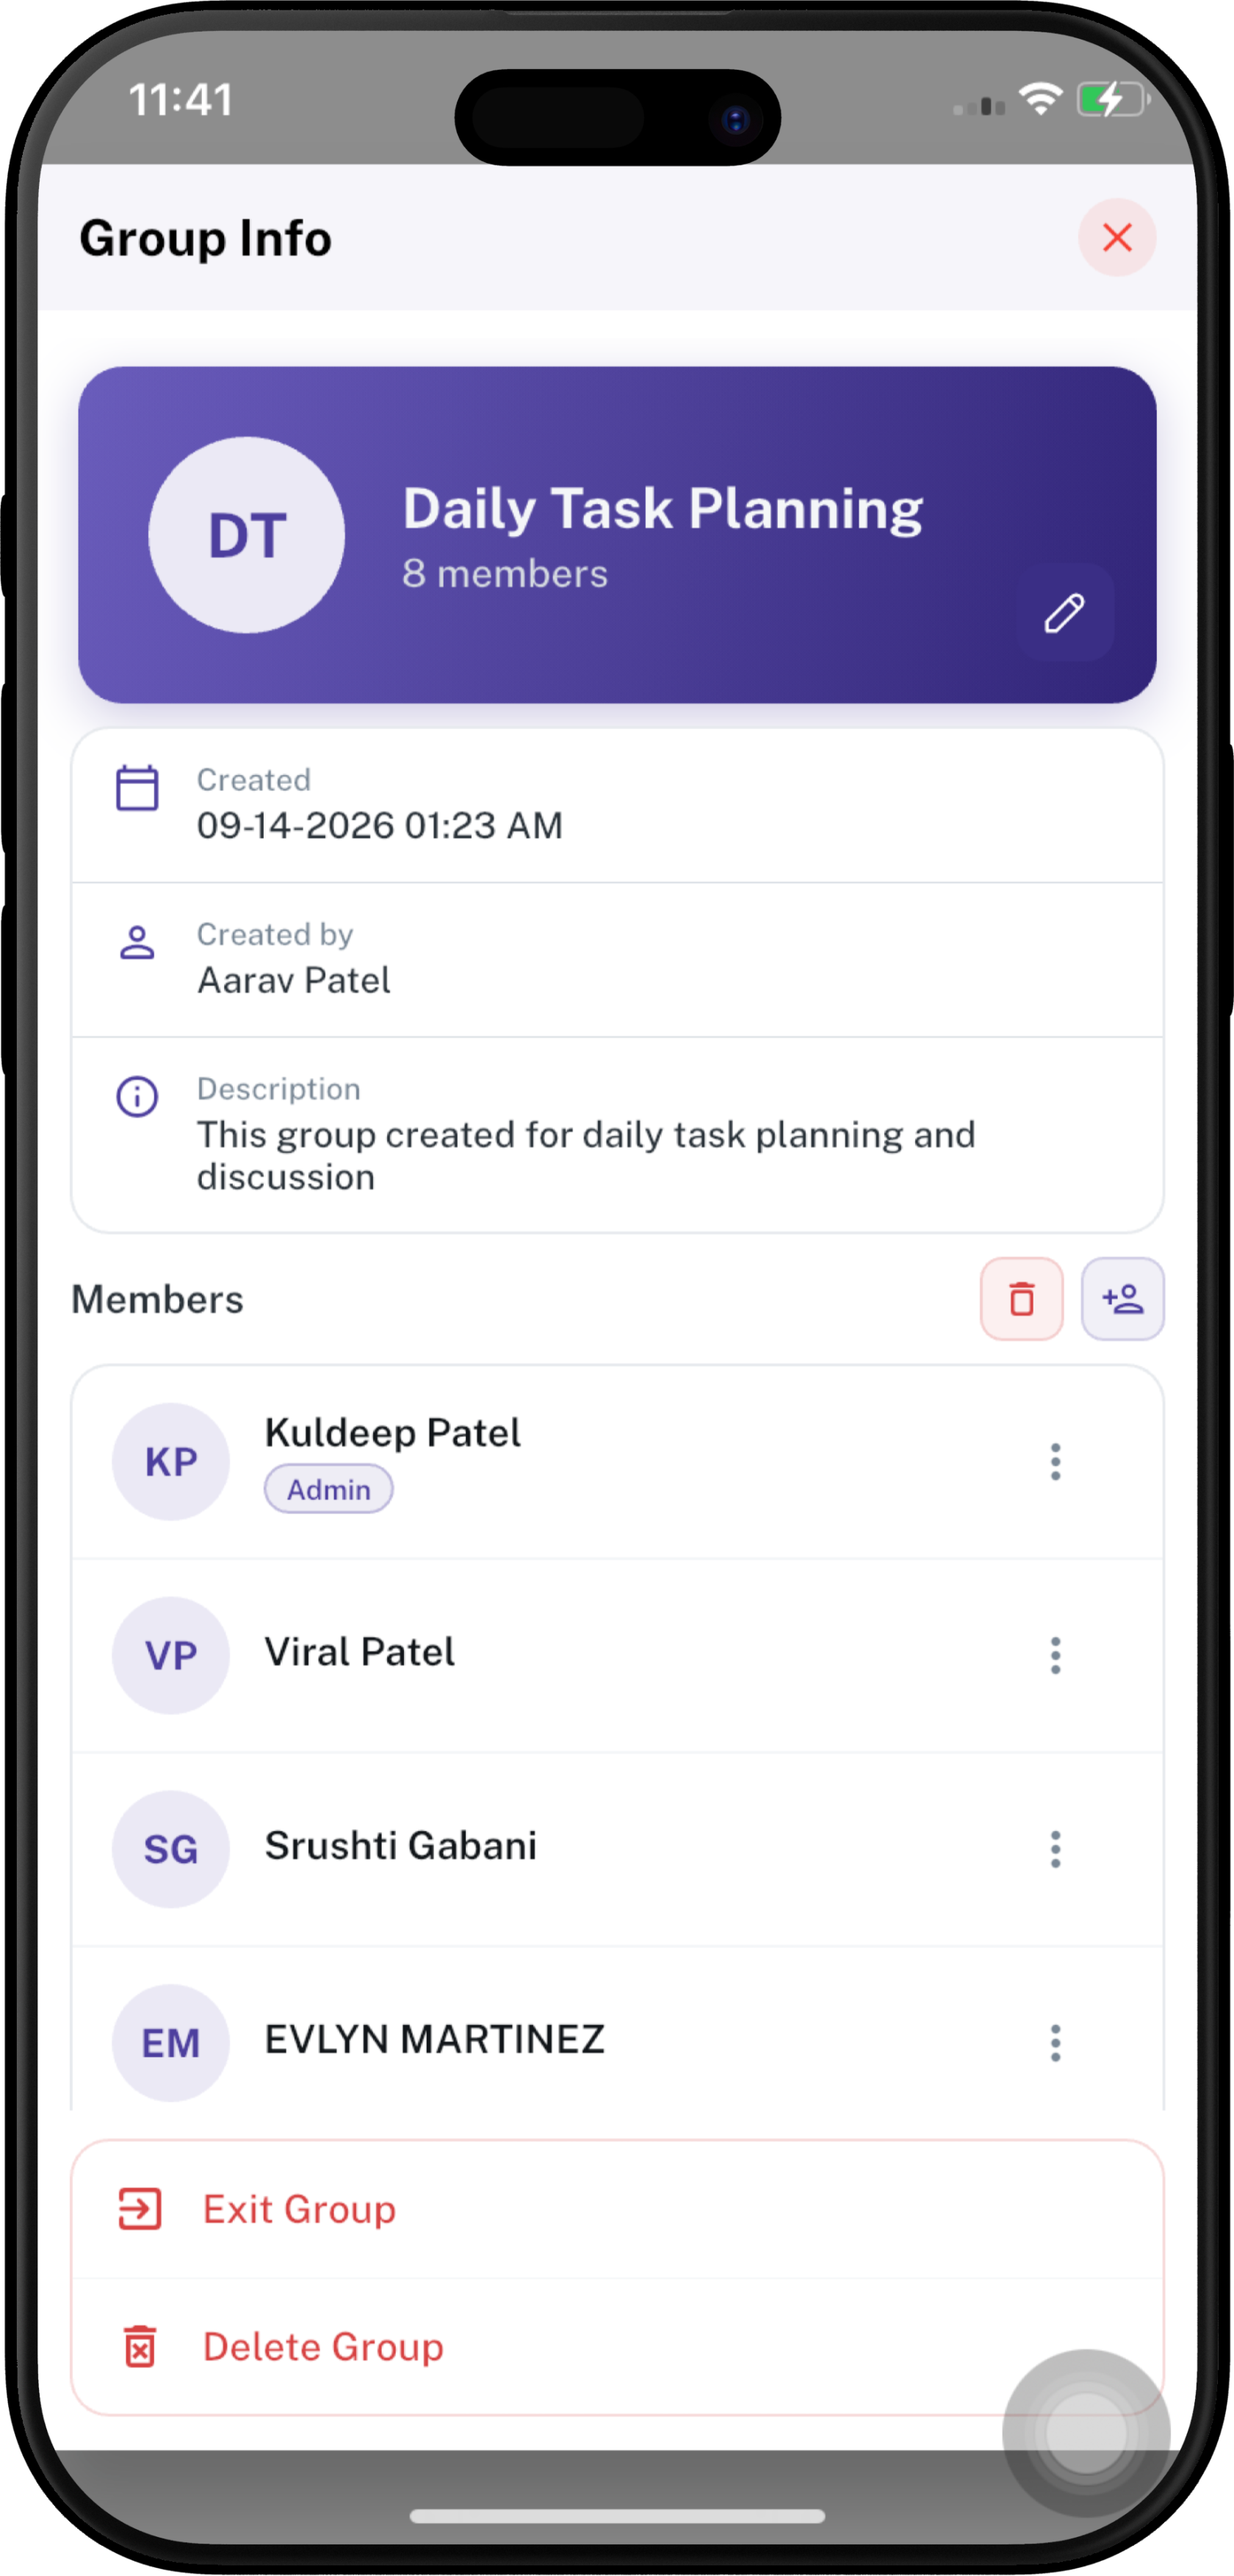
The Contact Info screen displays the group name, number of members, creation details, description, member list, and group management options.
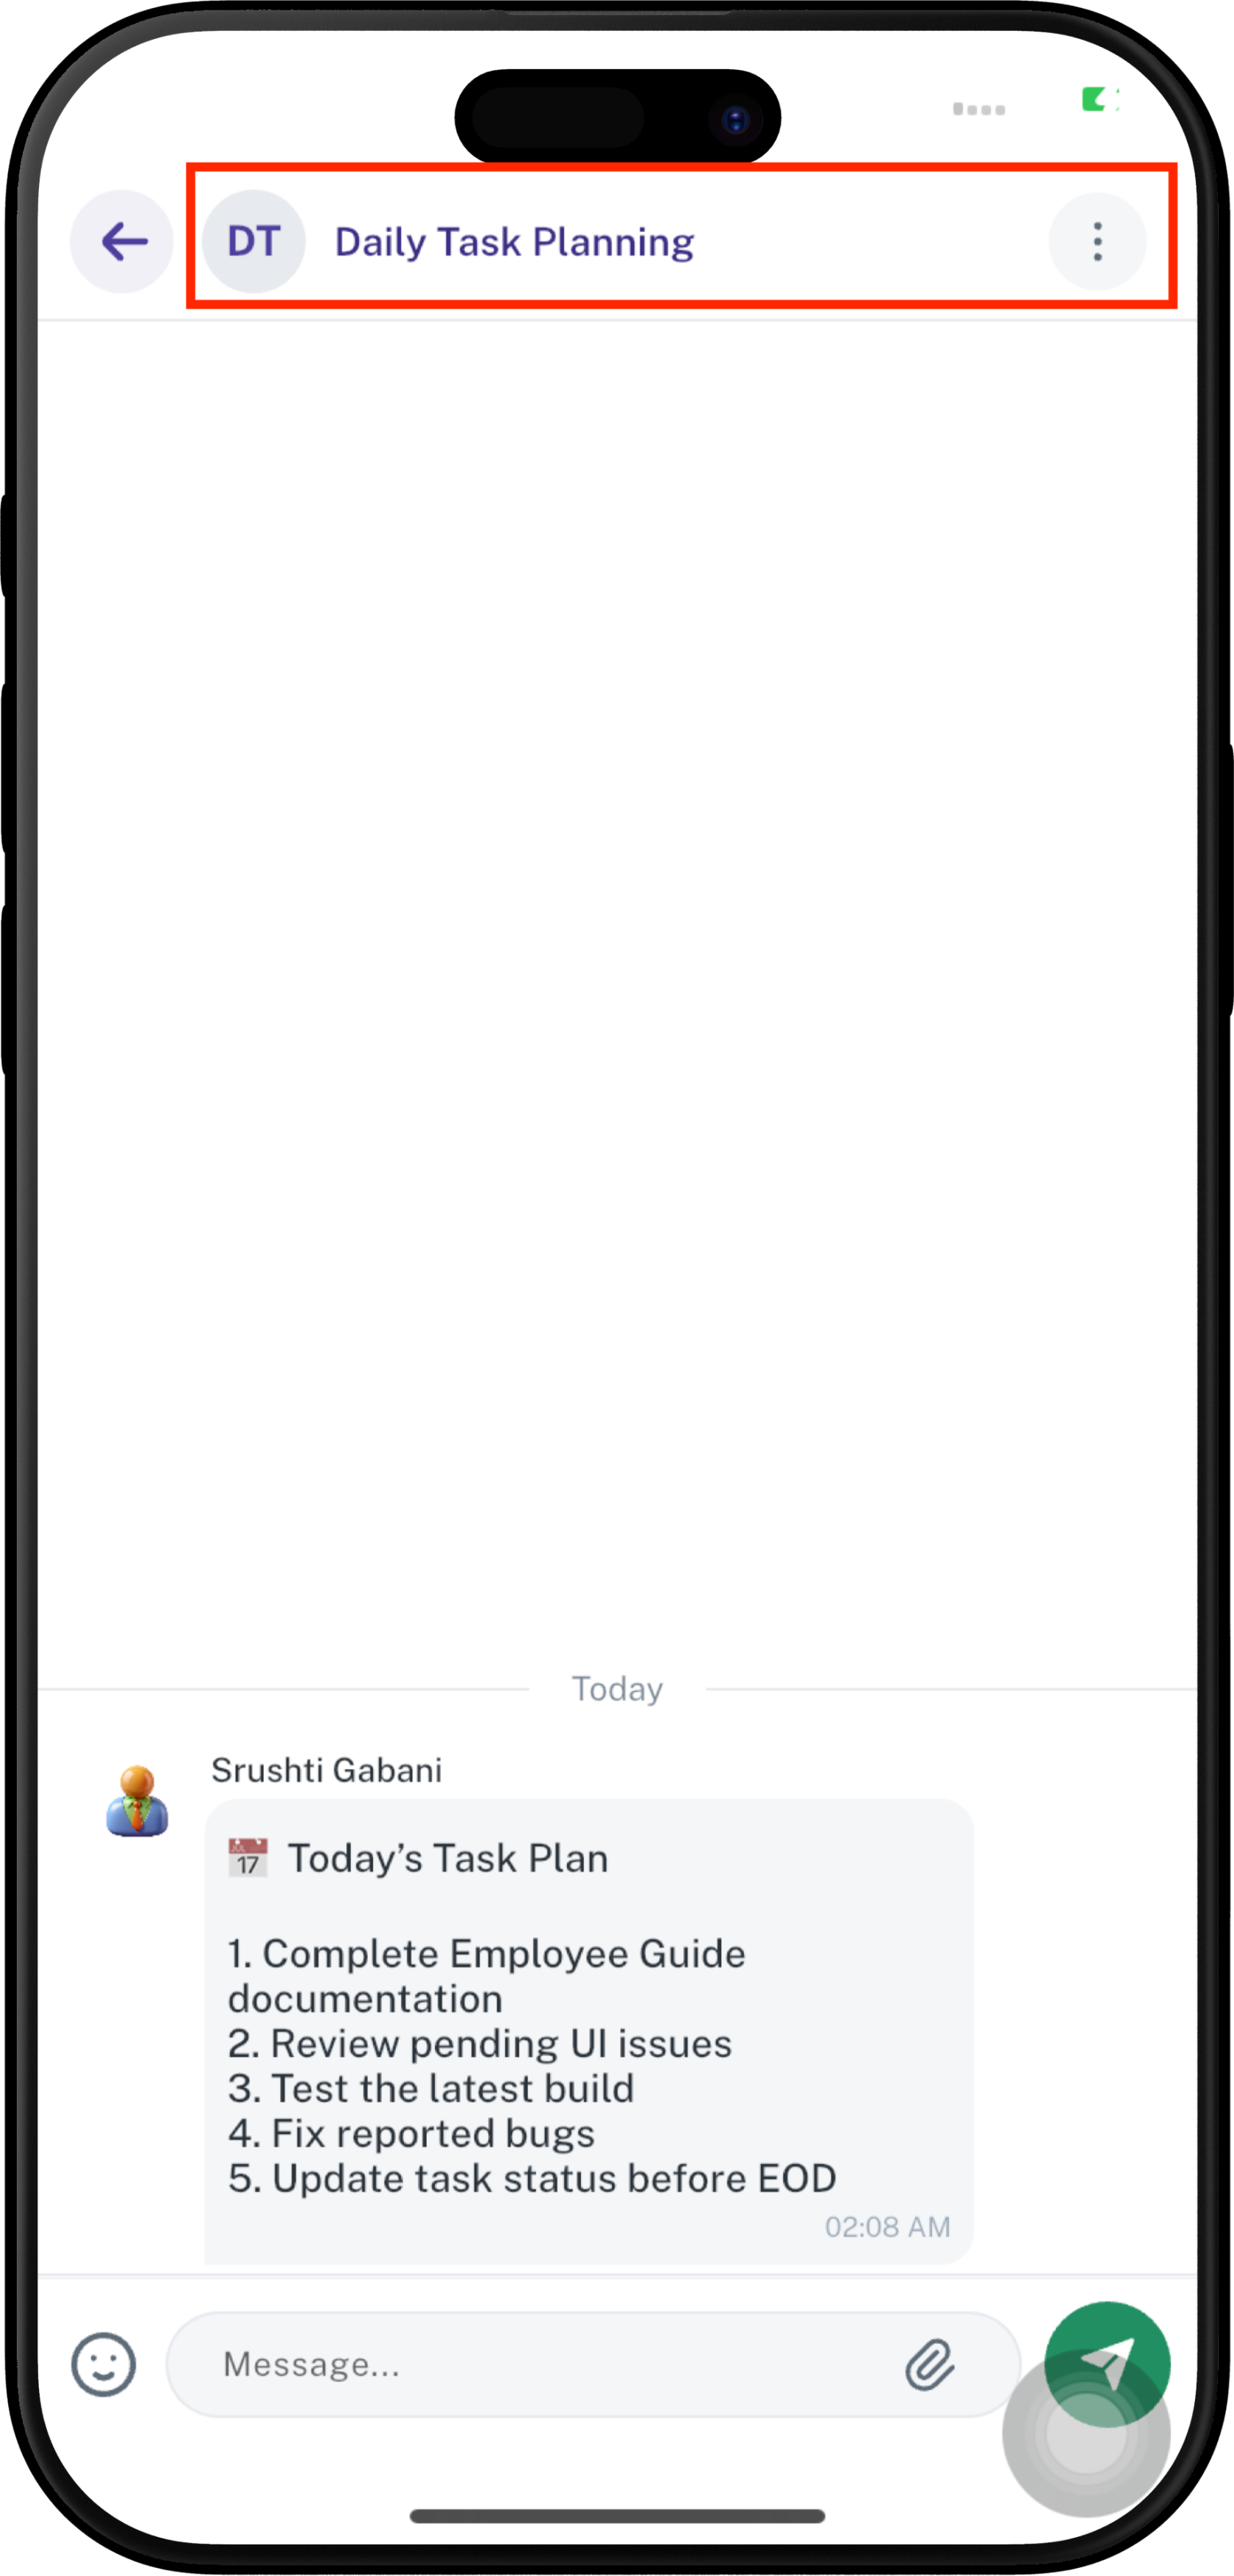
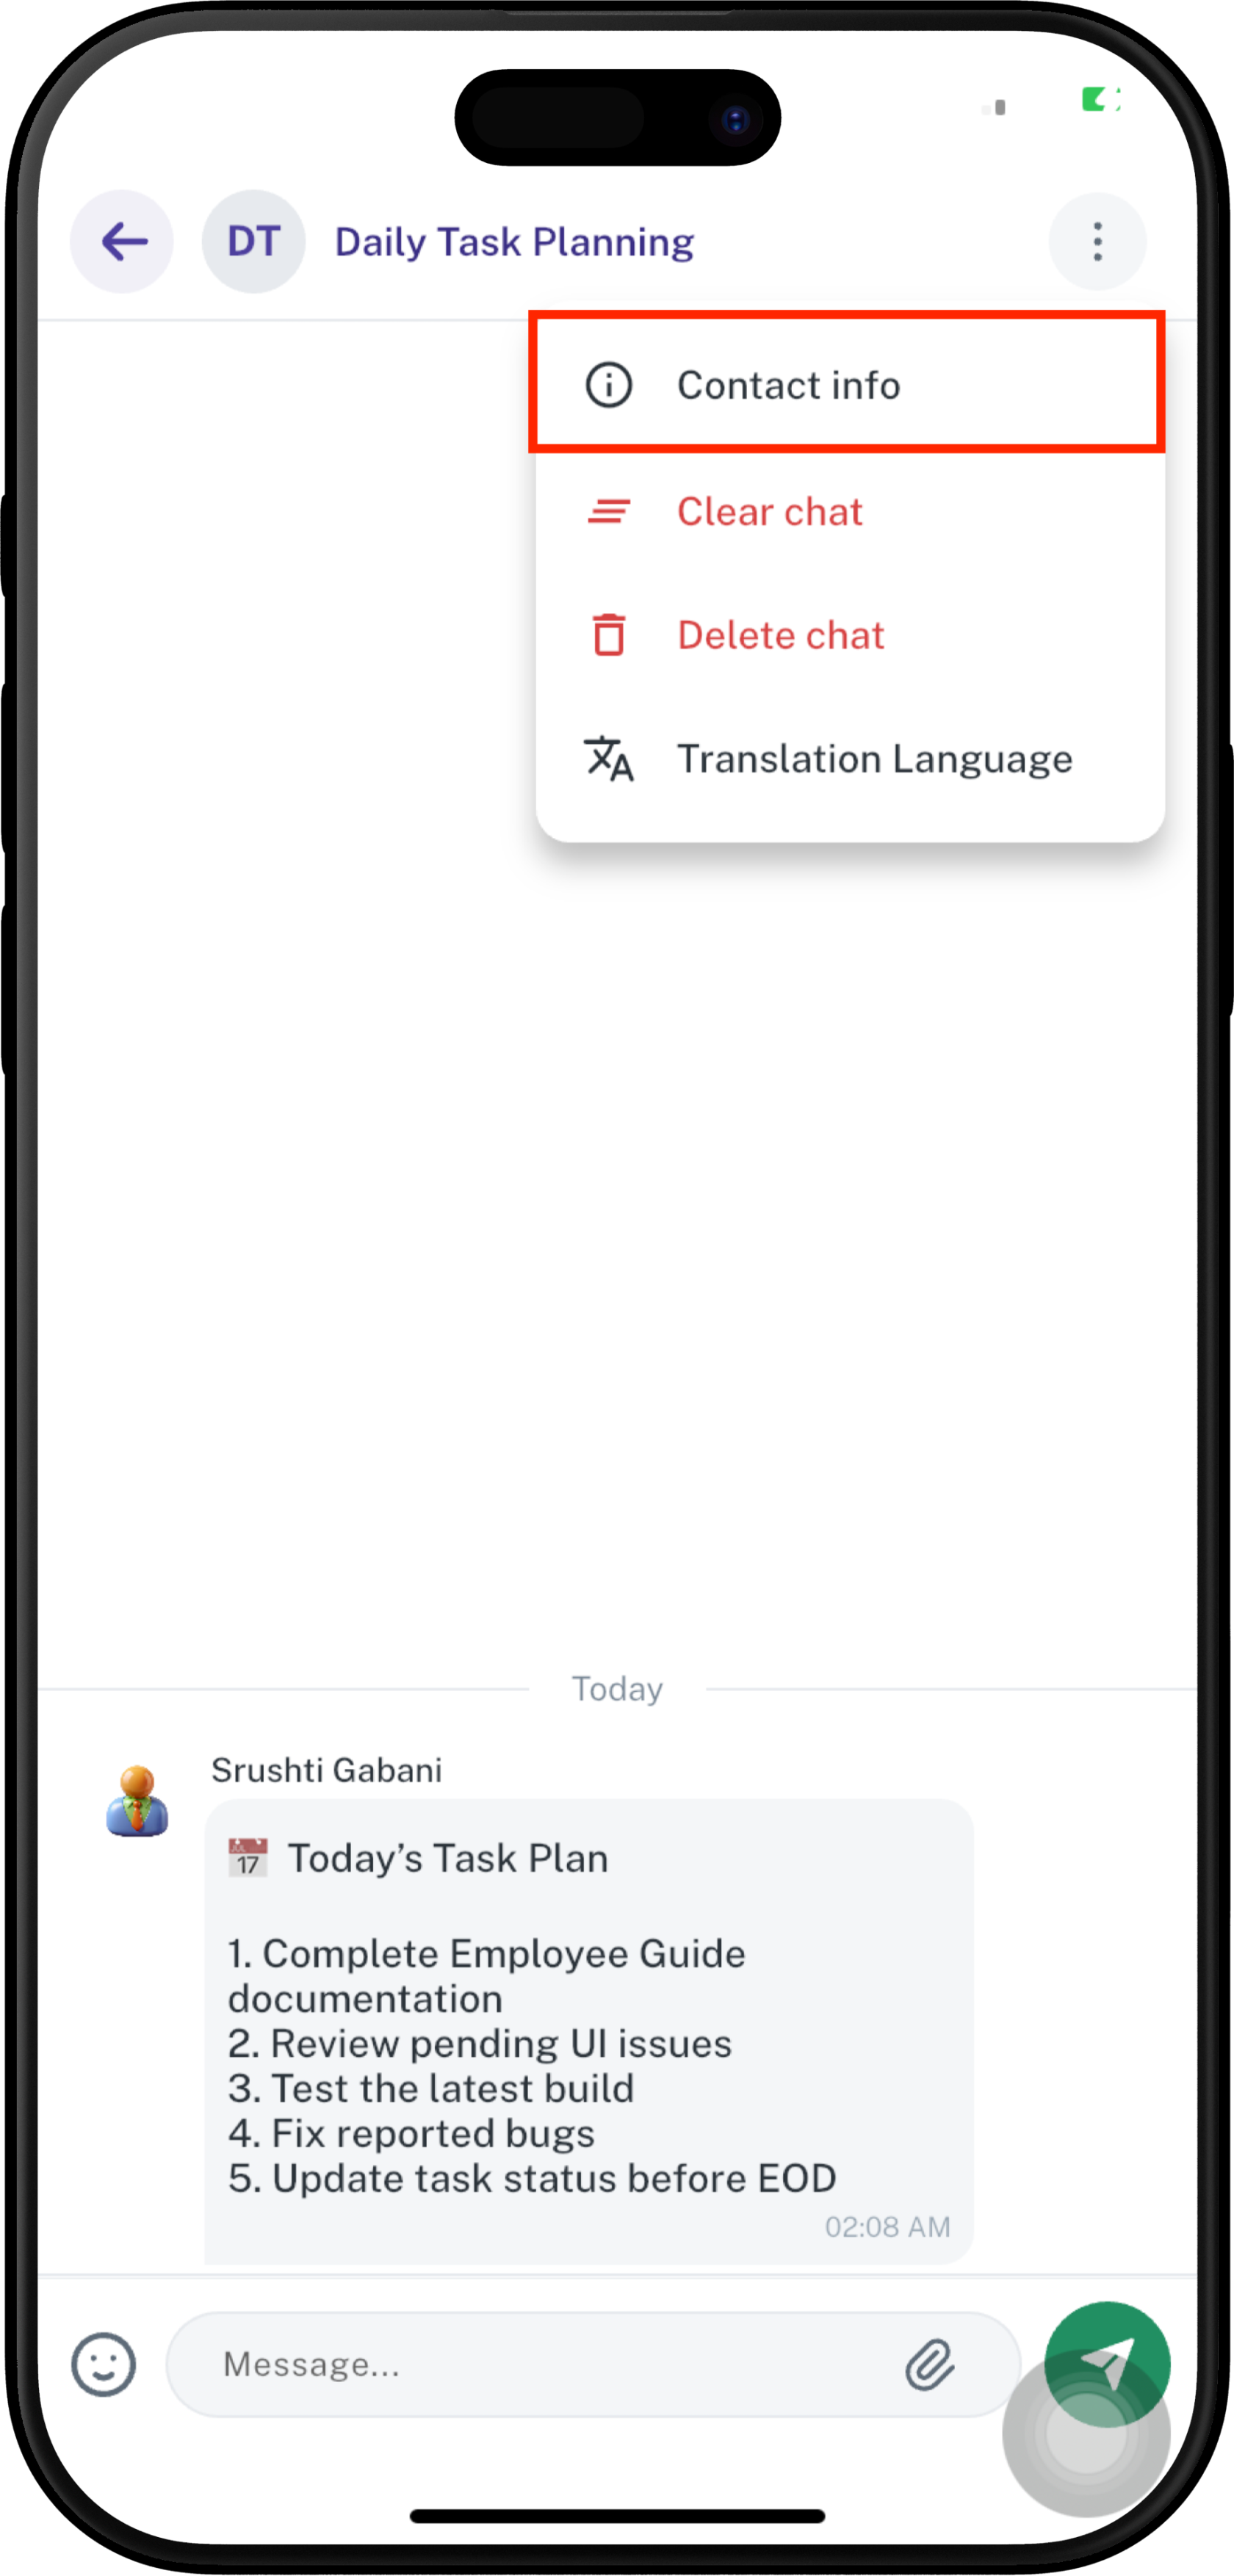
Group Information
The Group Info screen shows:
- Group Name — Displays the name of the group.
- Member Count — Shows the total number of group members.
- Created — Shows the date and time when the group was created.
- Created by — Shows the employee who created the group.
- Description — Shows the purpose or description of the group.
See All Members
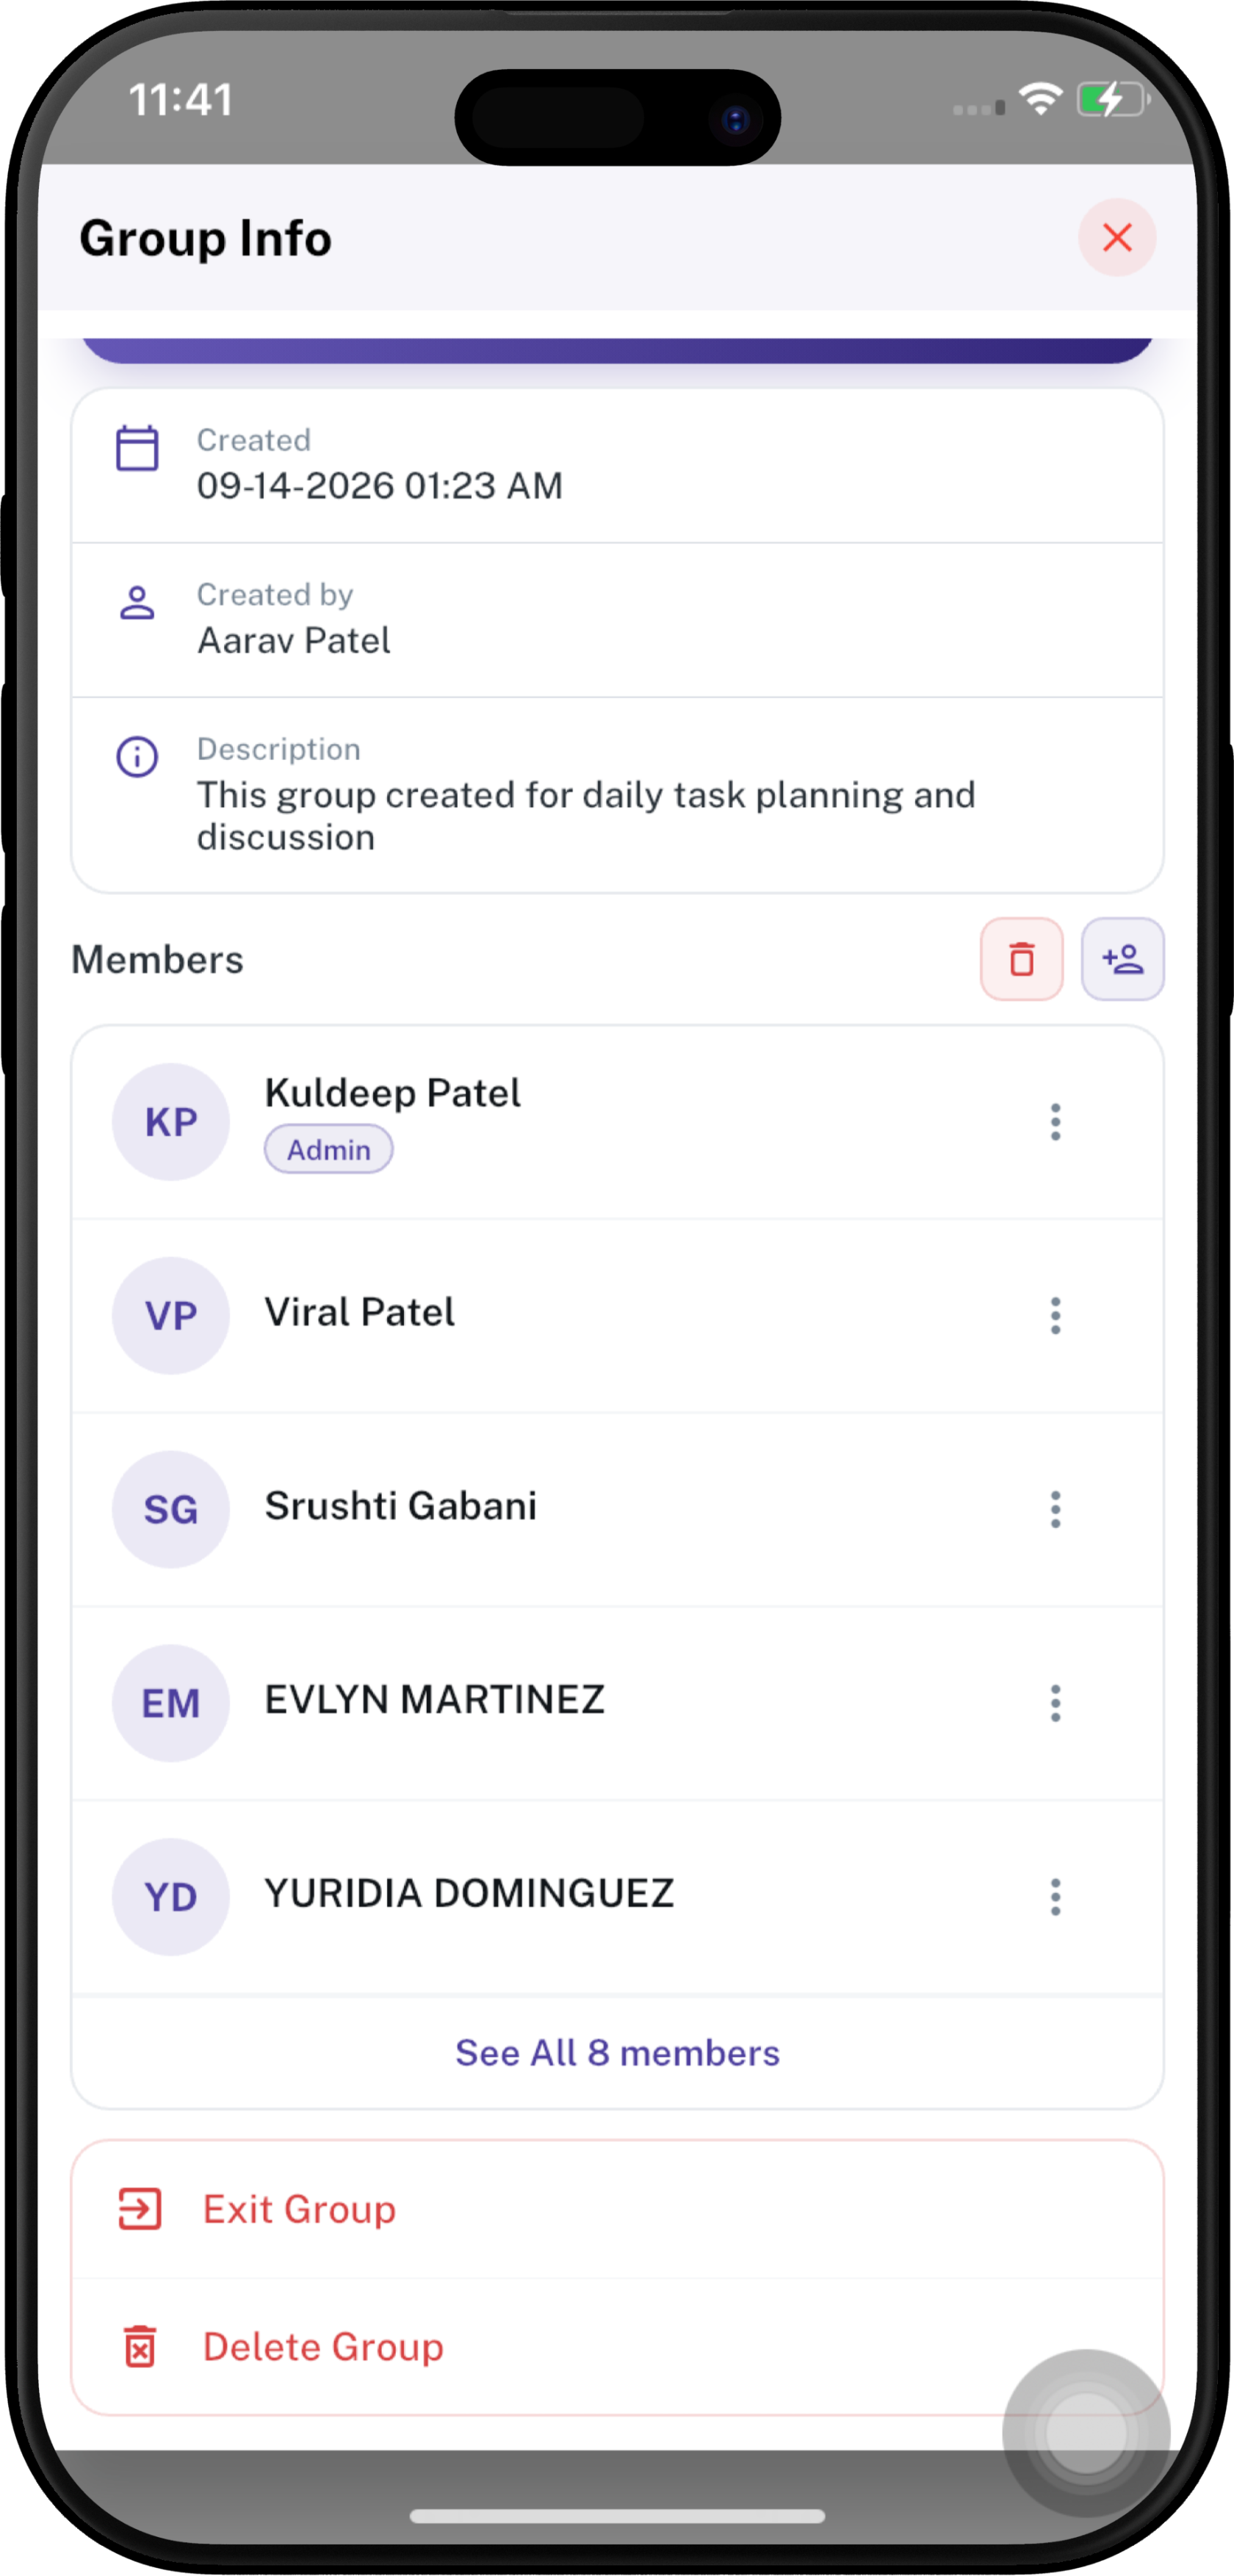
The Members section displays the members currently included in the group.
- Review the members shown on the Group Info screen.
- Tap See All 8 members to view the complete member list.
- Each member is displayed with their name and profile/avatar.
- A member with the Admin label is a group administrator.
Note: The number of members shown depends on the actual group membership.
Add Members
A group administrator can add employees to the group.
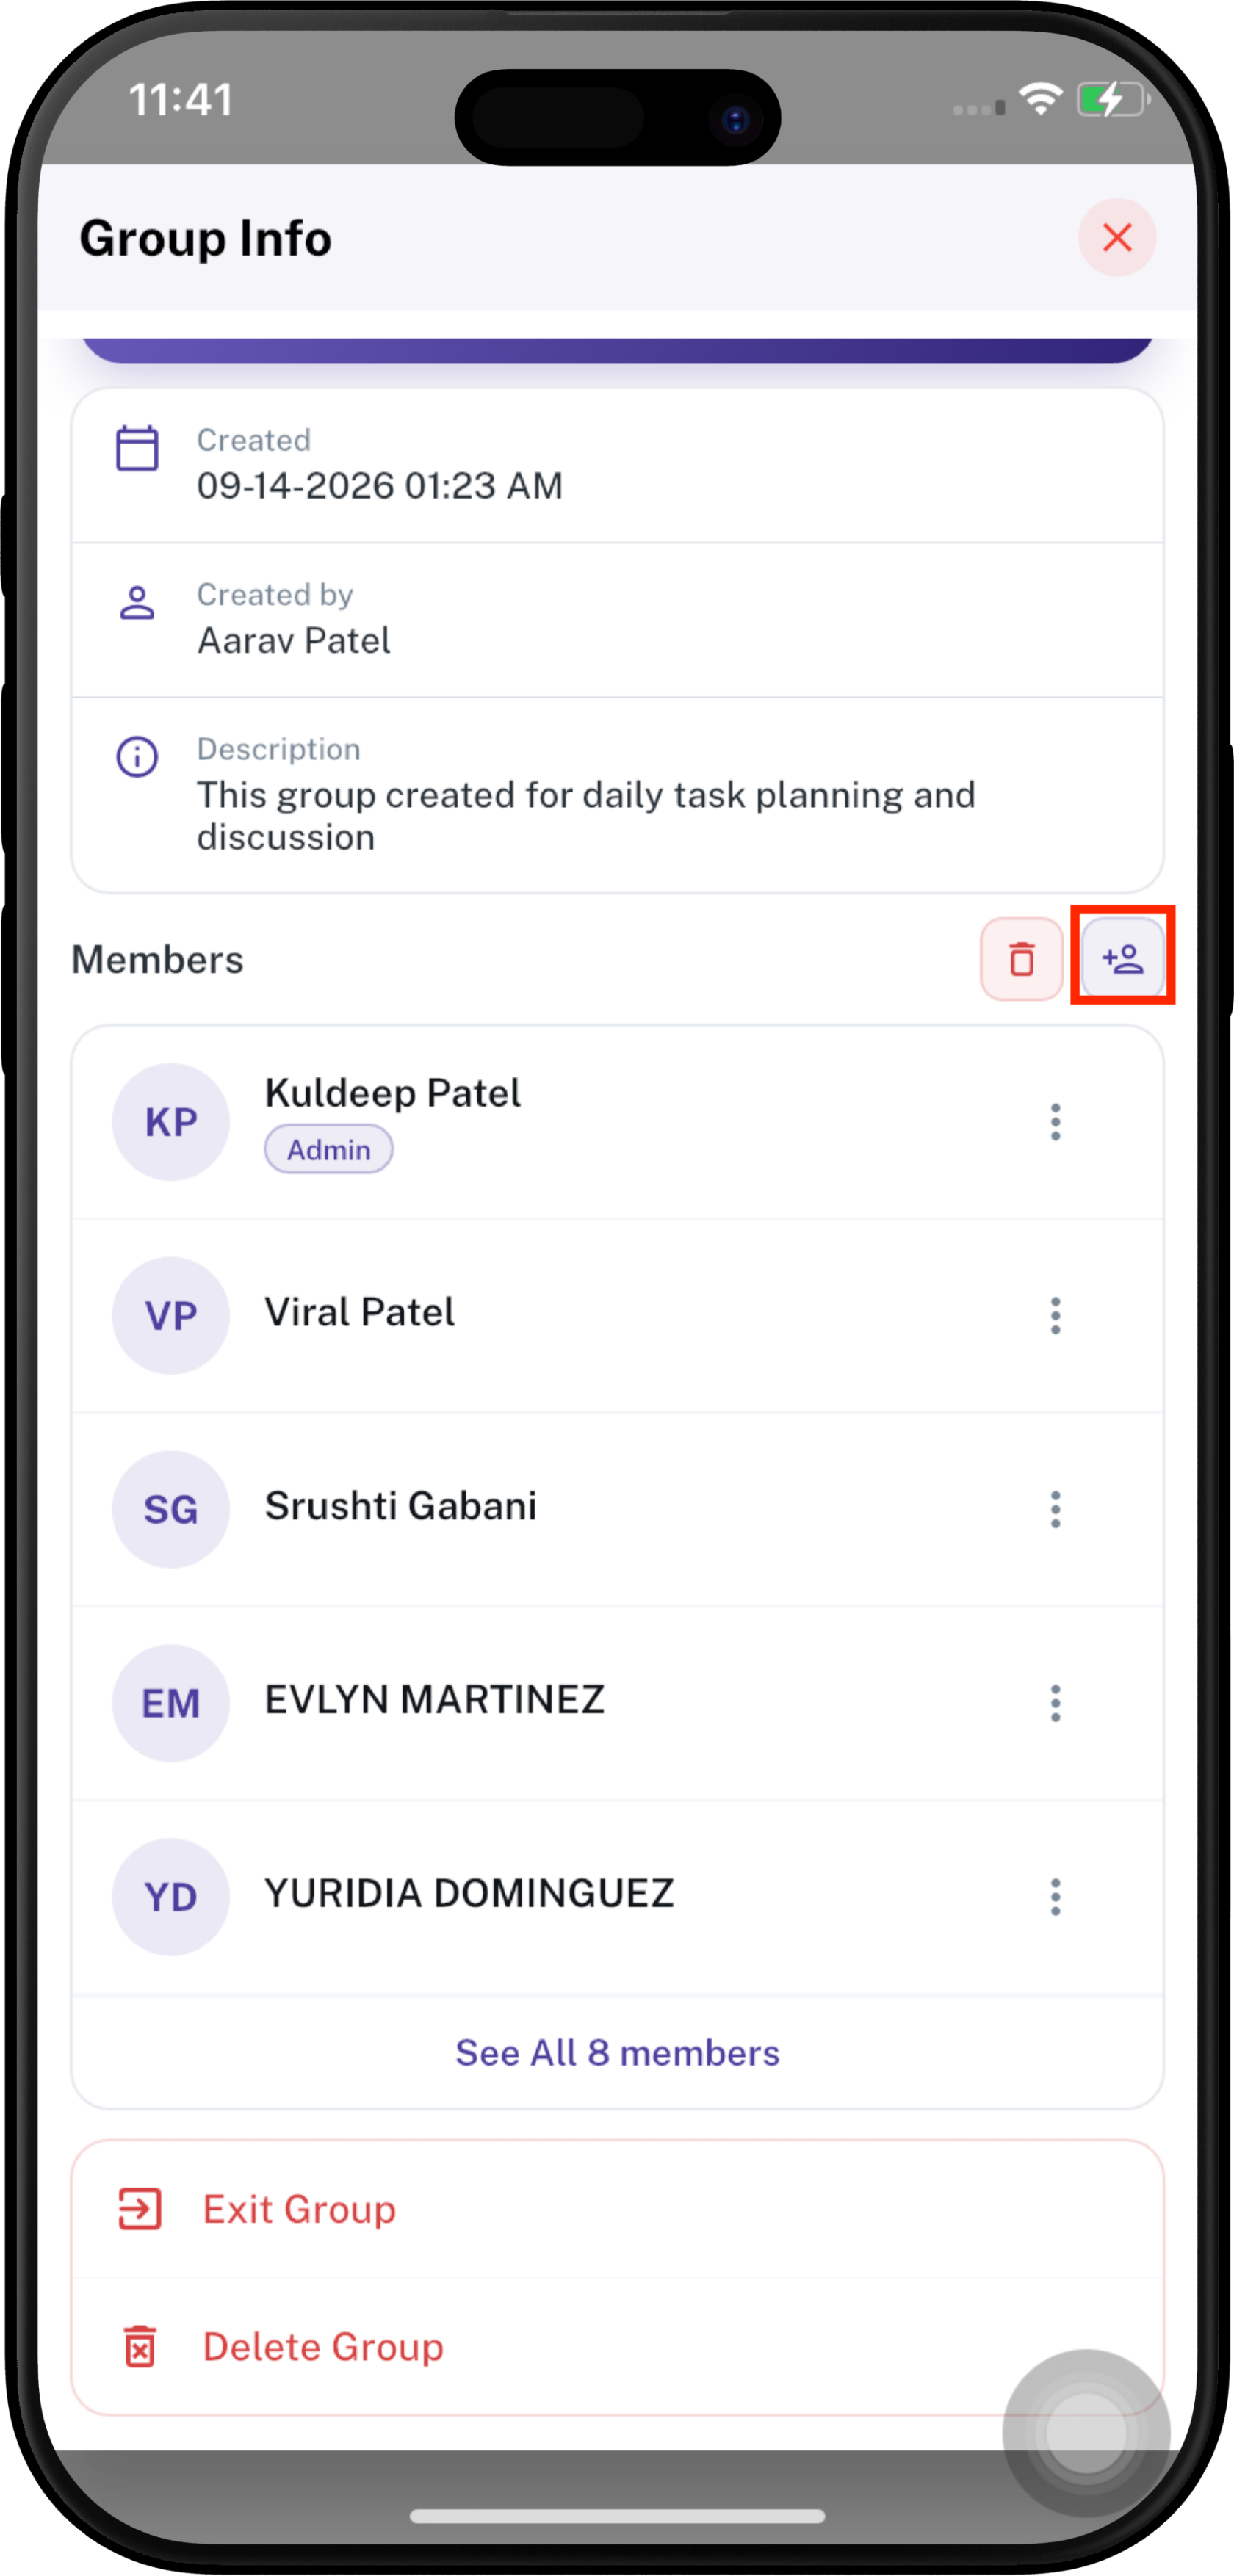
- From Group Info, tap the Add Member icon.
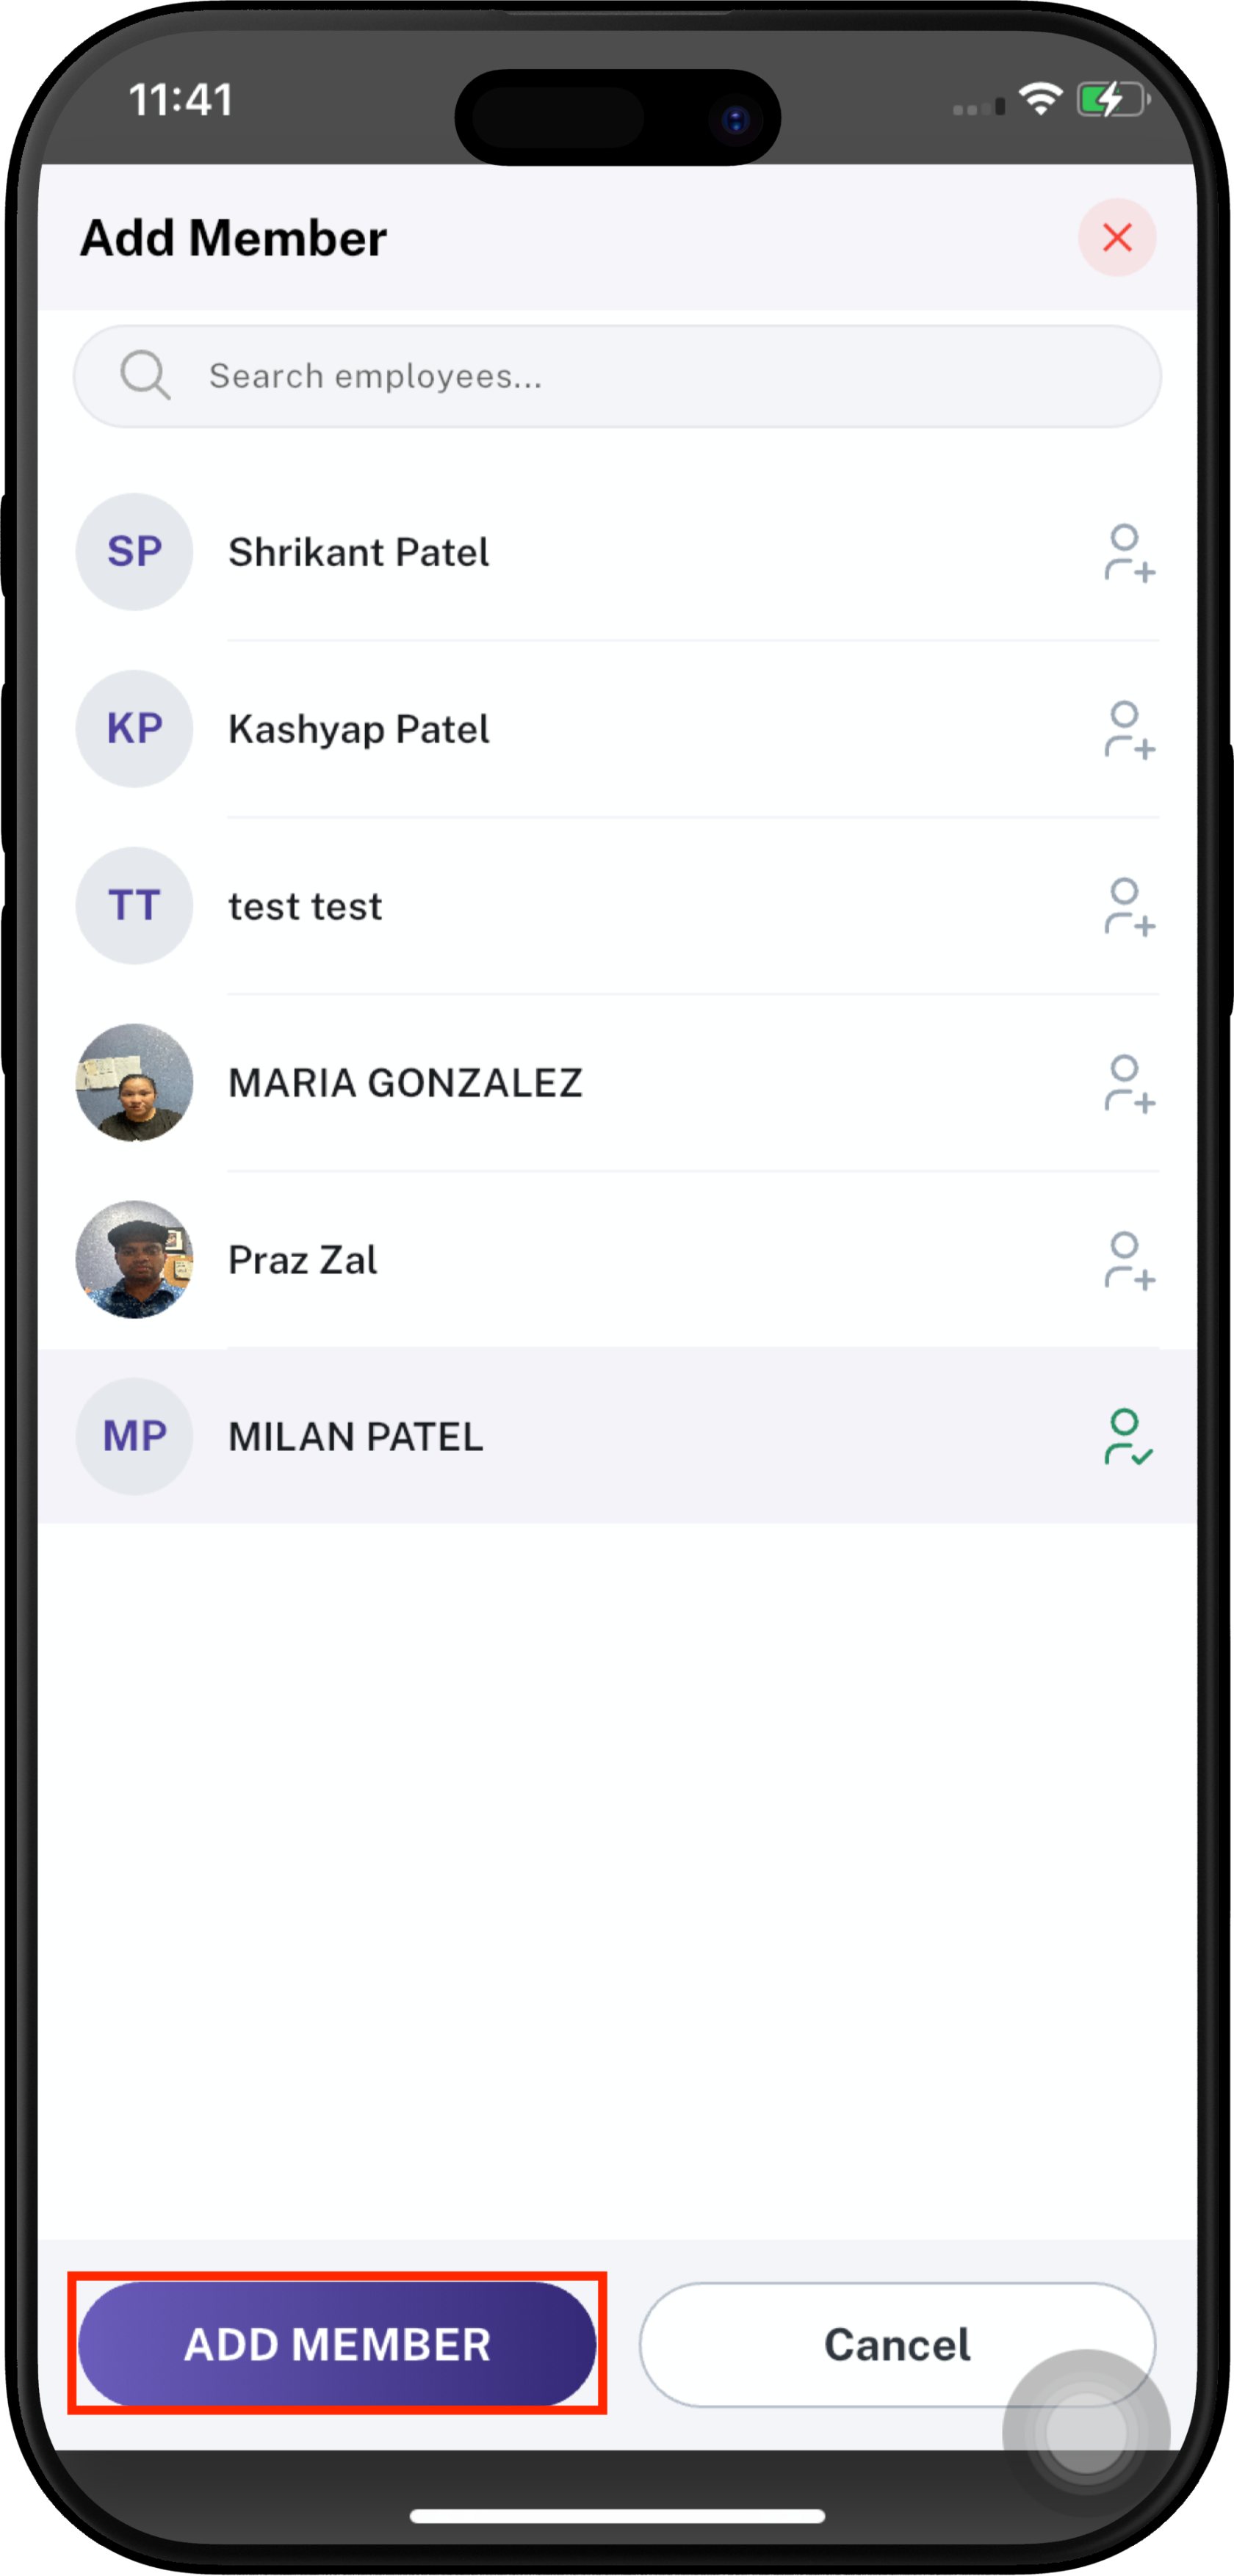
- The Add Member screen opens.
- Use Search employees to find an employee.
- Tap the add icon next to the employee you want to add.
- Selected employees are highlighted.
- Tap ADD MEMBER to confirm.
- Tap Cancel to leave without adding members.
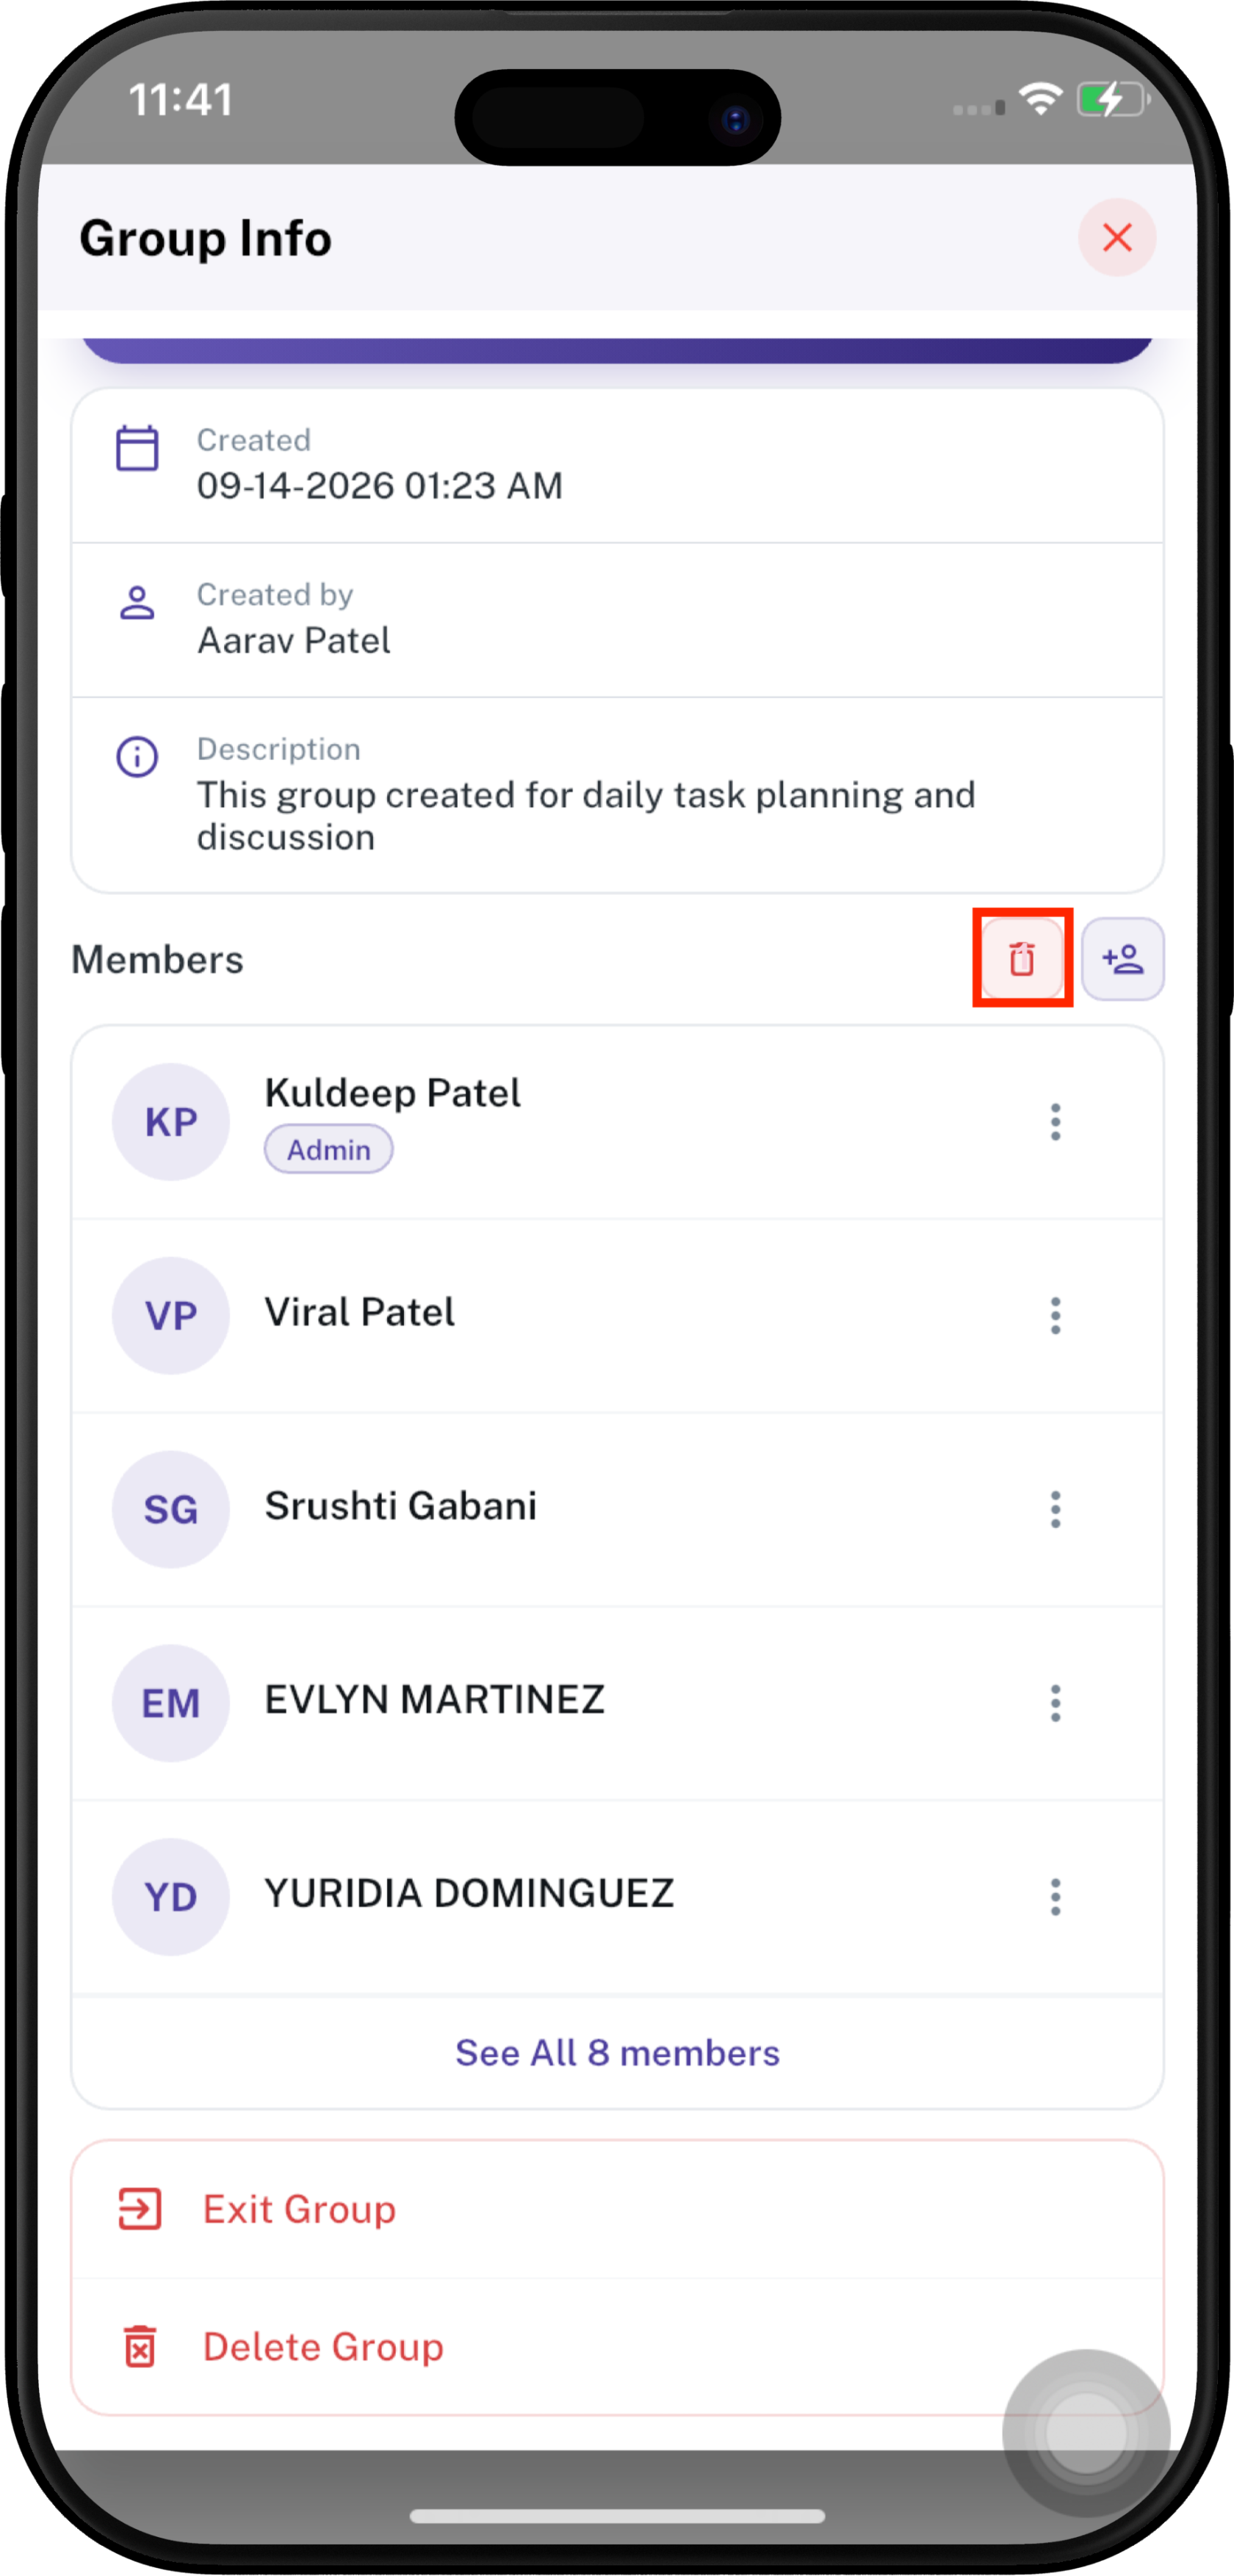
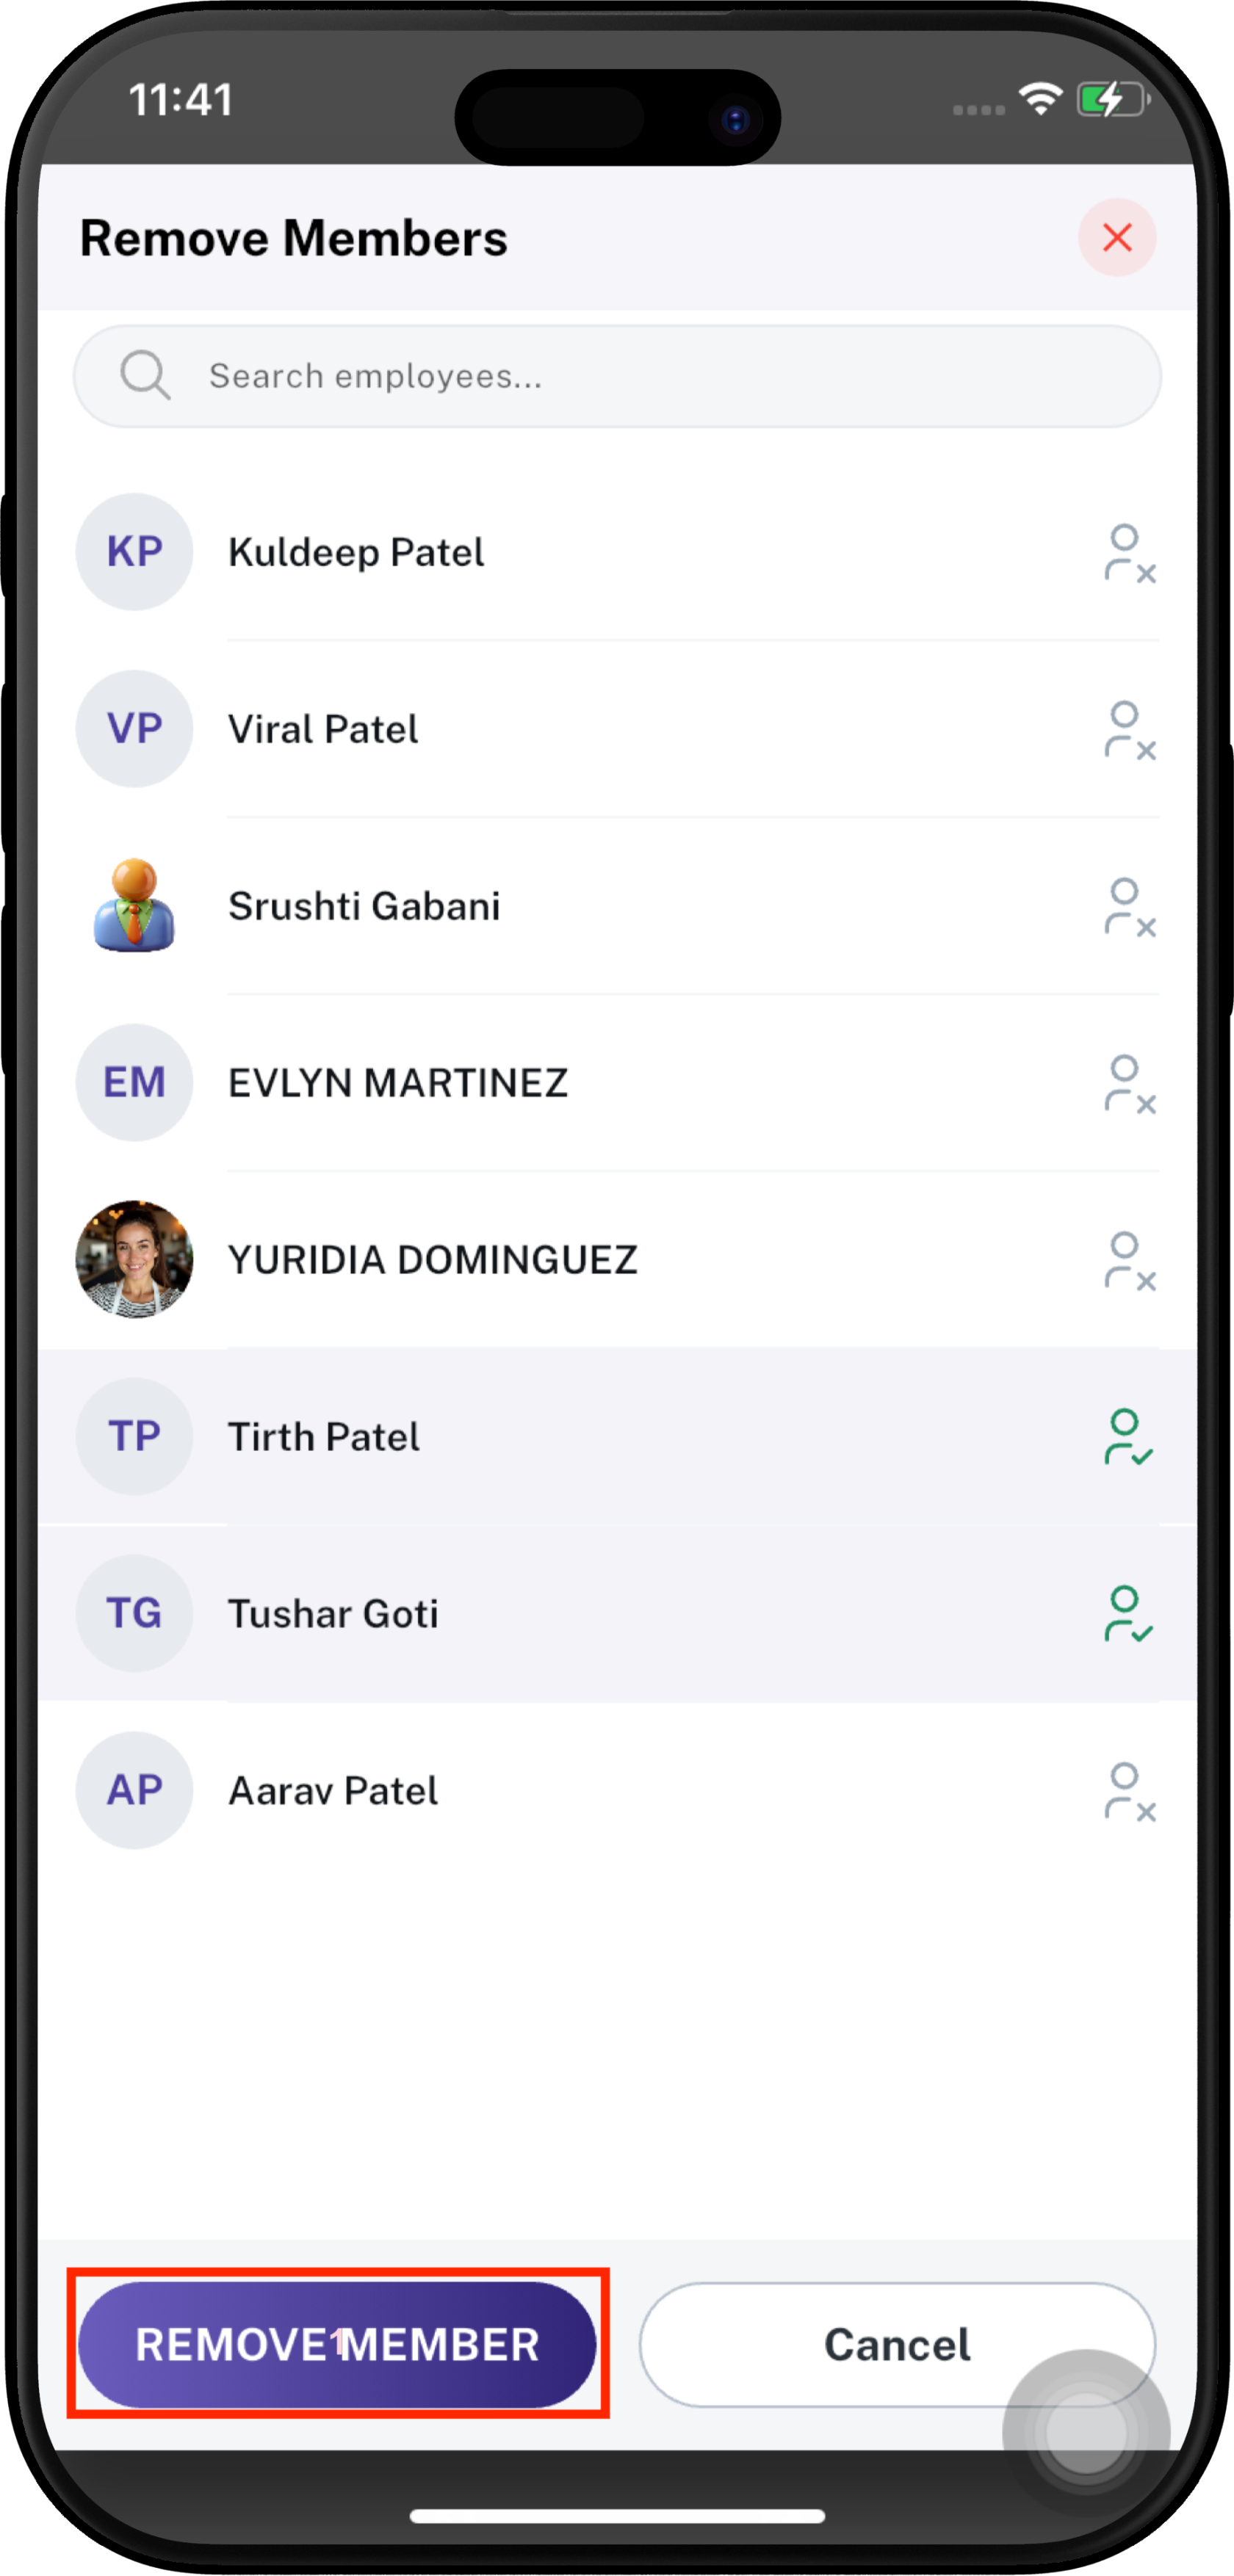
Remove Members
A group administrator can remove existing members from the group.
- From Group Info, tap the Remove Members icon.
- The Remove Members screen opens.
- Search for an employee if required.
- Select the member or members to remove.
- Tap REMOVE MEMBER.
- Tap Cancel to stop the action.
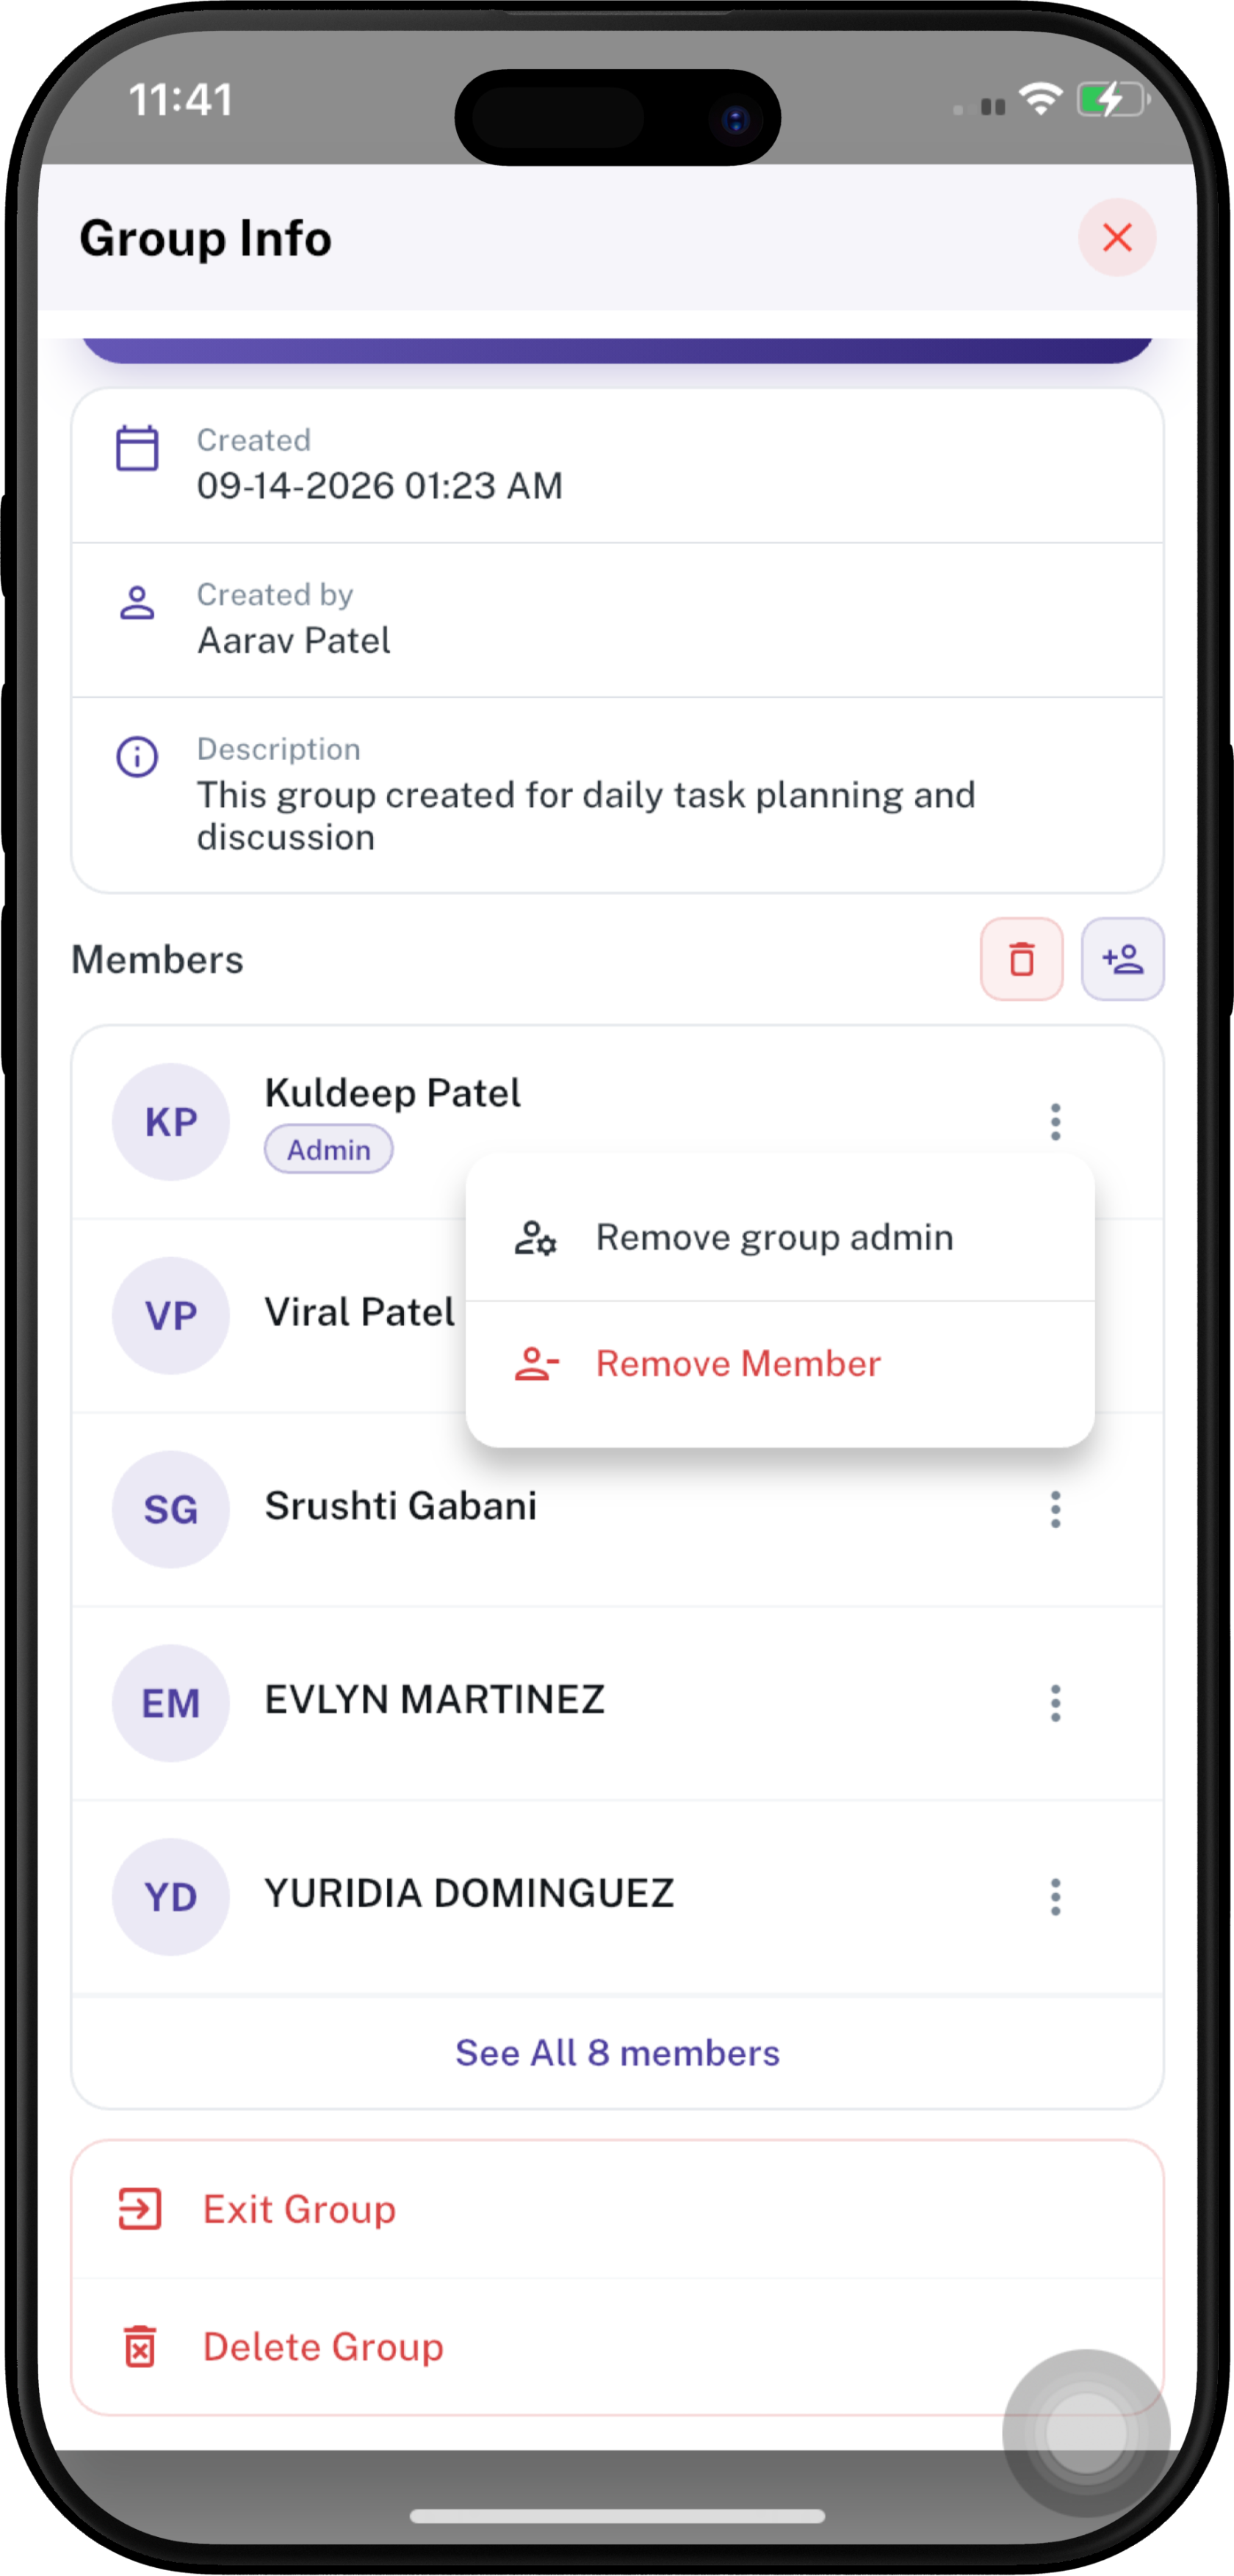
Manage a Member
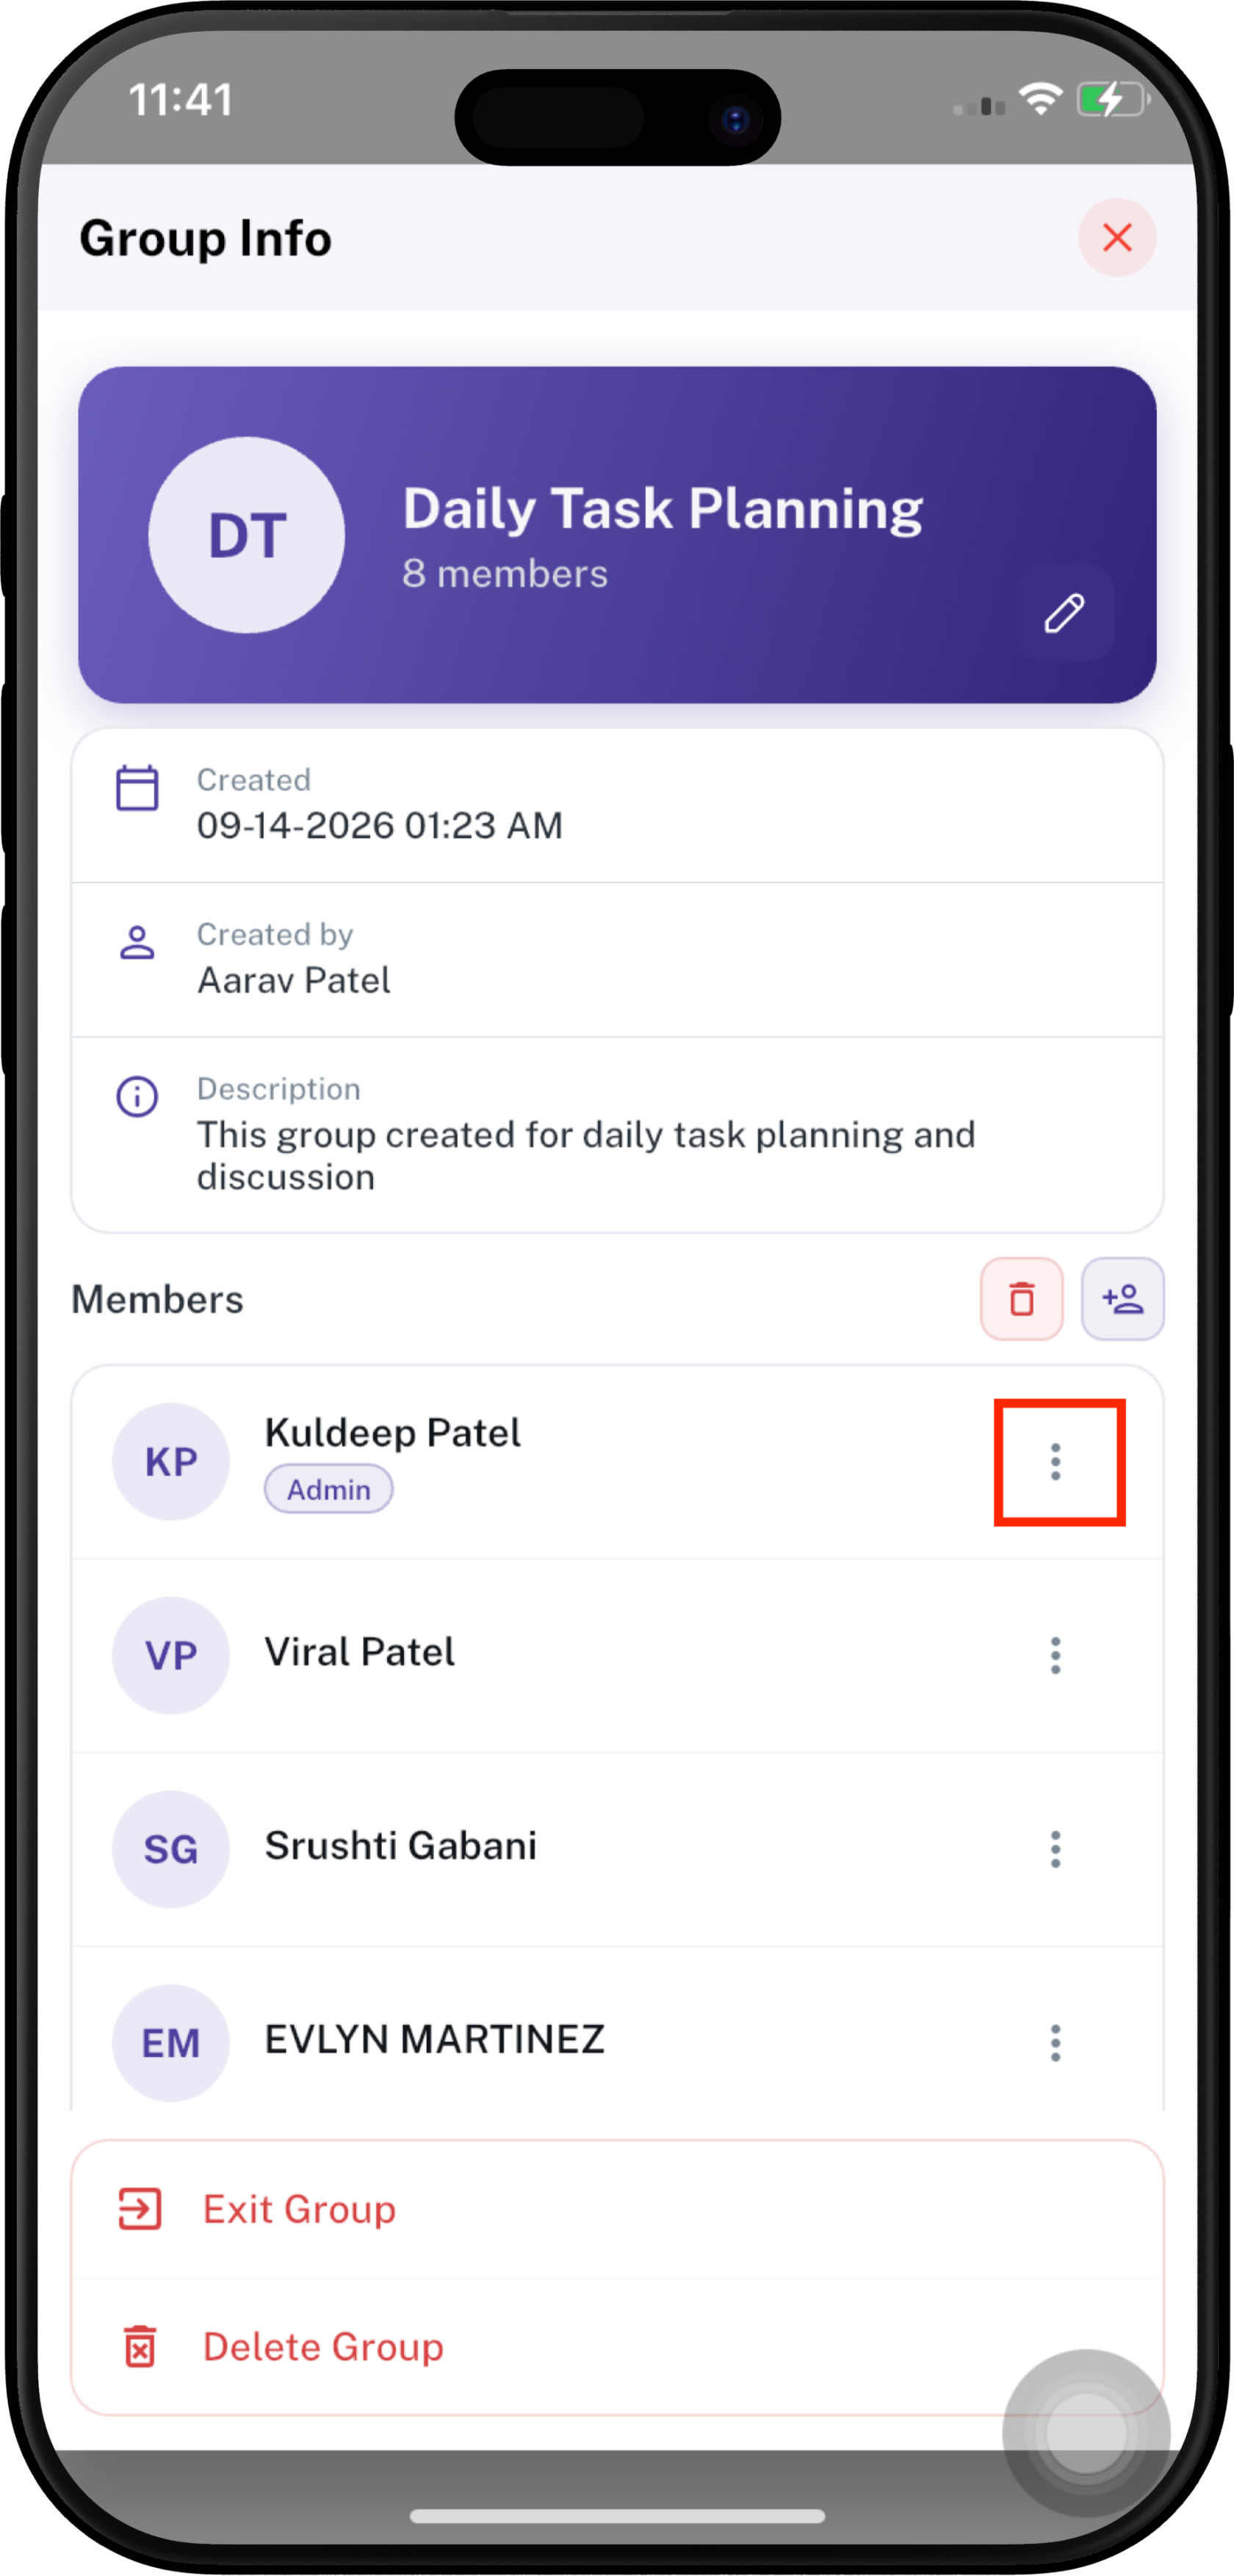
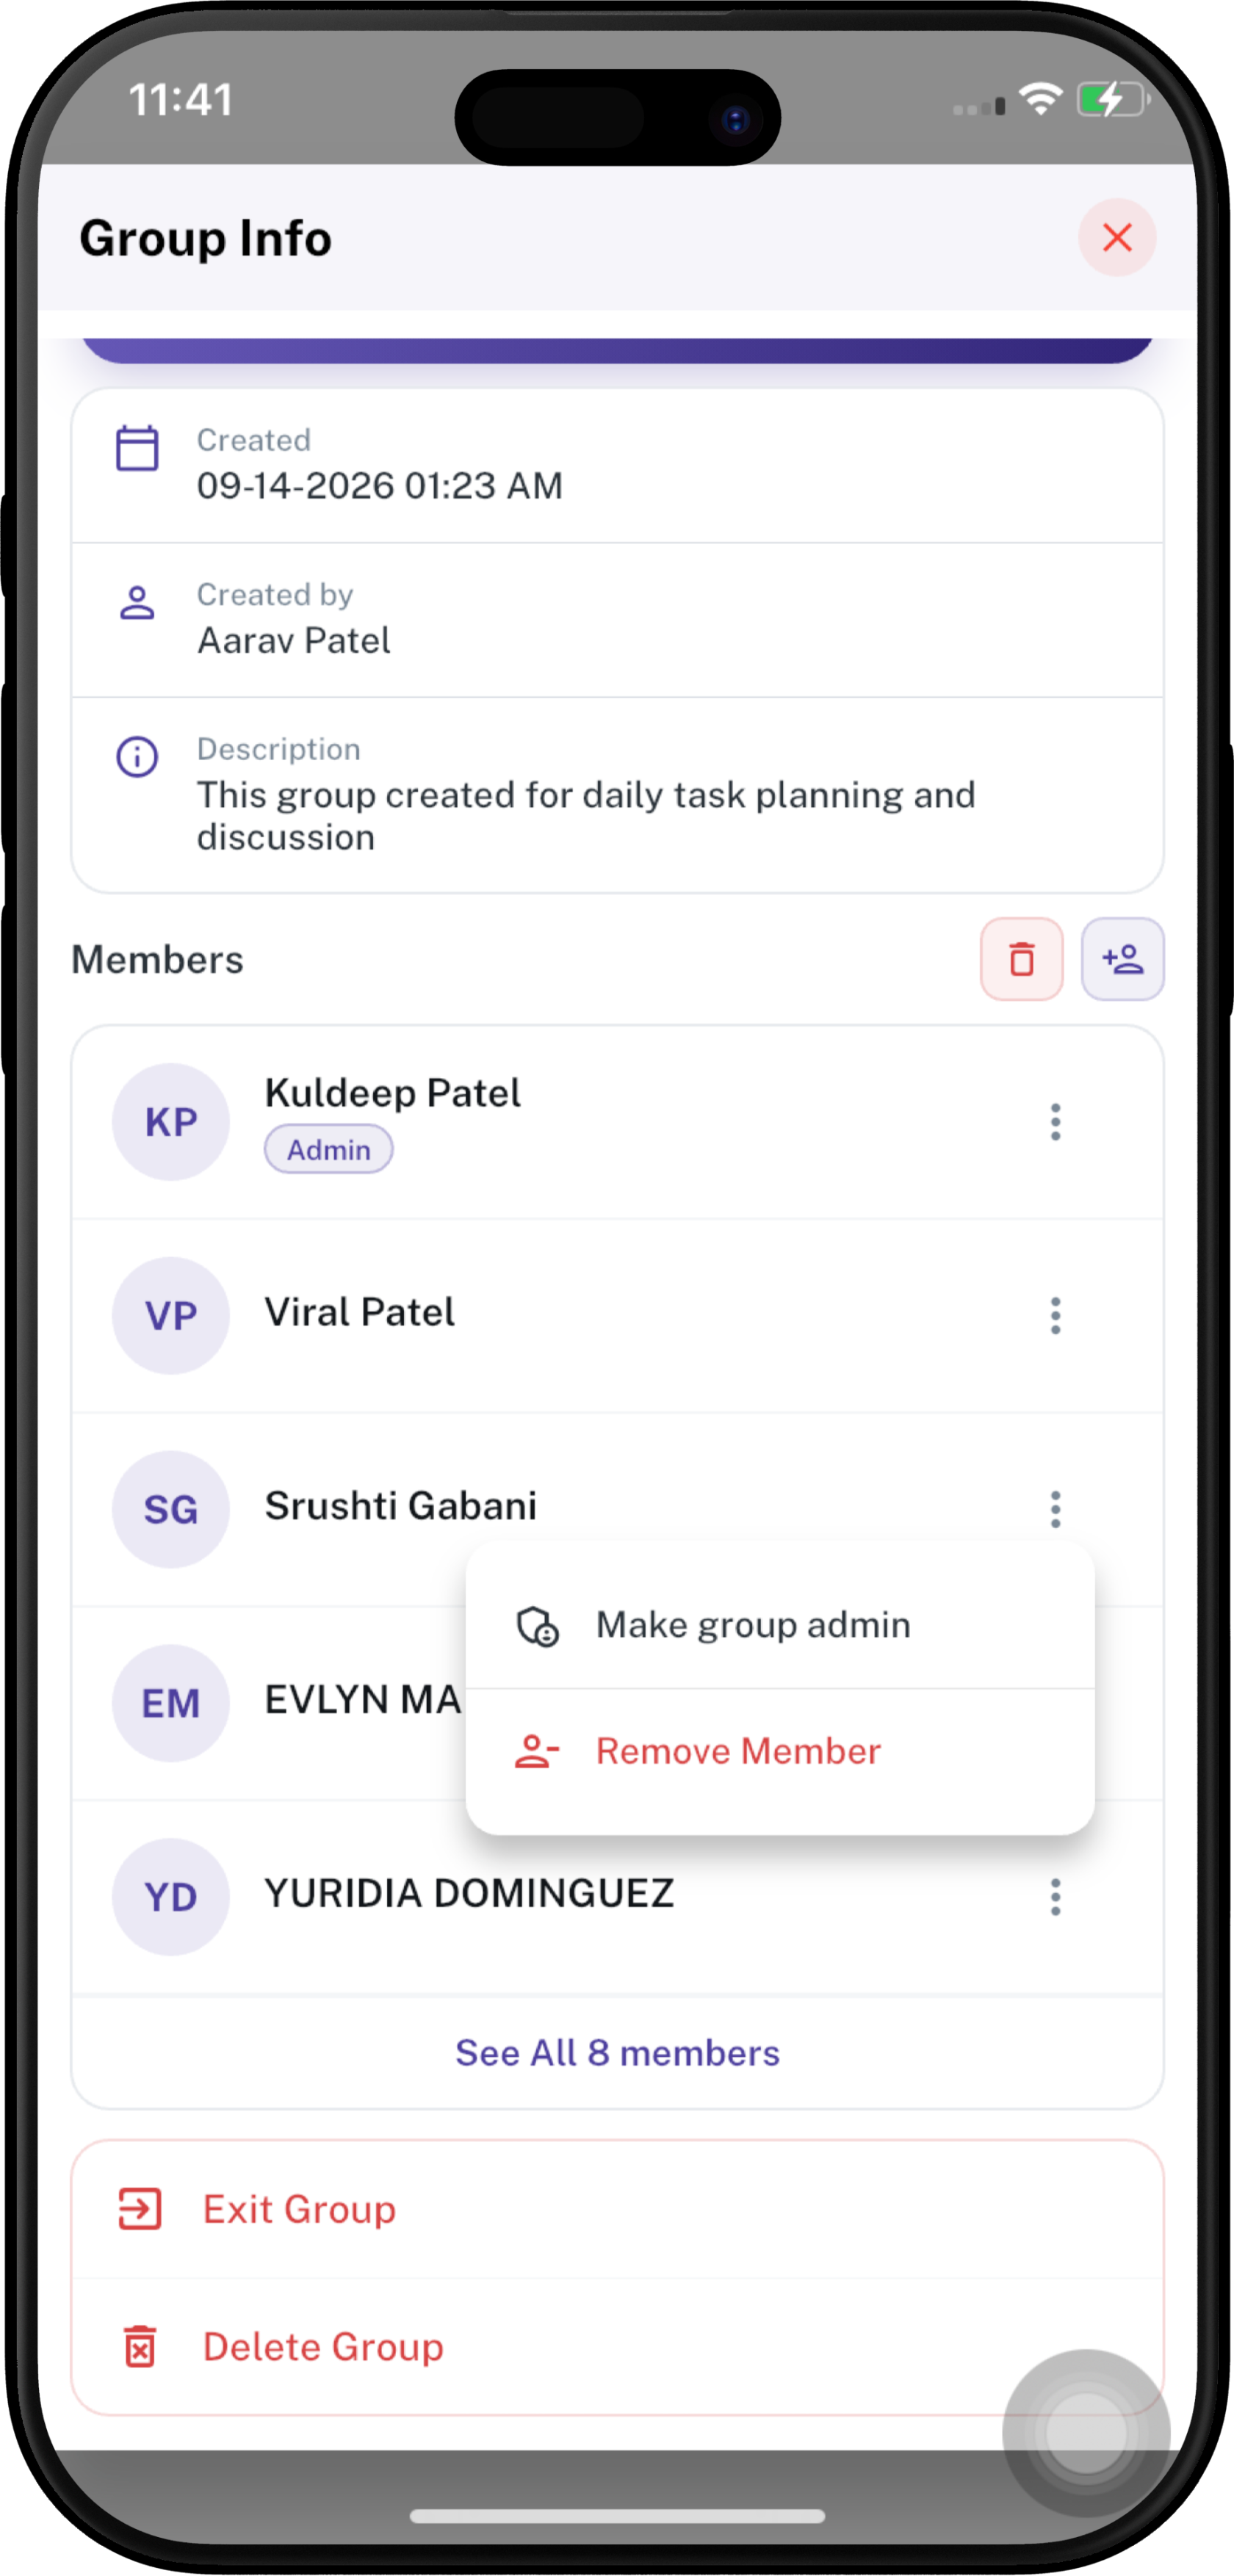
For a group admin, the menu can include:
- Make group admin — Gives the selected member group-admin privileges. The admin status is shown with an Admin label beside the member's name.
- Remove group admin — If a member is already a group admin, the member remains in the group but no longer has group-admin privileges.
- Remove Member — Removes the selected member from the group.
Edit Group
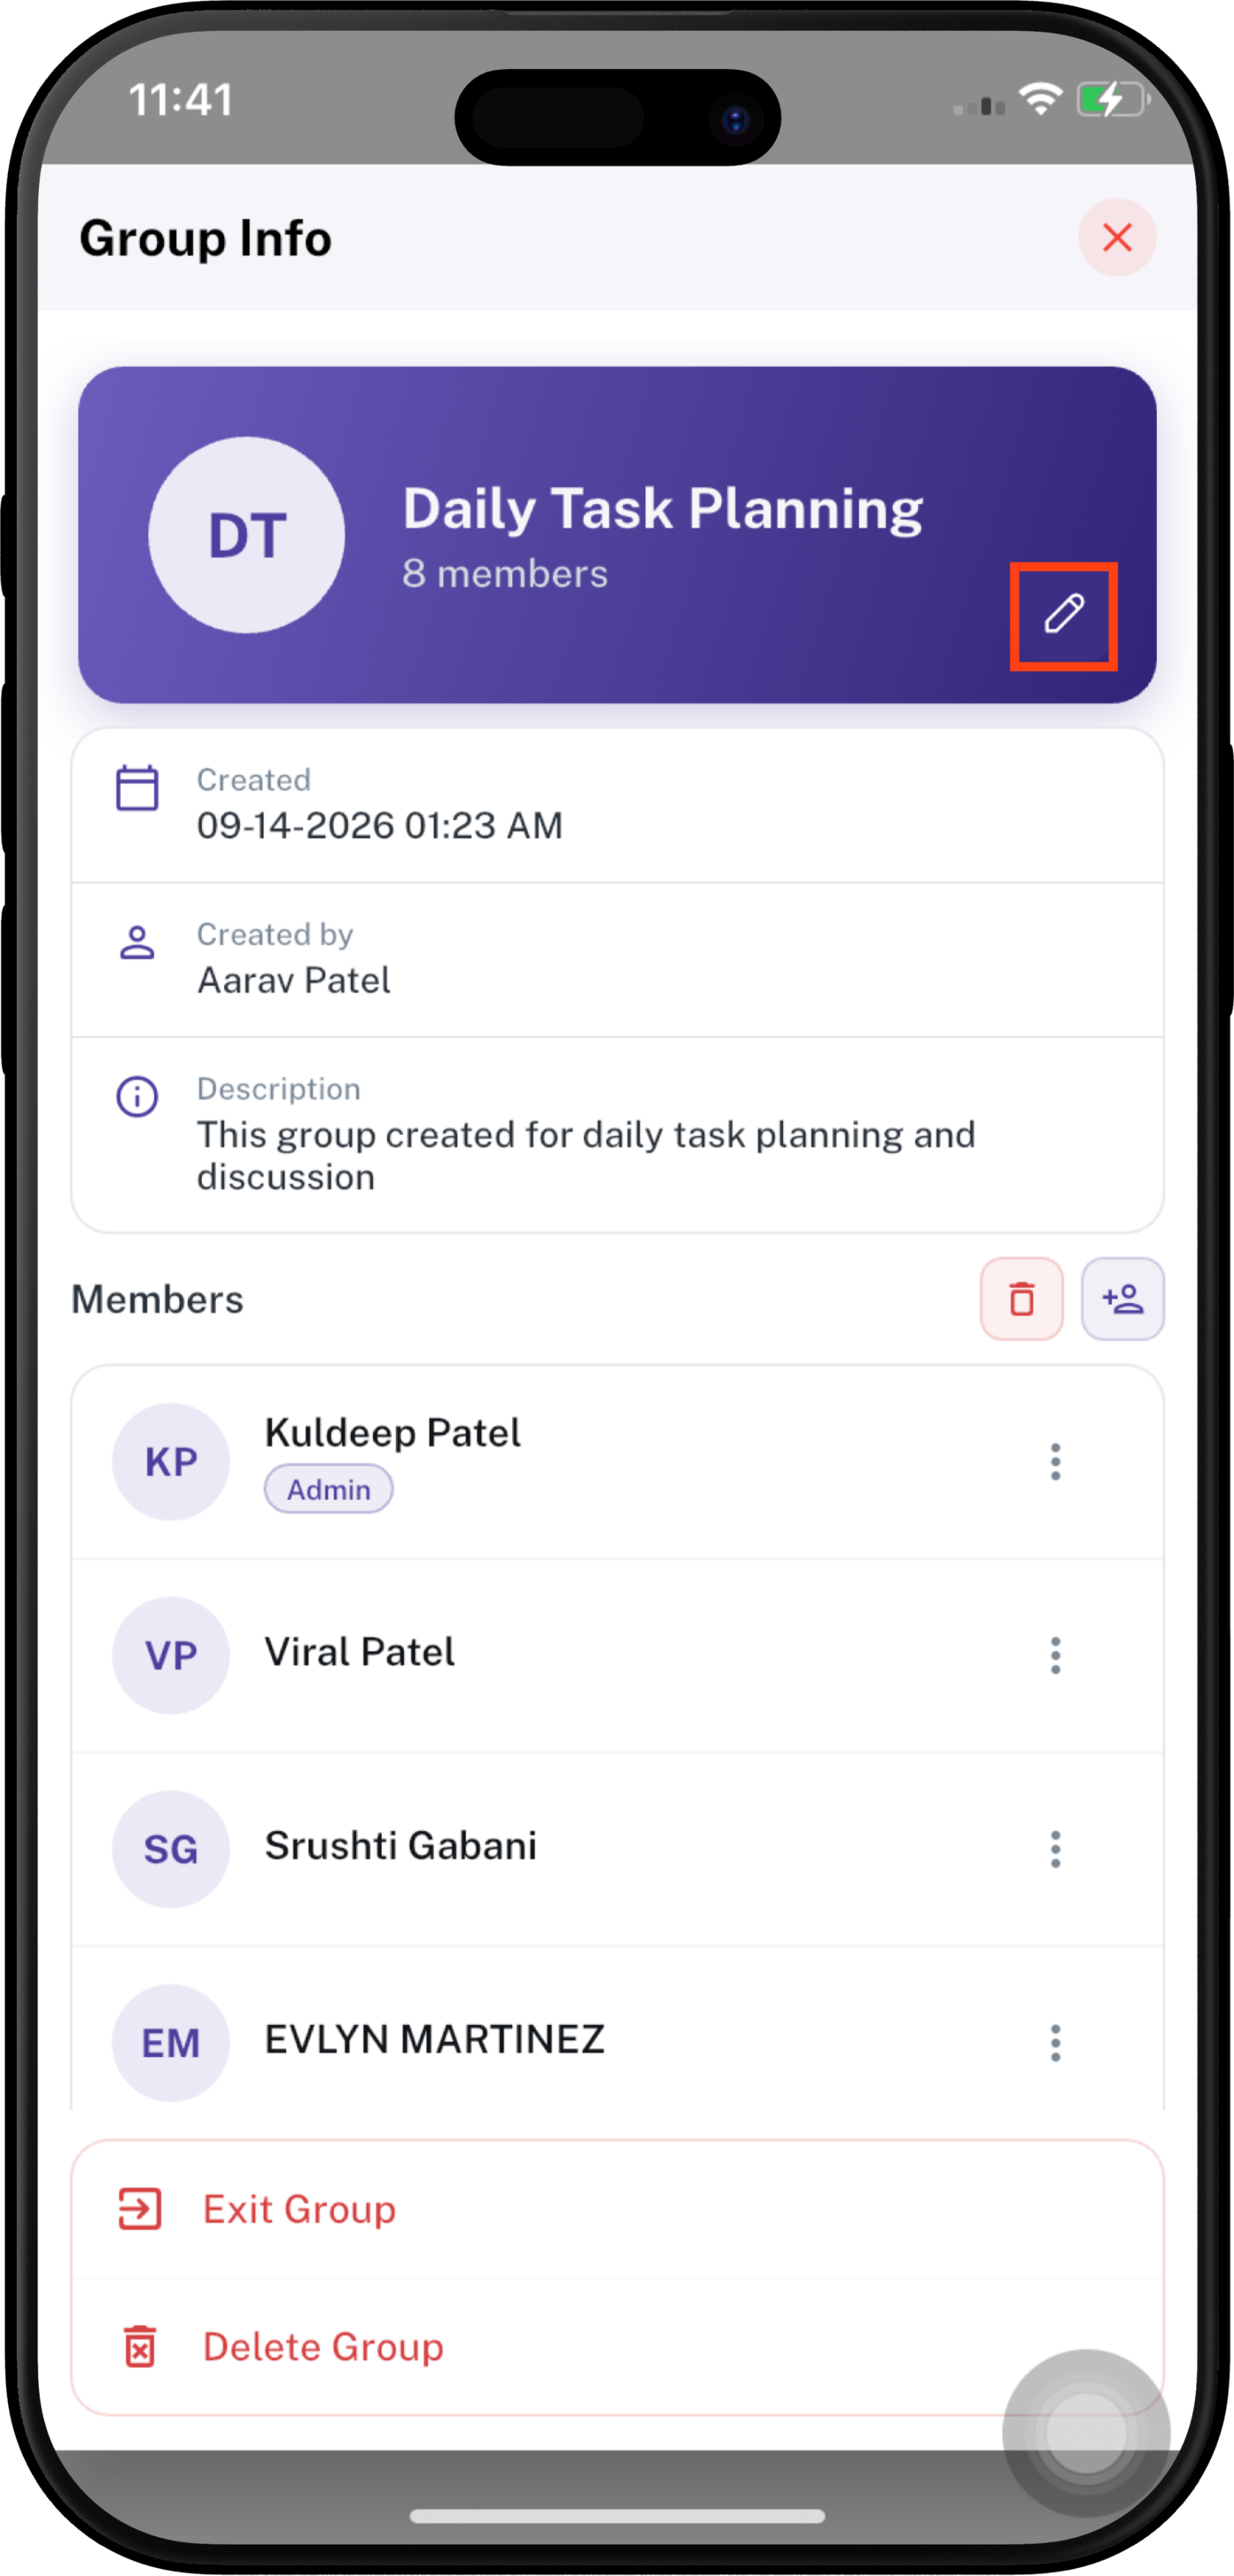
Group administrators can update group information.
- Open Group Info.
- Tap the Edit icon.
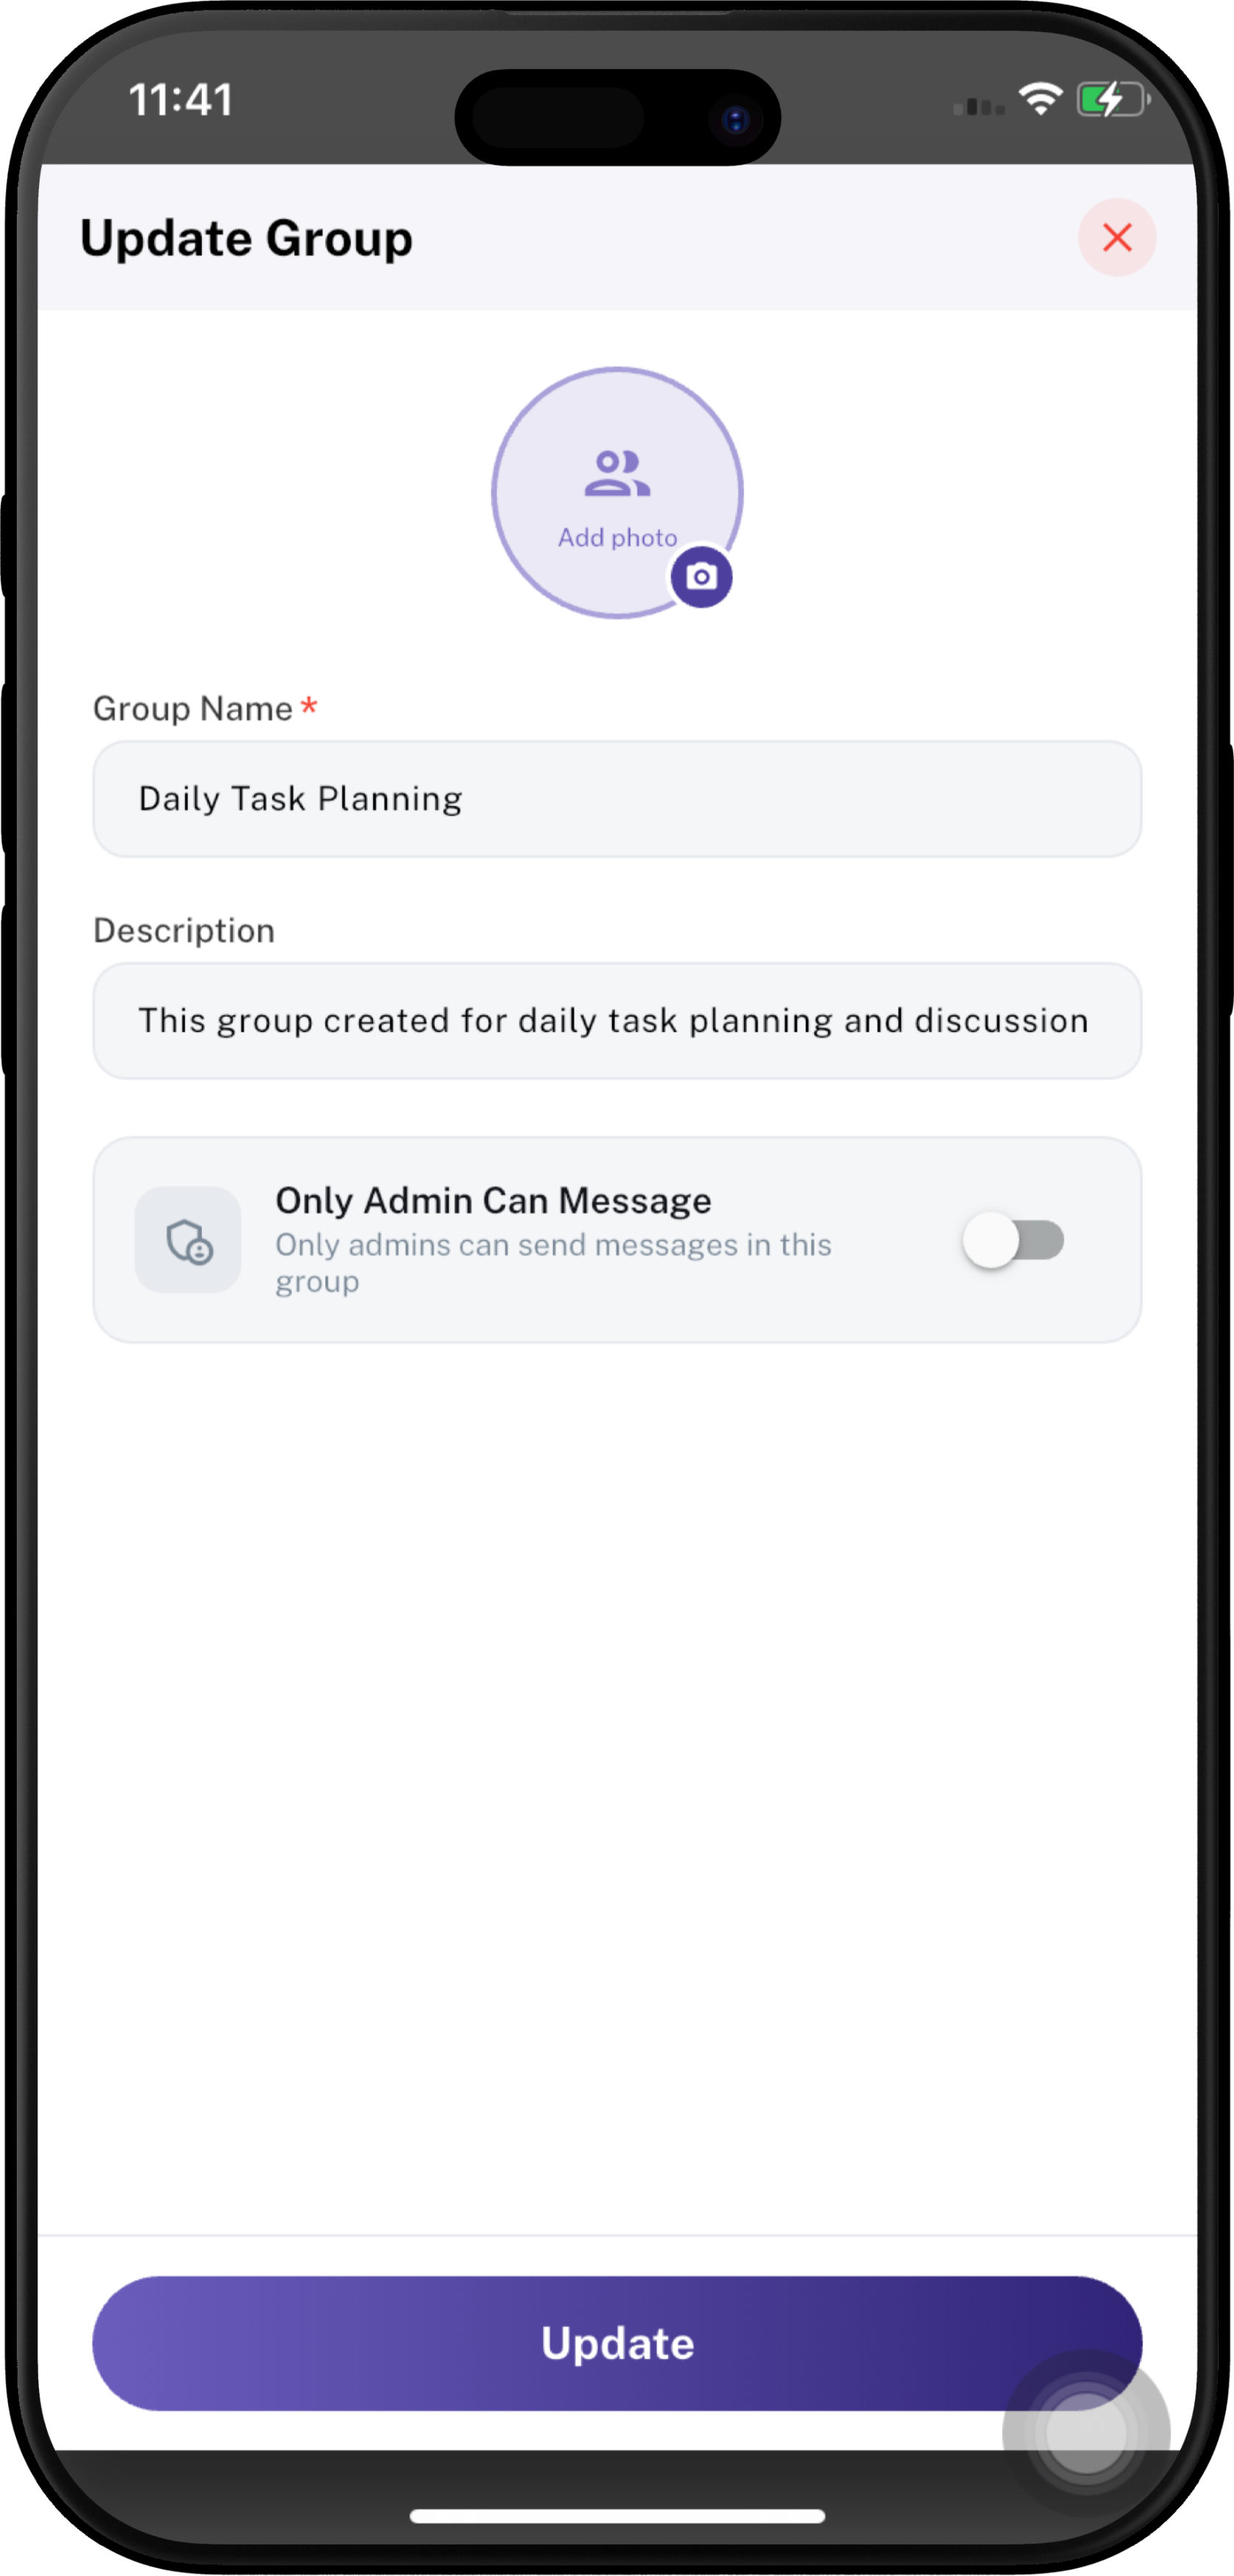
- The Update Group screen opens.
- Update the required group information:
- Add Photo
- Group Name
- Description
- Only Admin Can Message
- Tap Update to save the changes.
- Tap Close to close the screen without saving.
Only Admin Can Message
The Only Admin Can Message option controls who can send messages in the group.
- Enabled — Only group administrators can send messages.
- Disabled — Group members can send messages according to the group's normal permissions.
The setting can be changed from Update Group.
Exit Group
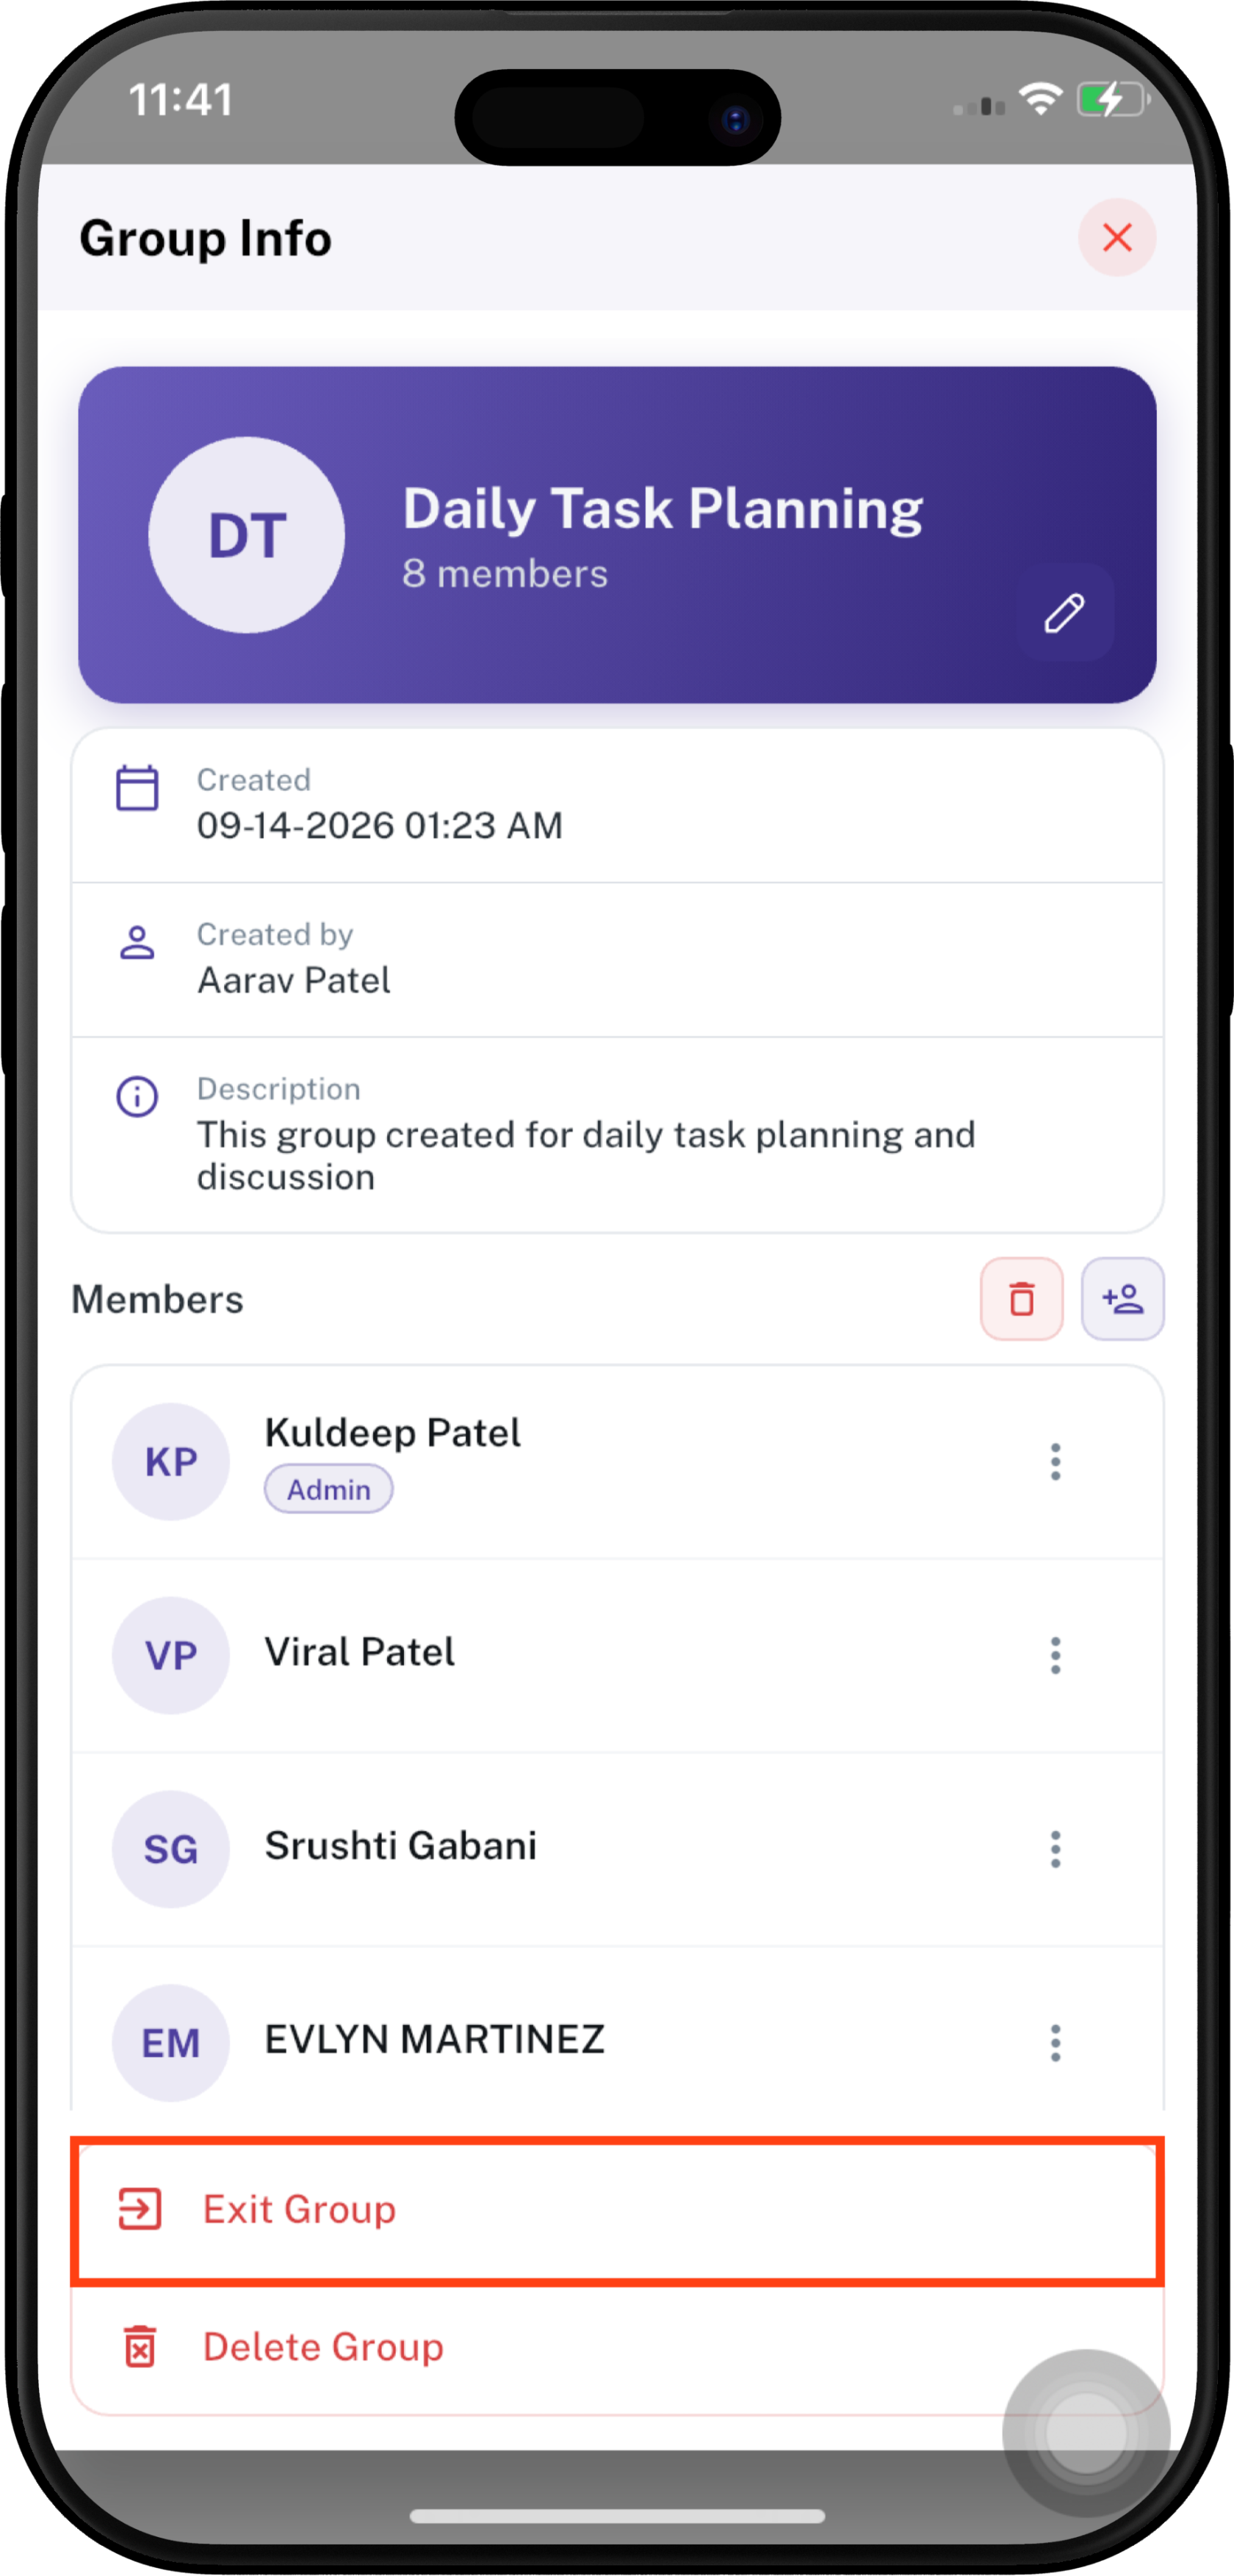
A member can leave the group by selecting Exit Group from Group Info.
- Open Group Info.
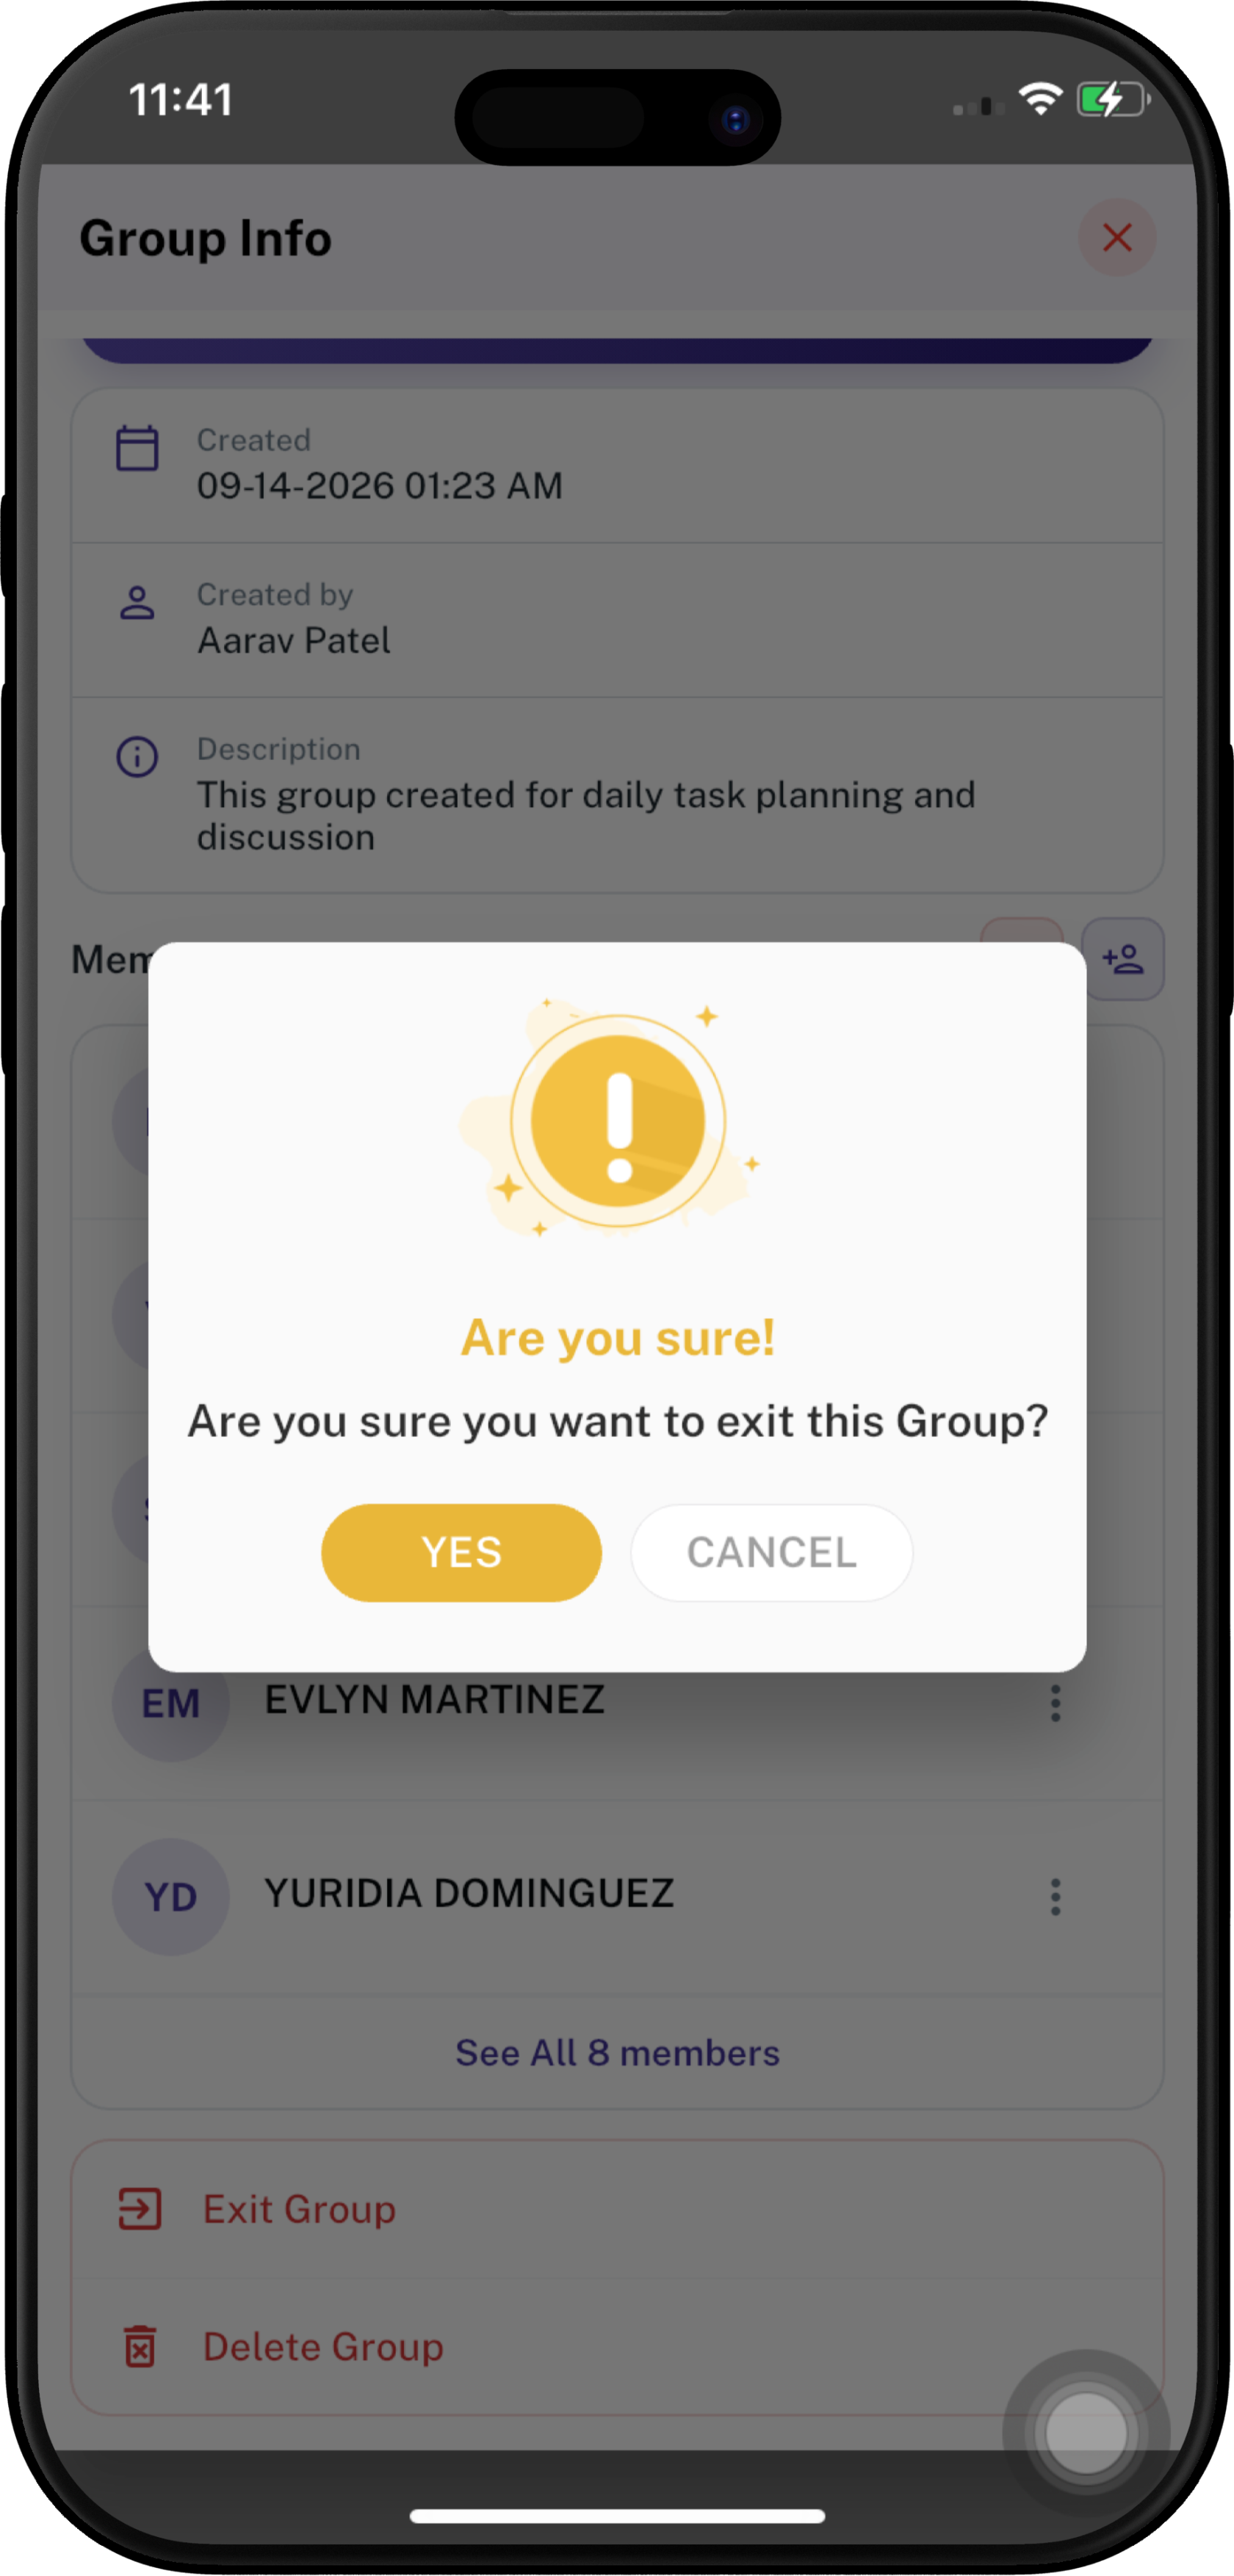
- Tap Exit Group.
- A confirmation message appears: “Are you sure you want to exit this Group?”
- Tap YES to leave the group.
- Tap CANCEL to stay in the group.
Delete Group
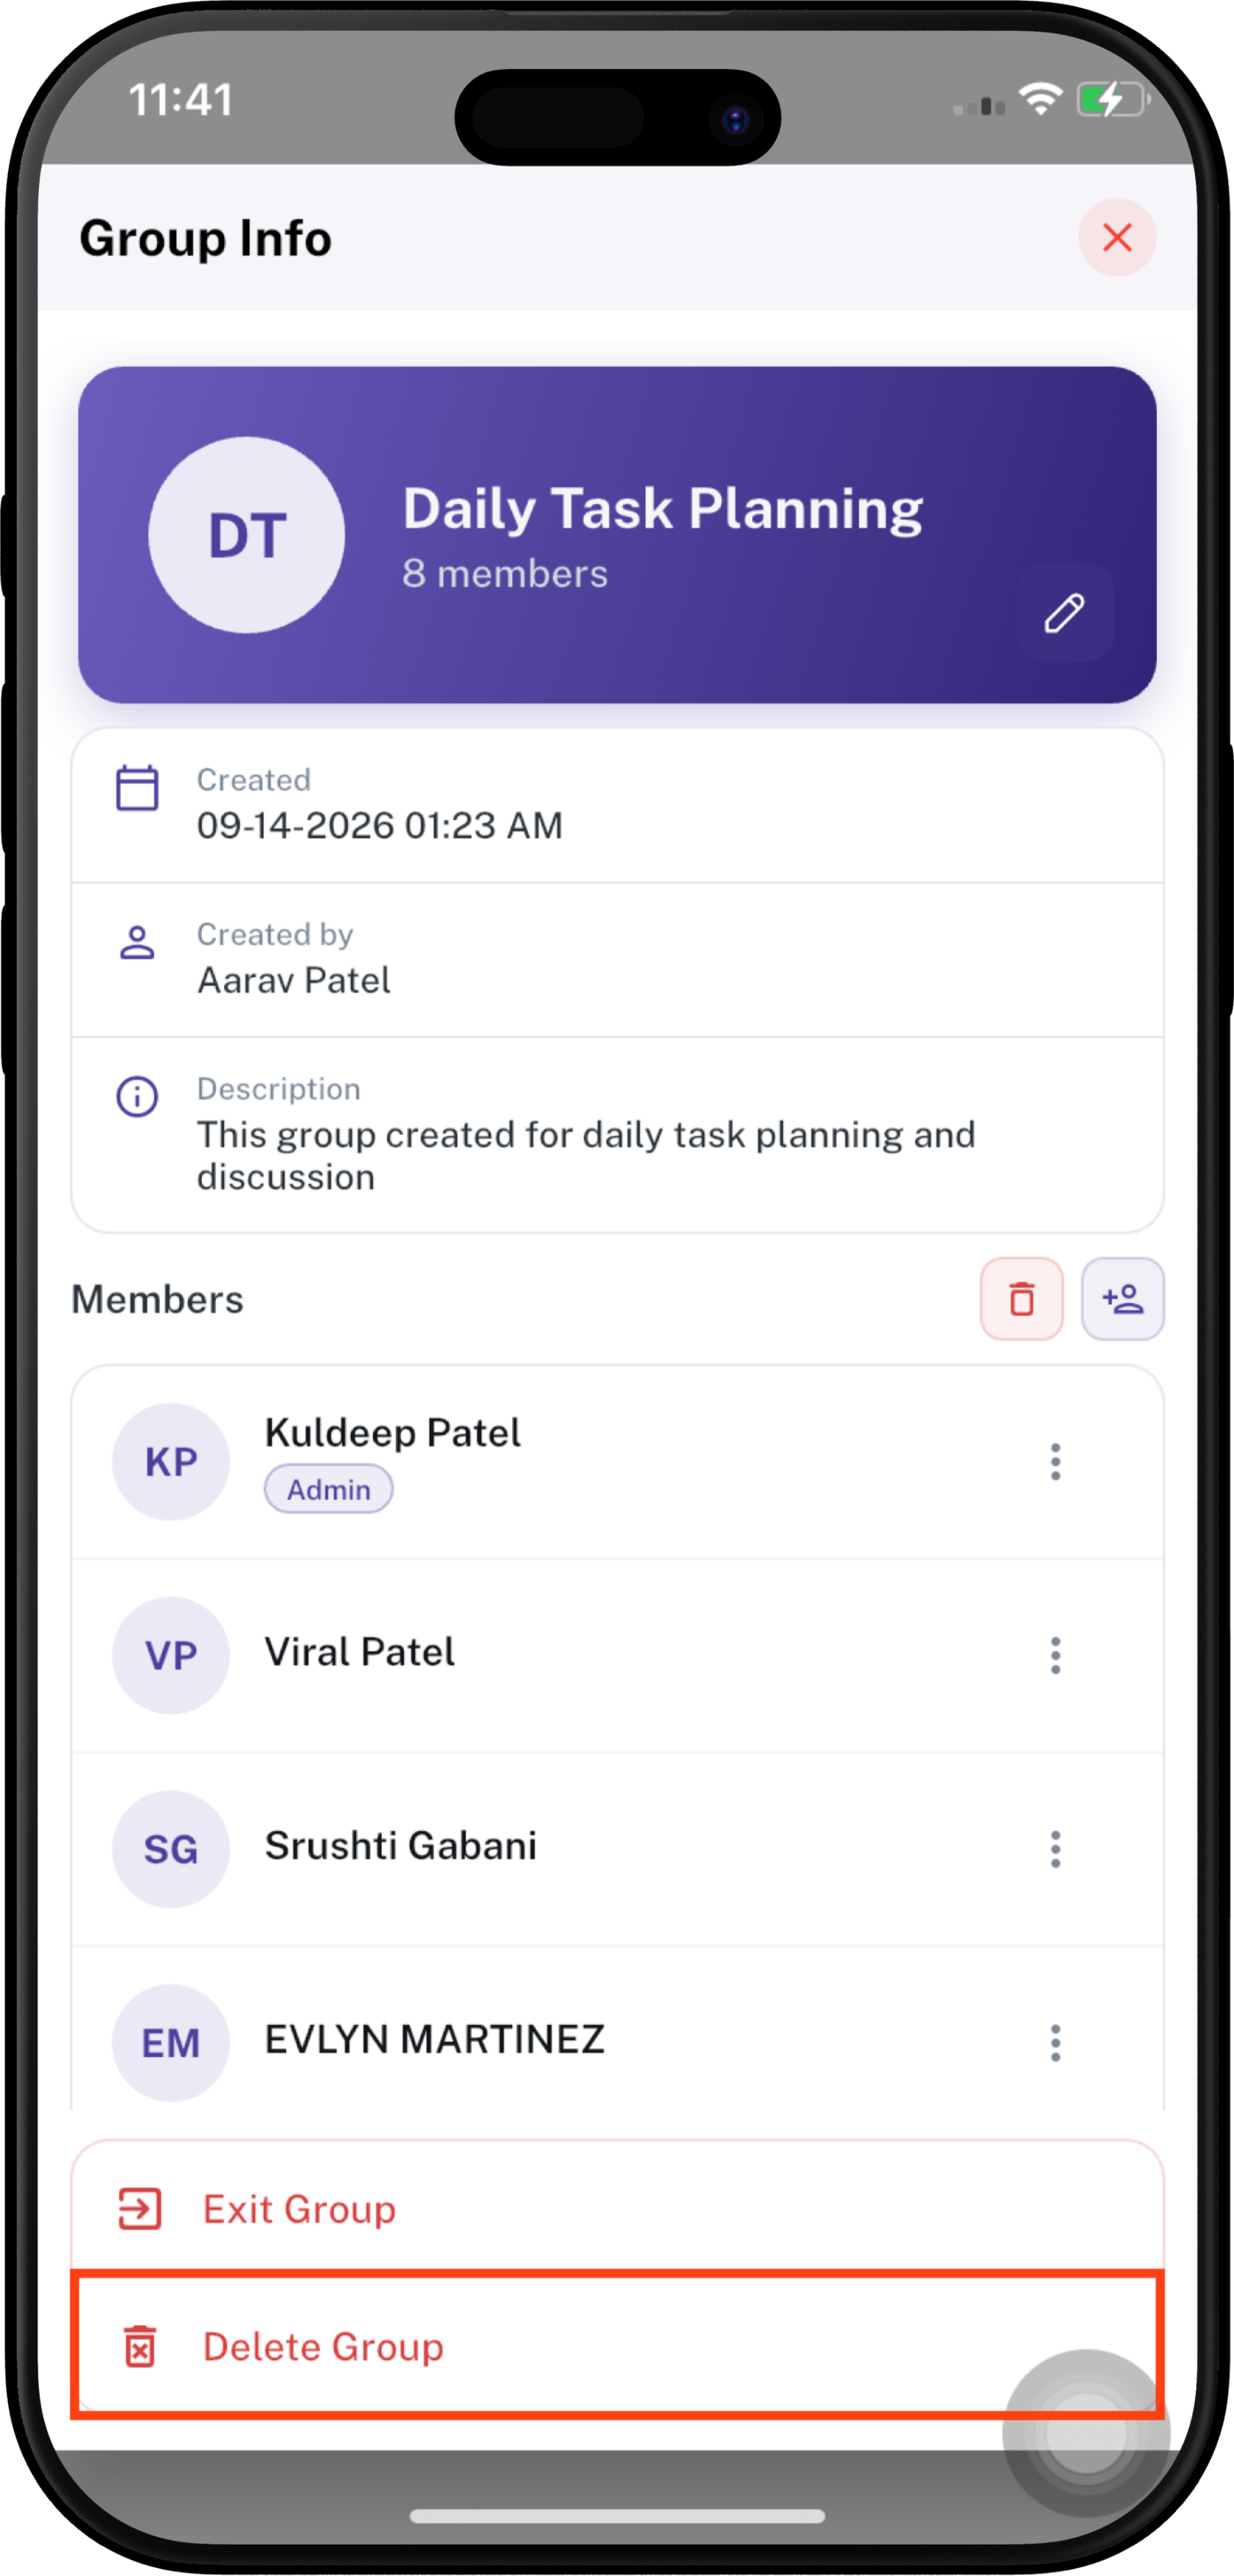
The group creator/authorized administrator can delete the group when the option is available.
- Open Group Info.
- Tap Delete Group.
- A confirmation message appears explaining that the group and all messages will be permanently deleted.
- Tap YES to permanently delete the group.
- Tap CANCEL to stop the deletion.
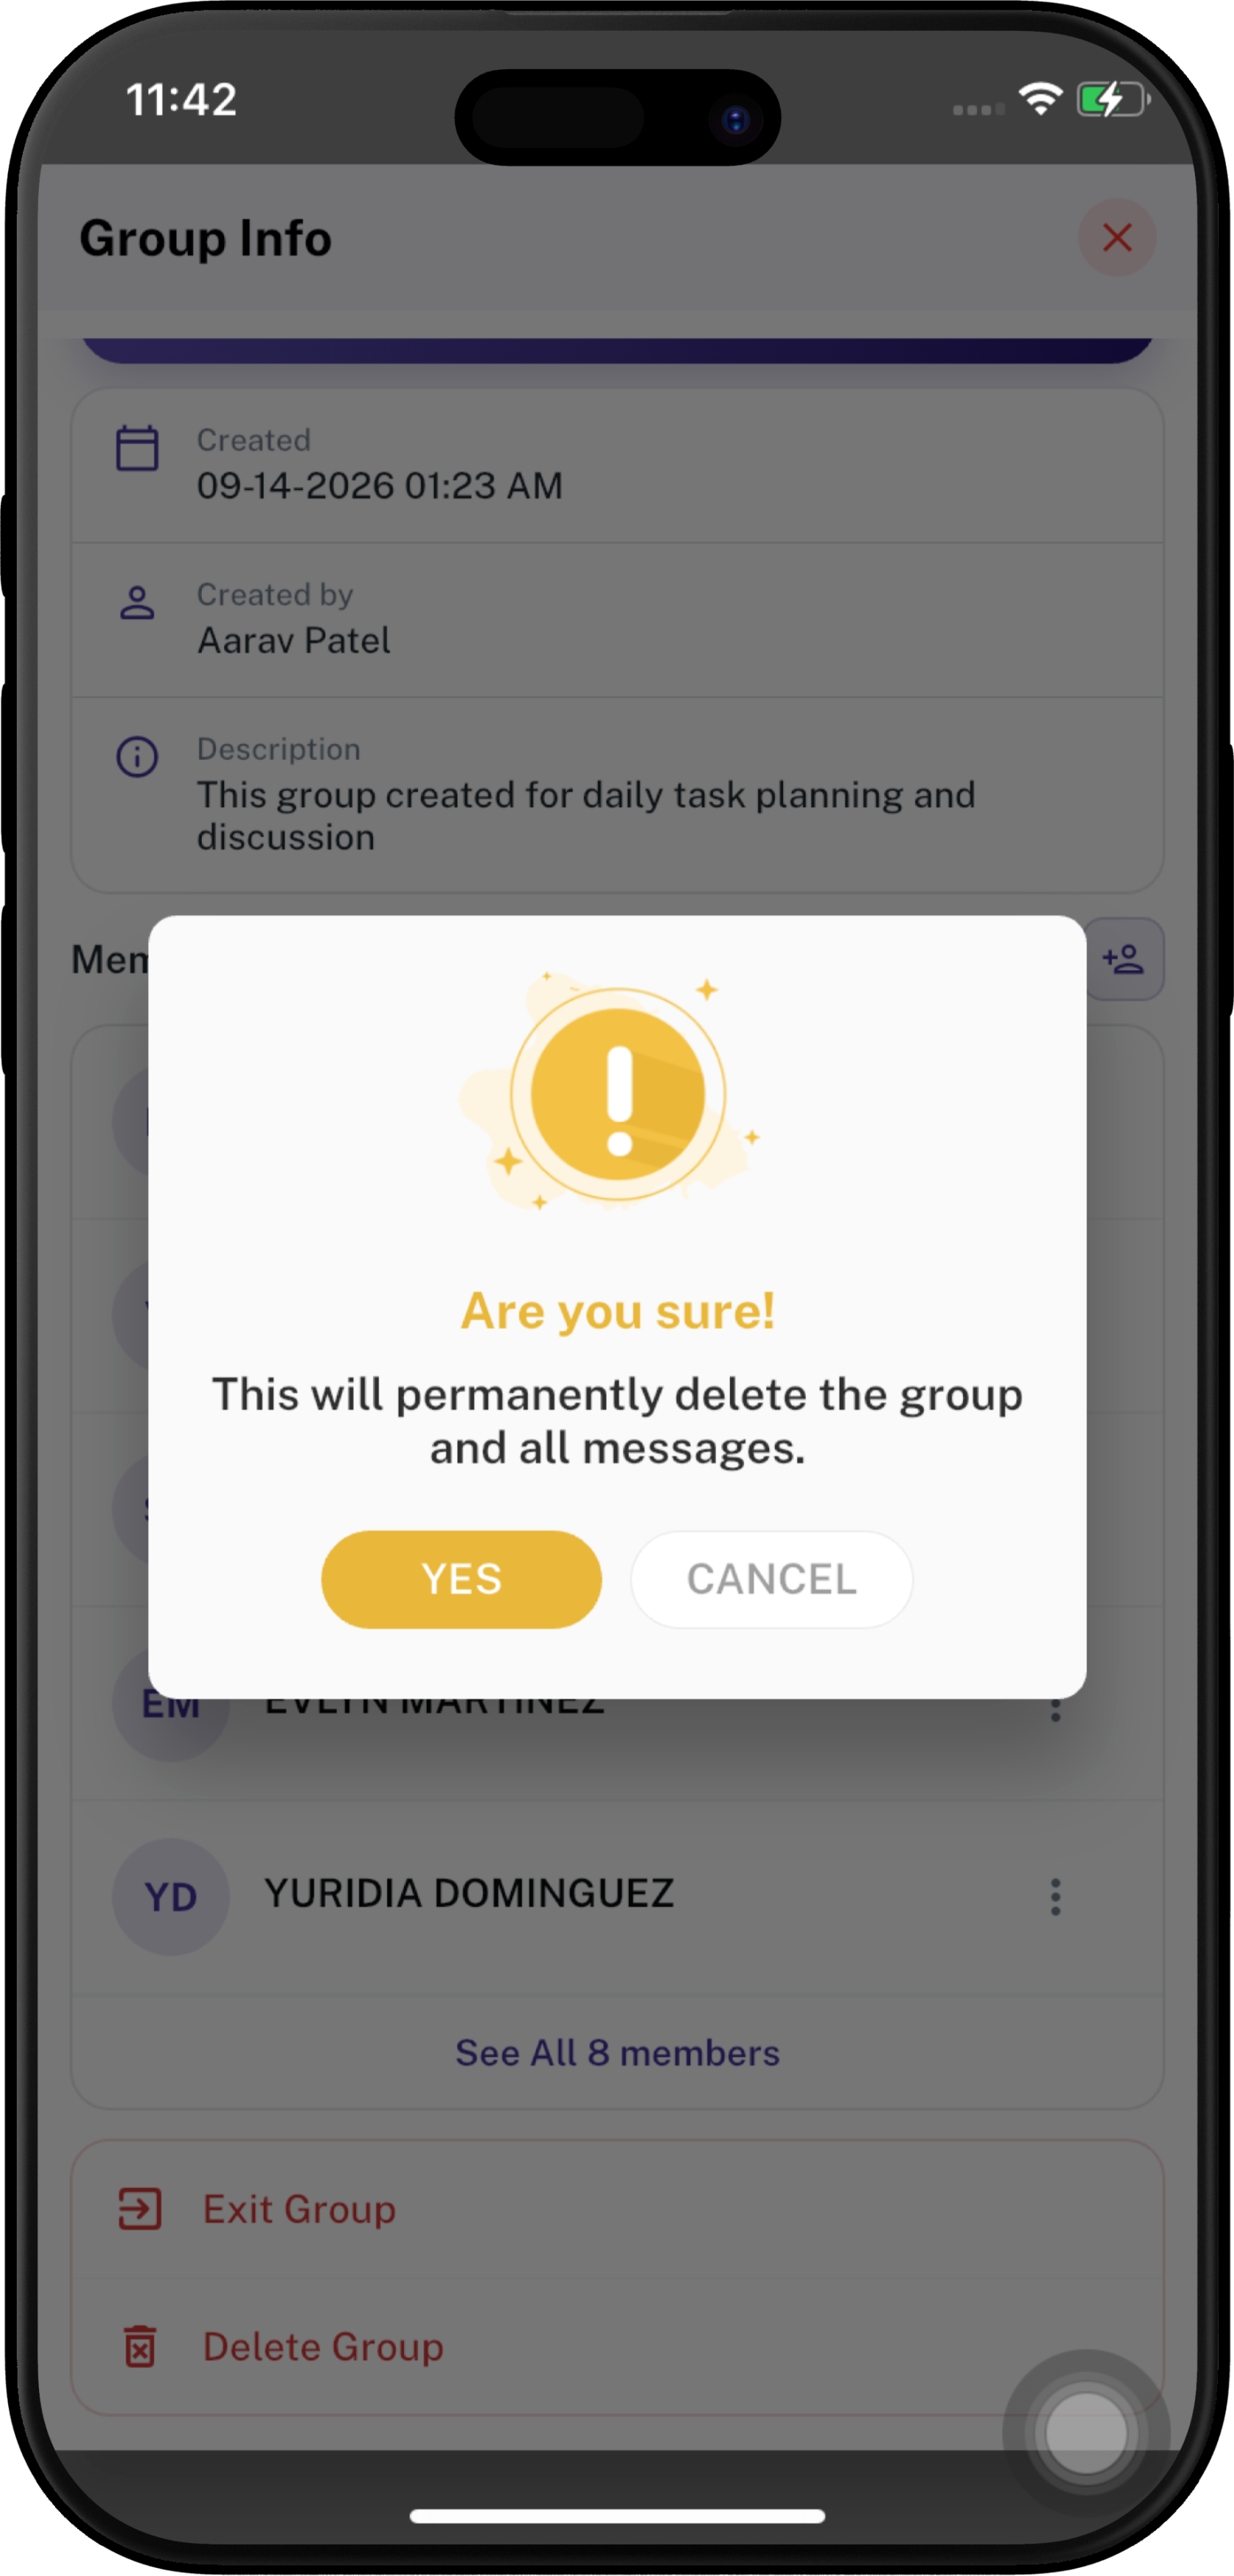
Important: Deleting a group is permanent and removes the group and its messages. Users should confirm the action carefully.
Messaging and Chat Actions
Once a conversation is open, employees can send text messages, emojis, photos, videos, documents, and polls. Users can also reply to, copy, react to, or delete messages and manage the conversation from the ⋮ menu.
Send a Message
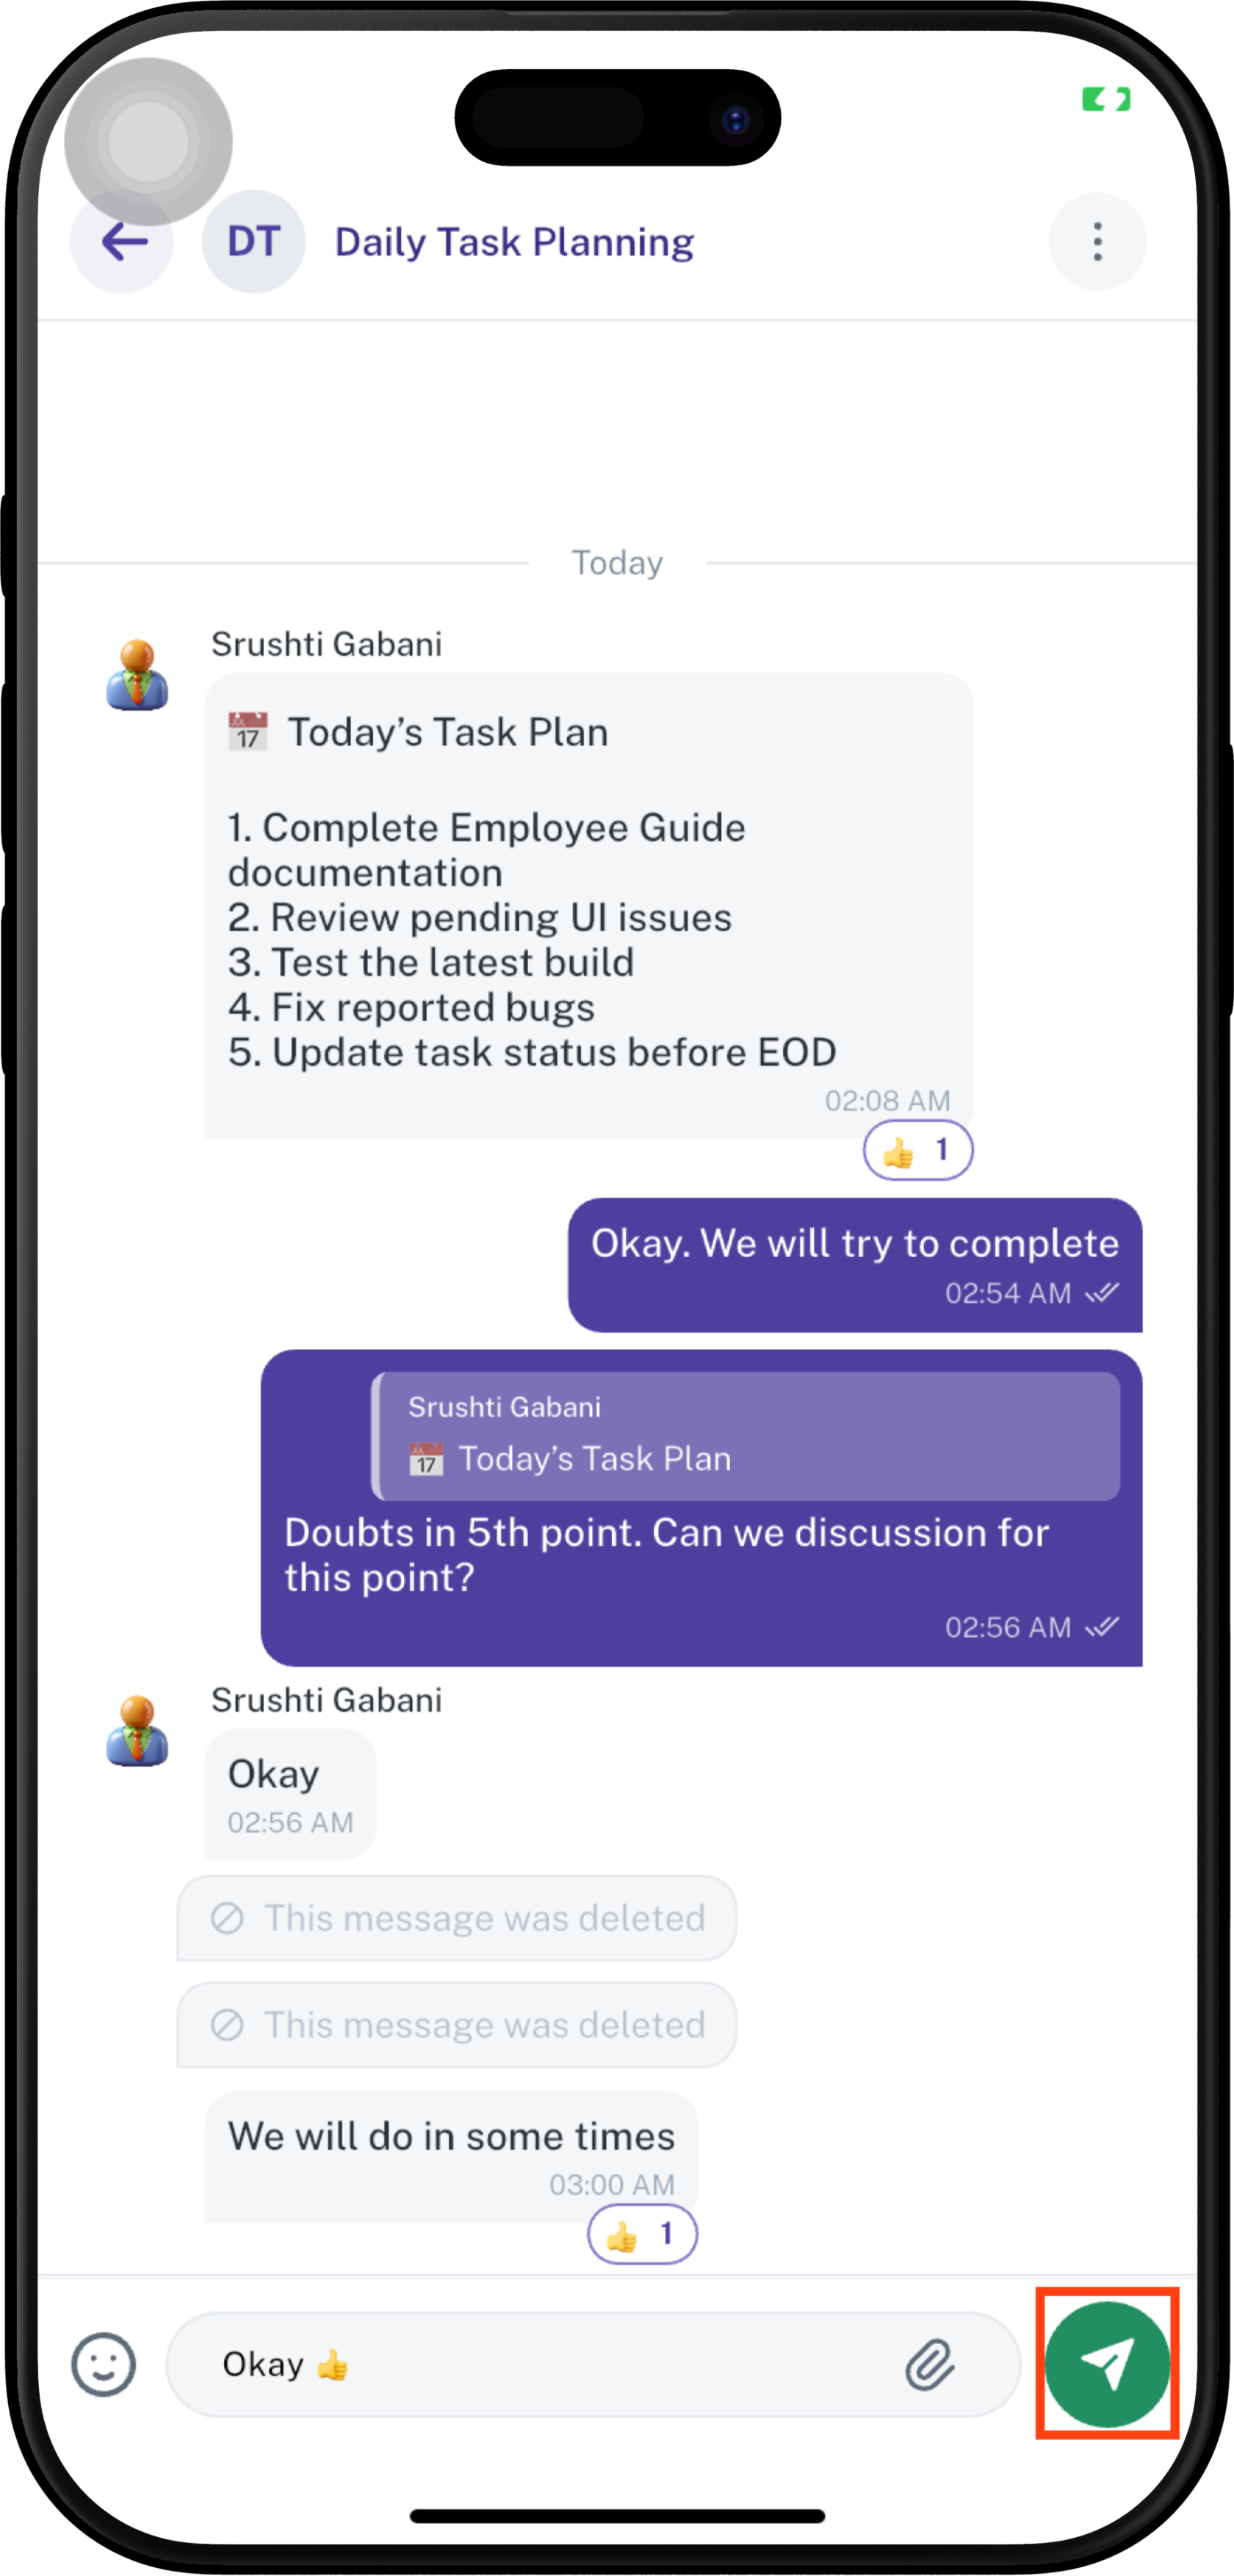
- Open the required conversation.
- Tap the Message... field at the bottom.
- Type the message.
- Tap the Send button.
- The message appears in the conversation with its sent time.
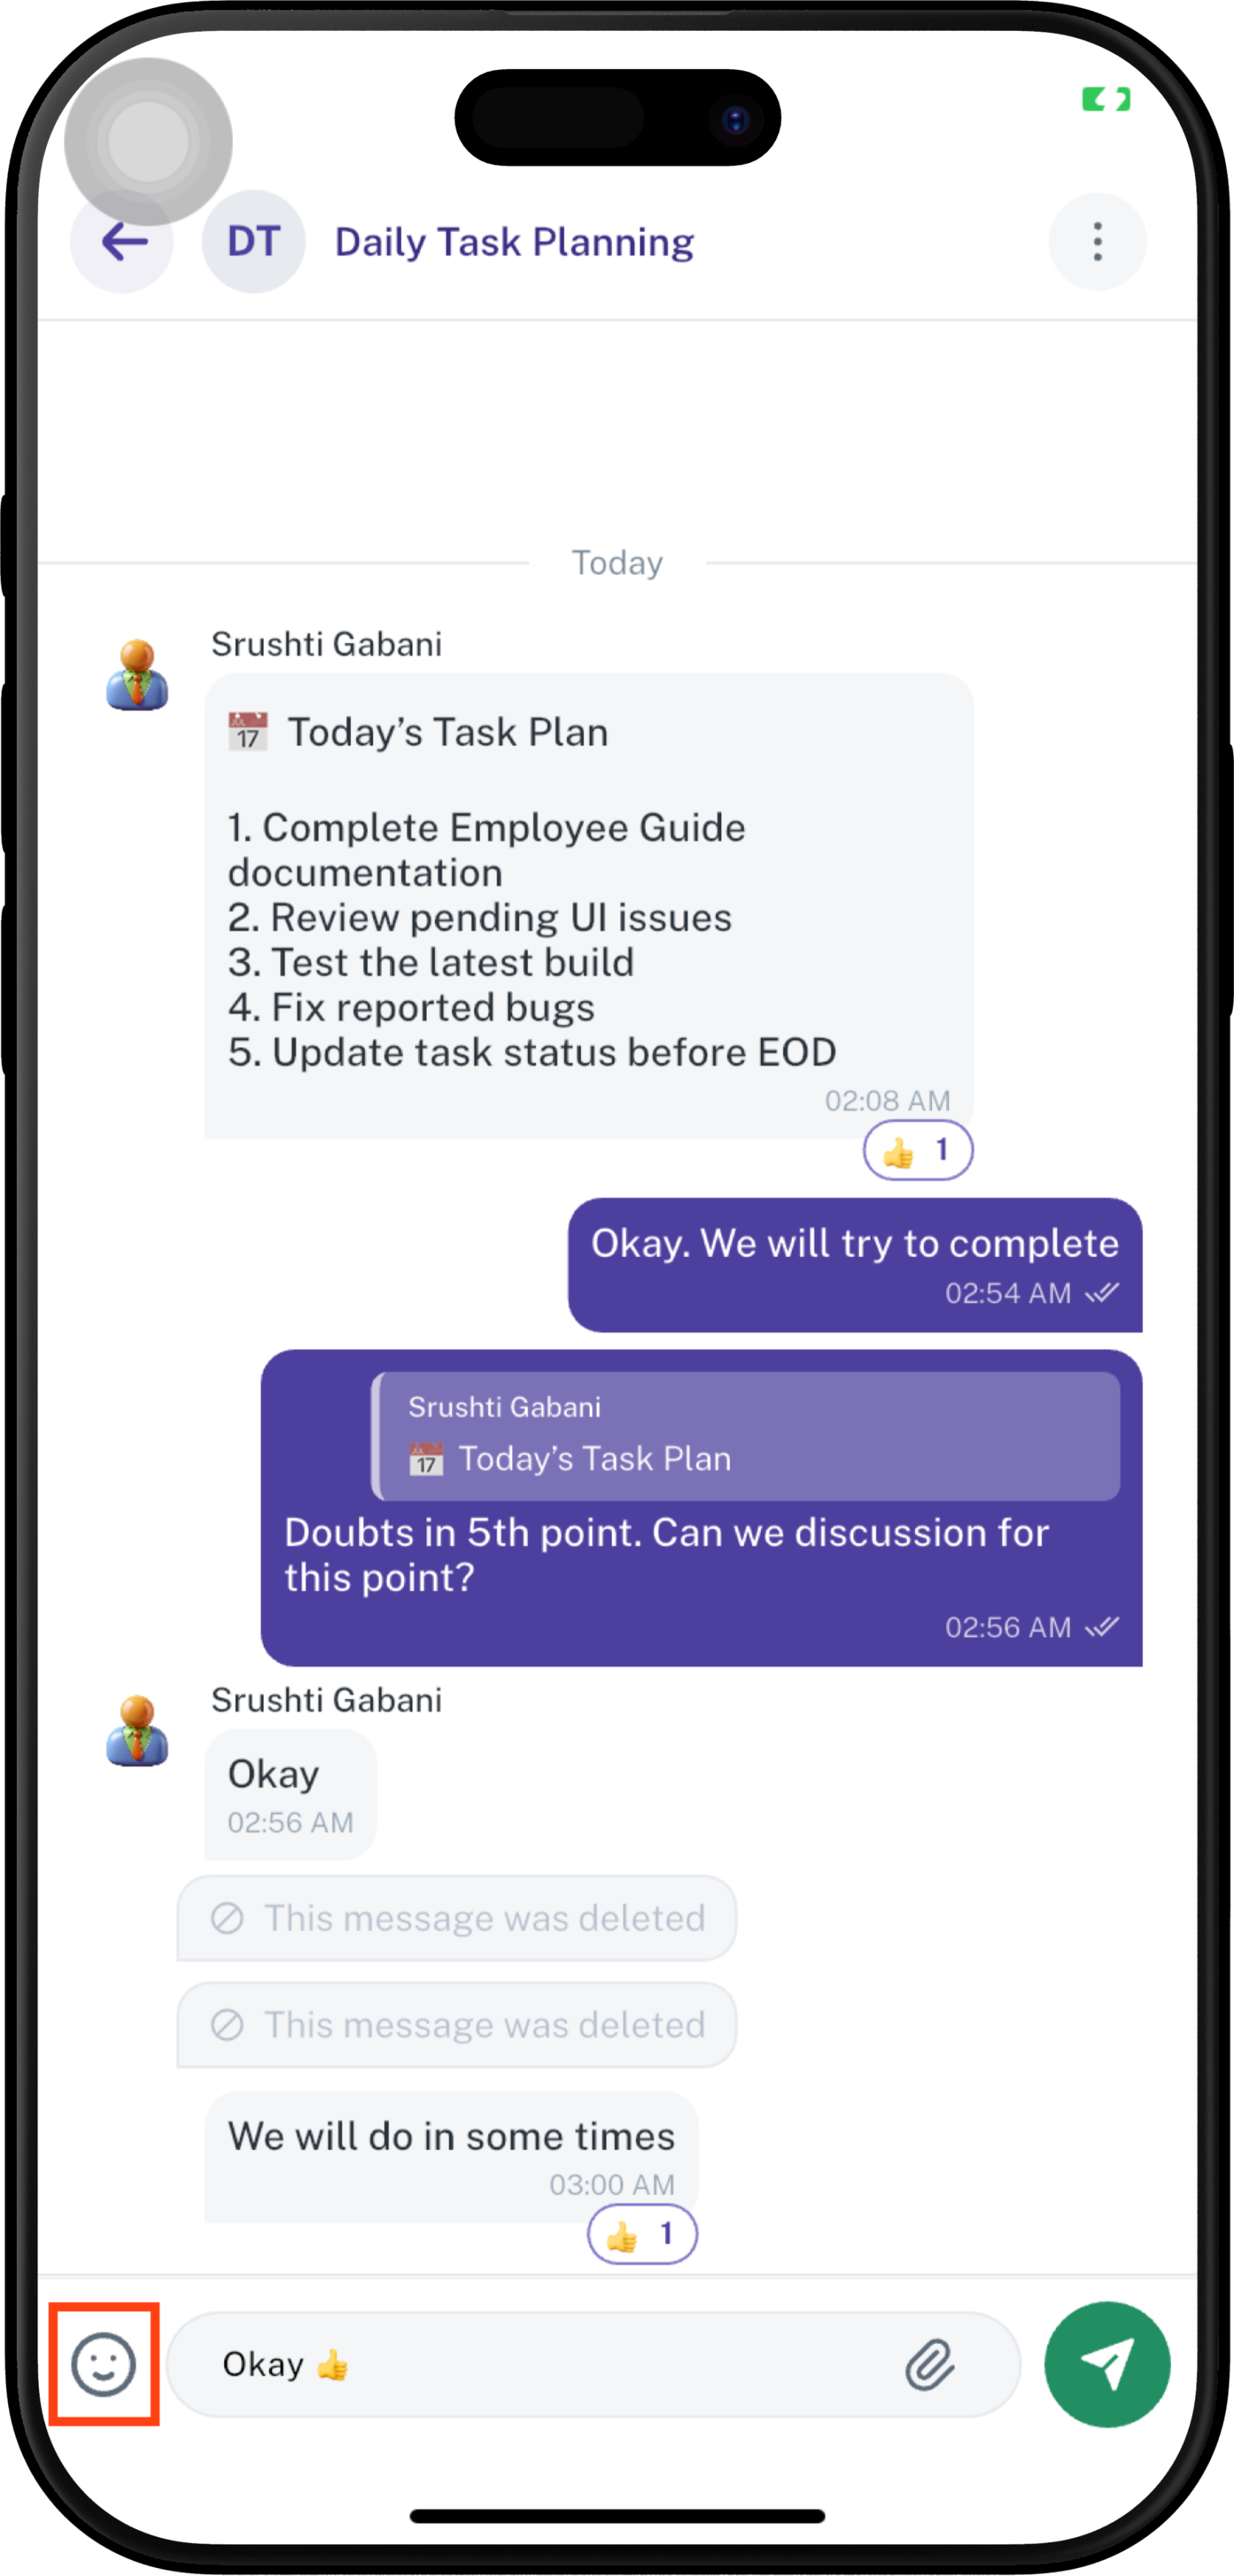
Send an Emoji
- Tap the 😊 icon beside the message field.
- The emoji panel opens.
- Select the required emoji.
- The selected emoji is added to the message field.
- Tap Send to send it.
The emoji panel also provides categories for quickly finding different types of emojis.

Add an Attachment
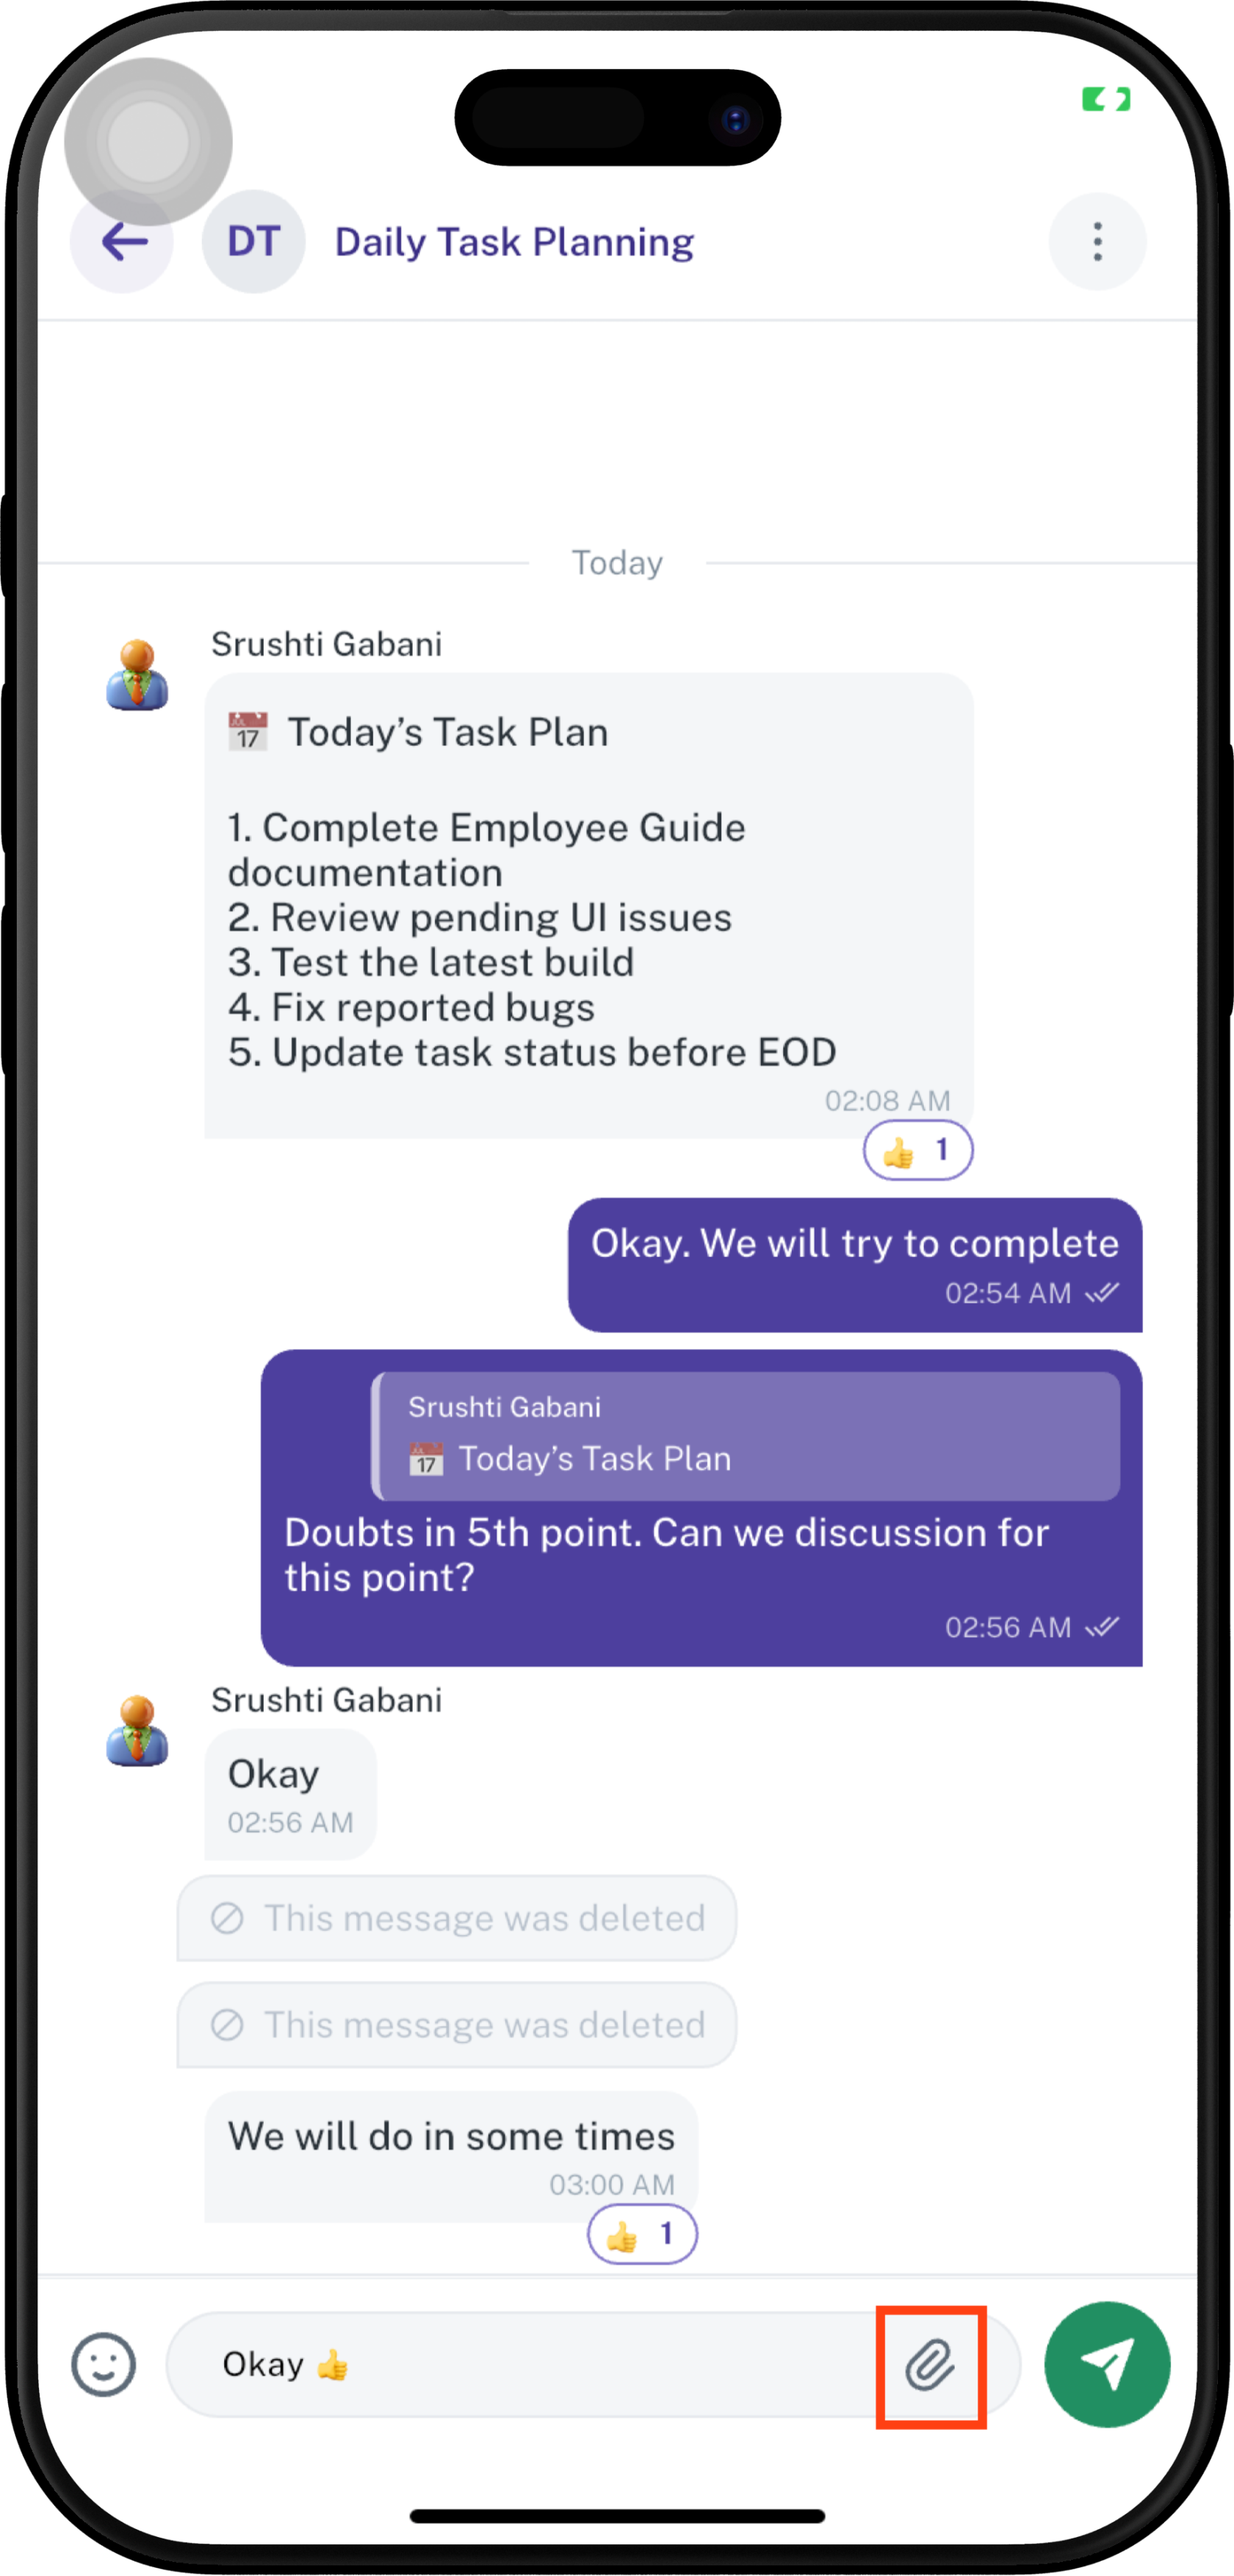
Tap the 📎 Attachment icon beside the message field to open the attachment options.
The following options are available:
- Camera — Capture a new photo using the
devicedevice's camera. - Photos — Select an existing photo from the device.
- Video — Select or attach a video.
- Document — Select and attach a document.
- Poll — Create and send a poll in
thegroupsconversation.and channels only.

Camera
Tap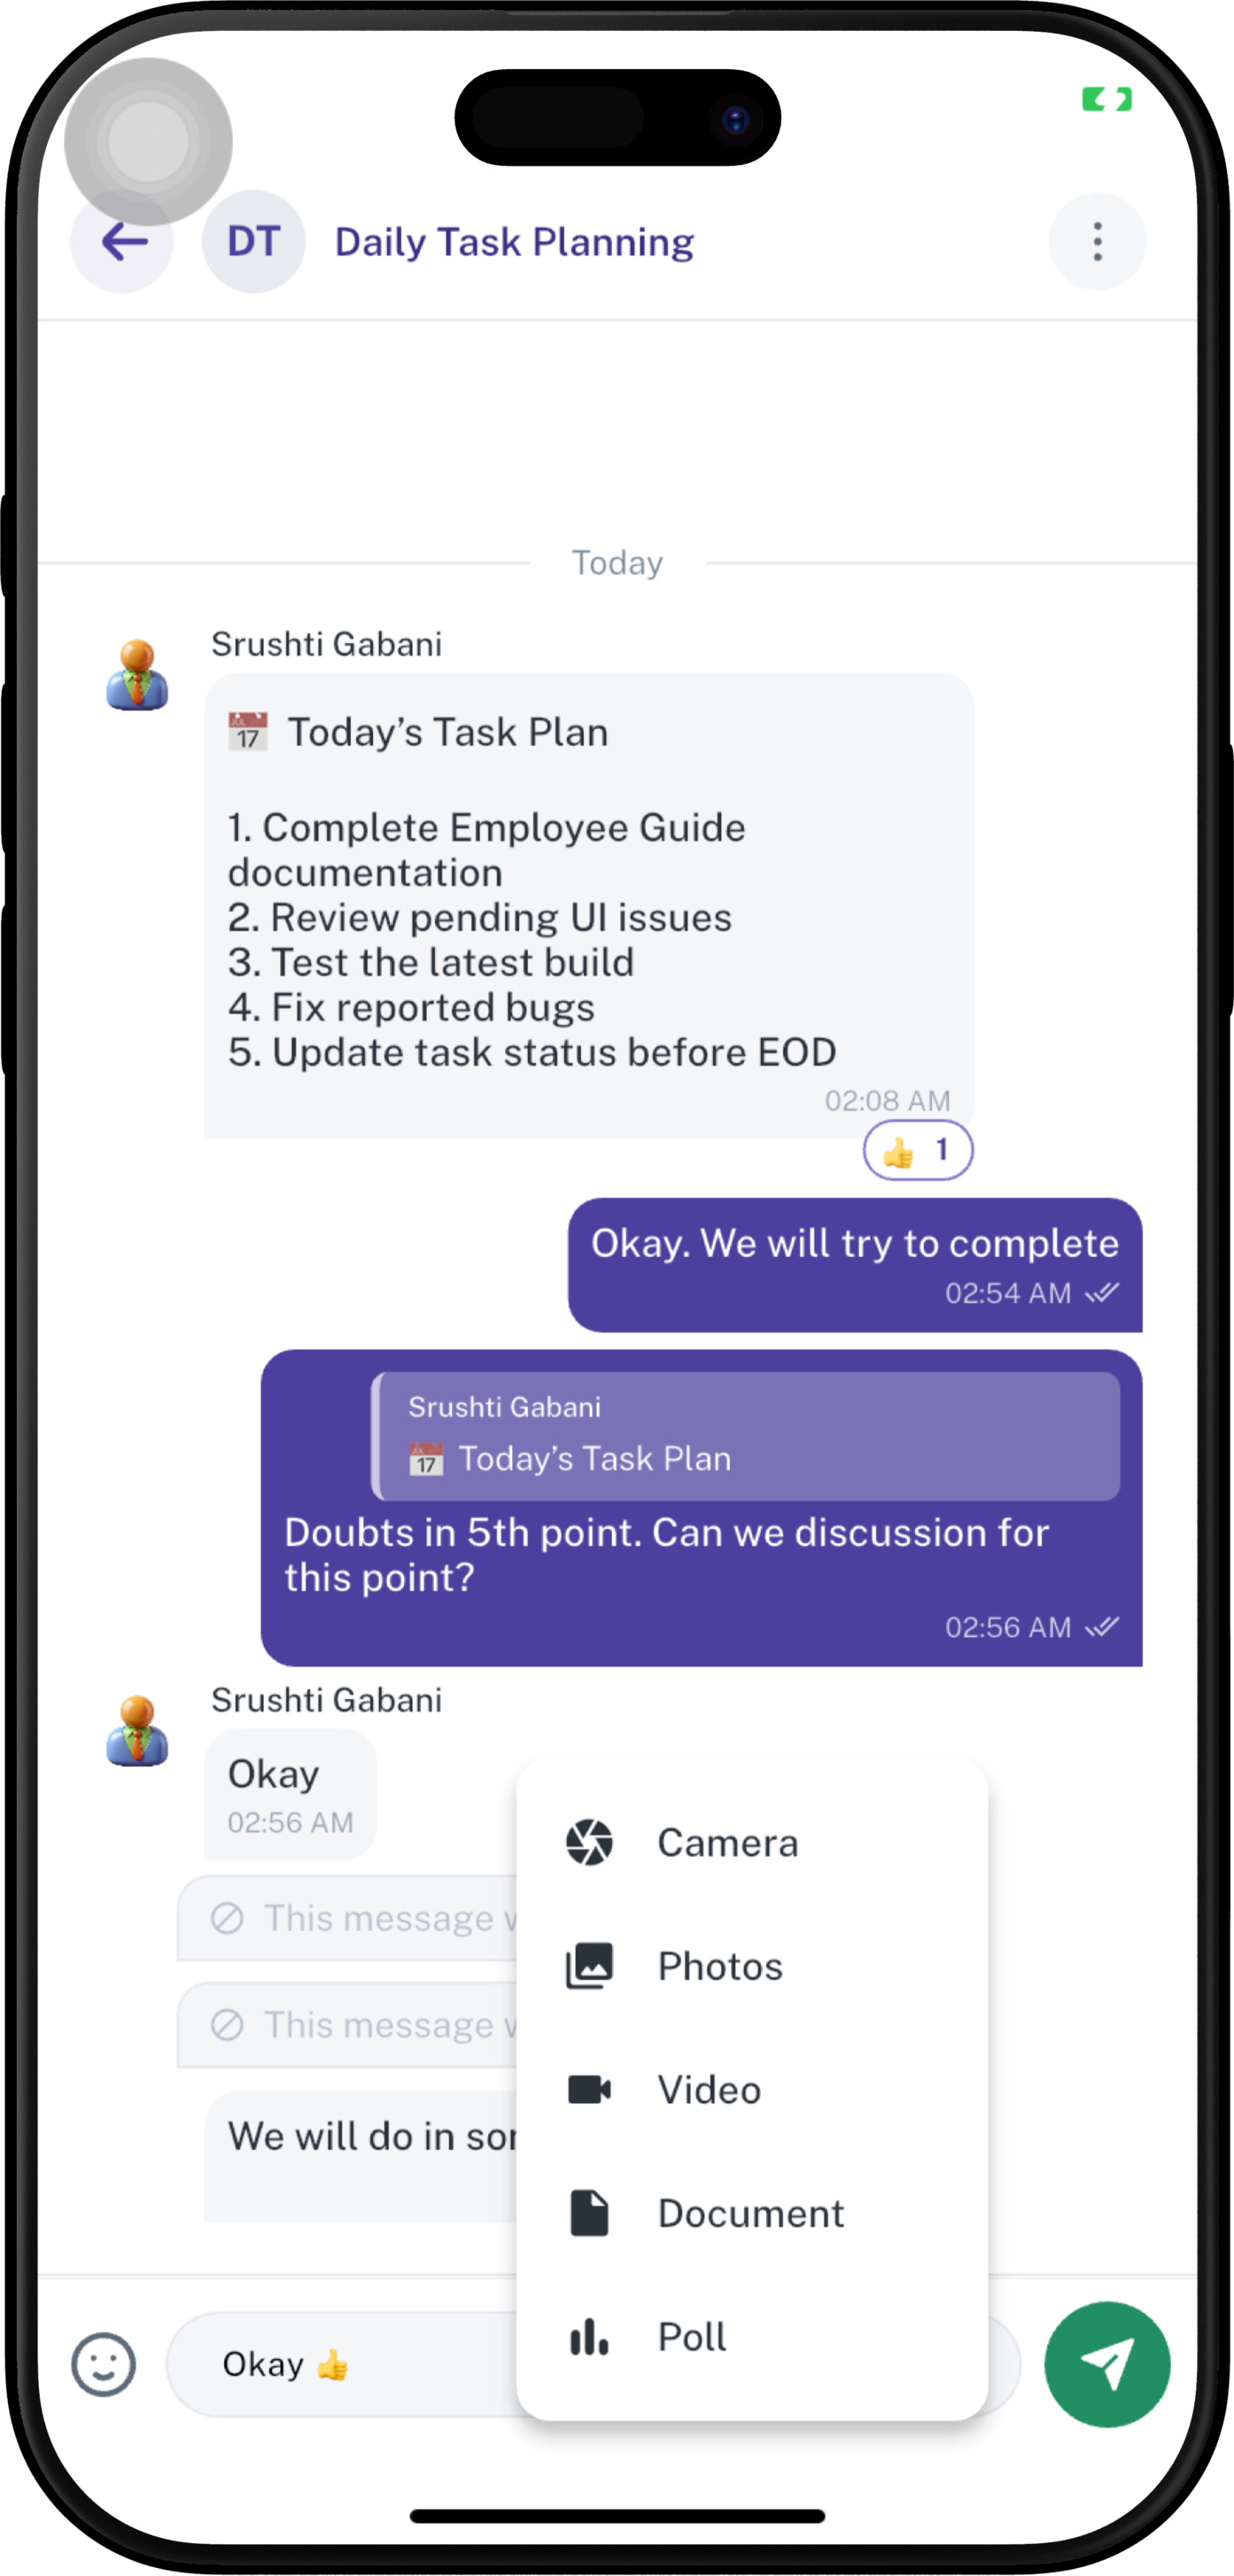
📎
Photos
Tap📎 Attachment.SelectPhotos.Choose a photo from the device.Confirm the selection if prompted.Send the photo.
Video
Tap📎 Attachment.SelectVideo.Choose or capture the required video.Confirm the selection if prompted.Send the video.
Document
Tap📎 Attachment.SelectDocument.Choose the required document.Confirm the selection if prompted.Send the document.
Poll
Tap📎 Attachment.SelectPoll.Enter the poll question and required options.Complete the poll details.Send the poll to the conversation.
Note:The fields shown while creating a poll may vary depending on the configured poll options.
Message Actions
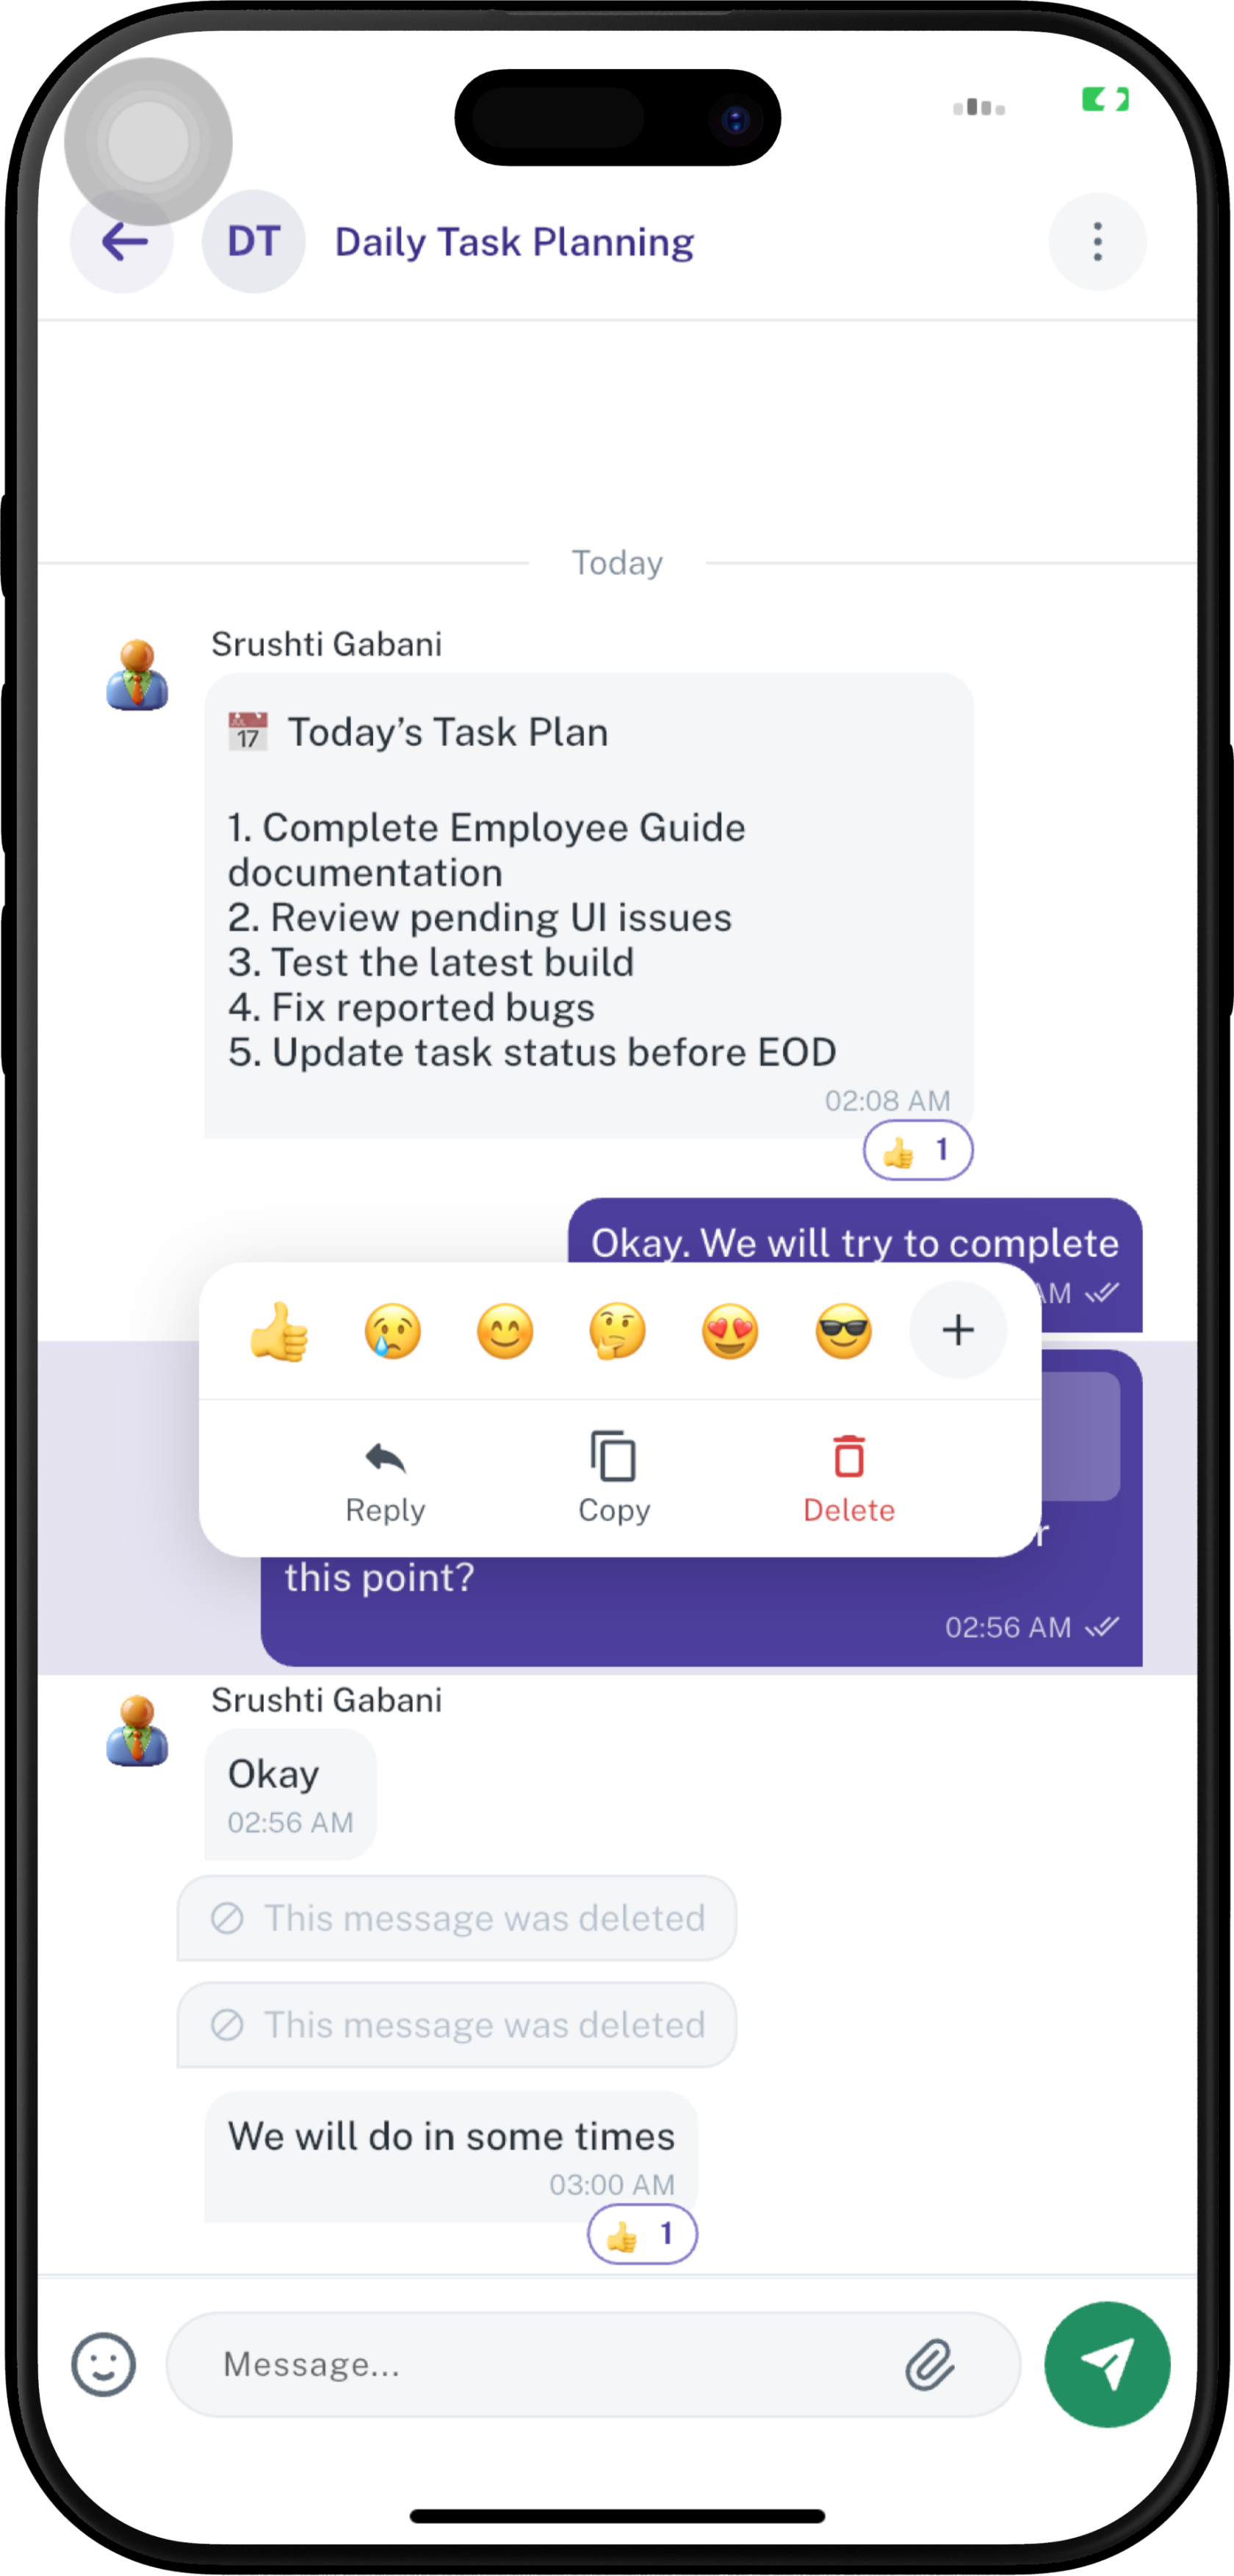
Users can interact with an existing message by pressing and holding the message. The available actions can depend on whether the message belongs to the user and on the user's permissions.

Reactions
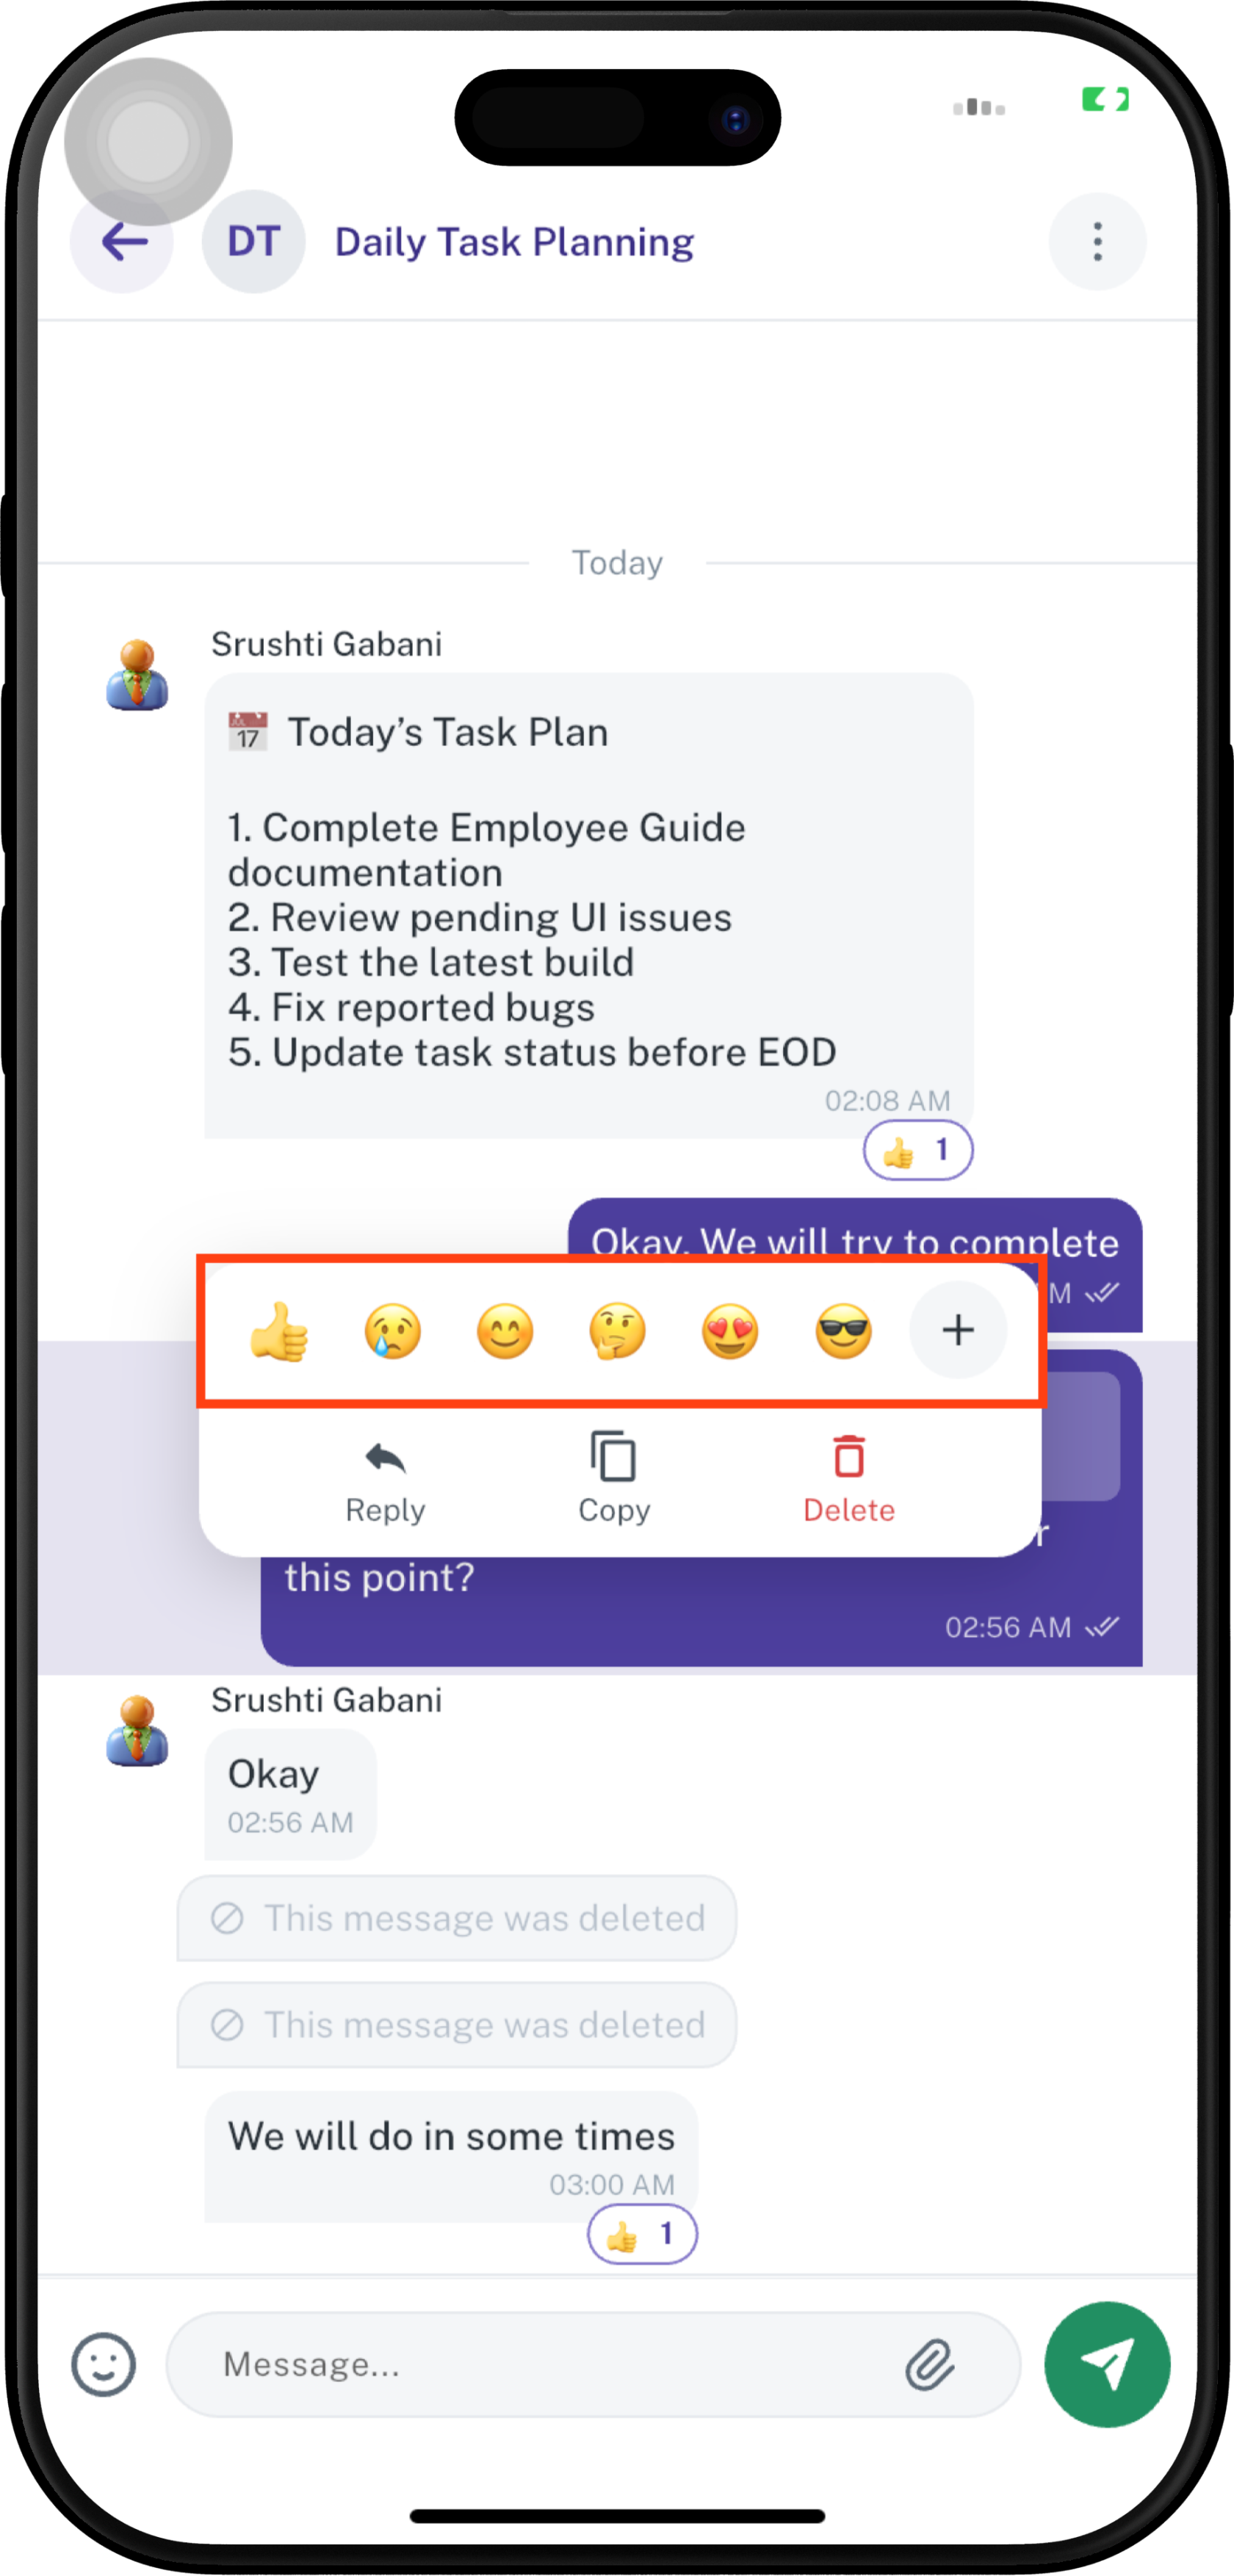
- Press and hold the message.
- Select a reaction from the reaction bar.
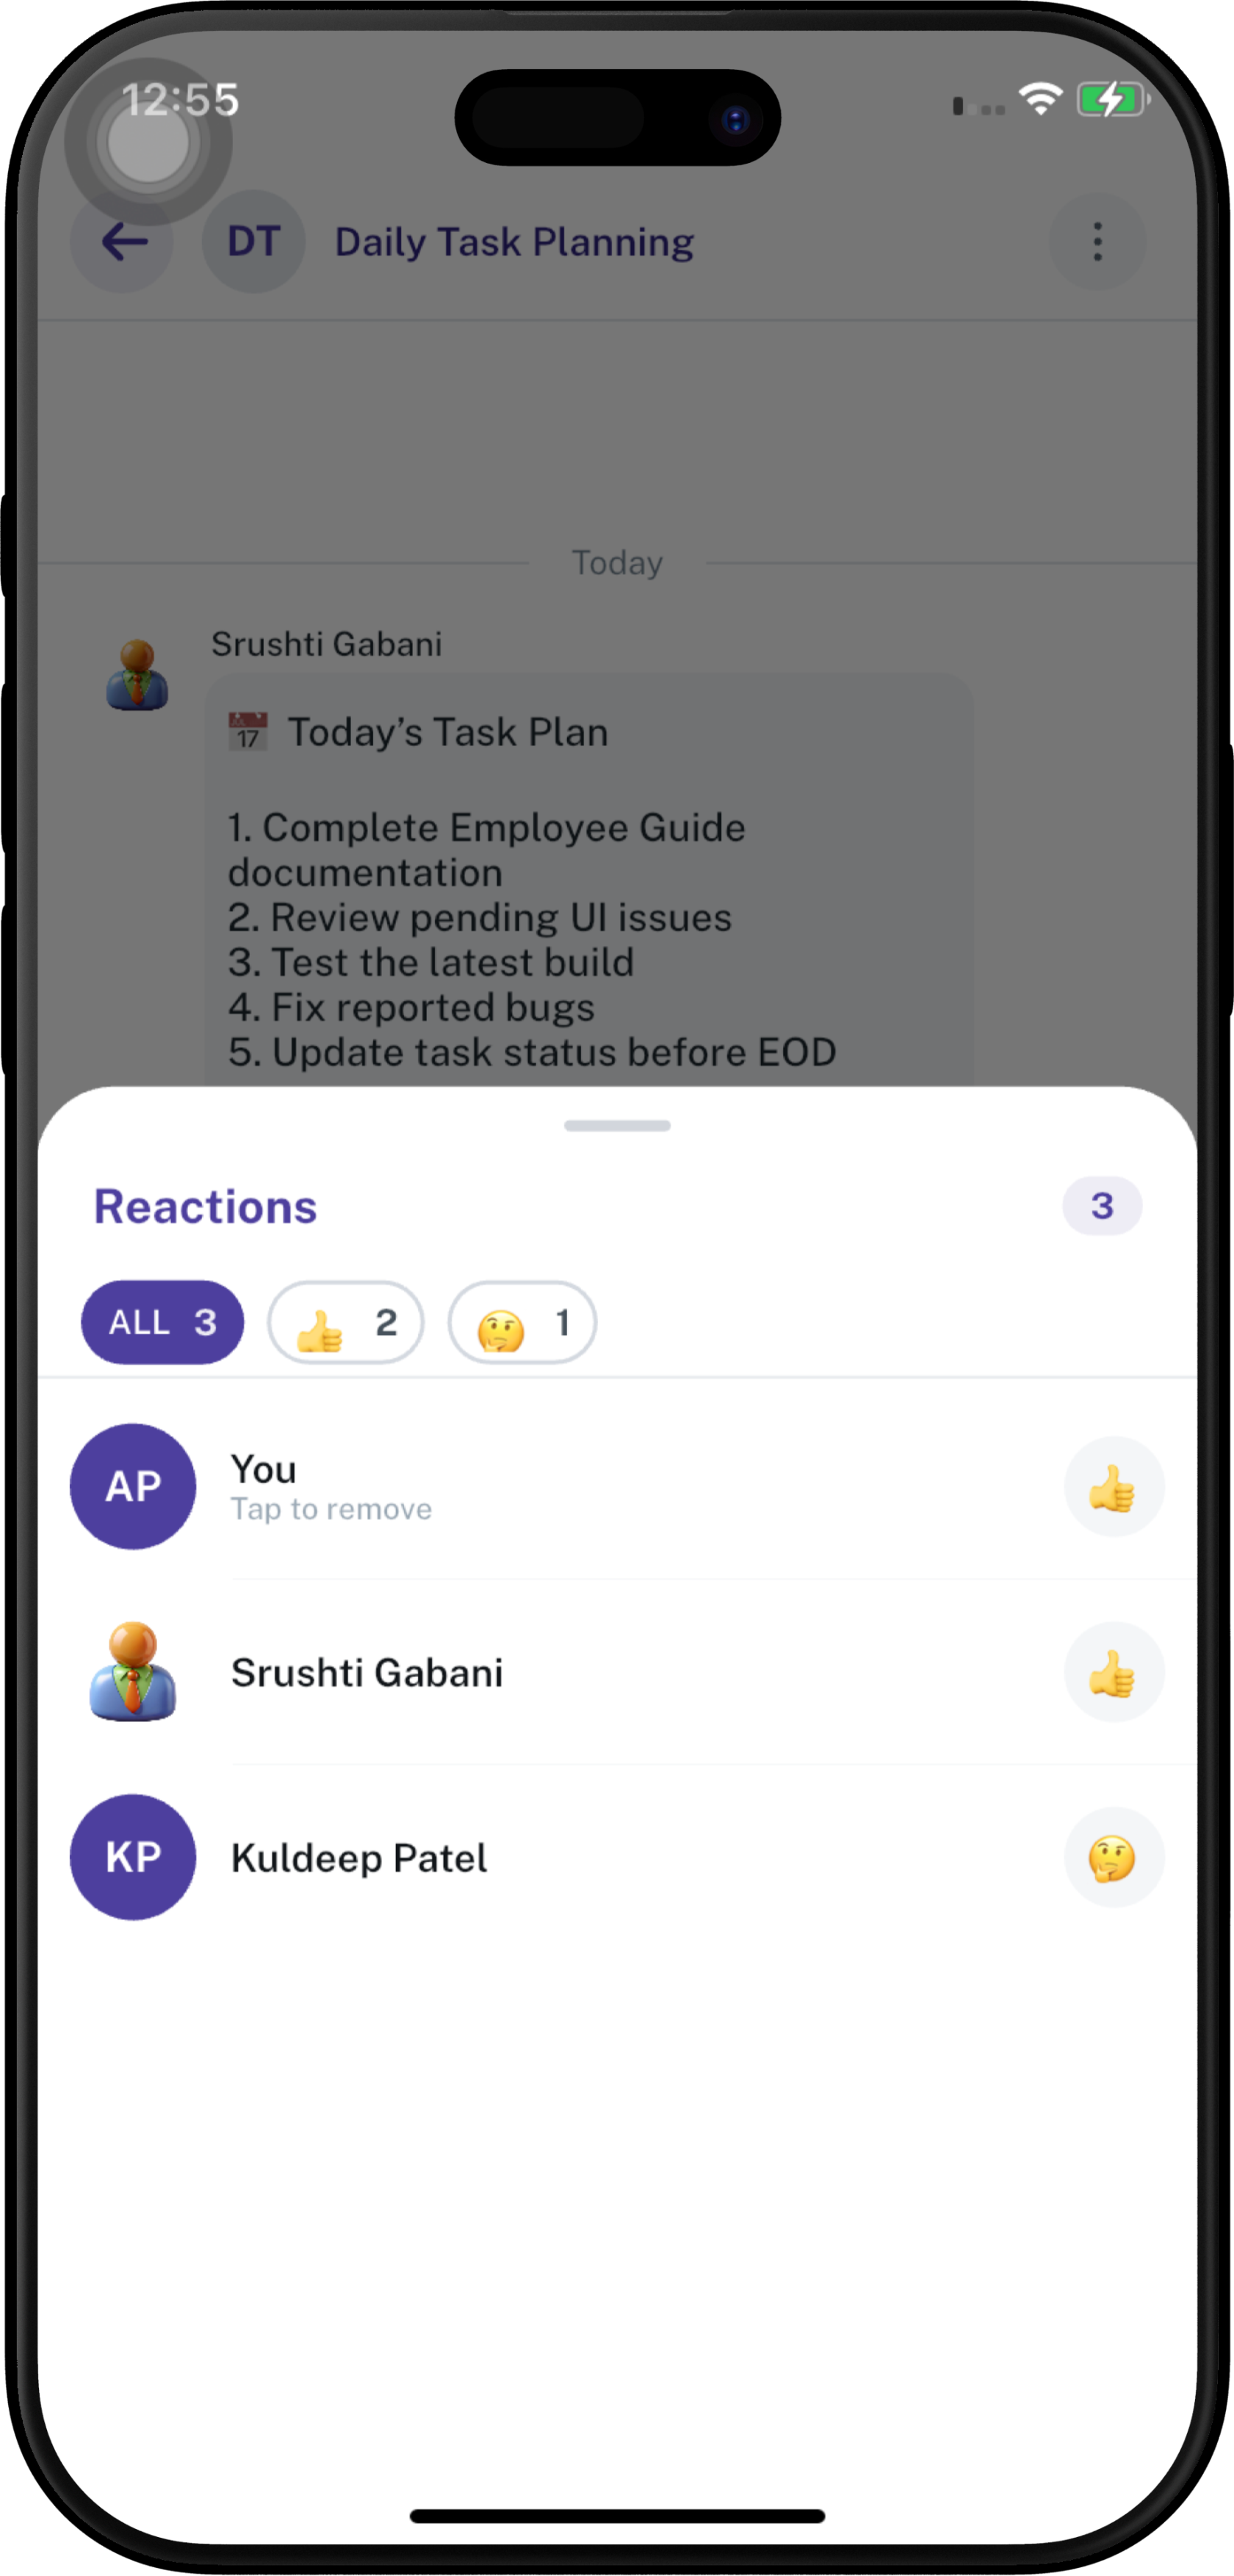
- The selected reaction appears
onin the message. - A reaction count is displayed when applicable.
- You can remove your reaction by tapping Tap to Remove or selecting the reaction bar.
Common quick reactions include 👍, 😢, 😊, 🤔, 😍, and 😎. Tap + to view more available emojis.
Reply to a Message
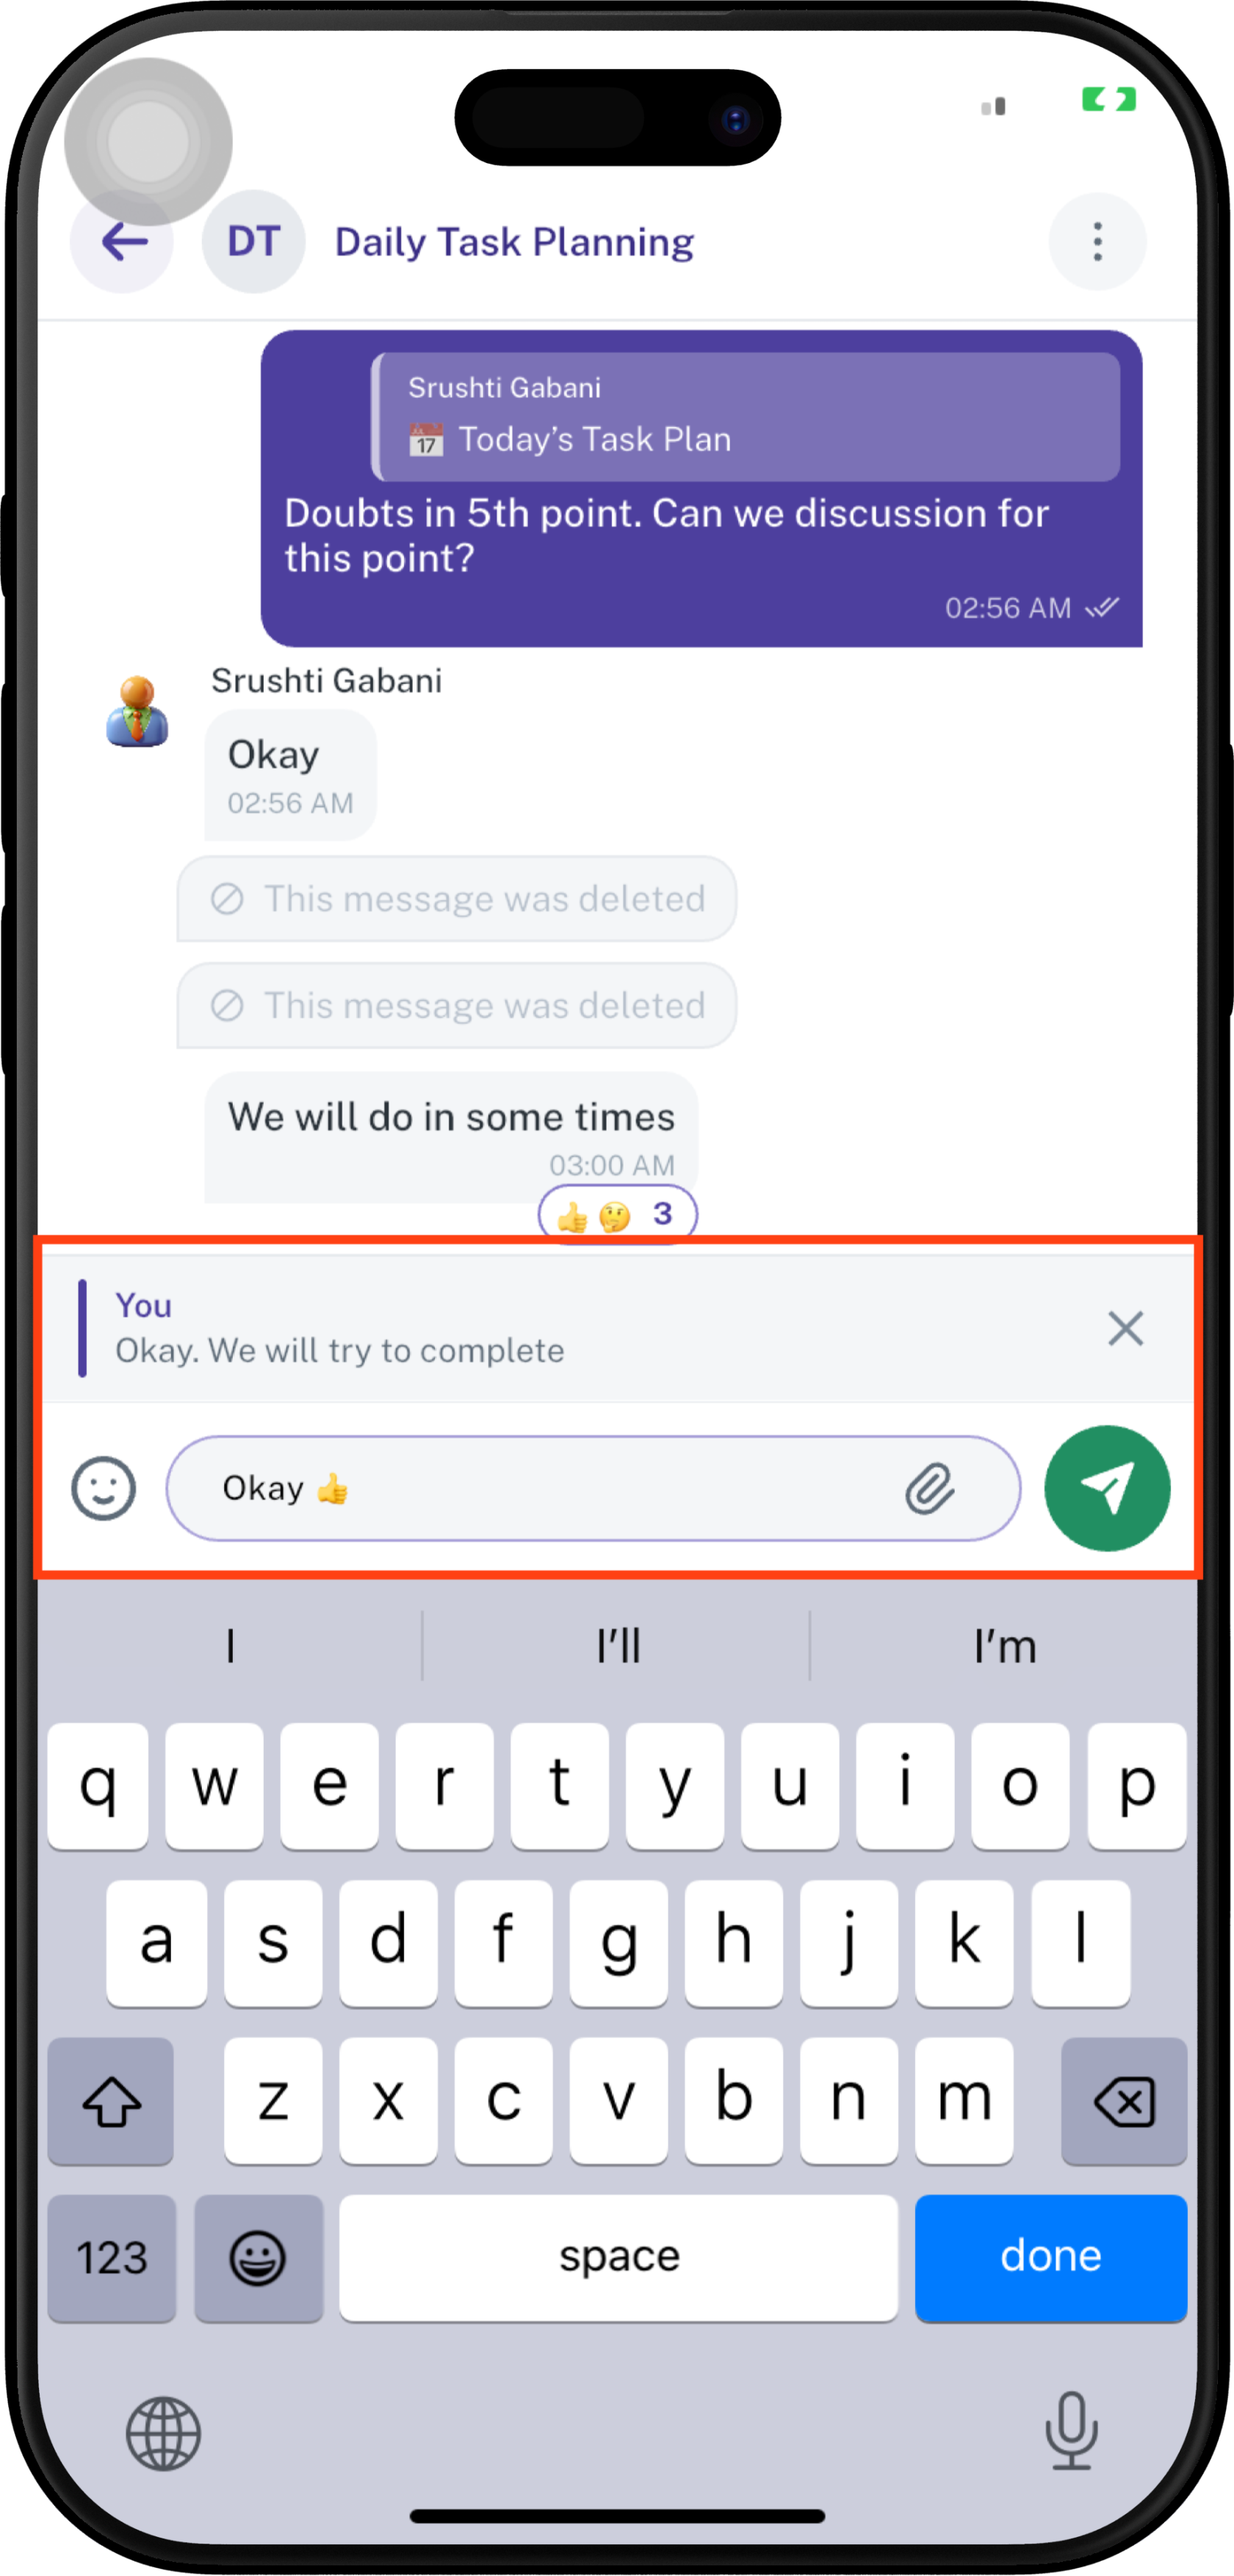
- Press and hold the message.
- Tap Reply.
- The selected message is attached to the reply composer.
- Type your response.
- Tap Send.
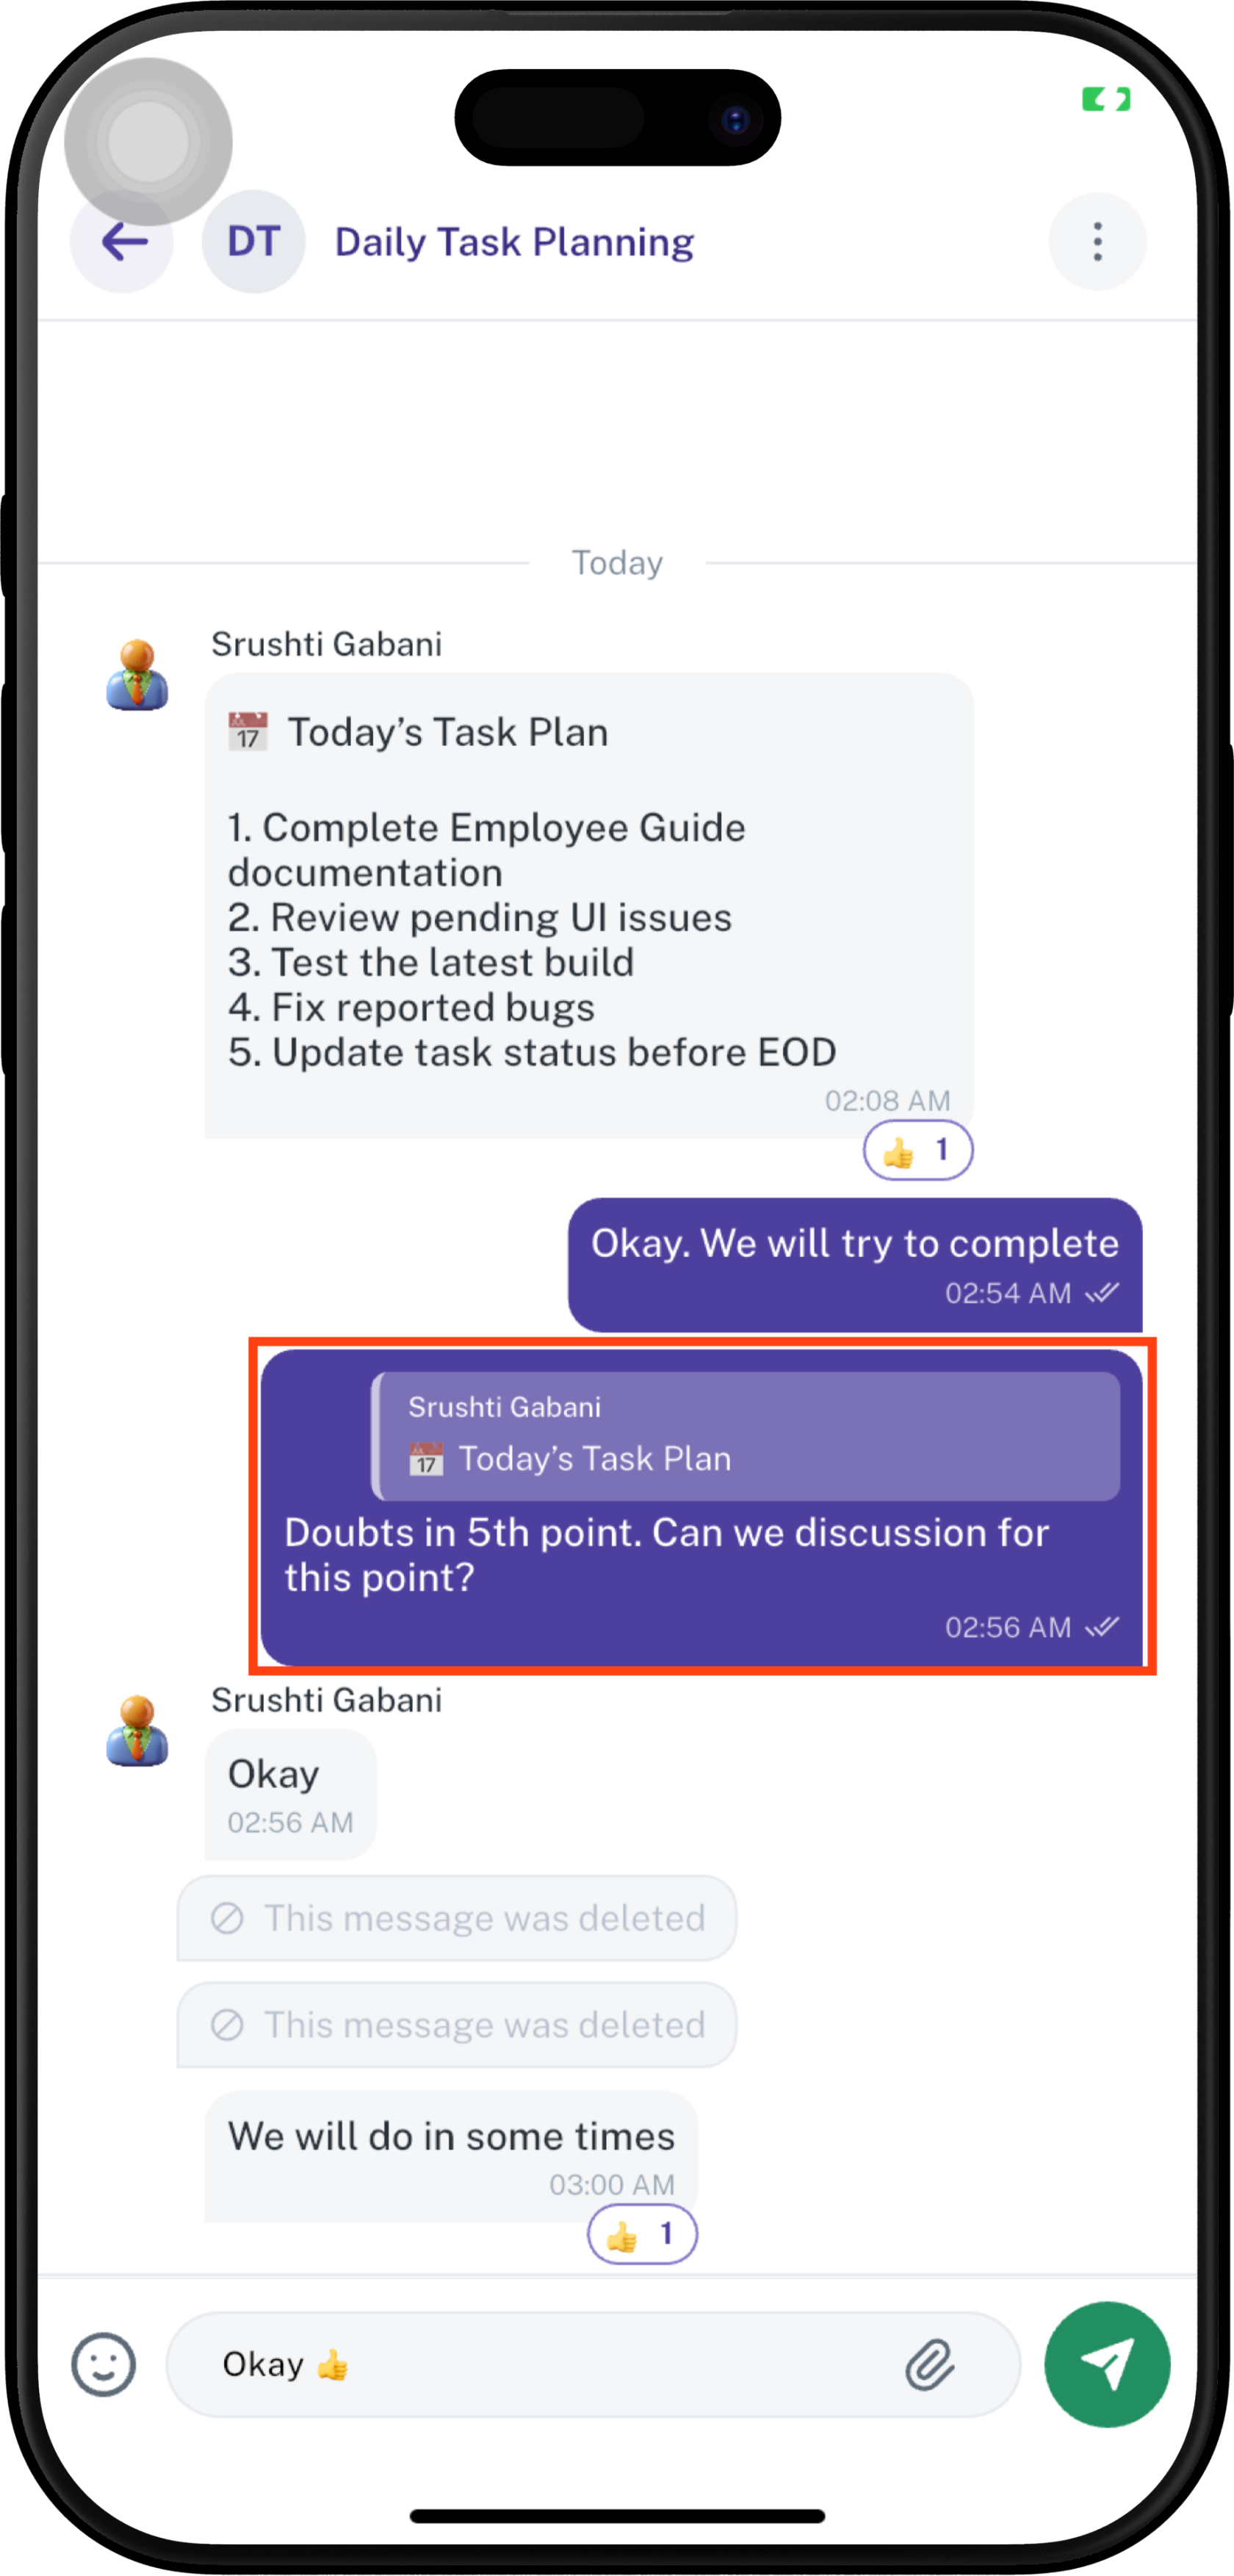
The reply shows the original message above the responseresponse, so the conversation context is clear.
Copy a Message
- Press and hold the message.
- Tap Copy.
- The message text is copied to the device clipboard.
- Paste it wherever required.
Delete a Message
- Press and hold the message.
- Tap Delete when the option is available.
- Confirm the deletion if a confirmation prompt appears.
- Deleted messages are displayed as This message was deleted
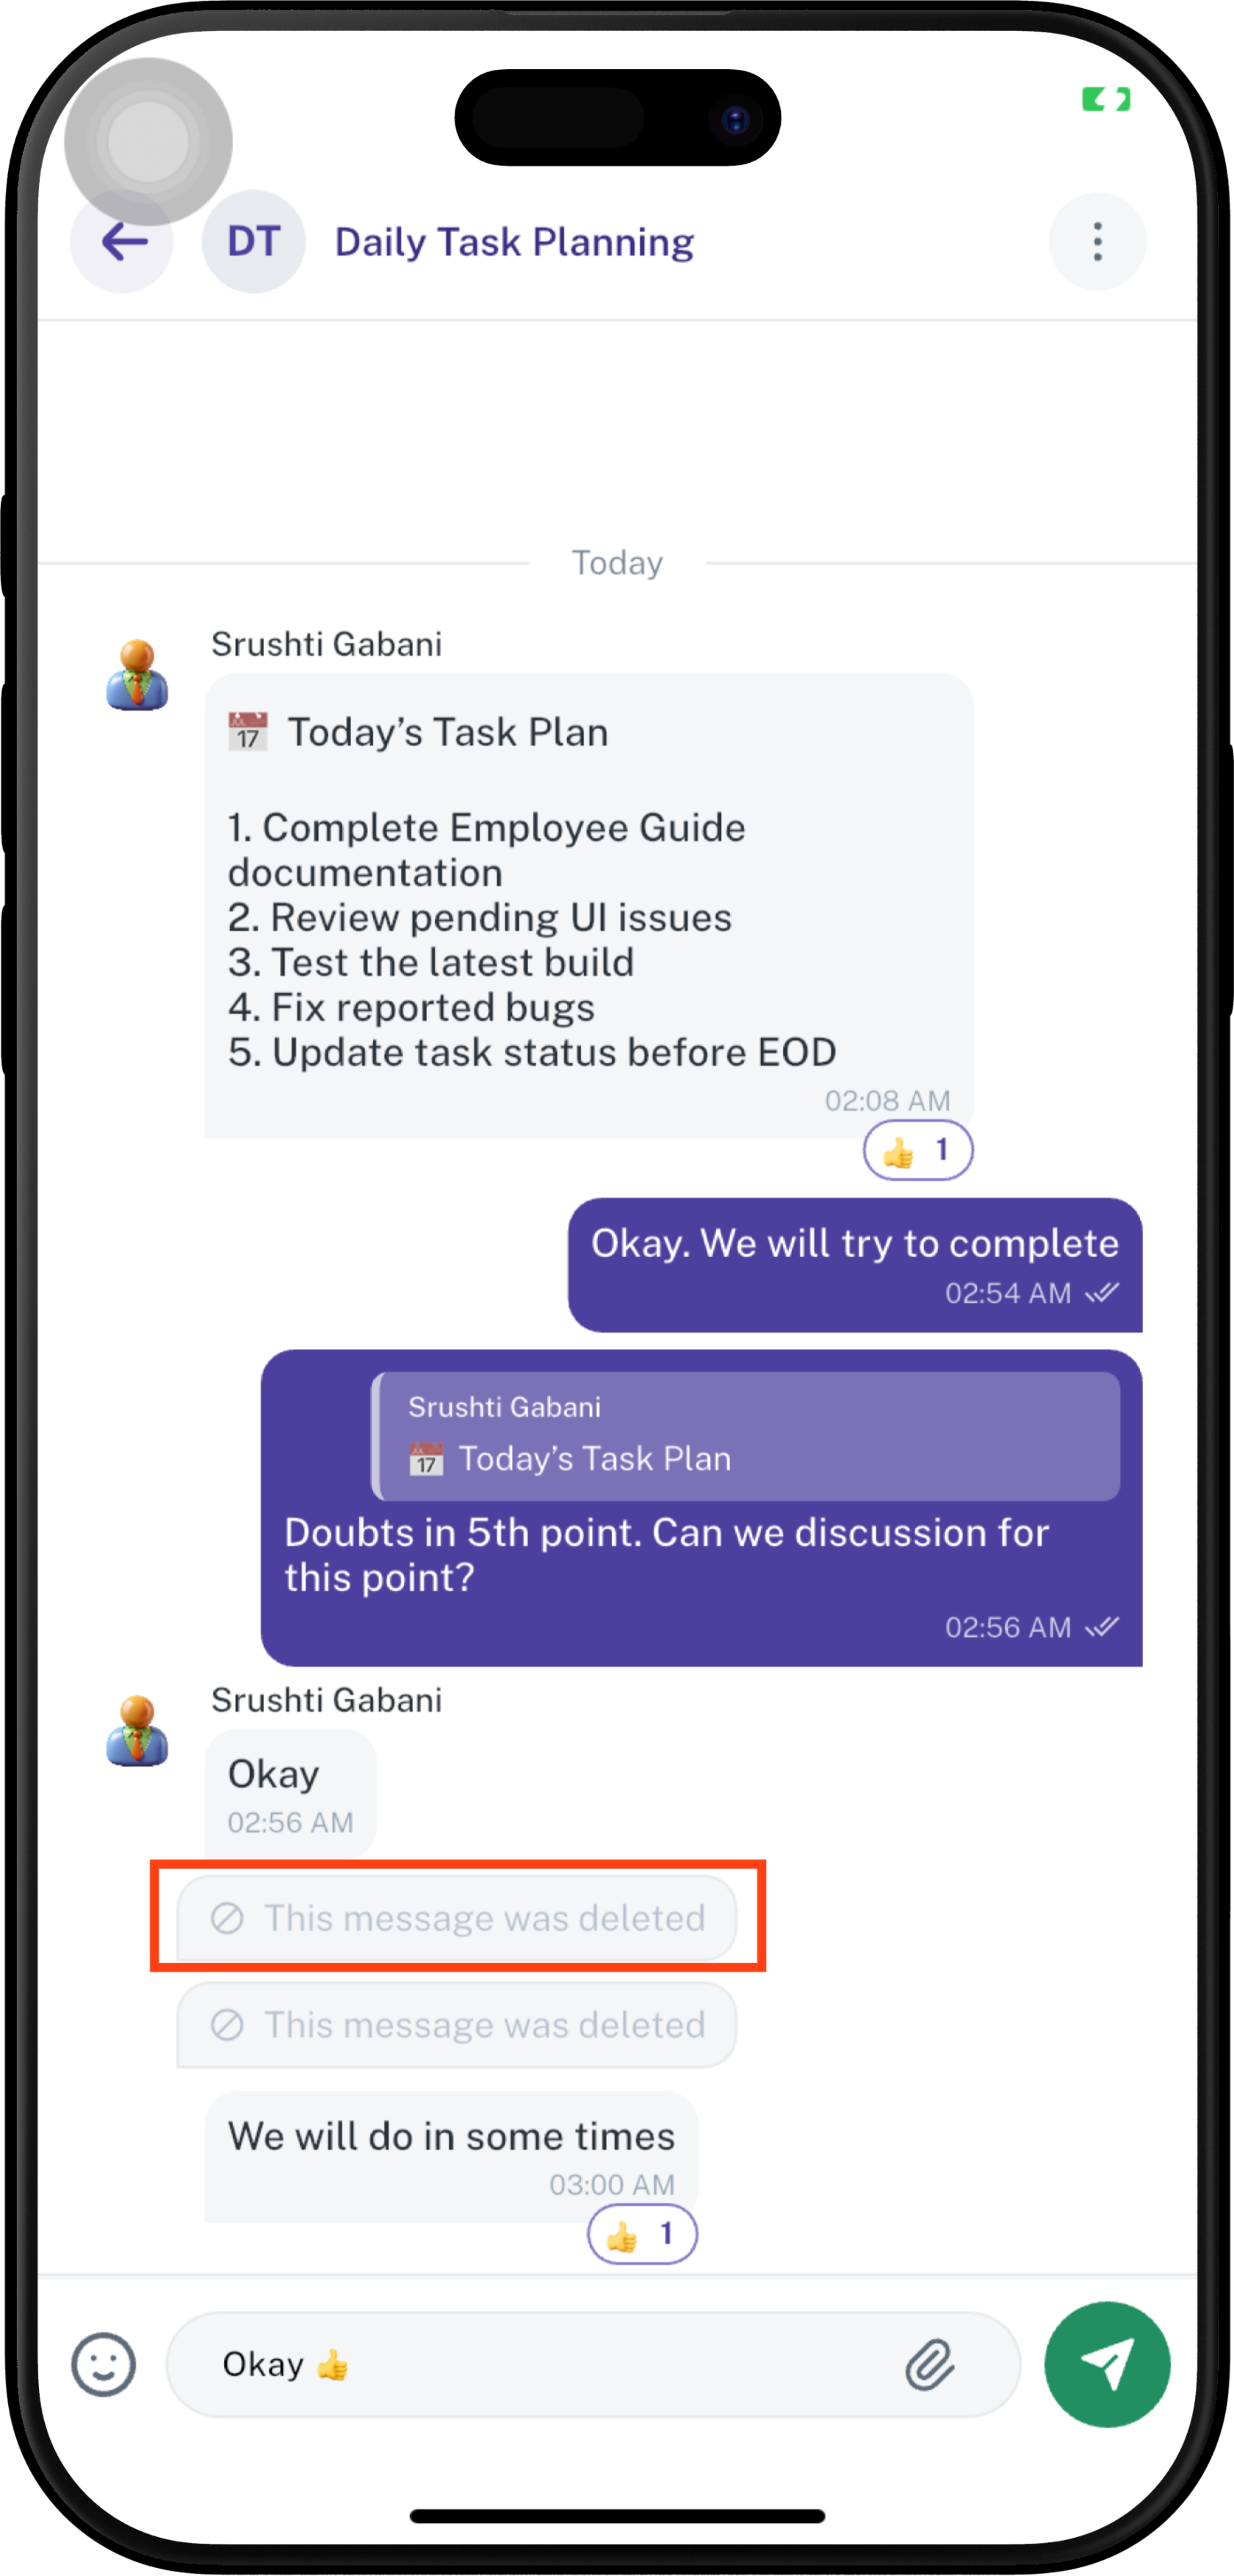
Note: The Delete option may be available only for messages the user is permitted to delete.
Chat Menu Actions

- Contact info — View information related to the current contact or conversation.
- Clear chat — Clear the messages from the current conversation.
- Delete chat — Delete the current chat/conversation.
- Translation Language — Select the language used for chat translation.
Contact Info
- Tap ⋮.
- Select Contact info.
- Review the available contact or conversation information.
Clear Chat
- Tap ⋮.
- Select Clear chat.
- Confirm the action if prompted.
Note: Use Clear chat when you want to remove the conversation messages while keeping the chat available, subject to the application's configured behavior.
Delete Chat
- Tap ⋮.
- Select Delete chat.
- Confirm the deletion if prompted.
Important: Review the confirmation carefully before deleting a chat.
Translation Language
The chat provides a Translation Language option for selecting the preferred language for translated messages.
- Tap ⋮ in the top-right corner.
- Select Translation Language.
- The Choose Language screen opens.
- Select the preferred language.
- Tap Continue.
The example screen provides:
- English — Default language.
- Spanish — Español.
- Gujarati — ગુજરાતી.

Note: The languages available in the application may depend on the configured language list.
Quick Messaging Guide
| Action | How to access |
|---|---|
| Send Message | Type in Message... → Send |
| Emoji | Tap 😊 → Select emoji → Send |
| Camera | Tap 📎 → Camera |
| Photos | Tap 📎 → Photos |
| Video | Tap 📎 → Video |
| Document | Tap 📎 → Document |
| Poll | Tap 📎 → Poll |
| Reaction | Press and hold message → Select reaction |
| Reply | Press and hold message → Reply |
| Copy | Press and hold message → Copy |
| Delete Message | Press and hold message → Delete |
| Clear Chat | ⋮ → Clear chat |
| Delete Chat | ⋮ → Delete chat |
| Translation Language | ⋮ → Translation Language → Select language → Continue |
Messaging Flow
Open Chat → Type Message / 😊 / 📎 → Send
📎 Attachment → Camera / Photos / Video / Document / Poll
Press & Hold Message → Reaction / Reply / Copy / Delete
⋮ Chat Menu → Contact Info / Clear Chat / Delete Chat / Translation Language
💡 Key Points
- Chat enables communication between employees and managers.
- Employees can search for another employee before starting a conversation.
- Recent conversations are displayed for quick access.
- Unread messages are identified using an unread count badge.
- Users can filter conversations by All, Unread, Groups, and Channels.
- The + button provides an option to create a new group or channel.
- The Chat module keeps workplace communication accessible from the Employee App.