# Storeroom Inventory Assign

### Overview

The **Storeroom Inventory Assign** feature allows users to assign approved inventory to a configured **Store Room**.

Inventory can be assigned to a Store Room through the following methods:

1. **Auto Assignment** — The assignment is generated from the **Inventory Receive → Assign** process after inventory has been approved.
2. **Manual Assignment** — Users can create an assignment directly from the **Storeroom Inventory Assign** page by selecting a Store Room and entering the quantity to assign.

The Storeroom Inventory Assign feature manages the movement of approved inventory into Store Rooms while maintaining the available stock, assigned stock, assignment status, and approval workflow.

The assignment process supports Store Room-level **Stock Assignment &amp; Issue Approval**. When approval is required, the requested quantity is blocked while the assignment is pending. The quantity is either assigned after approval or released back to available stock if the assignment is rejected.

### Assignment Workflow

The assignment workflow depends on whether **Stock Assignment &amp; Issue Approval** is required for the selected Store Room.

When approval is required:

**Create Assignment → Pending → Approved / Rejected**

When approval is not required:

**Create Assignment → Direct Assigned**

### Assignment Types

<table id="bkmrk-assignment-type-desc"><thead><tr><th>Assignment Type</th><th>Description</th></tr></thead><tbody><tr><td>**Auto**</td><td>The assignment is generated from the Inventory Receive → Assign process.</td></tr><tr><td>**Manual**</td><td>The assignment is created directly from the Storeroom Inventory Assign page.</td></tr></tbody></table>

### Assignment Status

<table id="bkmrk-status-description-p"><thead><tr><th>Status</th><th>Description</th></tr></thead><tbody><tr><td>**Pending**</td><td>The assignment has been created and is waiting for approval. The requested quantity is blocked and cannot be assigned to another request.</td></tr><tr><td>**Approved**</td><td>The assignment has been approved and the requested inventory has been assigned to the Store Room.</td></tr><tr><td>**Rejected**</td><td>The assignment has been rejected and the previously blocked quantity has been released back to available stock.</td></tr><tr><td>**Direct Assigned**</td><td>The Store Room does not require assignment approval, so the inventory is assigned immediately.</td></tr></tbody></table>

---

## Storeroom Inventory Assign List

[![image.png](https://docs.spendwelltechsystem.com/uploads/images/gallery/2026-09/scaled-1680-/H9qimage.png)](https://docs.spendwelltechsystem.com/uploads/images/gallery/2026-09/H9qimage.png)

The **Storeroom Inventory Assign** list provides a centralized view of inventory assignments created for the property's Store Rooms.

Users can review the Store Room, assignment date, number of items assigned, assignment type, and current assignment status.

The screen provides the following controls and information:

- **Assignment ID** — Identifies the unique inventory assignment record.
- **Assigned Date** — Displays the date on which the assignment was created.
- **Store Room** — Displays the Store Room to which the inventory is assigned.
- **Store Room No.** — Displays the unique Store Room number or code.
- **Items Assigned** — Displays the number of inventory items included in the assignment.
- **Assignment Type** — Displays whether the assignment was created through **Auto** or **Manual** assignment.
- **Status** — Displays the current status of the assignment.
- **Create** — Opens the manual Store Room inventory assignment process.

### Assignment Type

The **Assignment Type** identifies how the assignment was created.

#### Auto

An **Auto** assignment is generated from the **Inventory Receive → Assign** process.

After an Inventory Receive is approved, the user can use the **Assign** function to prepare the approved inventory for Store Room assignment.

The assignment is recorded as:

**Assignment Type = Auto**

#### Manual

A **Manual** assignment is created directly from the **Storeroom Inventory Assign** page.

The user selects the Store Room and enters the quantity to assign for the required inventory items.

The assignment is recorded as:

**Assignment Type = Manual**

---

## Create Storeroom Inventory Assign

[![storeroominventoryassign-add.png](https://docs.spendwelltechsystem.com/uploads/images/gallery/2026-09/scaled-1680-/storeroominventoryassign-add.png)](https://docs.spendwelltechsystem.com/uploads/images/gallery/2026-09/storeroominventoryassign-add.png)

Click **Create** from the **Storeroom Inventory Assign** list to create a manual inventory assignment.

The system first requires the user to select the **Storage Room** where the inventory will be assigned.

After the Store Room is selected, the system displays the inventory items and the stock information available for assignment.

### Key Fields

- **Assignment ID** — Displays the unique identifier generated for the inventory assignment.
- **Storage Room** — Used to select the Store Room where the inventory will be assigned.
- **Search Items** — Allows the user to search for a specific inventory item.

After selecting the Store Room, the system displays the inventory items available for assignment.

---

## Store Room Inventory Items

[![storeroominventoryassign-add.png](https://docs.spendwelltechsystem.com/uploads/images/gallery/2026-09/scaled-1680-/storeroominventoryassign-add.png)](https://docs.spendwelltechsystem.com/uploads/images/gallery/2026-09/storeroominventoryassign-add.png)

The inventory table displays the stock information for the selected Store Room.

The table provides the following fields:

- **Item Code** — Identifies the inventory item using its configured unique item code.
- **Item Name** — Identifies the inventory item available for assignment to the Store Room.
- **Unit** — Specifies the stock unit used to maintain the inventory quantity.
- **Current Stock** — Displays the quantity currently assigned to the selected Store Room.
- **Available Stock** — Displays the approved inventory quantity currently available for Store Room assignment.
- **Assign Stock** — Specifies the quantity to be assigned to the selected Store Room.
- **New Stock** — Displays the resulting Store Room stock after the assignment is applied.

## Stock Information

The Store Room assignment screen displays three important stock quantities used to determine how much inventory can be assigned.

### Current Stock

**Current Stock** represents the quantity of the selected inventory item that is currently assigned to the selected Store Room.

For example:

**Current Stock = 3 PCS**

This means that the Store Room currently contains 3 PCS of the item.

### Available Stock

**Available Stock** represents the approved inventory received through the **Inventory Receive** process that is currently available for Store Room assignment.

For example:

**Available Stock = 8 PCS**

This means 8 PCS are currently available to be assigned.

Available Stock represents inventory that has already passed the Inventory Receive approval process and is available for Store Room assignment.

### Assign Stock

**Assign Stock** represents the quantity that the user wants to assign to the selected Store Room.

For example:

**Assign Stock = 5 PCS**

The system validates the requested quantity against the available quantity that can be assigned.

The user cannot assign more inventory than the available stock.

### New Stock

**New Stock** represents the Store Room stock after the requested assignment is completed.

The system calculates New Stock using:

**New Stock = Current Stock + Assign Stock**

For example:

**Current Stock = 3 PCS**

**Assign Stock = 5 PCS**

Therefore:

**New Stock = 3 + 5 = 8 PCS**

After the assignment is completed, the Store Room stock becomes **8 PCS**.

---

## Create Manual Assignment

[![storeroominventoryassign-add.png](https://docs.spendwelltechsystem.com/uploads/images/gallery/2026-09/scaled-1680-/storeroominventoryassign-add.png)](https://docs.spendwelltechsystem.com/uploads/images/gallery/2026-09/storeroominventoryassign-add.png)

The Manual Assignment process allows a user to assign approved inventory directly to a Store Room.

### Steps

1. Navigate to **Inventory Management**.
2. Open **Storeroom Inventory Assign**.
3. Click **Create**.
4. Select the required **Storage Room**.
5. Review the inventory items displayed for the selected Store Room.
6. Review the **Current Stock** for each item.
7. Review the **Available Stock**.
8. Enter the required quantity in **Assign Stock**.
9. Verify the calculated **New Stock**.
10. Verify that the requested quantity does not exceed the available stock.
11. Complete the assignment.
12. The system determines whether the selected Store Room requires assignment approval.
13. If approval is required, the assignment is created with **Pending** status.
14. If approval is not required, the assignment is completed as **Direct Assigned**.

---

# Auto Assignment

<div id="bkmrk--9" style="display: flex; gap: 30px; justify-content: center; align-items: flex-start; flex-wrap: wrap;"><div style="text-align: center; width: 560px;">[ ![Step 1 - Assign Inventory](https://docs.spendwelltechsystem.com/uploads/images/gallery/2026-09/scaled-1680-/inventory-receive.png) ](https://docs.spendwelltechsystem.com/uploads/images/gallery/2026-09/scaled-1680-/inventory-receive.png)</div></div>**Step 1 – Assign Inventory**  
After the inventory receipt is approved, click the **Assign (+)** icon to begin assigning the approved inventory to a Store Room.

<div id="bkmrk--10" style="display: flex; gap: 30px; justify-content: center; align-items: flex-start; flex-wrap: wrap;"><div style="text-align: center; width: 560px;">  
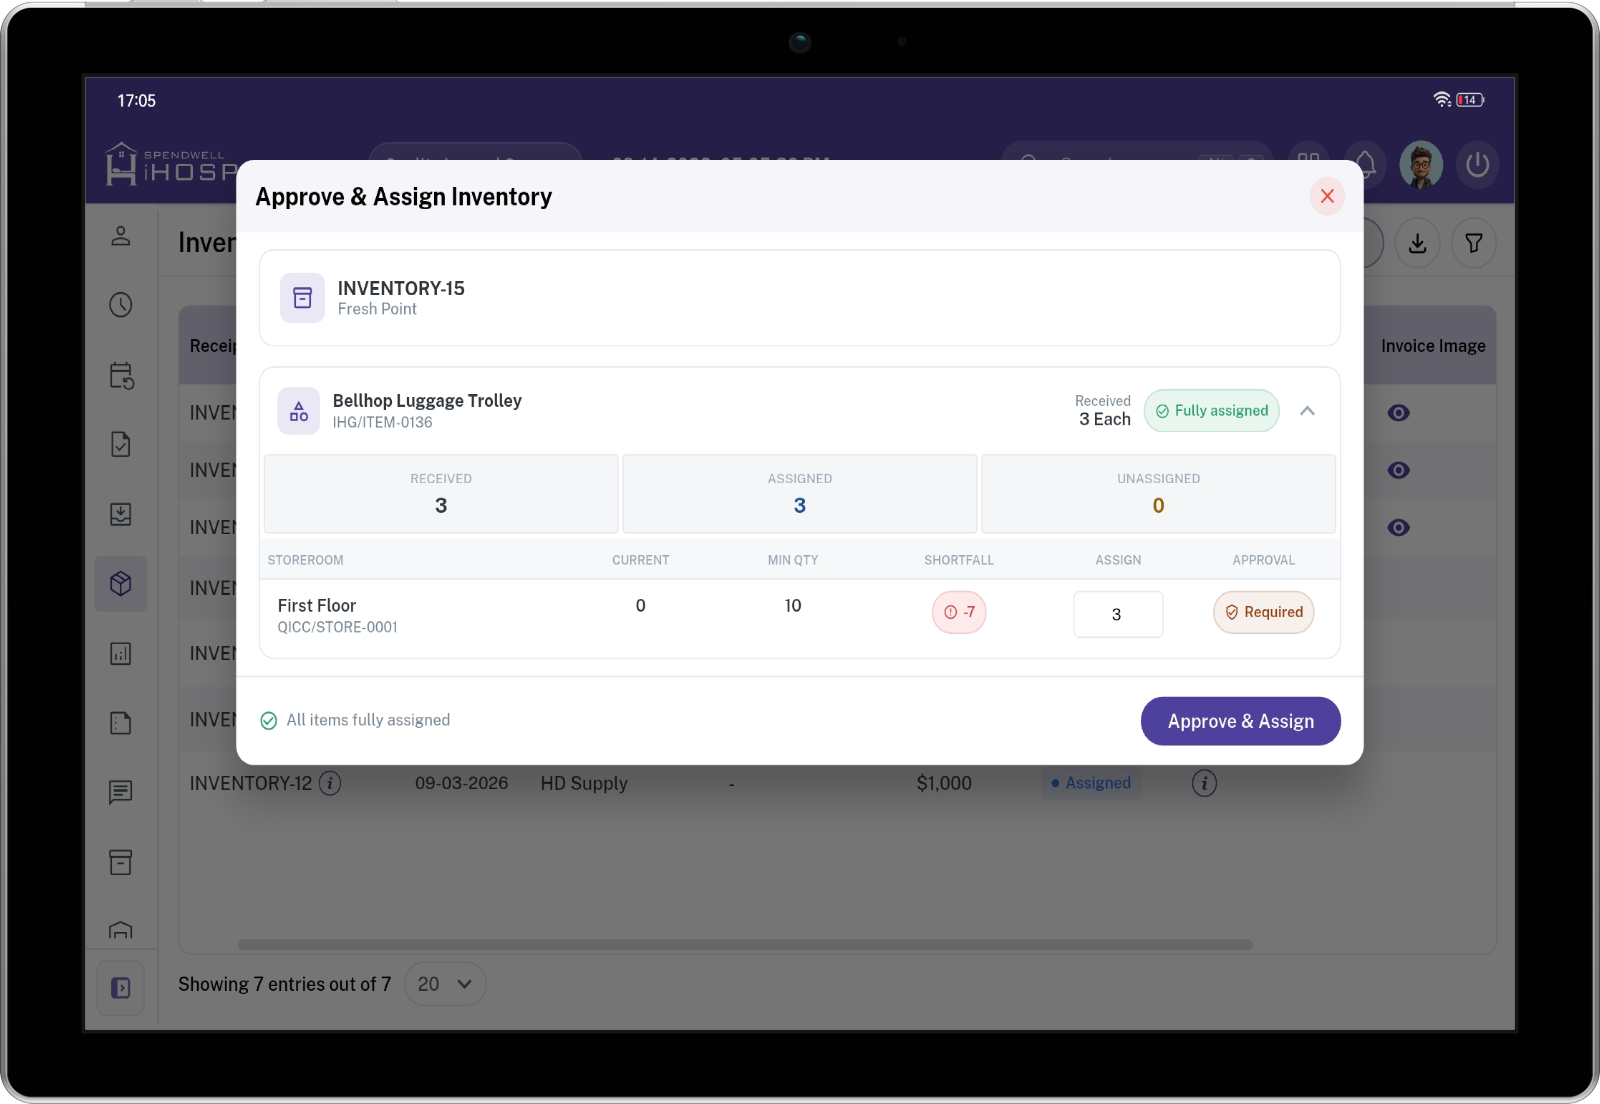
</div><div style="text-align: center; width: 500px;">[ ![Step 2 - Review and Approve Assignment](https://docs.spendwelltechsystem.com/uploads/images/gallery/2026-09/scaled-1680-/inventory-assign.png) ](https://docs.spendwelltechsystem.com/uploads/images/gallery/2026-09/scaled-1680-/inventory-assign.png)</div></div>**Step 2 – Review and Approve Assignment**  
Review the quantity automatically assigned to the Store Room. If required, update the quantity before selecting **Approve &amp; Assign** to complete the inventory assignment.

The **Auto Assignment** process is initiated from the **Inventory Receive** workflow.

After an Inventory Receive is approved, the approved inventory can be assigned to Store Rooms using the **Assign** function.

The system prepares the Store Room assignment based on the configured Store Room inventory assignment rules.

The resulting assignment is recorded with:

**Assignment Type = Auto**

### Auto Assignment Workflow

**Inventory Receive → Pending → Approved → Assign → Auto Assignment**

The approved inventory becomes available for Store Room assignment after the Inventory Receive is approved.

### Auto Assignment Steps

1. Open **Inventory Receive**.
2. Locate the approved inventory receipt.
3. Open the approved receipt.
4. Select the **Assign** function.
5. Review the Store Room assignment information.
6. Review the inventory items and quantities.
7. Verify the Store Room to which the inventory will be assigned.
8. Verify the quantity being assigned.
9. Complete the assignment.
10. The system creates the Store Room inventory assignment with **Assignment Type = Auto**.
11. The system checks whether **Stock Assignment &amp; Issue Approval** is required for the Store Room.
12. If approval is required, the assignment enters **Pending** status.
13. If approval is not required, the assignment is completed as **Direct Assigned**.

---

## Auto Assignment Example

Assume an Inventory Receive contains:

**Item:** Sanitizer

**Stock Unit:** PCS

**Approved Available Stock:** 10 PCS

The Inventory Receive is approved and the user selects **Assign**.

The system prepares the Store Room assignment:

**Store Room:** Maintenance Stores

**Assign Stock:** 6 PCS

The resulting assignment is recorded as:

**Assignment Type = Auto**

If the Store Room requires approval:

**Status = Pending**

If the Store Room does not require approval:

**Status = Direct Assigned**

---

# Stock Assignment &amp; Issue Approval

The **Stock Assignment &amp; Issue Approval** setting controls whether a Store Room inventory assignment requires approval.

The approval requirement is configured at the Store Room level.

There are two possible workflows:

### Approval Required

When **Stock Assignment &amp; Issue Approval** is enabled, the assignment must be approved before the inventory becomes assigned to the Store Room.

**Create Assignment → Pending → Approve / Reject**

### Approval Not Required

When **Stock Assignment &amp; Issue Approval** is not enabled, the assignment is completed immediately.

**Create Assignment → Direct Assigned**

---

# Pending Assignment

[![storeroominventoryassign-status.png](https://docs.spendwelltechsystem.com/uploads/images/gallery/2026-09/scaled-1680-/storeroominventoryassign-status.png)](https://docs.spendwelltechsystem.com/uploads/images/gallery/2026-09/storeroominventoryassign-status.png)

When a Store Room requires **Stock Assignment &amp; Issue Approval**, a new assignment is created with:

**Status = Pending**

The requested quantity is blocked while the assignment is pending.

This prevents the same inventory quantity from being requested by another Store Room assignment.

### Pending Stock Example

Assume the approved inventory has:

**Available Stock = 10 PCS**

A user requests:

**Assign Stock = 6 PCS**

Because approval is required, the system blocks the requested quantity.

The stock becomes:

<table id="bkmrk-stock-type-quantity-"><thead><tr><th>Stock Type</th><th align="right">Quantity</th></tr></thead><tbody><tr><td>Total Available Before Assignment</td><td align="right">10 PCS</td></tr><tr><td>Pending / Blocked Quantity</td><td align="right">6 PCS</td></tr><tr><td>Available for Other Assignments</td><td align="right">4 PCS</td></tr></tbody></table>

The 6 PCS remain reserved for the pending assignment.

Another assignment cannot use those 6 PCS while the request is pending.

---

# Approve Assignment

[![storeroominventoryassign-approved.png](https://docs.spendwelltechsystem.com/uploads/images/gallery/2026-09/scaled-1680-/storeroominventoryassign-approved.png)](https://docs.spendwelltechsystem.com/uploads/images/gallery/2026-09/storeroominventoryassign-approved.png)

The **Approve** action completes a pending Store Room inventory assignment.

When the assignment is approved:

**Pending → Approved**

The blocked quantity is finalized as Store Room inventory.

### Approve Steps

1. Open **Storeroom Inventory Assign**.
2. Locate the assignment with **Pending** status.
3. Open the assignment.
4. Review the Store Room.
5. Review the inventory items.
6. Verify the assigned quantities.
7. Verify the available stock.
8. Review the resulting Store Room stock.
9. Click **Approve**.
10. The assignment status changes to **Approved**.
11. The blocked quantity is finalized as assigned inventory.
12. The Store Room stock is updated.

### Approval Example

Before approval:

**Current Stock = 3 PCS**

**Assign Stock = 6 PCS**

**Pending Blocked Stock = 6 PCS**

After approval:

**New Stock = 3 + 6 = 9 PCS**

The 6 PCS are now officially assigned to the Store Room.

---

# Reject Assignment

[![storeroominventory-reject.png](https://docs.spendwelltechsystem.com/uploads/images/gallery/2026-09/scaled-1680-/storeroominventory-reject.png)](https://docs.spendwelltechsystem.com/uploads/images/gallery/2026-09/storeroominventory-reject.png)

A pending assignment can be rejected when the requested inventory should not be assigned to the Store Room.

When the assignment is rejected:

**Pending → Rejected**

The requested quantity is not added to the Store Room stock.

The blocked quantity is released and becomes available for future assignments.

### Reject Steps

1. Open **Storeroom Inventory Assign**.
2. Locate the assignment with **Pending** status.
3. Open the assignment.
4. Review the Store Room and inventory details.
5. Review the requested quantity.
6. Click **Reject**.
7. The assignment status changes to **Rejected**.
8. The blocked quantity is released.
9. The released quantity becomes available for another assignment.

### Rejection Example

Before rejection:

**Available Stock = 4 PCS**

**Pending Blocked Stock = 6 PCS**

After rejection:

**Available Stock = 10 PCS**

**Pending Blocked Stock = 0 PCS**

The 6 PCS can now be requested by another Store Room assignment.

---

# Direct Assignment

[![storeroominventoryassign-add.png](https://docs.spendwelltechsystem.com/uploads/images/gallery/2026-09/scaled-1680-/storeroominventoryassign-add.png)](https://docs.spendwelltechsystem.com/uploads/images/gallery/2026-09/storeroominventoryassign-add.png)

When **Stock Assignment &amp; Issue Approval** is not required for the selected Store Room, the assignment does not enter Pending status.

The inventory is assigned immediately.

The workflow is:

**Create Assignment → Direct Assigned**

### Direct Assignment Steps

1. Create a Store Room inventory assignment.
2. Select the Store Room.
3. Select or enter the inventory quantity.
4. Verify the available stock.
5. Verify the New Stock quantity.
6. Complete the assignment.
7. The inventory is assigned immediately.
8. The assignment is recorded with **Direct Assigned** status.

### Direct Assignment Example

**Current Stock = 3 PCS**

**Assign Stock = 5 PCS**

The system calculates:

**New Stock = 3 + 5 = 8 PCS**

Because approval is not required:

**Status = Direct Assigned**

The Store Room stock is immediately updated to **8 PCS**.

---

# Assignment Status

The assignment status represents the current state of the Store Room inventory assignment.

<table id="bkmrk-status-description-p-1"><thead><tr><th>Status</th><th>Description</th></tr></thead><tbody><tr><td>**Pending**</td><td>The assignment requires approval. The requested quantity is blocked until the assignment is approved or rejected.</td></tr><tr><td>**Approved**</td><td>The assignment has been approved and the inventory has been assigned to the Store Room.</td></tr><tr><td>**Rejected**</td><td>The assignment has been rejected and the blocked quantity has been released back to available inventory.</td></tr><tr><td>**Direct Assigned**</td><td>The Store Room does not require approval and the inventory has been assigned immediately.</td></tr></tbody></table>

### Status Flow

When approval is required:

**Pending → Approved**

or

**Pending → Rejected**

When approval is not required:

**Direct Assigned**

---

# Assignment Details

Users can open an assignment from the **Storeroom Inventory Assign** list to review the complete assignment details.

The Assignment Details screen provides information about the Store Room, assigned inventory, quantity, assignment type, user, date and time, and current status.

### Assignment Detail Fields

- **Assignment ID** — Identifies the unique inventory assignment record.
- **Store Room** — Identifies the Store Room to which the inventory is assigned.
- **Store Room No.** — Displays the unique Store Room number or code.
- **Item** — Identifies the inventory item included in the assignment.
- **Assigned Quantity** — Displays the quantity assigned to the Store Room.
- **Stock Unit** — Identifies the unit in which the assigned quantity is maintained.
- **Assignment Type** — Identifies whether the assignment was created through **Auto** or **Manual** assignment.
- **Assigned By** — Identifies the user who created or processed the assignment.
- **Assignment Date / Time** — Records when the assignment was created or processed.
- **Status** — Displays the current status of the assignment.

---

# Assignment Audit Trail

The Storeroom Inventory Assign feature provides an audit trail for inventory movement from approved inventory into Store Rooms.

The assignment record allows users to verify:

- **Assignment ID** — Which assignment was created.
- **Store Room** — Where the inventory was assigned.
- **Store Room No.** — The Store Room reference.
- **Item** — Which inventory item was assigned.
- **Assigned Quantity** — How much inventory was assigned.
- **Stock Unit** — The unit used for the assigned quantity.
- **Assignment Type** — Whether the assignment was Auto or Manual.
- **Assigned By** — Which user created or processed the assignment.
- **Assignment Date / Time** — When the assignment occurred.
- **Status** — The current assignment state.

This provides traceability from:

**Inventory Receive → Approved Inventory → Store Room Assignment**

---

# Inventory Assignment Example

The following example demonstrates the complete Store Room assignment process.

Assume an approved Inventory Receive contains:

**Item:** Sanitizer

**Stock Unit:** PCS

**Available Stock:** 10 PCS

The selected Store Room currently contains:

**Current Stock:** 3 PCS

The user wants to assign:

**Assign Stock:** 5 PCS

The system calculates:

**New Stock = Current Stock + Assign Stock**

**New Stock = 3 + 5 = 8 PCS**

### If Approval Is Required

The assignment is created as:

**Assignment Type = Manual**

**Status = Pending**

The requested 5 PCS are blocked while the assignment is pending.

If the assignment is approved:

**Status = Approved**

**Store Room Stock = 8 PCS**

If the assignment is rejected:

**Status = Rejected**

The 5 PCS are released back to available inventory.

### If Approval Is Not Required

The assignment is created as:

**Assignment Type = Manual**

**Status = Direct Assigned**

The 5 PCS are immediately added to the Store Room stock.

**Store Room Stock = 8 PCS**

---

# Complete Inventory Assignment Flow

[![storeroominventoryassignflow.png](https://docs.spendwelltechsystem.com/uploads/images/gallery/2026-09/scaled-1680-/storeroominventoryassignflow.png)](https://docs.spendwelltechsystem.com/uploads/images/gallery/2026-09/storeroominventoryassignflow.png)