Scheduling Board
Overview
The Scheduling Board allows managers and supervisors to create, view, manage, and publish employee work schedules from one centralized screen.
Managers can use the Scheduling Board to assign employees to shifts, review scheduled working hours, identify staffing gaps, manage shift conflicts, and control labor costs by comparing scheduled hours against staffing requirements and payroll budgets.
The board provides a visual, time-based view of employee schedules, helping managers ensure the right employees are scheduled for the required shifts while maintaining appropriate staffing levels.
Scheduling Board Screen
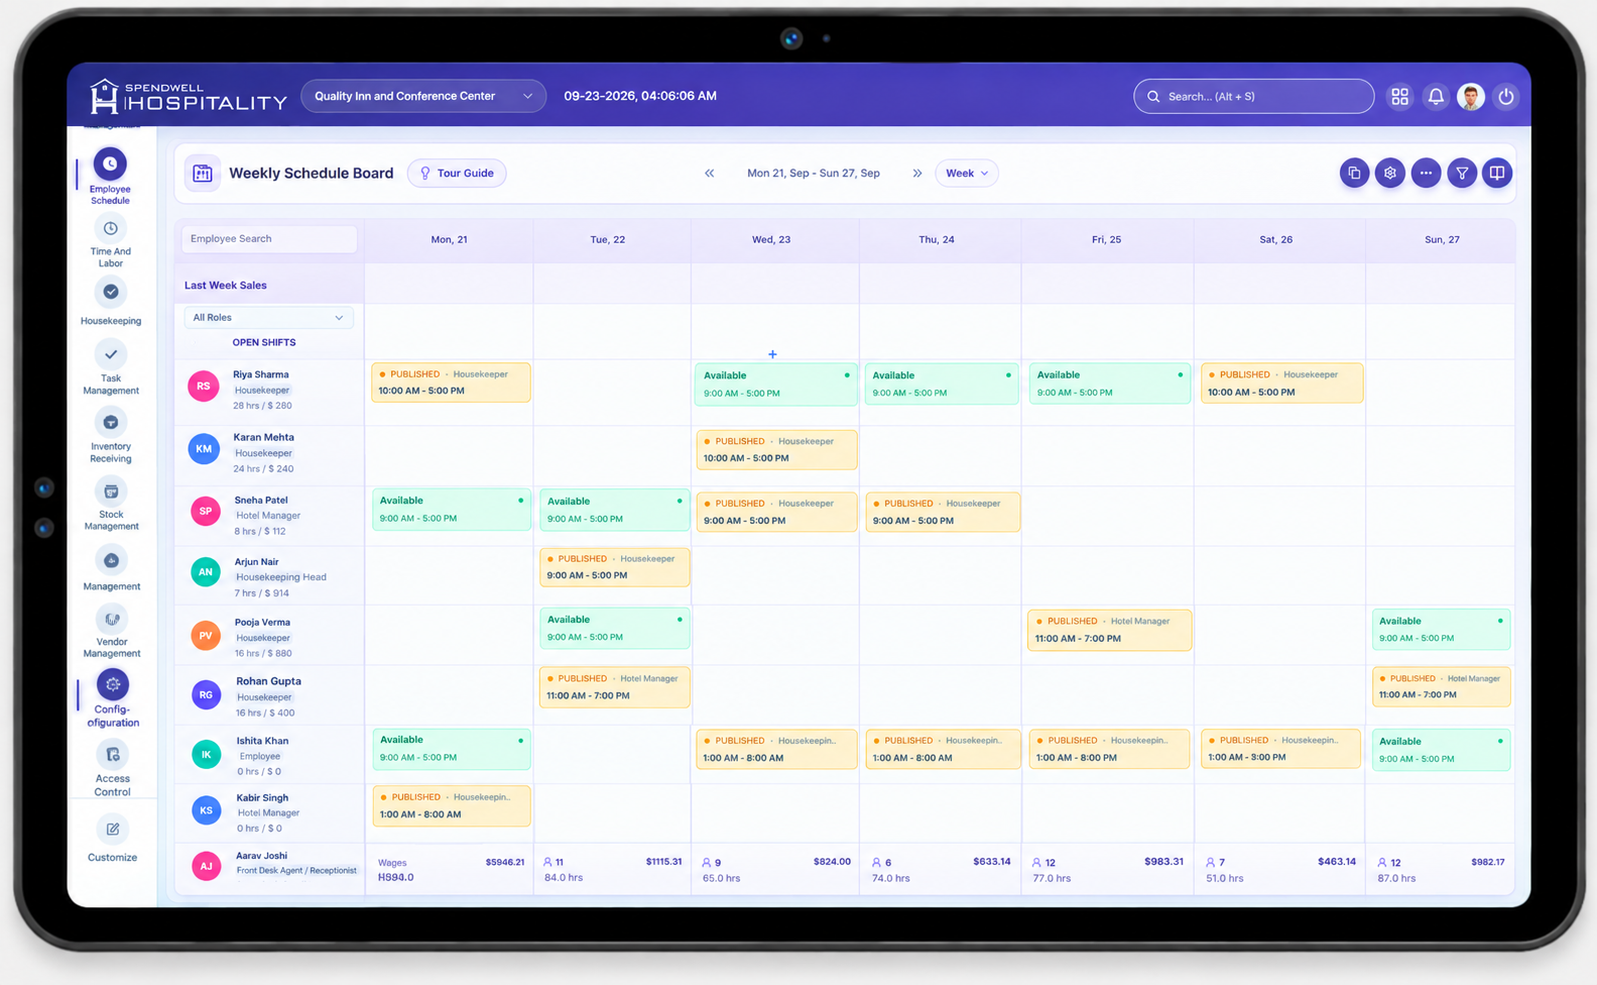
Weekly View
Review employee schedules and staffing coverage across the week.
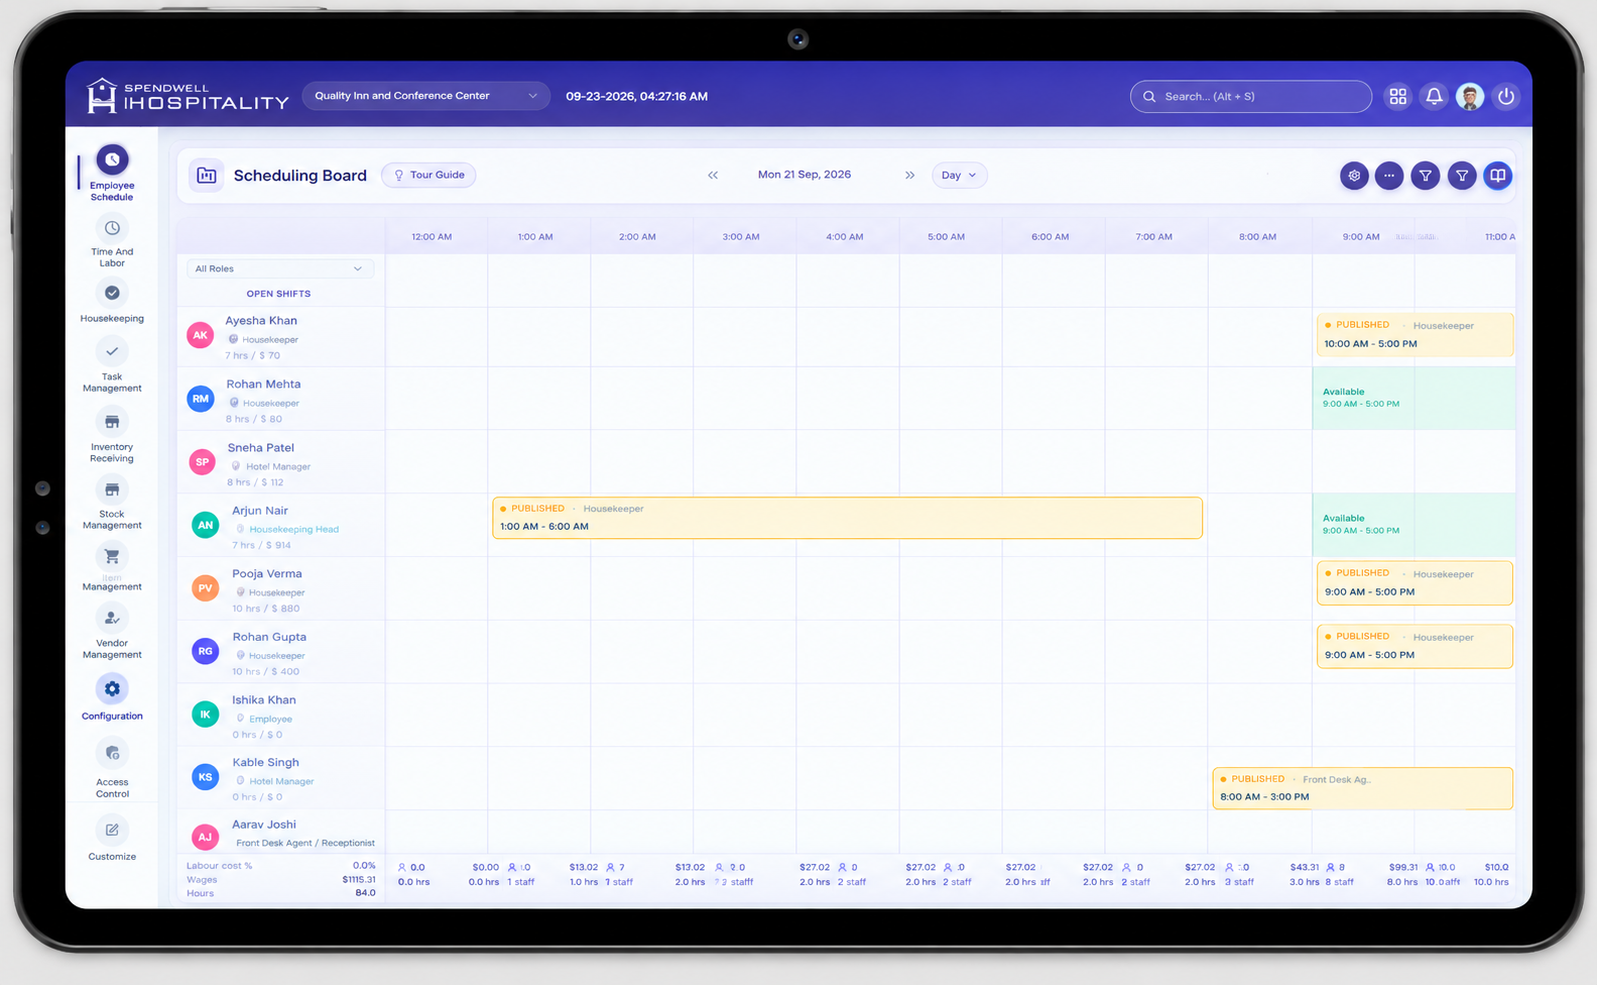
Daily View
Review employee shifts and scheduled working hours for a selected day.
What Managers Can See at a Glance
- Which employees are scheduled and when.
- Each employee's approved availability, so shifts can be assigned within their available hours.
- How many hours each employee is scheduled to work.
- Which shifts are unassigned.
- Where staffing coverage may be insufficient.
- Whether shifts overlap or create conflicts.
Employee Schedule View
Each employee appears as a separate row showing their assigned shifts for the selected period, so managers can review a schedule without opening each shift individually.
Employee row can display: name, profile info, position/department, scheduled hours, number of assigned shifts, and coverage information.
Each shift can display: start/end time, total duration, position/role, and shift status.
Managing Shifts
Create a Shift
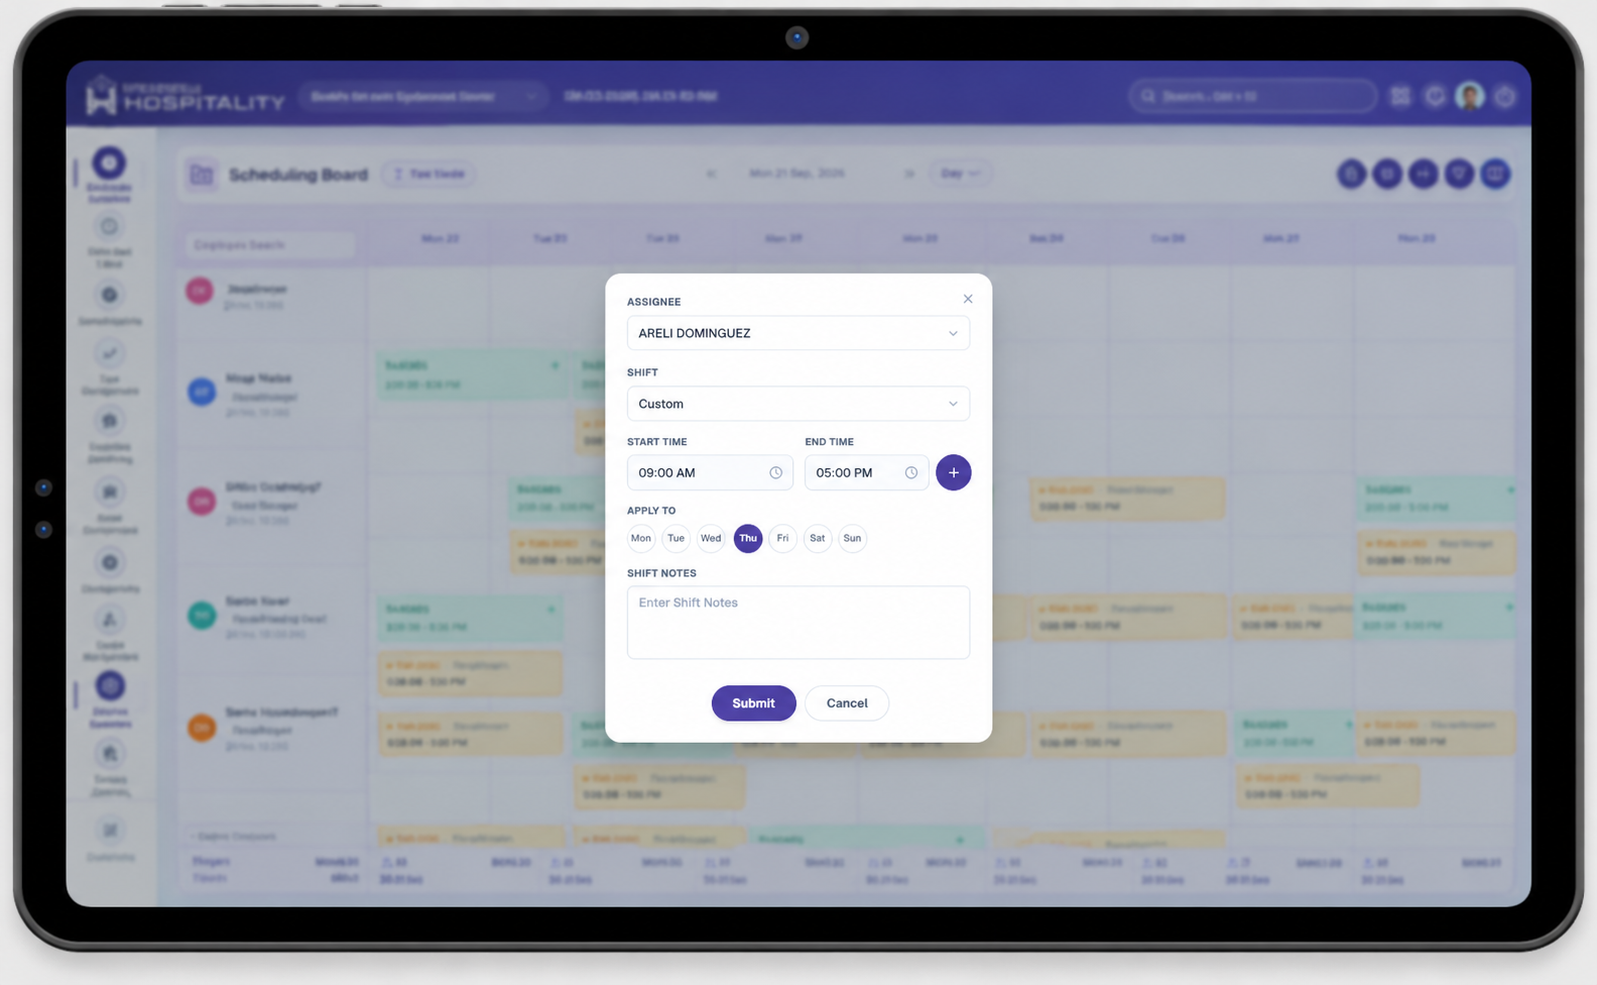
Create Shift - Tablet View
Create and manage employee shifts from the Scheduling Board.
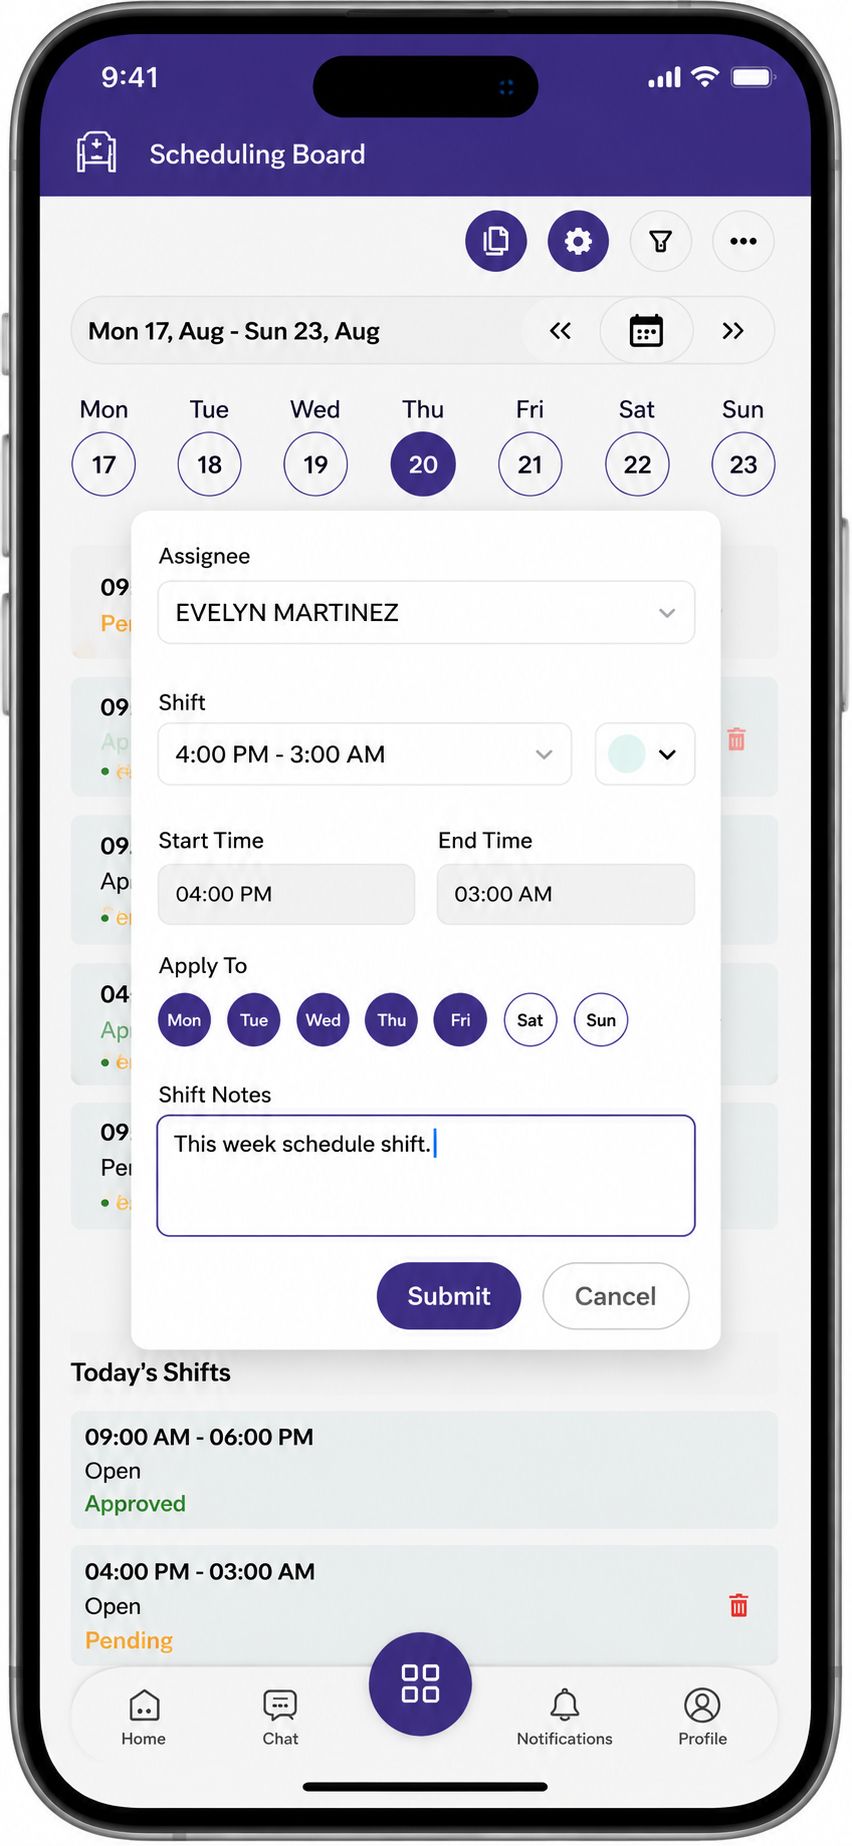
Create Shift - Mobile View
Create and manage employee shifts from a mobile device.
- Click the corresponding employee and date cell in the scheduling grid to create the shift.
- Select the employee (or leave unassigned to create an Open Shift).
- Select the date.
- Enter the Start Time and End Time.
- Select the applicable position.
- Select a shift type, or Custom for specific hours.
- Add shift notes if needed.
- Review the employee's availability and any scheduling conflicts.
- Select Save or Create.
Note: The system should validate the employee's availability and existing schedule before saving the shift.
Update a Shift
- Select the shift on the board.
- Select Edit.
- Update the time, employee, position, department, location, or notes as needed.
- Review the change.
- Select Update.
Delete a Shift
- Select the shift.
- Select Delete.
- Confirm the deletion.
Assign or Reassign an Employee
Useful when an employee becomes unavailable, coverage needs change, or workload needs balancing.
- Select the shift.
- Select Edit or Reassign.
- Select the new employee.
- Review their availability and any conflicts.
- Select Save.
Copy Schedule
Copies an existing week's schedule to another week — useful when the new week follows a similar staffing pattern.
Workflow: Select Source Week → Select Target Week → Review Schedule → Copy → Review Copied Schedule
- Open the Scheduling Board.
- Navigate to the week you want to copy.
- Select Copy Schedule.
- Select the source week and target week.
- Review what will be copied, then confirm.
- Review the copied schedule and adjust individual shifts (employee, time, add/delete shifts, notes) as needed.
Important: After copying, review the target week's employee availability, leave, and potential conflicts before publishing — a copied schedule is a starting point, not a finished one.
Availability, Conflicts & Coverage
Checking Availability
The Scheduling Board should be used together with Team Availability. Before assigning a shift, check whether the employee is available, unavailable, has a pending availability change, is on approved leave, or already has a shift during that period.
The Scheduling Board displays each employee's approved availability and leave information alongside their schedule, so managers can see when an employee is available to work and whether they are on approved leave while assigning or adjusting shifts.
Note: Approved availability should be the primary reference when assigning shifts.
Scheduling Conflicts
A conflict can occur when:
- An employee is scheduled during an unavailable period.
- The employee has approved leave on the scheduled date.
- Two shifts overlap for the same employee.
- A shift falls outside approved availability.
- Scheduled hours exceed configured limits (where applicable).
When a conflict is detected, the system can display a warning. For example, if an employee has approved leave on the selected date, the Scheduling Board can indicate that the employee is on leave.
Note: A warning doesn't always block saving — behavior depends on configured scheduling rules.
Staffing Coverage
Compare scheduled employees against operational requirements to spot understaffed or overstaffed periods, unassigned shifts, and gaps — then adjust assignments or shift times accordingly.
Scheduled Hours
Calculated from each shift's start and end time.
| Start | End | Scheduled Hours |
|---|---|---|
| 09:00 AM | 05:00 PM | 8 hours |
| 09:00 AM | 09:45 AM | 45 minutes |
Note: Scheduled hours are planned time and may differ from actual worked hours recorded via time tracking/attendance.
Filters and Search
The Scheduling Board provides filters to help managers quickly find employees, review schedules, and analyze staffing coverage.
Available Filters
- Date View: Switch between Week and Day views to review the schedule for the selected period.
- Employee: Search the schedule by a specific employee.
- Employee Forecast: View staffing information based on the employee forecast.
- People Forecast: View the required staffing level based on the people forecast.
- Hour Forecast: View staffing requirements based on the hour forecast.
Schedule Status and Approval Workflow
The schedule follows a defined workflow from shift creation through approval and publishing. Managers can create and update shifts, while approval determines when a shift becomes available to employees in My Schedule Week.
Pending
- The shift has been created or modified but has not yet been approved.
- The shift is not visible to the employee in My Schedule Week.
Published
- The schedule has been published by the Assistant Manager and is available for review by the higher-level manager.
- For Open Shifts, the shift is visible to eligible employees and can be claimed.
- Assigned employee shifts are not yet visible to employees when higher-level approval is required.
Approved
- The higher-level manager has reviewed and approved the published schedule.
- The approved assigned shifts are now visible to employees in My Schedule Week.
Unpublish
- The schedule is withdrawn from the published/approved state because changes or re-approval are required.
- When a schedule is unpublished, its status returns to Pending and it must go through the configured role-based approval workflow again.
Full Workflow
Create/Update Shift → Pending → Publish → Published → Higher-Level Approval → Approved
Open Shifts
Lets managers create a shift without assigning it to a specific employee, so eligible employees can claim it — helpful for filling staffing gaps flexibly.
Workflow: Manager Creates Open Shift → Published → Employee Claims → Manager Reviews → Approve or Reject
Create an Open Shift
- Open the Scheduling Board.
- Select the date and time.
- Create a new shift and set it as Open.
- Enter start/end time, shift type (or Custom), and notes if needed.
- Select Submit.
An open shift must be published before employees can view or claim it.
Employee Claims & Manager Review
When an employee claims an open shift, they're associated with the request but not assigned until the manager approves it. Before approving, the manager should review the employee's availability, leave status, existing schedule, and scheduled hours.
- Approve → Employee is assigned; shift is removed from other employees' claim options.
- Reject → Employee is not assigned; the shift can remain open for others to claim.
Important: Claiming an open shift does not automatically assign it — assignment only happens after manager approval.
Scheduling Board Settings
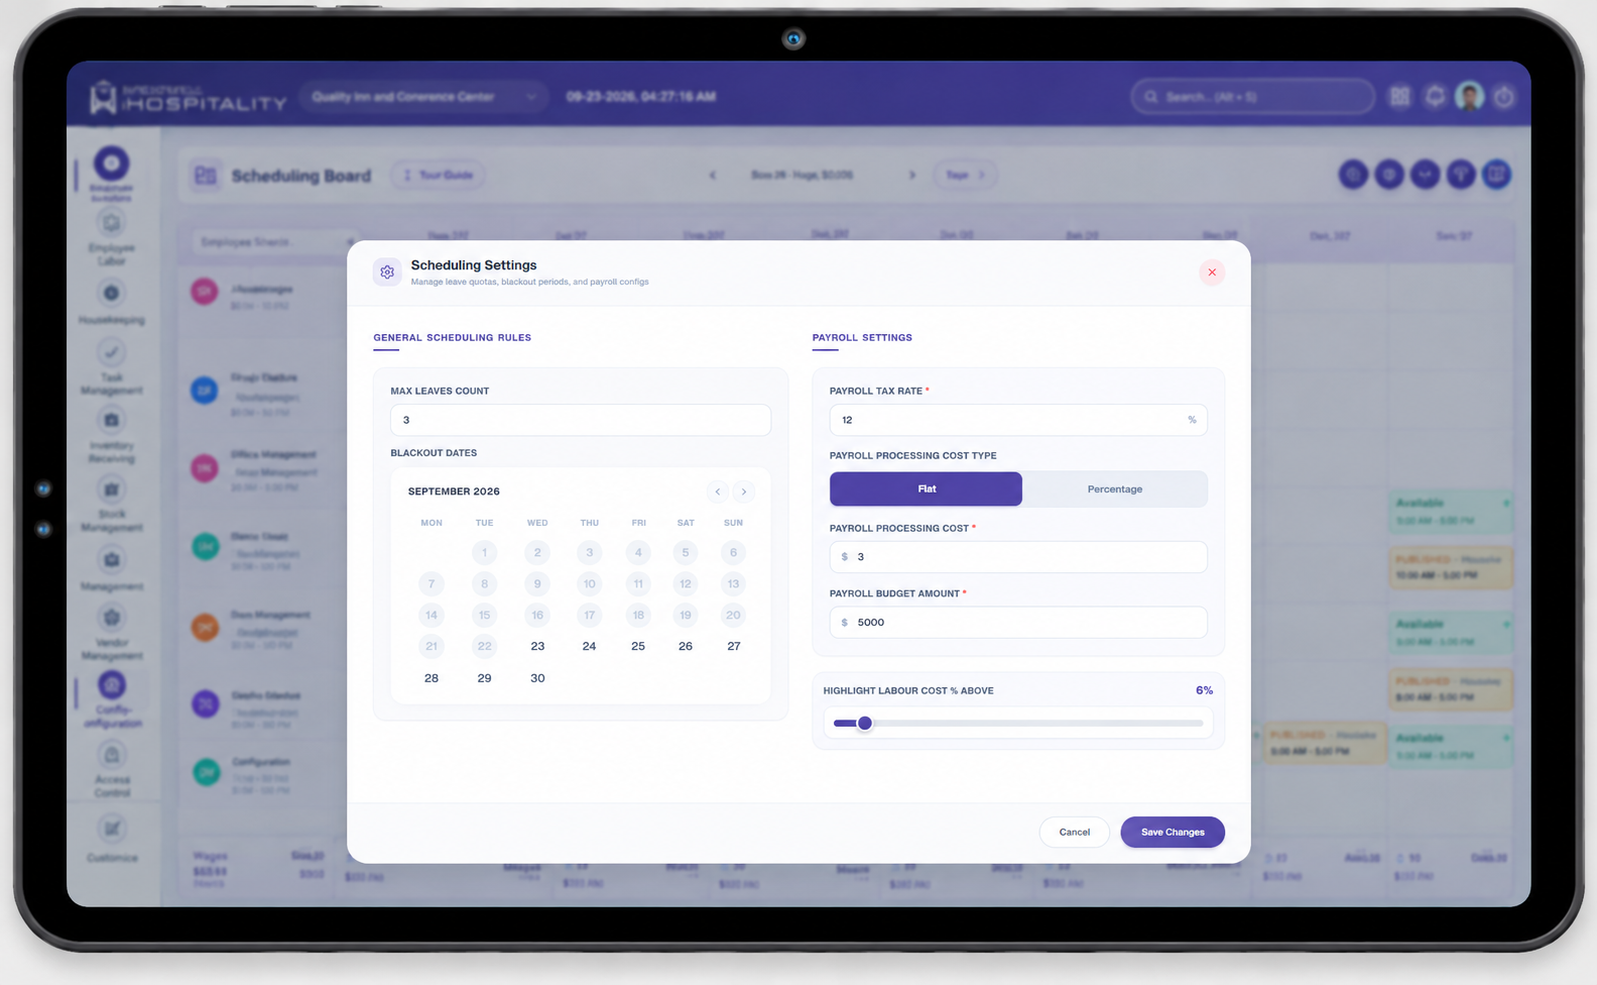
Leave and Scheduling Rules
- Max Leaves Count — Maximum number of employees who can be on leave on the same day. Once the limit is reached, further leave requests for that day aren't allowed.
- Blackout Dates — Specific dates where employee leave isn't permitted at all (e.g. a high-demand event date), regardless of how many employees are already on leave elsewhere.
Payroll Settings
- Payroll Tax Rate — Tax percentage used in labor cost calculations.
- Payroll Processing Cost Type — Flat amount or percentage-based.
- Payroll Processing Cost — The actual cost value, per the selected type.
- Payroll Budget Amount — The configured budget used to compare against scheduled labor costs.
Labor Cost Highlighting
Highlight Labor Cost % Above — a configurable threshold (e.g. 10%) above which scheduled labor costs are visually flagged, helping managers spot overspend early.
Update Settings
- Open the Scheduling Board → Settings.
- Update leave rules, blackout dates, payroll settings, or the labor cost threshold.
- Review the values.
- Select Save.
Notifications
Employees are notified when: a new schedule is approved, a shift is assigned, a shift time changes, a shift is reassigned, or a published shift is unpublished/cancelled.
Best Practices
- Review approved availability before scheduling.
- Avoid overlapping shift assignments.
- Check staffing coverage and scheduled hours before publishing.
- Resolve conflicts and unassigned shifts before publishing.
- Review schedules again after any post-publish changes.
- Review leave rules, blackout dates, and labor cost settings regularly to keep them aligned with current staffing and budget needs.
Important Notes
- The Scheduling Board creates and manages actual work shifts; Team Availability only informs it — approved availability doesn't create a shift automatically.
- Approved and Published are different, sequential statuses — published authorizes a schedule, approved makes it visible to employees.
- An open shift must be published before employees can claim it, and claiming doesn't equal assignment — manager approval is still required.
- A shift trade only takes effect after manager approval.
- Unpublishing a schedule returns it to Pending so it can go through approval again.
- Scheduled hours are planned time and may differ from actual worked hours recorded via time tracking.