Vendor Management
Vendor
The Vendor Master stores complete supplier information, including vendor details, contacts, addresses, tax ID, documents, and vendor codes. It is used to link vendors with inventory receipts and items, track stock purchases, and generate vendor-wise spending and inventory reports.
Complete the required fields marked with * before saving the vendor.
1. Vendor Details
Use this tab to enter the vendor's main business information.

| Field | Required | Description |
|---|---|---|
| Vendor Type | Yes | Identifies the type or category of the vendor. |
| Vendor Code | Yes | Provides a unique system identifier for the vendor. |
| Vendor Name | Yes | Enter the official name of the supplier or service provider. |
| Federal Tax ID (EIN) | No | Enter the vendor's Federal Tax Identification Number (EIN), if applicable. |
Note: Fields marked with * are mandatory.
2. Contact Details
Use this tab to add people who can be contacted at the vendor company.
You can add more than one contact. Each contact email must be unique within the vendor's contact list.
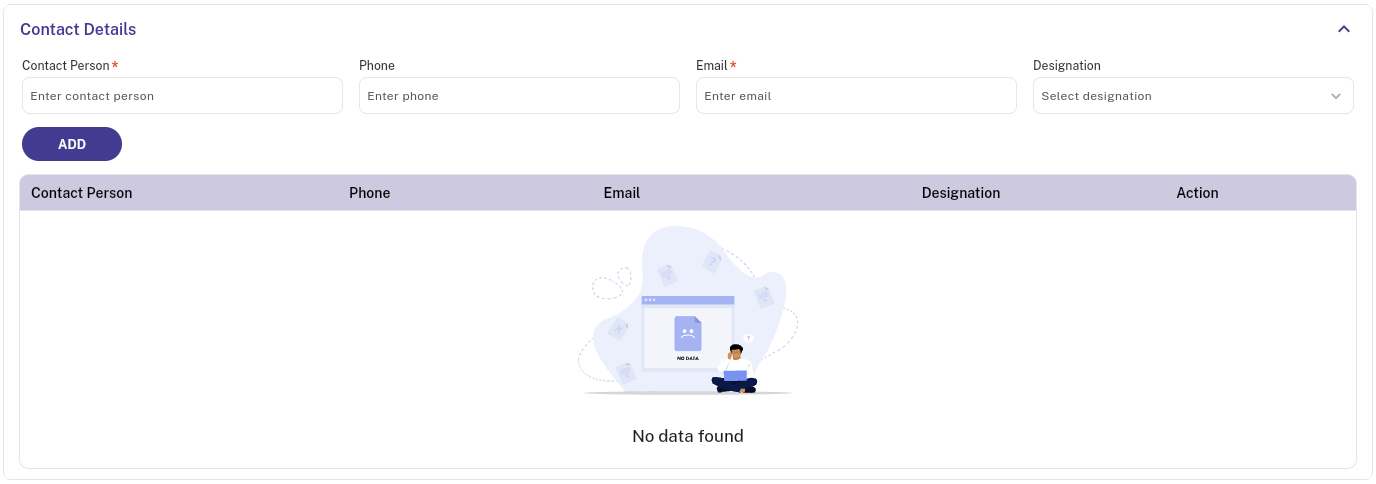
| Field | Required | Description |
|---|---|---|
| Contact Person | Yes | Stores the name of a person who can be contacted at the vendor company. |
| Phone | No | Stores the contact person's phone number. |
| Yes | Stores the contact person's email address. | |
| Designation | No | Stores the contact person's job title. |
- Enter the Contact Person.
- Enter the Phone number.
- Enter the Email address.
- Select the Designation, if applicable.
- Tap ADD.
- The contact is added to the contact list.
The contact list displays:
- Contact Person
- Phone
- Designation
- Action
If needed, use the available Action option to manage the contact entry.
3. Billing Address
Use this tab to enter the address used for vendor billing and financial documents.

| Field | Required | Description |
|---|---|---|
| Address | No | Stores the vendor's billing street or full address. |
| Country | No | Identifies the billing country. |
| State | No | Identifies the billing state or province. |
| City | No | Identifies the billing city. |
| Postal Code | No | Stores the billing postal or ZIP code. |
4. Shipping Address
Use this tab to enter the address where goods or services are delivered.

| Field | Required | Description |
|---|---|---|
| Address | No | Stores the vendor's shipping or delivery address. |
| Country | No | Identifies the shipping country. |
| State | No | Identifies the shipping state or province. |
| City | No | Identifies the shipping city. |
| Postal Code | No | Stores the shipping postal or ZIP code. |
5. Documents
Use this tab to store documents related to the vendor.
You can add multiple documents for one vendor.
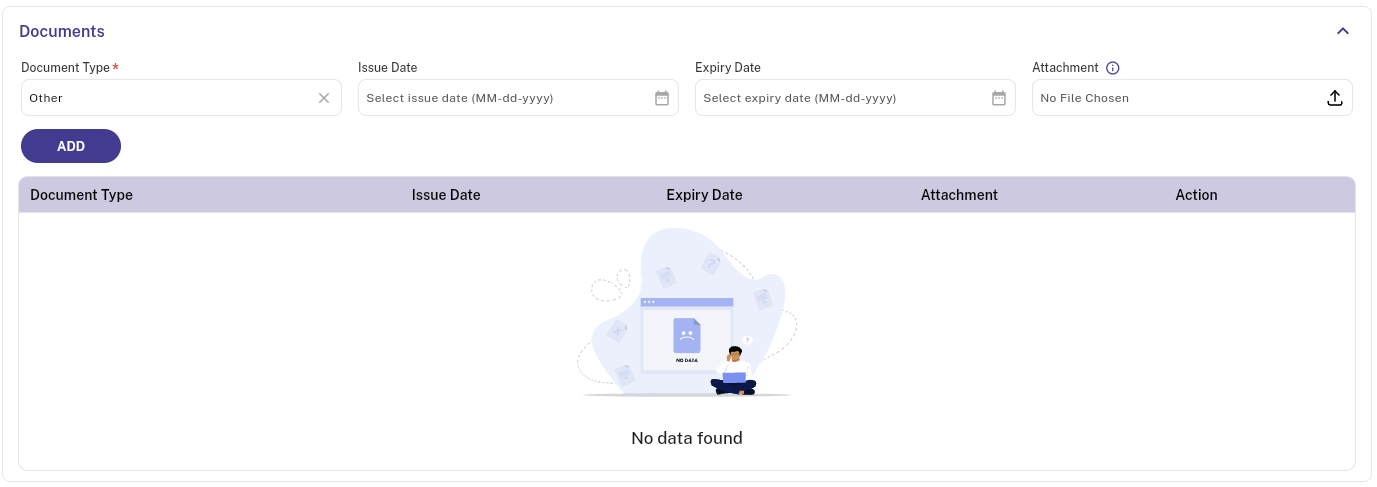
| Field | Required | Description |
|---|---|---|
| Document Type | Yes | Identifies the type of vendor document. |
| Issue Date | No | Select the date on which the document was issued. |
| Expiry Date | No | Select the document's expiry date, if applicable. |
| Attachment | No | Upload the related document file. |
- Select the Document Type.
- Select the Issue Date, if applicable.
- Select the Expiry Date, if applicable.
- Select the Attachment upload option and choose the required file.
- Tap ADD.
- The document is added to the document list.
The document list displays:
- Document Type
- Issue Date
- Expiry Date
- Attachment
- Action
Use the available Action option to manage the added document.
6. Save the Vendor
After entering all required information:
- Review the Vendor Details.
- Review the Contact Details.
- Check the Billing Address.
- Check the Shipping Address.
- Review the added Documents.
- Select SAVE to save the vendor information.
Vendor Item
Vendor Item is used to connect a property's internal items with the way a specific vendor identifies and prices those items.
For example, the Item Master may contain Housekeeping Tissue, while a vendor's invoice may call it HT-500 or Premium Tissue. Vendor Item stores that vendor-specific code and name so the system can match the invoice line to the correct internal item.
Where to Open It
Open the Vendor Item page from Vendor Management. The page displays items from Item Master and allows the user to filter them by vendor, category, subcategory, assignment status, and search text.
The page does not create a new item. Items must first exist in Item Master. Vendor Item only adds vendor-specific information to those existing items.
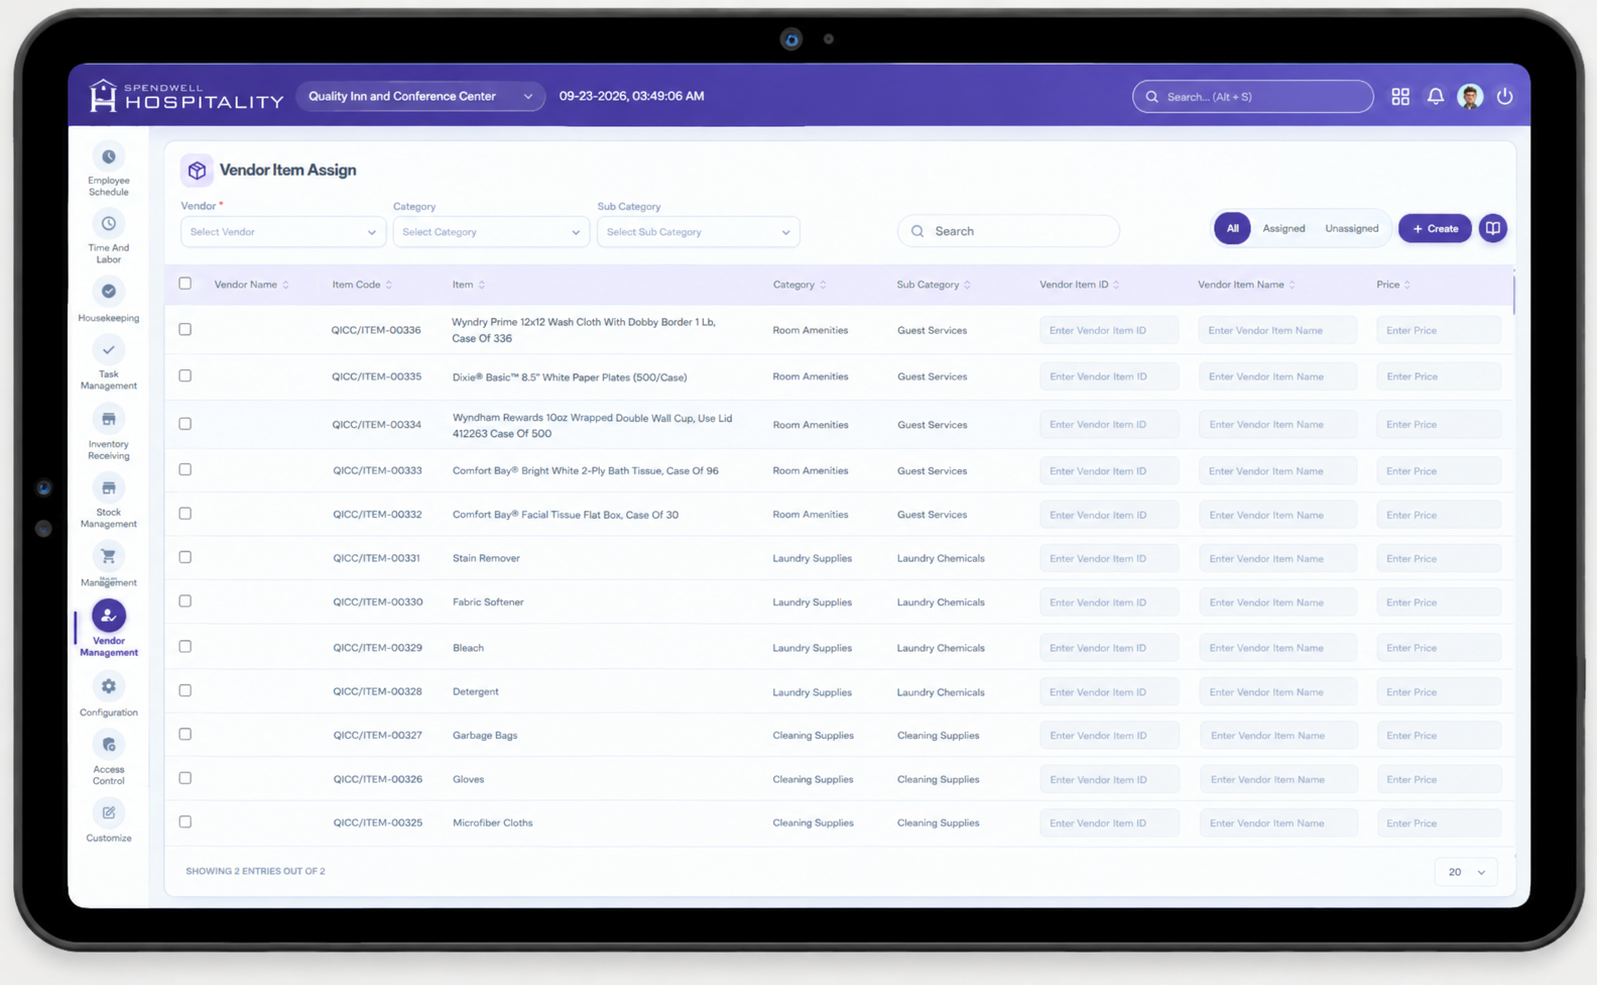
Vendor Item List Fields
The list is generated from active Item Master records and the vendor assignments for the selected property.
| Field | Use | What it shows |
|---|---|---|
| Vendor Name | Identifies the supplier linked to the assignment. | The vendor assigned to the item. An item can show multiple assigned vendors. |
| Item Code | Identifies the internal item. | The code maintained in Item Master. |
| Item | Identifies the internal inventory item. | The item that will be used for stock and receiving. |
| Category | Groups items for filtering and reporting. | The item's category from Item Master. |
| Sub Category | Provides a more detailed item grouping. | The item's subcategory from Item Master. |
| Vendor Item ID | Stores the vendor's product code or SKU. | The code printed on the vendor invoice. |
| Vendor Item Name | Stores the vendor's description for the item. | The name or description used by the vendor. |
| Price | Stores the vendor-specific item price. | The assigned vendor price; when no assignment exists, the item purchase rate may be shown as the fallback. |
| Assignment Status | Shows whether the item is mapped to the selected vendor. | Assigned or unassigned. |
How to Assign an Item to a Vendor
- Create the vendor in the Vendor page first.
- Confirm that the item already exists and is active in Item Master.
- Open the Vendor Item page.
- Select or filter by the vendor.
- Find the required item using search, category, or subcategory filters.
- Enter the vendor's item code in Vendor Item ID.
- Enter the vendor's invoice name or description in Vendor Item Name.
- Enter the vendor's price in Price, if available.
- Select the item for assignment.
- Save the assignment.
- Confirm that the item appears as assigned and that the vendor-specific values are displayed.
Important Save Behaviour
- The assignment is specific to both the vendor and the property.
- There can be one Vendor Item record for a vendor and property. The record contains all assigned items for that combination.
- Saving assignments updates the existing record when one already exists.
- If an item is not assigned, the system can still display it in the list, but it will not be available through that vendor's assignment mapping.
- An item can be assigned to more than one vendor. The Vendor Item list builds an assigned-vendor list for each item.
How the assignment is used in other pages
1. Inventory Receive
When it is used: When receiving stock from a vendor or reading a vendor invoice.
How it works:
- The user selects a vendor in Inventory Receive or sends a vendor ID with the invoice.
- The system loads Vendor Item assignments for that vendor and property.
- The system first tries to match invoice data with Item Master values.
- If no direct Item Master match is found, it compares the invoice item code or item number with the Vendor Item ID.
- It can also compare the invoice item description with the Vendor Item Name.
- When a match is found, the system links the invoice line to the correct internal item and adds it to the inventory receipt.
- The received quantity and price can then be used for stock updates and inventory reports.
The assignment is especially important for invoices where the vendor's product code or description is different from the internal item code or name.
2. Inventory Stock
When it is used: When reviewing current stock by vendor.
Selecting a vendor filters the stock item list to items assigned to that vendor. The page also uses Vendor Item data to show vendor context and vendor-related item information.
3. Stock History
When it is used: When reviewing past stock movements.
If a stock history record does not already contain the vendor name or vendor ID, the system can use the Vendor Item mapping for the item to fill that vendor context.
4. Inventory Analytics and Vendor Reports
Pages/reports: Inventory analytics, Vendor Spend Summary, Vendor Spend Detail, and Vendor Unmapped Item Report.
Vendor Item supports vendor-based analysis by connecting received invoice lines to a vendor and internal item. The mapped vendor item ID is also available in detailed inventory and unmapped-item results.
The Vendor Unmapped Item Report is useful for finding invoice items that could not be matched. Those rows are candidates for a new Vendor Item assignment.
What Happens When Related Data Changes
Vendor name changes
When a vendor name is updated, the system updates the stored vendor name in Vendor Item records and inventory receipts linked to that vendor.
Item name changes
When an Item Master item name is updated, the system updates the matching item name in Vendor Item records. Related inventory, stockroom, and stock records are updated as well.
Item deletion
An Item Master item cannot be deleted when it is used by a Vendor Item assignment or other dependent inventory records. The system reports that the item is in use until those dependencies are handled.
Vendor deletion
A vendor cannot be deleted while it has Vendor Item assignments or inventory receipts linked to it.
Troubleshooting
| Problem | Likely cause | Action |
|---|---|---|
| Vendor does not appear | The vendor is missing, inactive, or outside the current company context. | Confirm the vendor exists and use the correct company session. |
| Item does not appear | The item is inactive or not available to the current property. | Check Item Master and the item's property/global settings. |
| Invoice line is unmapped | Vendor Item ID or Vendor Item Name does not match the invoice. | Update the mapping with the exact vendor code or invoice description. |
| Vendor filter shows no items | No Vendor Item assignment exists for that vendor and property. | Assign the item for the correct property. |
| Assignment disappeared | The assignment list was empty or the previous mapping was replaced. | Reopen Vendor Item and save the complete intended assignment list. |