Scheduling
Employee Scheduling is a comprehensive workforce scheduling solution built for modern hospitality operations. It enables managers and employees to manage availability, coordinate team schedules, plan weekly shifts, and efficiently manage shift trades. With centralized scheduling and real-time visibility, teams can improve workforce coordination, reduce scheduling conflicts, and ensure the right employees are assigned at the right time.
Overview
Purpose
Employee Scheduling helps hotel managers and employees plan, manage, and coordinate workforce schedules from one centralized platform. Manage availability, build and publish schedules, claim open shifts, and handle shift trades while keeping employees and managers aligned.
Key Capabilities
- Employee Availability — Employees set their available and unavailable days and working hours.
- Team Availability — Managers review team availability to plan shifts effectively.
- Scheduling Board — Managers create, assign, adjust, and manage employee shifts.
- My Schedule Week — Employees can view their upcoming weekly schedule, assigned shifts, and working hours.
- Open Shift Claims — Employees can view and claim available open shifts after the schedule is published. Approved claims are added directly to the employee's schedule.
- Shift Management — Managers can manage shift assignments and make schedule changes based on operational requirements.
- Shift Trade — Employees can request shift trades with other eligible team members, while managers can review, approve, or reject trade requests.
- Schedule Visibility — Keep employees and managers aligned with clear, up-to-date schedule information.
How It Works
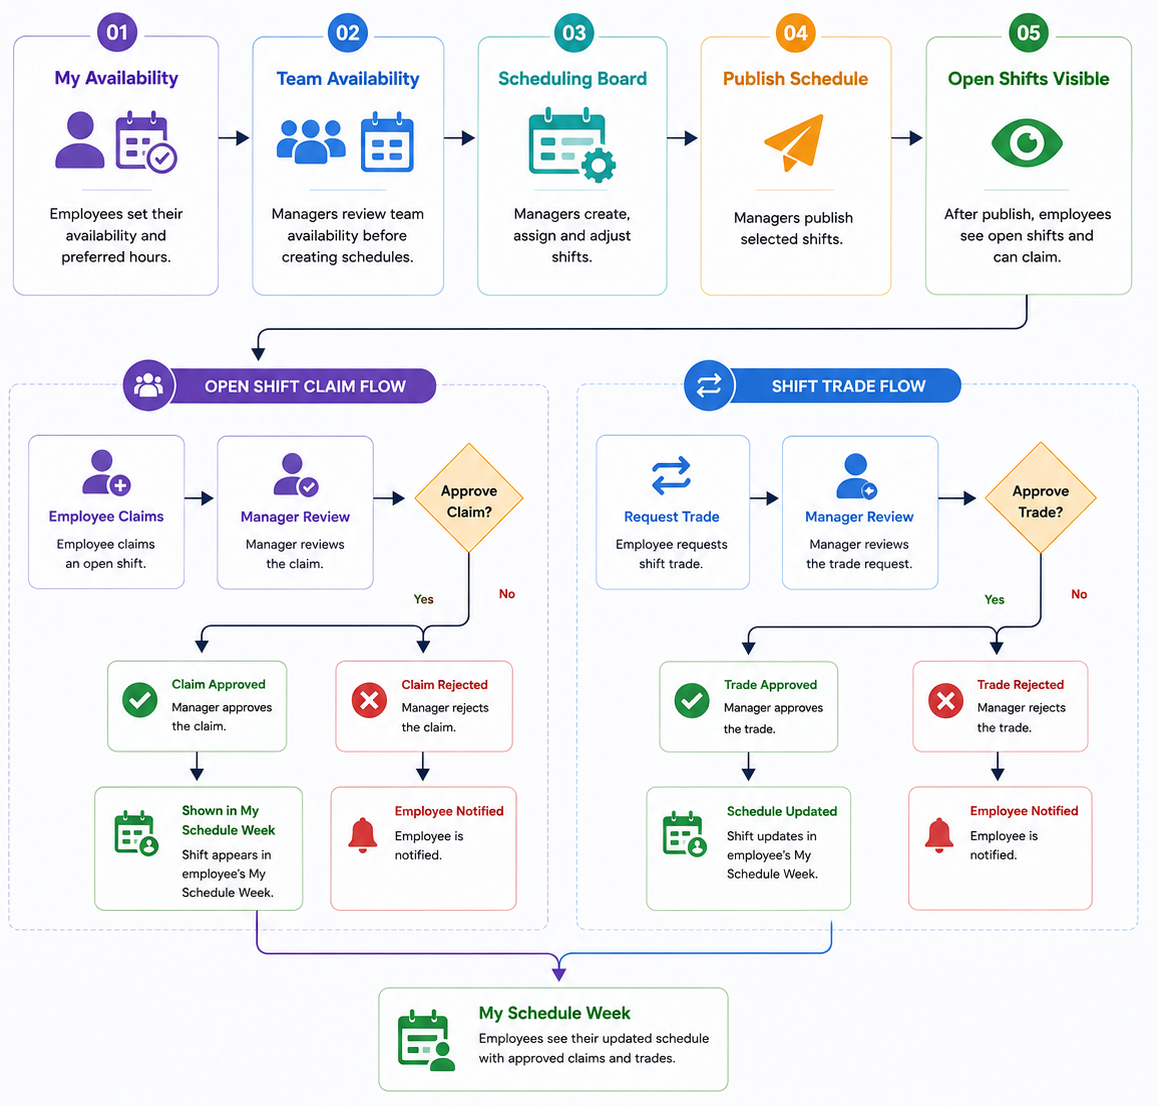
Navigation
Overview → My Availability → Team Availability → Scheduling Board → My Schedule Week → Open Shift Claims → Shift Trade
My Availability
Overview
The My Availability feature allows employees to define when they are available or unavailable to work. Employees can set specific working hours for selected days and submit their availability to their manager for review.
Keeping availability up to date helps managers create schedules based on employee availability, reduce scheduling conflicts, and improve workforce planning.
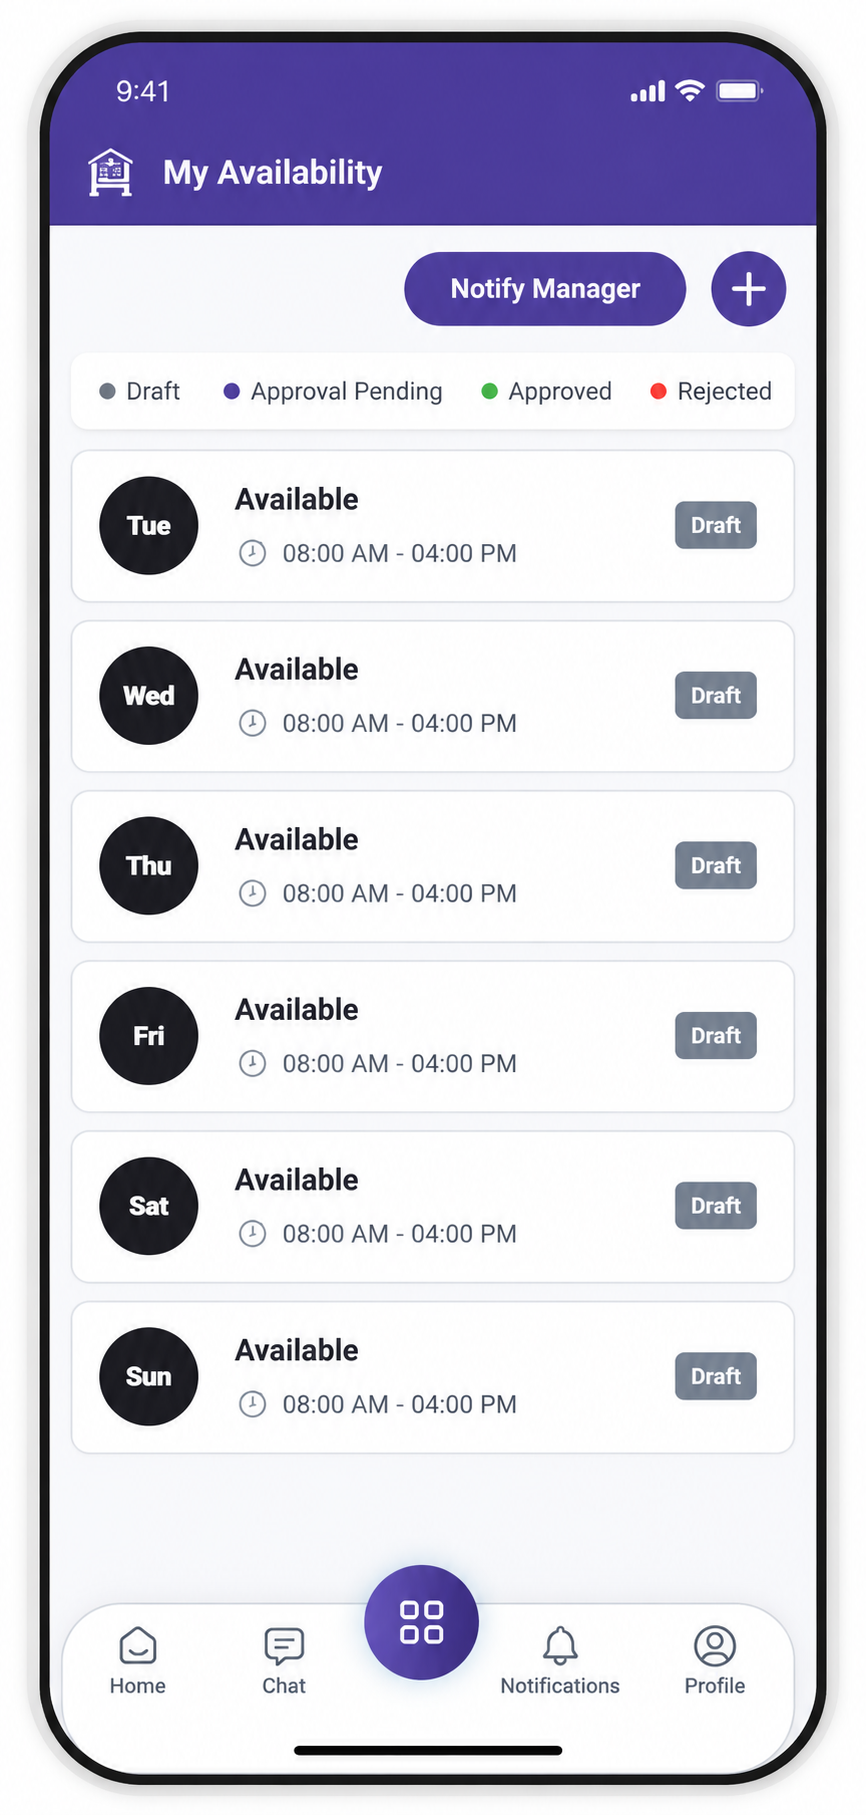
My Availability Screen
The My Availability screen displays the employee's saved availability for each day. Each entry shows the availability type, working hours, and current status.
Key Information
- Day — The day for which availability is configured.
- Availability Type — Shows whether the employee is Available or Unavailable.
- Working Hours — Displays the configured start and end time.
- Status — Shows the current status of the availability.
Availability Status
| Status | Meaning |
|---|---|
| Draft | Availability has been created but has not been submitted to the manager. |
| Approval Pending | Availability has been submitted and is waiting for manager review. |
| Approved | The manager has approved the availability. |
| Rejected | The manager has rejected the availability. |
My Availability List
The availability list allows employees to review their configured availability and check the current status of each entry.
Create Availability
Employees can create a new availability entry by selecting the + button on the My Availability screen.
Steps
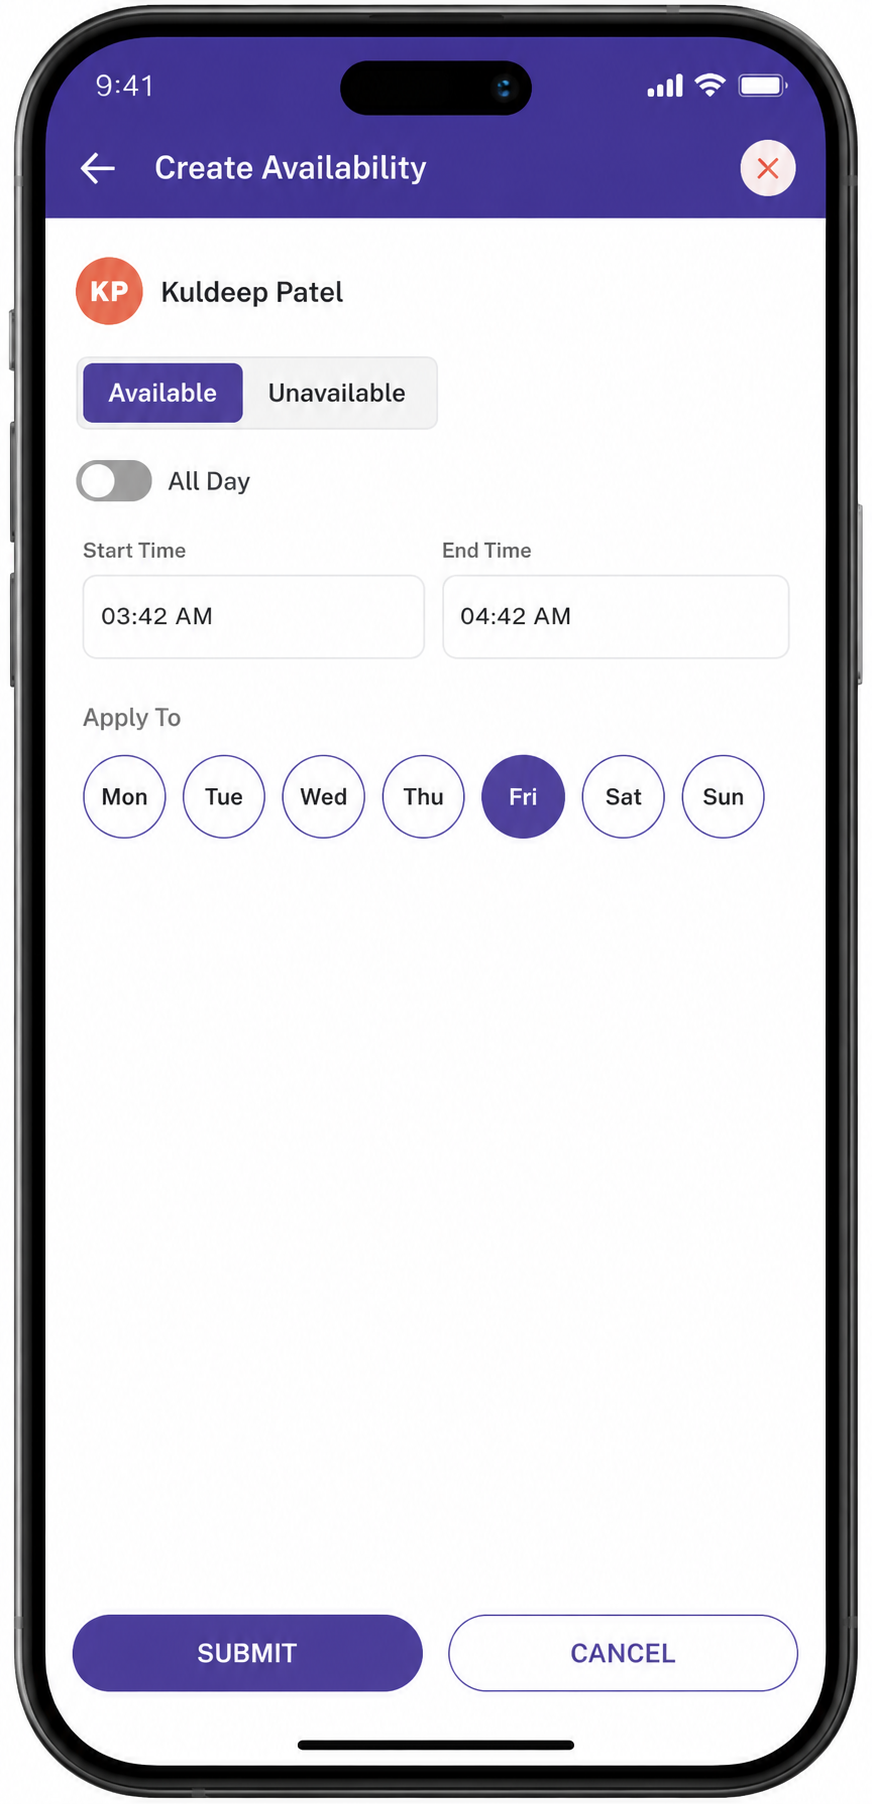
Availability Options
Available
Indicates that the employee is available to work during the selected day and time.
All Day
When enabled, the availability applies to the entire selected day instead of a specific time range.
Review Availability
After creating an availability entry, employees can return to the My Availability screen to review the saved information.
Employees can verify:
- Selected days
- Available or unavailable status
- Start and end times
- Current approval status
Newly created availability is initially shown as Draft until it is submitted to the manager.
Notify Manager
After creating or updating availability, employees can select Notify Manager to send their availability changes to their manager for review.
Employees can also add an optional note to provide additional information about the change.
Steps
- Select Notify Manager.
- Enter an optional note.
- Review the information.
- Select Notify Manager to submit the notification.

Example Note
This is my next week availability.
After the notification is submitted, the availability moves from Draft to Approval Pending.
Manager Review
Once the availability is submitted, the manager reviews the request.
The manager can:
- Approve the availability.
- Reject the availability.
Approved
When the manager approves the request, the availability status changes to Approved and can be considered when creating employee schedules.
Rejected
When the manager rejects the request, the availability status changes to Rejected. The employee can review the request and make the necessary changes before submitting it again.
Availability Workflow
The complete availability workflow is:
Create Availability → Draft → Notify Manager → Approval Pending → Manager Review → Approved / Rejected
Approved Flow
Create → Notify Manager → Approval Pending → Manager Approves → Approved → Used for Scheduling
Rejected Flow
Create → Notify Manager → Approval Pending → Manager Rejects → Rejected → Employee Updates Availability
Important Notes
- Keep your availability accurate and up to date.
- Availability does not automatically create a work shift.
- Availability is used by managers when creating employee schedules.
- Notify your manager after making changes that require approval.
- Approval is required before submitted availability is treated as approved for scheduling purposes.
- Weekly Availability — Once an availability schedule is set for a week, it remains effective for the applicable weeks until the employee updates or changes their availability.
- If an employee does not make any changes, the existing availability continues to apply to future scheduling periods.
Team Availability
Overview
The Team Availability feature allows managers and supervisors to view and manage employee availability from one centralized screen. Managers can review availability across the team, make availability changes when required, and approve or reject individual or multiple availability slots.
Team Availability provides visibility into employee availability, working hours, approval status, and staffing coverage, helping managers make informed scheduling decisions.
Team Availability Screen
The Team Availability screen provides a consolidated view of availability for multiple employees.
Managers can review each employee's availability by day, time, availability type, and approval status.
Key Information
- Employee — The team member associated with the availability.
- Day — The day for which availability is configured.
- Availability Type — Shows whether the employee is Available or Unavailable.
- Working Hours — Displays the configured start and end time.
- Status — Shows the current availability status.
- Expand / Collapse — Allows managers to view or hide an employee's availability details.
Availability Status
| Status | Meaning |
|---|---|
| Draft | Availability has been created but has not been submitted for review. |
| Pending | Availability has been submitted and is waiting for manager action. |
| Approved | The availability has been approved and can be considered during scheduling. |
| Rejected | The availability has been rejected and may require changes. |
Team Availability List
The team availability list allows managers to review multiple employees and their availability from one screen.
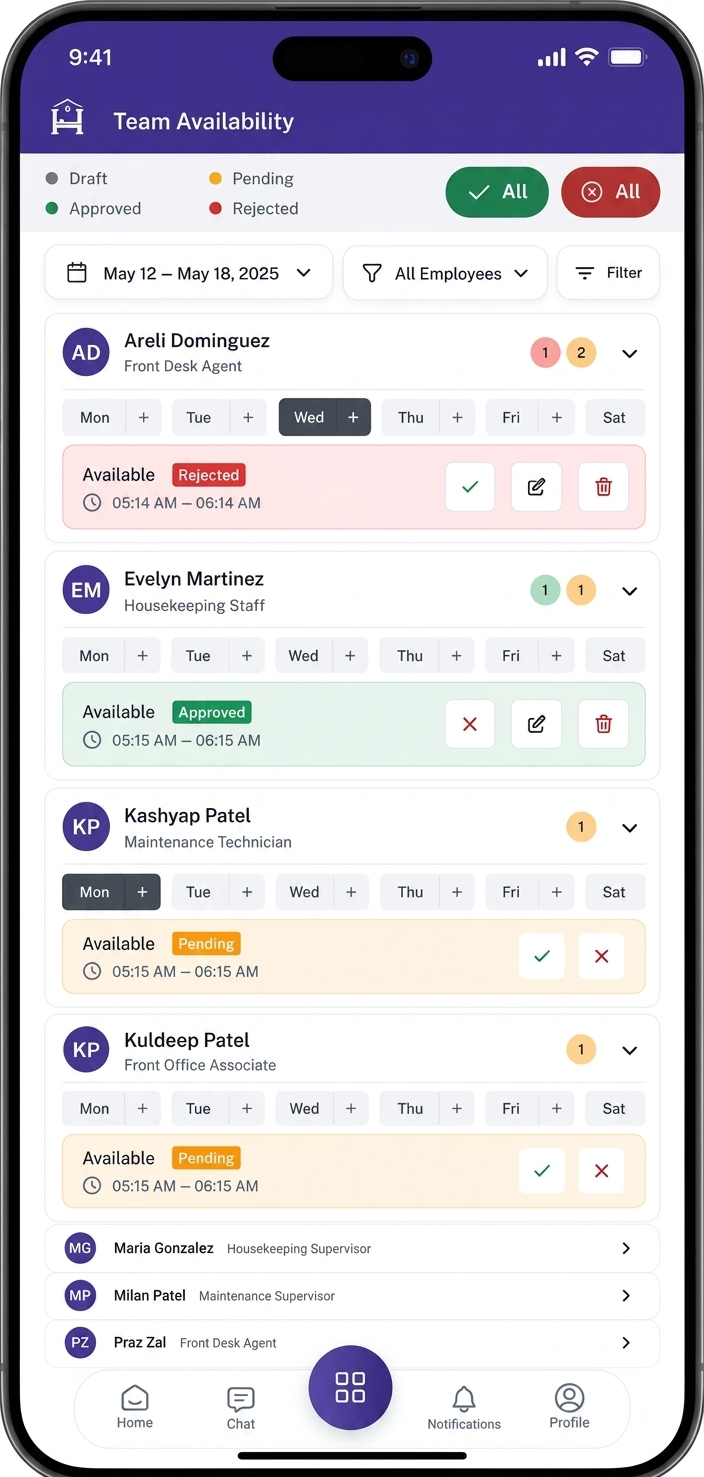
Managers can expand an employee to view their individual availability slots and take actions on each slot.
Manage Employee Availability
Managers can manage availability directly from the Team Availability screen.
Available actions include:
- Add Availability — Create a new availability slot for an employee.
- Update Availability — Edit an existing availability slot.
- Delete Availability — Remove an availability slot when it is no longer required.
- Approve Availability — Approve an individual pending slot.
- Reject Availability — Reject an individual pending slot.
- Approve All — Approve all applicable pending slots at once.
- Reject All — Reject all applicable pending slots at once.
Create and Update Availability
Managers can create a new availability entry or update an existing employee availability entry.
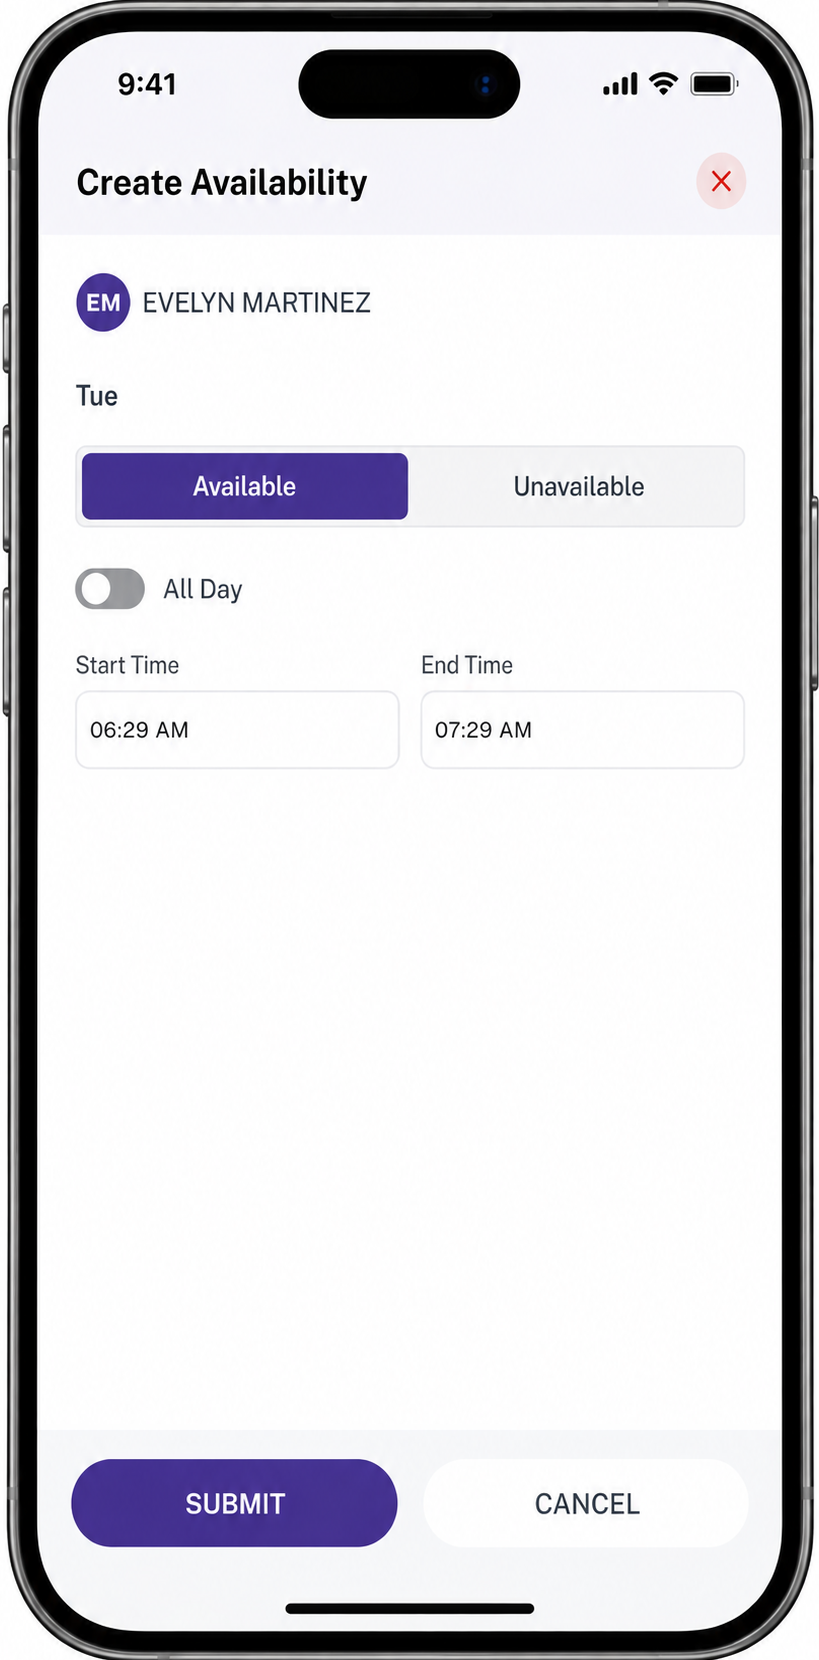
Create Availability
Create a new availability slot by selecting the day, availability type, and working hours.
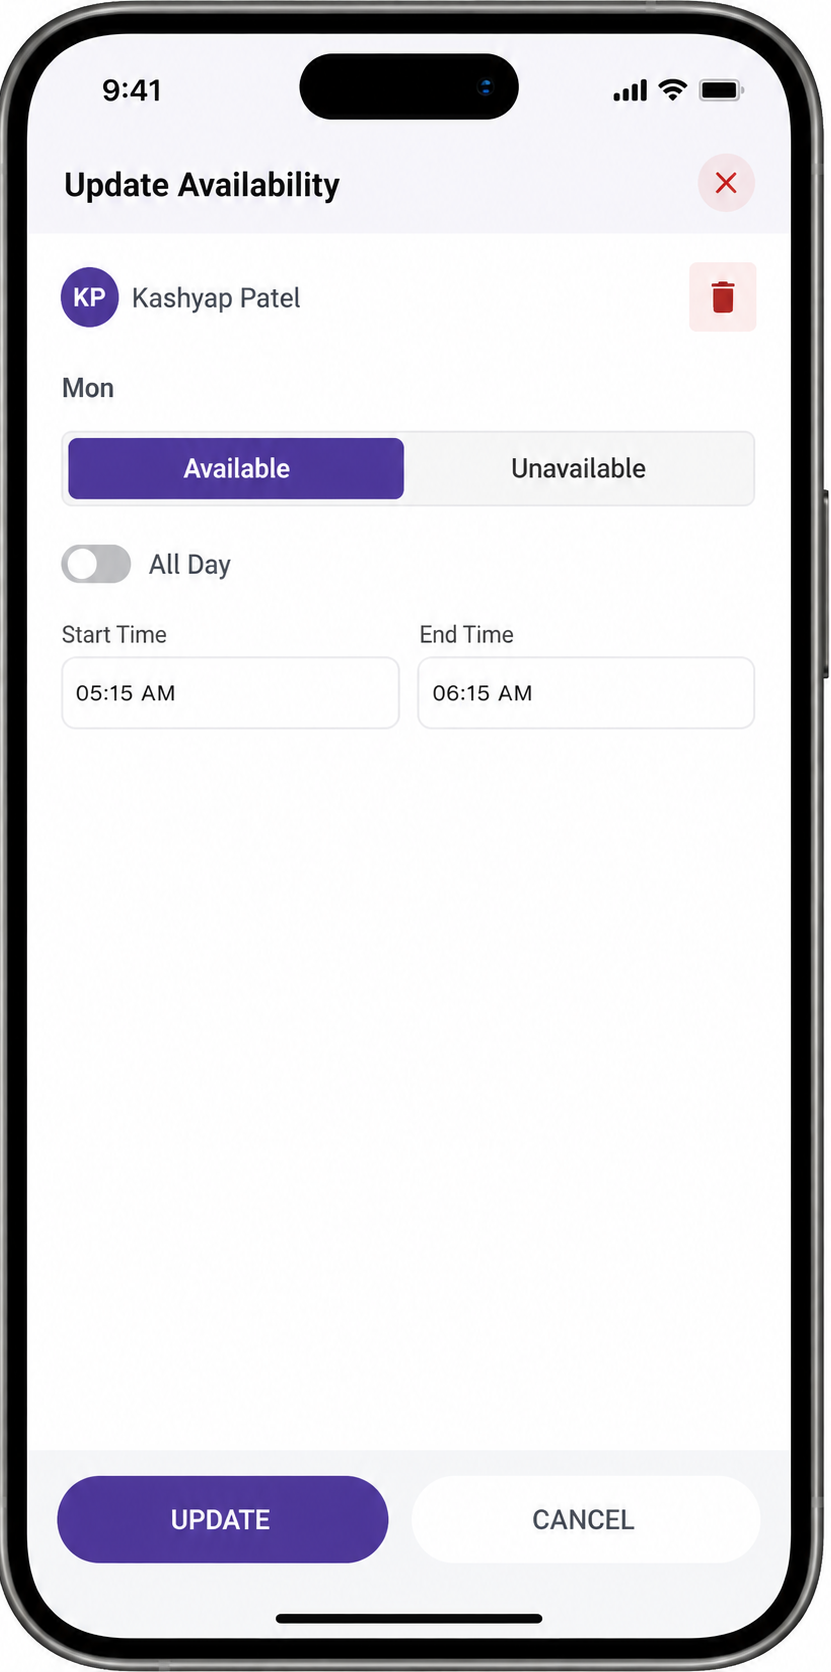
Update Availability
Update an existing availability slot by changing the availability type or working hours.
Create Availability
Managers can add availability for an employee when a new availability slot is required.
Steps
- Select the employee.
- Select the day.
- Select Available or Unavailable.
- Enable All Day if applicable.
- Enter the Start Time and End Time.
- Select Submit.
Update Availability
Managers can edit an existing availability slot when an employee's availability changes.
Steps
- Select the employee's availability slot.
- Select Edit.
- Update the availability type or working hours.
- Select Update to save the changes.
Note: Managers can also delete an availability slot when it is no longer required.
Approve and Reject Availability
Managers can review pending availability slots and take action individually or in bulk.
Individual Approval or Rejection
Each availability slot can be reviewed independently.
Managers can:
- Select Approve to approve the individual availability slot.
- Select Reject to reject the individual availability slot.
Once an action is completed, the slot status is updated accordingly.
Bulk Approval or Rejection
Managers can also process multiple availability slots at once.
- Approve All — Approves all applicable pending availability slots.
- Reject All — Rejects all applicable pending availability slots.
A confirmation message is displayed before processing the bulk action.
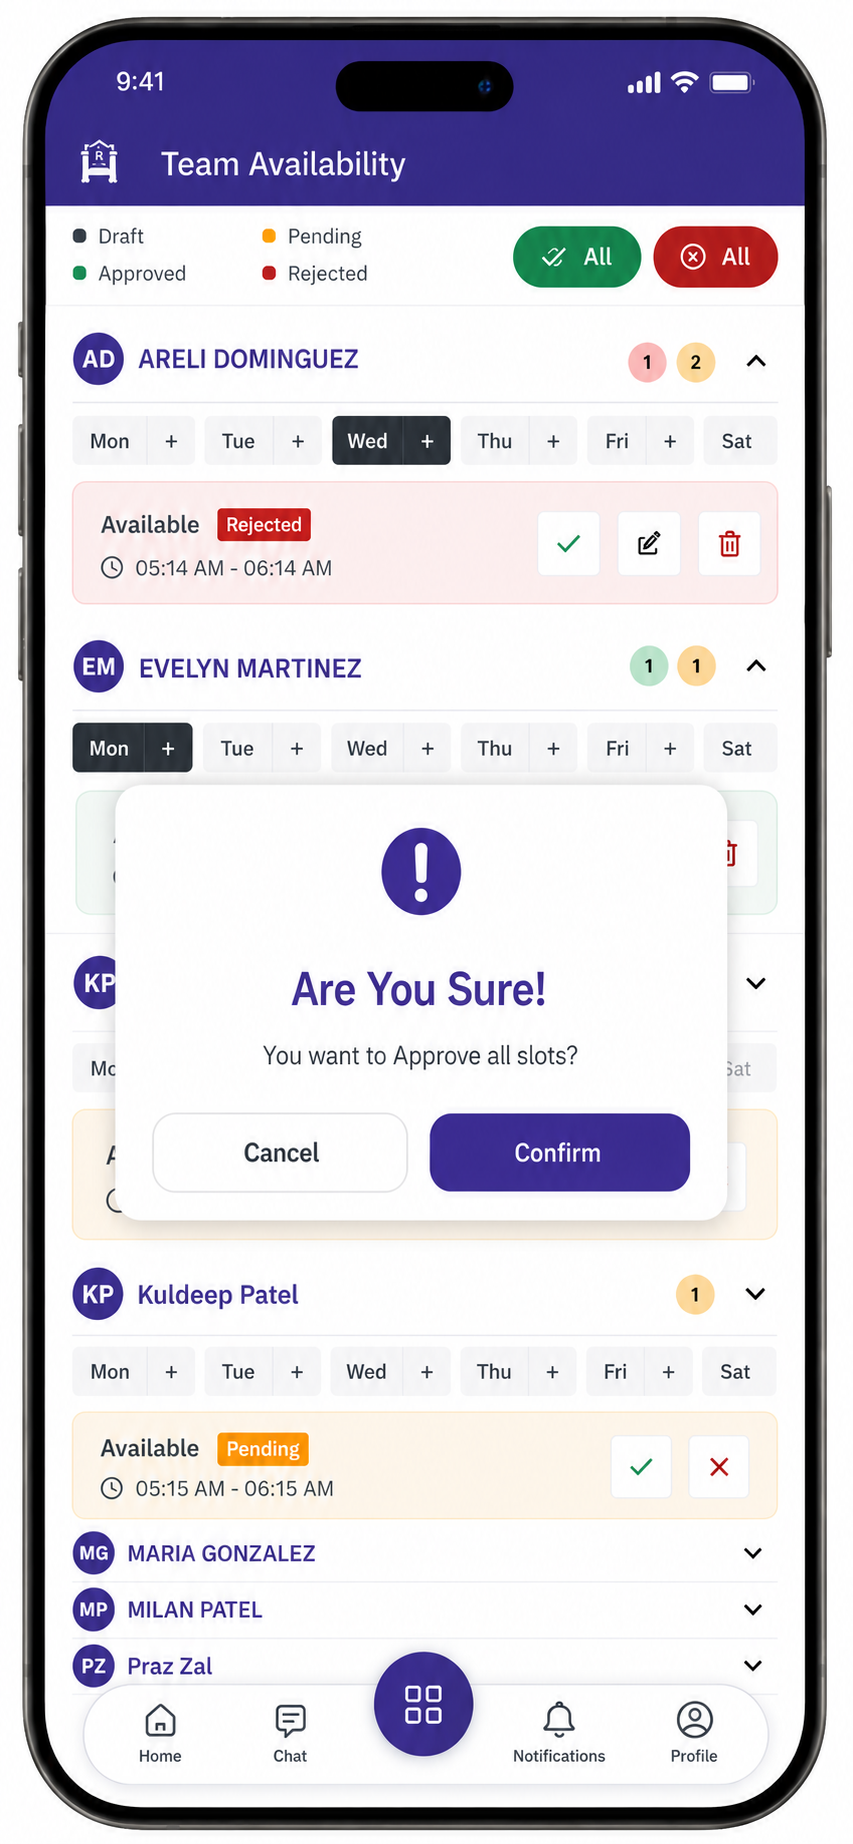
Manager Availability Workflow
The manager workflow is:
View Team Availability → Review Employee Slots → Add / Update / Delete → Approve or Reject → Availability Updated
Individual Approval
Pending → Manager Reviews → Approve → Approved
Individual Rejection
Pending → Manager Reviews → Reject → Rejected
Bulk Approval
Pending Slots → Approve All → Confirmation → All Applicable Slots Approved
Bulk Rejection
Pending Slots → Reject All → Confirmation → All Applicable Slots Rejected
Using Team Availability for Scheduling
Team Availability is used as a reference when creating employee schedules.
Managers can use approved availability to:
- Assign shifts to employees who are available.
- Avoid assigning shifts during unavailable periods.
- Identify employees who can cover staffing requirements.
- Identify staffing gaps.
- Balance shifts across available employees.
- Reduce scheduling conflicts.
Note: Team Availability does not automatically create or assign a work shift. Managers use approved availability when building the schedule.
Availability Updates
When an employee changes their availability, the updated information is reflected in Team Availability according to the availability approval workflow.
Managers can review the change and approve or reject it as required.
If a manager directly updates an employee's availability, the updated information is saved according to the system's availability rules.
Important Notes
- Team Availability provides managers with a consolidated view of employee availability.
- Managers can add, update, and delete employee availability slots.
- Managers can approve or reject individual availability slots.
- Managers can use Approve All or Reject All to process multiple applicable pending slots.
- Approved availability should be used as the primary reference when planning schedules.
- Employee availability does not automatically create a work shift.
- Availability may continue to apply to future scheduling periods until it is changed.
- Managers should review recent availability changes before creating or publishing schedules.
Scheduling Board
Overview
The Scheduling Board allows managers and supervisors to create, view, manage, and publish employee work schedules from one centralized screen.
Managers can use the Scheduling Board to assign employees to shifts, review scheduled working hours, identify staffing gaps, manage shift conflicts, and control labor costs by comparing scheduled hours against staffing requirements and payroll budgets.
The board provides a visual, time-based view of employee schedules, helping managers ensure the right employees are scheduled for the required shifts while maintaining appropriate staffing levels.
Scheduling Board Screen
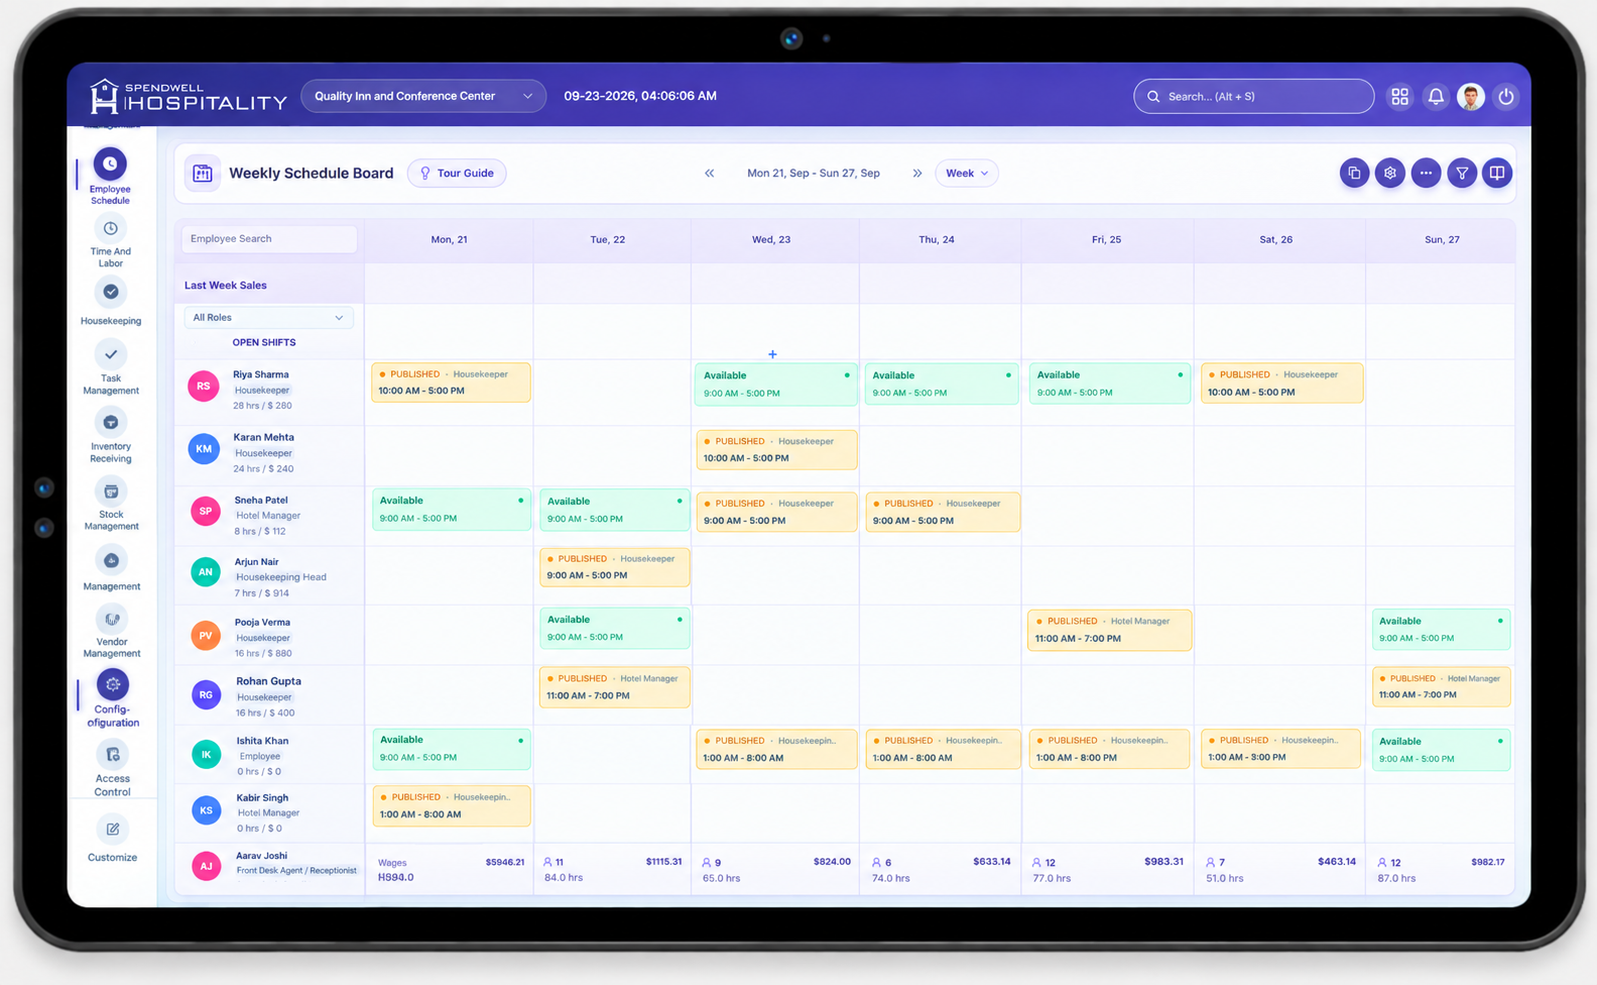
Weekly View
Review employee schedules and staffing coverage across the week.
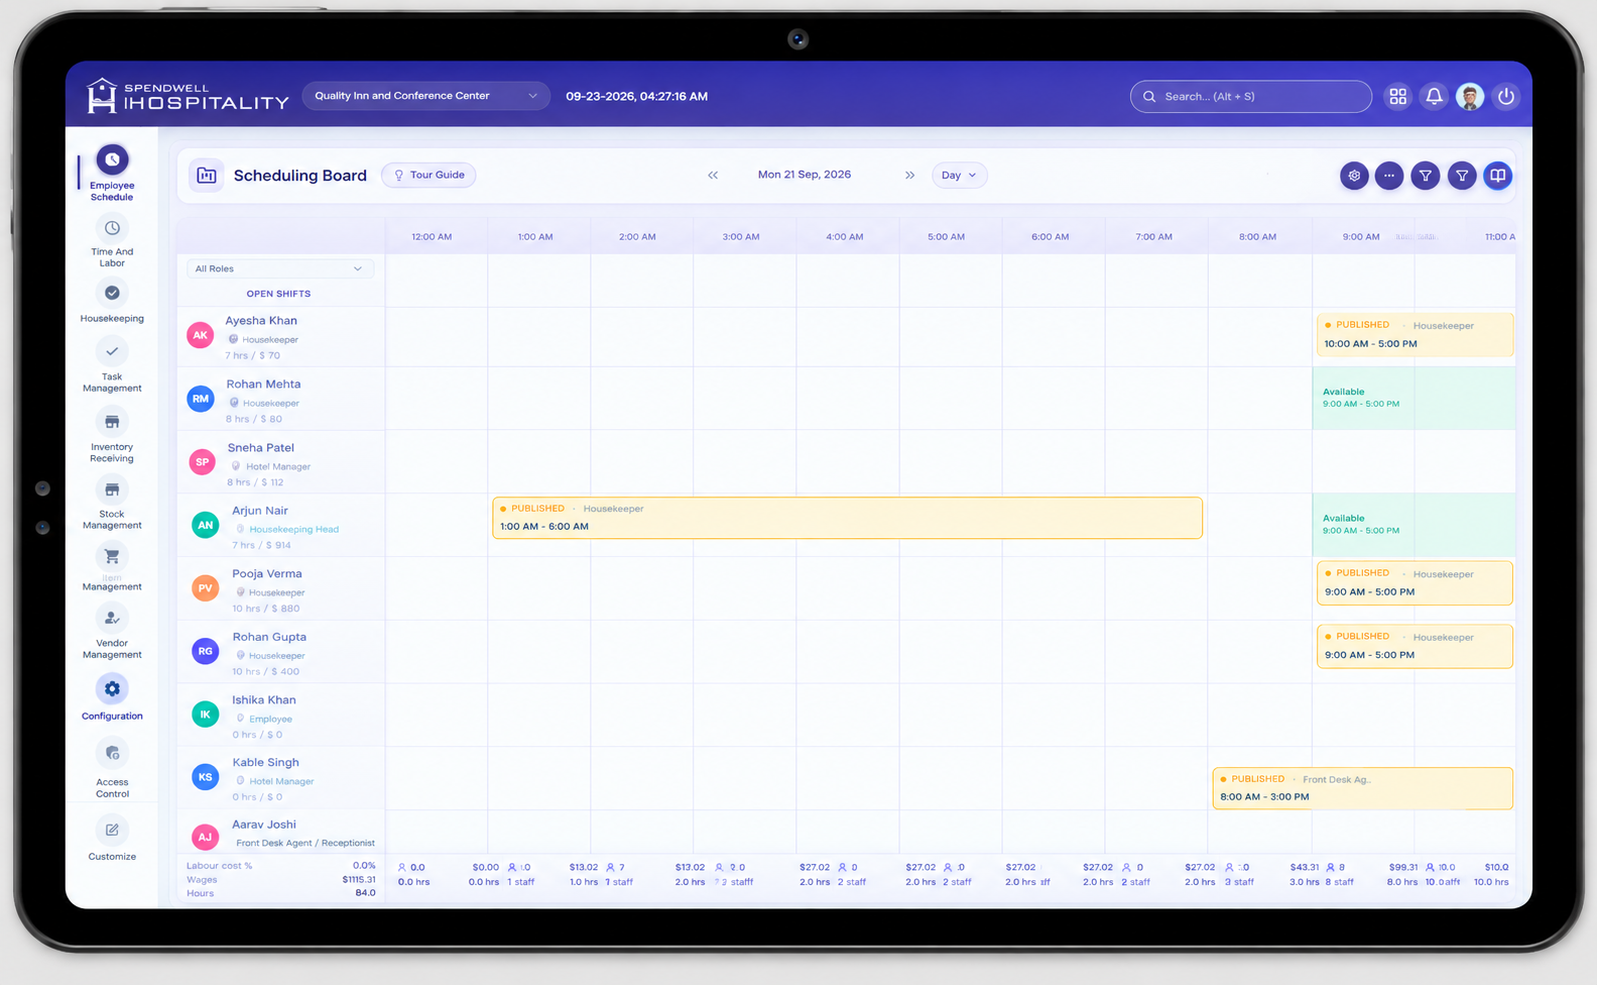
Daily View
Review employee shifts and scheduled working hours for a selected day.
What Managers Can See at a Glance
- Which employees are scheduled and when.
- Each employee's approved availability, so shifts can be assigned within their available hours.
- How many hours each employee is scheduled to work.
- Which shifts are unassigned.
- Where staffing coverage may be insufficient.
- Whether shifts overlap or create conflicts.
Employee Schedule View
Each employee appears as a separate row showing their assigned shifts for the selected period, so managers can review a schedule without opening each shift individually.
Employee row can display: name, profile info, position/department, scheduled hours, number of assigned shifts, and coverage information.
Each shift can display: start/end time, total duration, position/role, and shift status.
Managing Shifts
Create a Shift
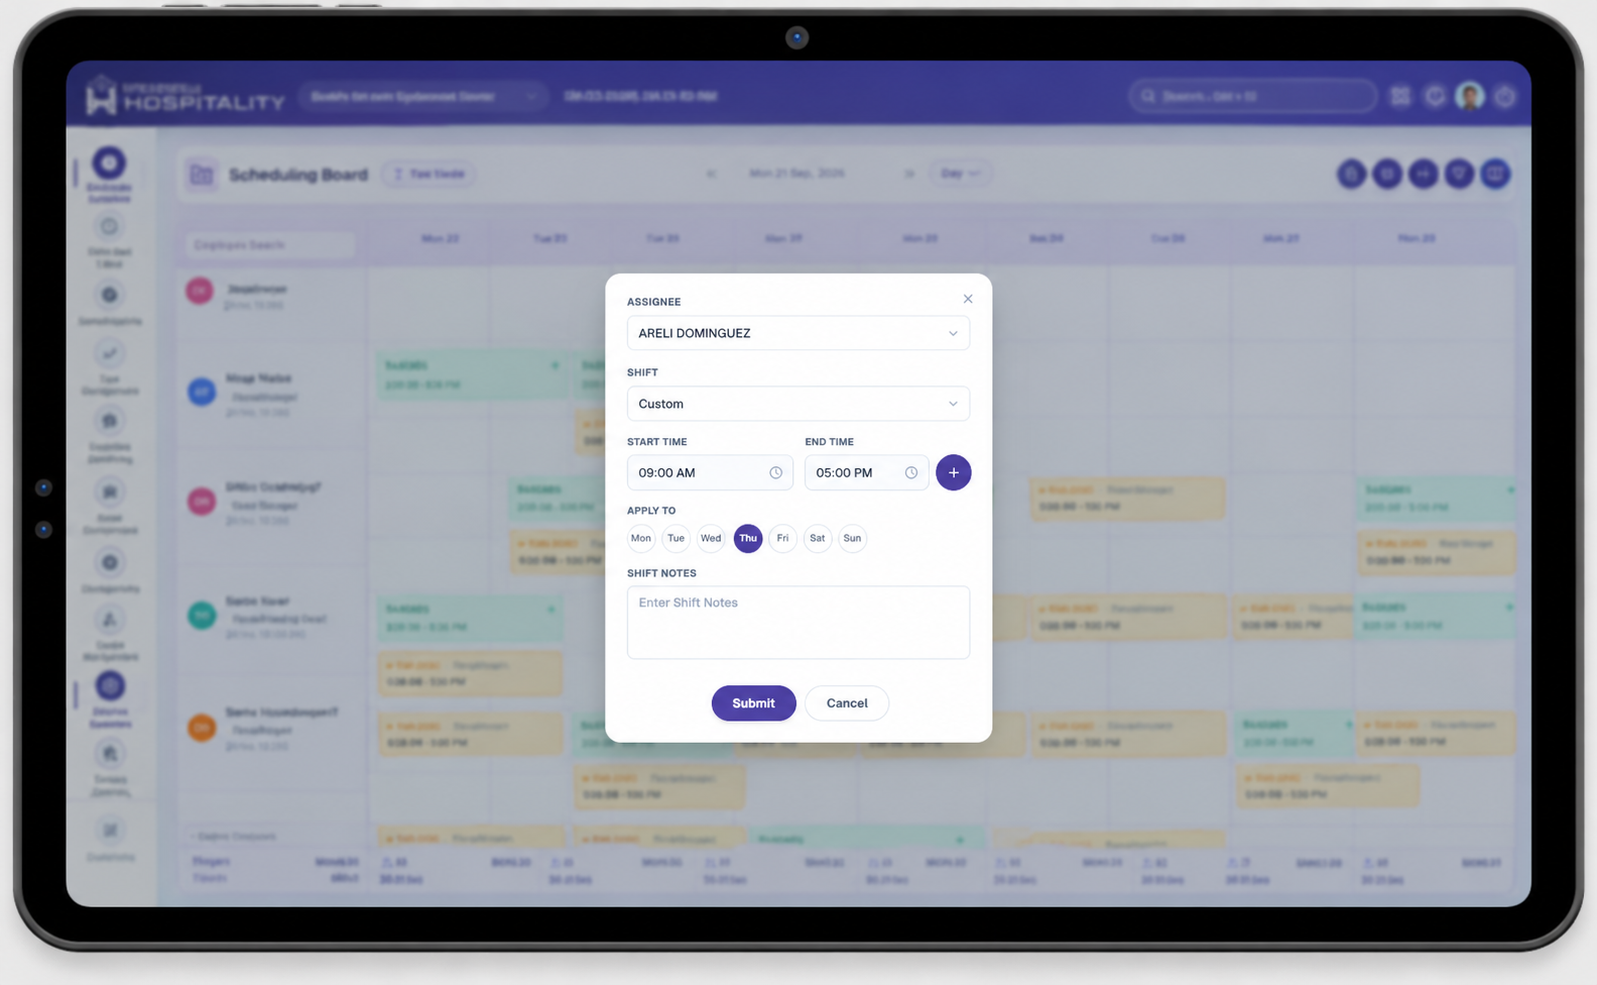
Create Shift - Tablet View
Create and manage employee shifts from the Scheduling Board.
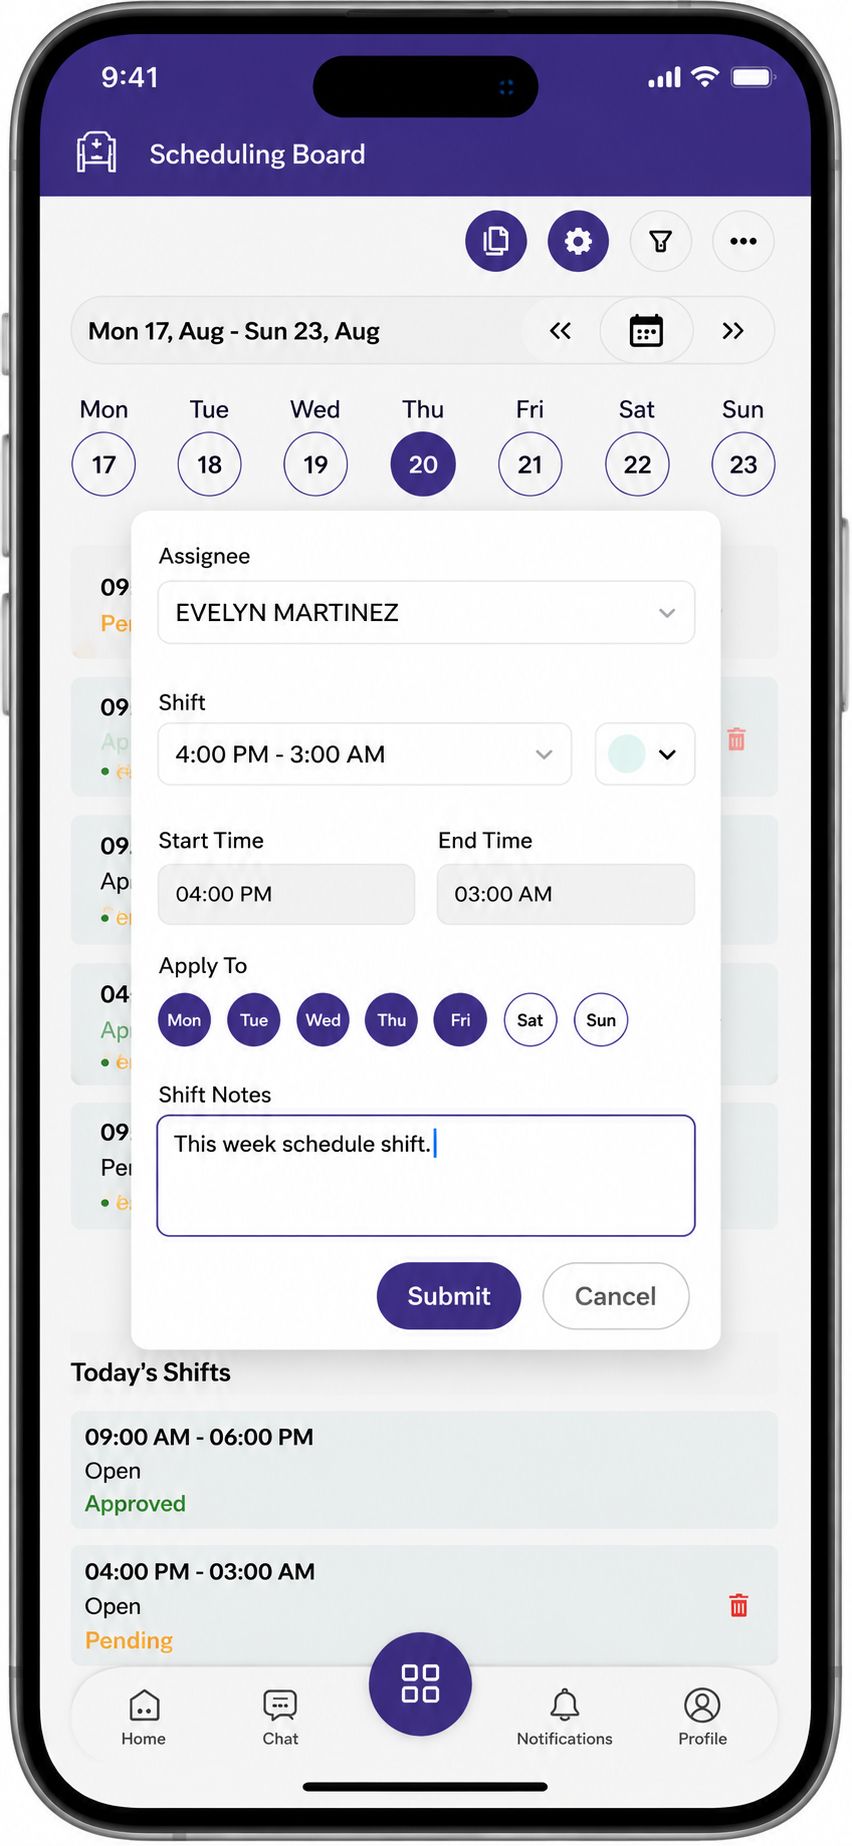
Create Shift - Mobile View
Create and manage employee shifts from a mobile device.
- Click the corresponding employee and date cell in the scheduling grid to create the shift.
- Select the employee (or leave unassigned to create an Open Shift).
- Select the date.
- Enter the Start Time and End Time.
- Select the applicable position.
- Select a shift type, or Custom for specific hours.
- Add shift notes if needed.
- Review the employee's availability and any scheduling conflicts.
- Select Save or Create.
Note: The system should validate the employee's availability and existing schedule before saving the shift.
Update a Shift
- Select the shift on the board.
- Select Edit.
- Update the time, employee, position, department, location, or notes as needed.
- Review the change.
- Select Update.
Delete a Shift
- Select the shift.
- Select Delete.
- Confirm the deletion.
Assign or Reassign an Employee
Useful when an employee becomes unavailable, coverage needs change, or workload needs balancing.
- Select the shift.
- Select Edit or Reassign.
- Select the new employee.
- Review their availability and any conflicts.
- Select Save.
Copy Schedule
Copies an existing week's schedule to another week — useful when the new week follows a similar staffing pattern.
Workflow: Select Source Week → Select Target Week → Review Schedule → Copy → Review Copied Schedule
- Open the Scheduling Board.
- Navigate to the week you want to copy.
- Select Copy Schedule.
- Select the source week and target week.
- Review what will be copied, then confirm.
- Review the copied schedule and adjust individual shifts (employee, time, add/delete shifts, notes) as needed.
Important: After copying, review the target week's employee availability, leave, and potential conflicts before publishing — a copied schedule is a starting point, not a finished one.
Availability, Conflicts & Coverage
Checking Availability
The Scheduling Board should be used together with Team Availability. Before assigning a shift, check whether the employee is available, unavailable, has a pending availability change, is on approved leave, or already has a shift during that period.
The Scheduling Board displays each employee's approved availability and leave information alongside their schedule, so managers can see when an employee is available to work and whether they are on approved leave while assigning or adjusting shifts.
Note: Approved availability should be the primary reference when assigning shifts.
Scheduling Conflicts
A conflict can occur when:
- An employee is scheduled during an unavailable period.
- The employee has approved leave on the scheduled date.
- Two shifts overlap for the same employee.
- A shift falls outside approved availability.
- Scheduled hours exceed configured limits (where applicable).
When a conflict is detected, the system can display a warning. For example, if an employee has approved leave on the selected date, the Scheduling Board can indicate that the employee is on leave.
Note: A warning doesn't always block saving — behavior depends on configured scheduling rules.
Staffing Coverage
Compare scheduled employees against operational requirements to spot understaffed or overstaffed periods, unassigned shifts, and gaps — then adjust assignments or shift times accordingly.
Scheduled Hours
Calculated from each shift's start and end time.
| Start | End | Scheduled Hours |
|---|---|---|
| 09:00 AM | 05:00 PM | 8 hours |
| 09:00 AM | 09:45 AM | 45 minutes |
Note: Scheduled hours are planned time and may differ from actual worked hours recorded via time tracking/attendance.
Filters and Search
The Scheduling Board provides filters to help managers quickly find employees, review schedules, and analyze staffing coverage.
Available Filters
- Date View: Switch between Week and Day views to review the schedule for the selected period.
- Employee: Search the schedule by a specific employee.
- Employee Forecast: View staffing information based on the employee forecast.
- People Forecast: View the required staffing level based on the people forecast.
- Hour Forecast: View staffing requirements based on the hour forecast.
Schedule Status and Approval Workflow
The schedule follows a defined workflow from shift creation through approval and publishing. Managers can create and update shifts, while approval determines when a shift becomes available to employees in My Schedule Week.
Pending
- The shift has been created or modified but has not yet been approved.
- The shift is not visible to the employee in My Schedule Week.
Published
- The schedule has been published by the Assistant Manager and is available for review by the higher-level manager.
- For Open Shifts, the shift is visible to eligible employees and can be claimed.
- Assigned employee shifts are not yet visible to employees when higher-level approval is required.
Approved
- The higher-level manager has reviewed and approved the published schedule.
- The approved assigned shifts are now visible to employees in My Schedule Week.
Unpublish
- The schedule is withdrawn from the published/approved state because changes or re-approval are required.
- When a schedule is unpublished, its status returns to Pending and it must go through the configured role-based approval workflow again.
Full Workflow
Create/Update Shift → Pending → Publish → Published → Higher-Level Approval → Approved
Open Shifts
Lets managers create a shift without assigning it to a specific employee, so eligible employees can claim it — helpful for filling staffing gaps flexibly.
Workflow: Manager Creates Open Shift → Published → Employee Claims → Manager Reviews → Approve or Reject
Create an Open Shift
- Open the Scheduling Board.
- Select the date and time.
- Create a new shift and set it as Open.
- Enter start/end time, shift type (or Custom), and notes if needed.
- Select Submit.
An open shift must be published before employees can view or claim it.
Employee Claims & Manager Review
When an employee claims an open shift, they're associated with the request but not assigned until the manager approves it. Before approving, the manager should review the employee's availability, leave status, existing schedule, and scheduled hours.
- Approve → Employee is assigned; shift is removed from other employees' claim options.
- Reject → Employee is not assigned; the shift can remain open for others to claim.
Important: Claiming an open shift does not automatically assign it — assignment only happens after manager approval.
Scheduling Board Settings
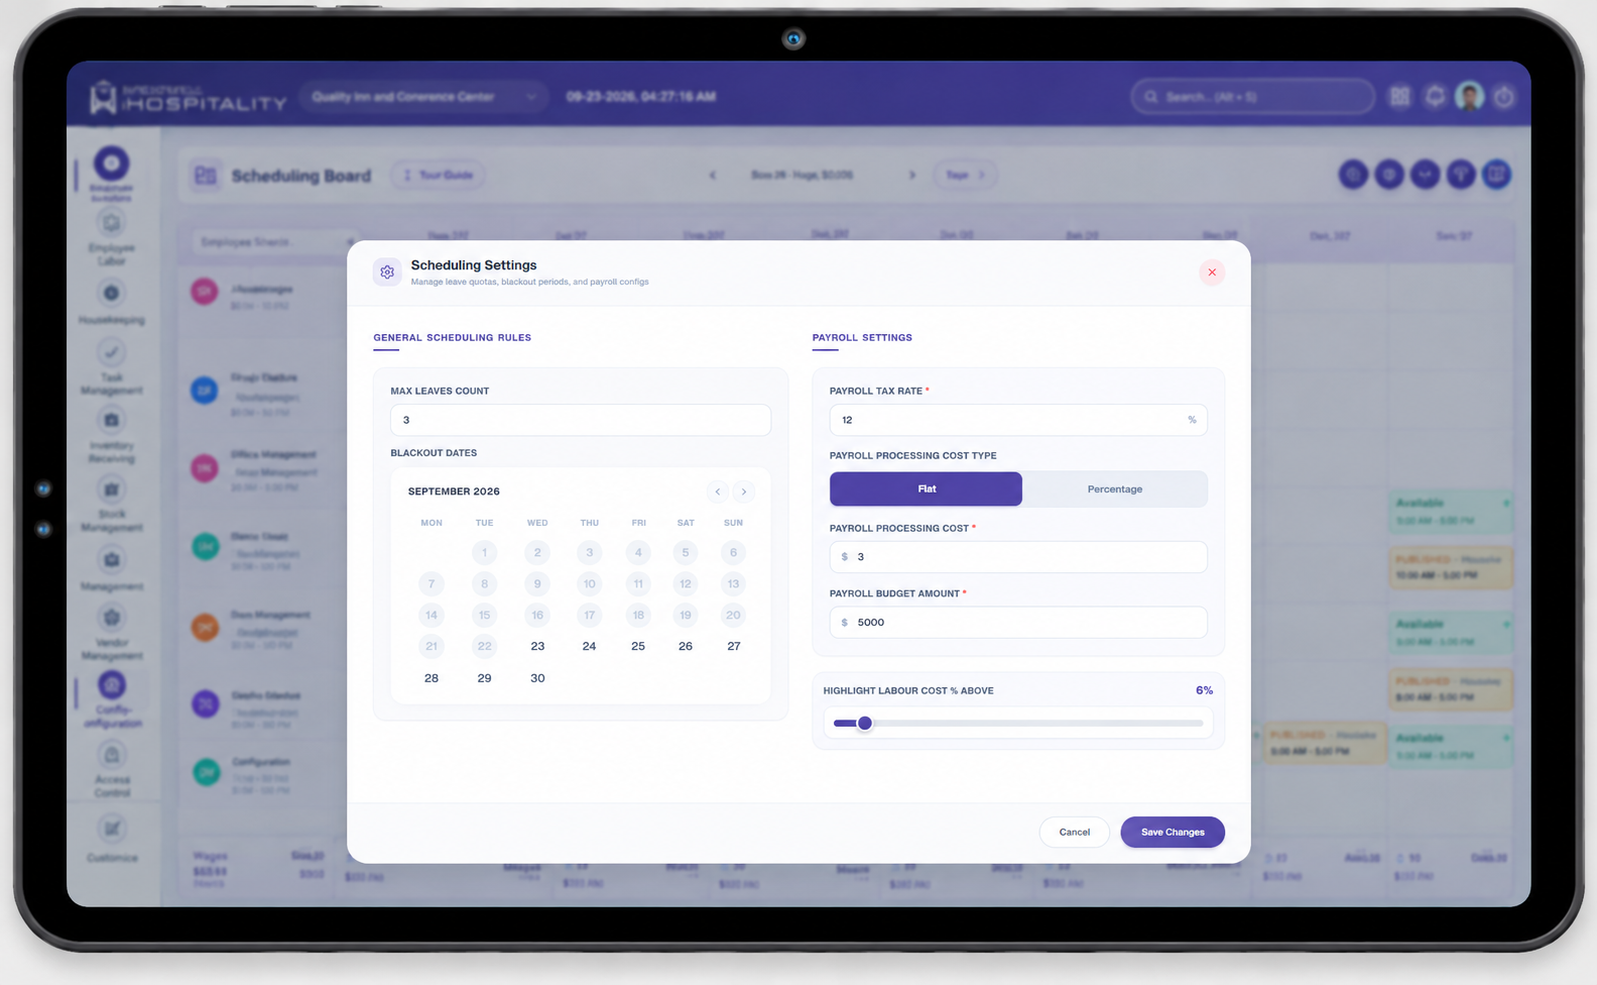
Leave and Scheduling Rules
- Max Leaves Count — Maximum number of employees who can be on leave on the same day. Once the limit is reached, further leave requests for that day aren't allowed.
- Blackout Dates — Specific dates where employee leave isn't permitted at all (e.g. a high-demand event date), regardless of how many employees are already on leave elsewhere.
Payroll Settings
- Payroll Tax Rate — Tax percentage used in labor cost calculations.
- Payroll Processing Cost Type — Flat amount or percentage-based.
- Payroll Processing Cost — The actual cost value, per the selected type.
- Payroll Budget Amount — The configured budget used to compare against scheduled labor costs.
Labor Cost Highlighting
Highlight Labor Cost % Above — a configurable threshold (e.g. 10%) above which scheduled labor costs are visually flagged, helping managers spot overspend early.
Update Settings
- Open the Scheduling Board → Settings.
- Update leave rules, blackout dates, payroll settings, or the labor cost threshold.
- Review the values.
- Select Save.
Notifications
Employees are notified when: a new schedule is approved, a shift is assigned, a shift time changes, a shift is reassigned, or a published shift is unpublished/cancelled.
Best Practices
- Review approved availability before scheduling.
- Avoid overlapping shift assignments.
- Check staffing coverage and scheduled hours before publishing.
- Resolve conflicts and unassigned shifts before publishing.
- Review schedules again after any post-publish changes.
- Review leave rules, blackout dates, and labor cost settings regularly to keep them aligned with current staffing and budget needs.
Important Notes
- The Scheduling Board creates and manages actual work shifts; Team Availability only informs it — approved availability doesn't create a shift automatically.
- Approved and Published are different, sequential statuses — published authorizes a schedule, approved makes it visible to employees.
- An open shift must be published before employees can claim it, and claiming doesn't equal assignment — manager approval is still required.
- A shift trade only takes effect after manager approval.
- Unpublishing a schedule returns it to Pending so it can go through approval again.
- Scheduled hours are planned time and may differ from actual worked hours recorded via time tracking.
My Scheduled Week
Overview
The My Scheduled Week page allows employees to view their weekly work schedule in one place. Employees can review their assigned shifts, including work dates, shift times, and scheduled details. The page also allows employees to see who is scheduled to work with them each day, claim available Open Shifts, and submit Shift Trade Requests to exchange scheduled shifts with eligible employees.
My Scheduled Week Screen
The My Scheduled Week screen provides employees with a weekly view of their scheduled shifts.
Employees can review their assigned shifts by date and time, see who is scheduled to work with them each day, claim available Open Shifts, and submit Shift Trade Requests to exchange shifts with eligible employees.
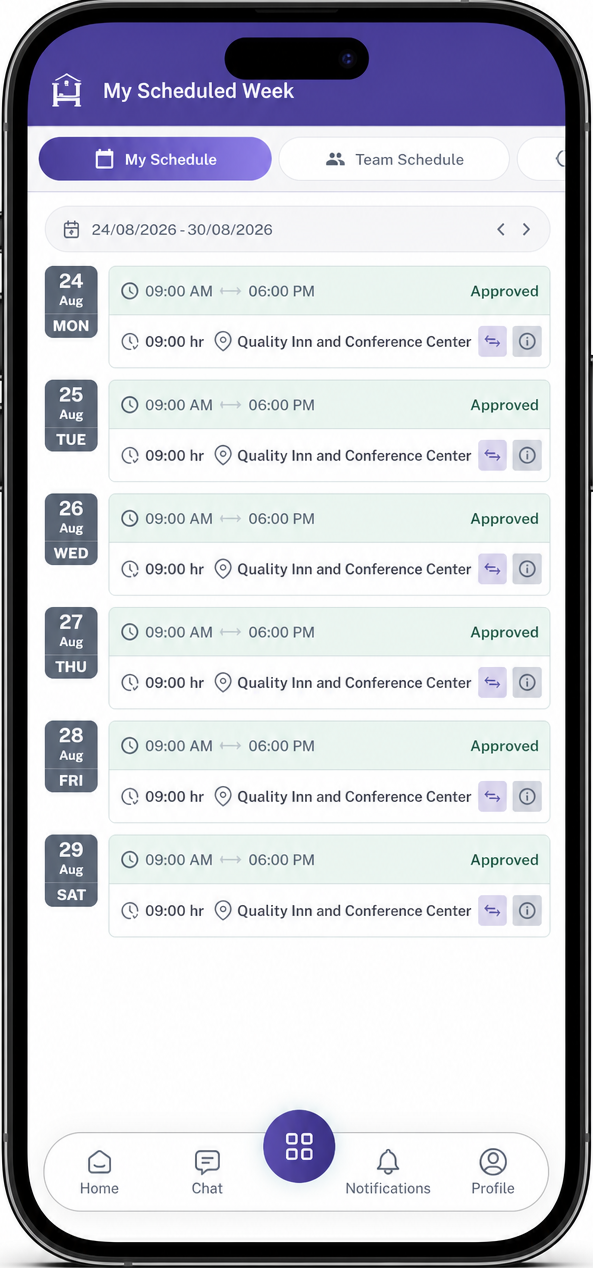
View your scheduled shifts, including dates, working hours, and shift details.
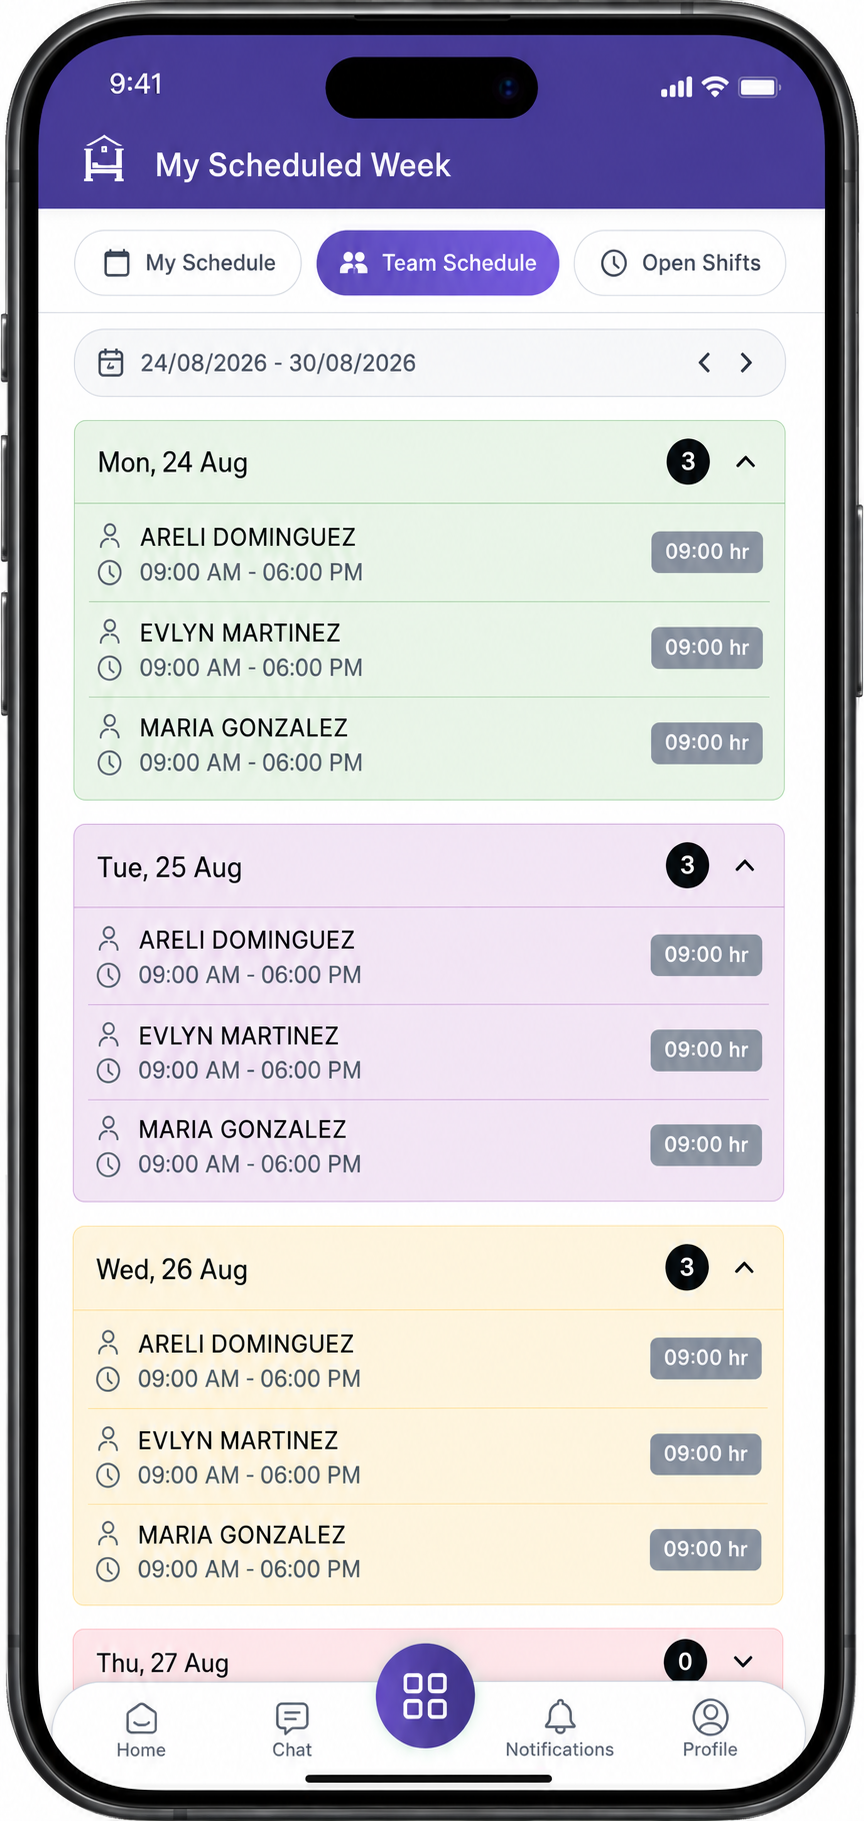
See which team members are scheduled to work alongside you during the week.
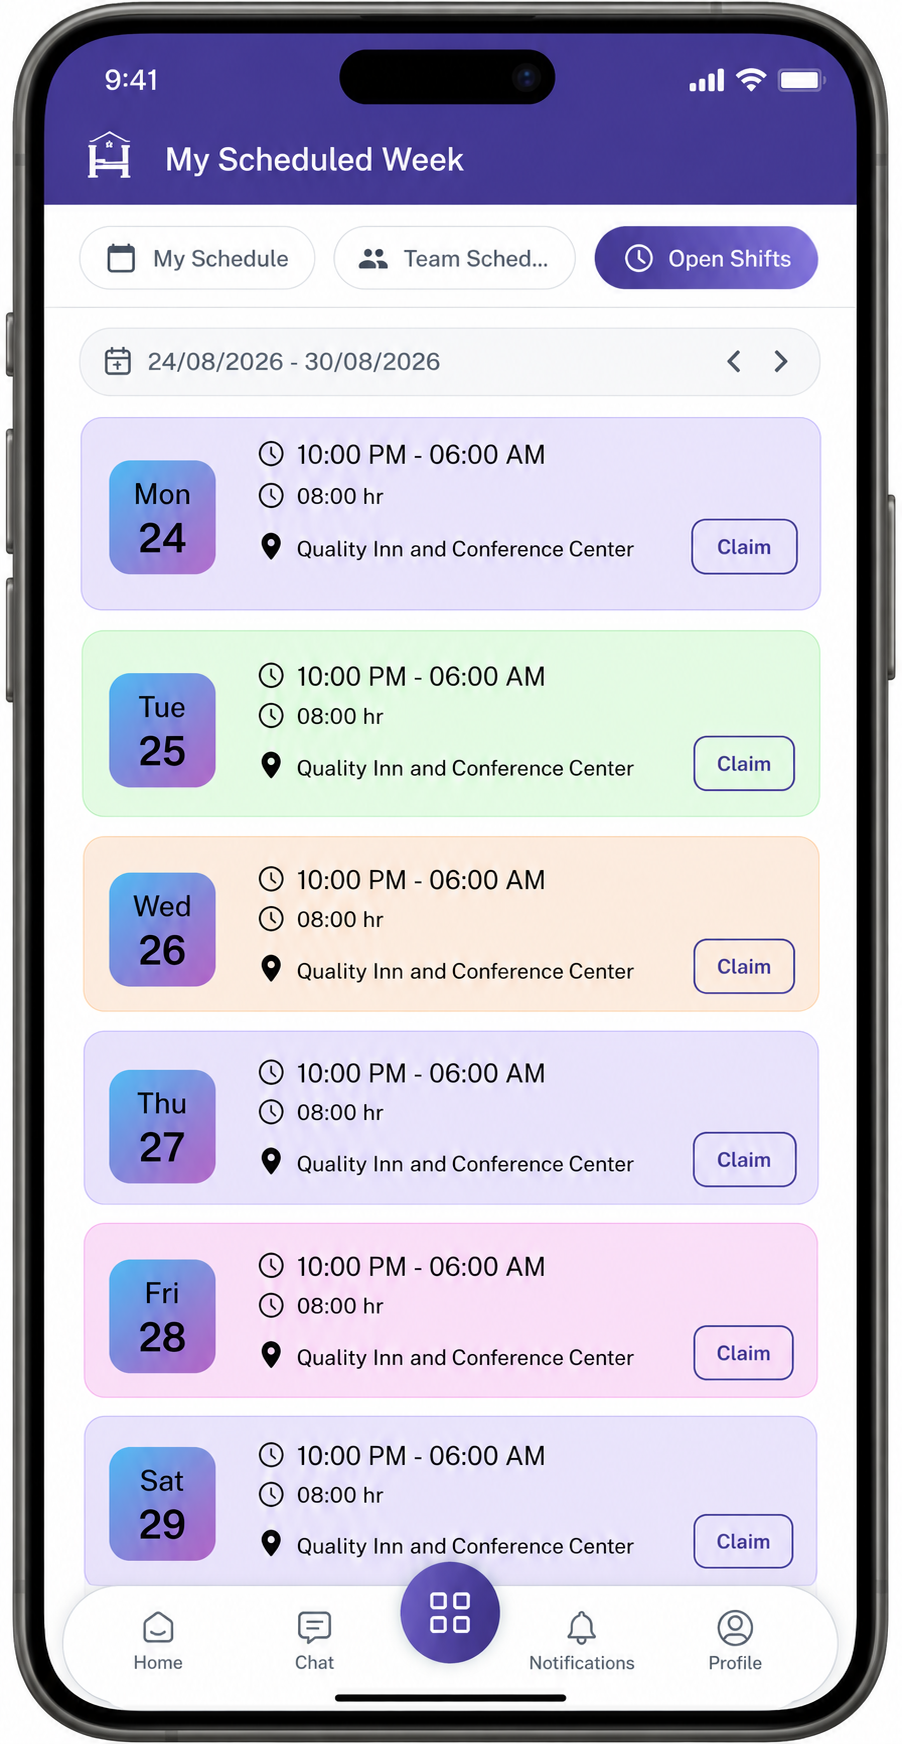
View available open shifts and claim a shift that matches your availability.
Claim an Open Shift
Employees can request an available Open Shift from the My Scheduled Week screen.
When an employee claims an Open Shift, the request is sent to the manager for review. The shift is assigned to the employee only after the manager approves the request.
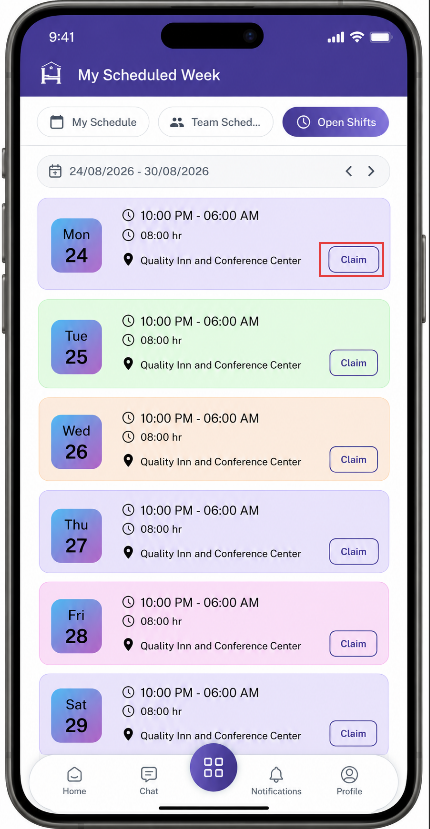
Steps
- Open My Scheduled Week.
- Locate the available Open Shift.
- Select the Open Shift you want to claim.
- Verify that the shift fits your availability and does not conflict with another scheduled shift.
- Select Claim Shift.
- Review the claim request details.
- Select Confirm to submit the request.
After submission, the claim request is sent to the manager for review.
Manager Review of Open Shift Requests
Managers can review Open Shift claim requests from the Manage Open Shift Requests section.
Managers can review the employee requesting the shift and the Open Shift details before taking action.
Approve a Claim Request
- Open Manage Open Shift Requests.
- Locate the pending Open Shift claim request.
- Review the employee and shift details.
- Select Approve.
- Confirm the approval.
Once approved, the Open Shift is assigned to the employee and becomes part of their scheduled shifts.
Reject a Claim Request
- Open Manage Open Shift Requests.
- Locate the pending Open Shift claim request.
- Review the employee and shift details.
- Select Reject.
- Confirm the rejection.
Once rejected, the Open Shift is not assigned to the employee.
Open Shift Claim Workflow
Open Shift Available → Employee Claims Shift → Claim Request Submitted → Manager Reviews Request
Manager Approves → Shift Assigned to Employee → Appears in My Scheduled Week
Manager Rejects → Request Rejected → Shift Not Assigned
Note: Claiming an Open Shift only submits a request. The shift is assigned to the employee after the manager approves the claim request.
Shift Trade
The Shift Trade feature allows employees to request changes to their scheduled shifts directly from the My Scheduled Week screen.
Employees can use the Trade Shift icon on an assigned shift to choose between two options:
- Swap Shift — Request to exchange the selected shift with a shift assigned to another eligible employee.
- Drop Shift — Give up the selected shift so it can become an Open Shift for another eligible employee to claim.
For a Swap Shift, the selected employee must approve the request before it is sent to the manager for final approval.
For a Drop Shift, the shift becomes available as an Open Shift, which can then be claimed by another eligible employee and submitted to the manager for approval.
Important: A shift is not changed or reassigned until the required approval process is completed.
Shift Trade Screen
The Shift Trade option is available directly from an employee's scheduled shift in My Scheduled Week.
When an employee selects the Trade Shift icon, SpendWell displays two options:
- Swap Shift
- Drop Shift
Employees can select the option that matches the action they want to perform.
Trade Shift Options
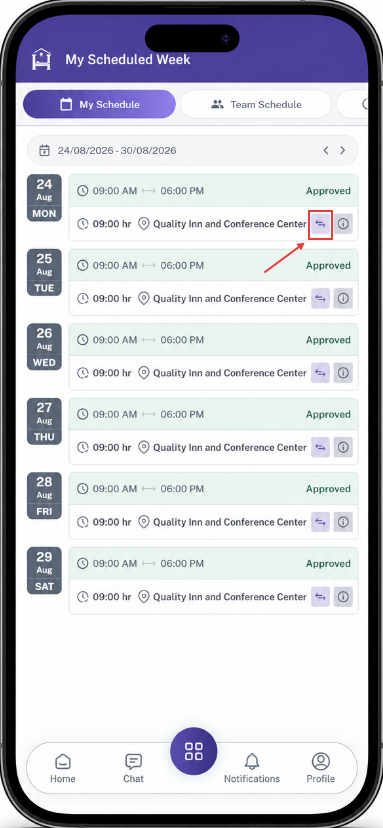
Swap Shift
Request to exchange your scheduled shift with an eligible employee's shift.
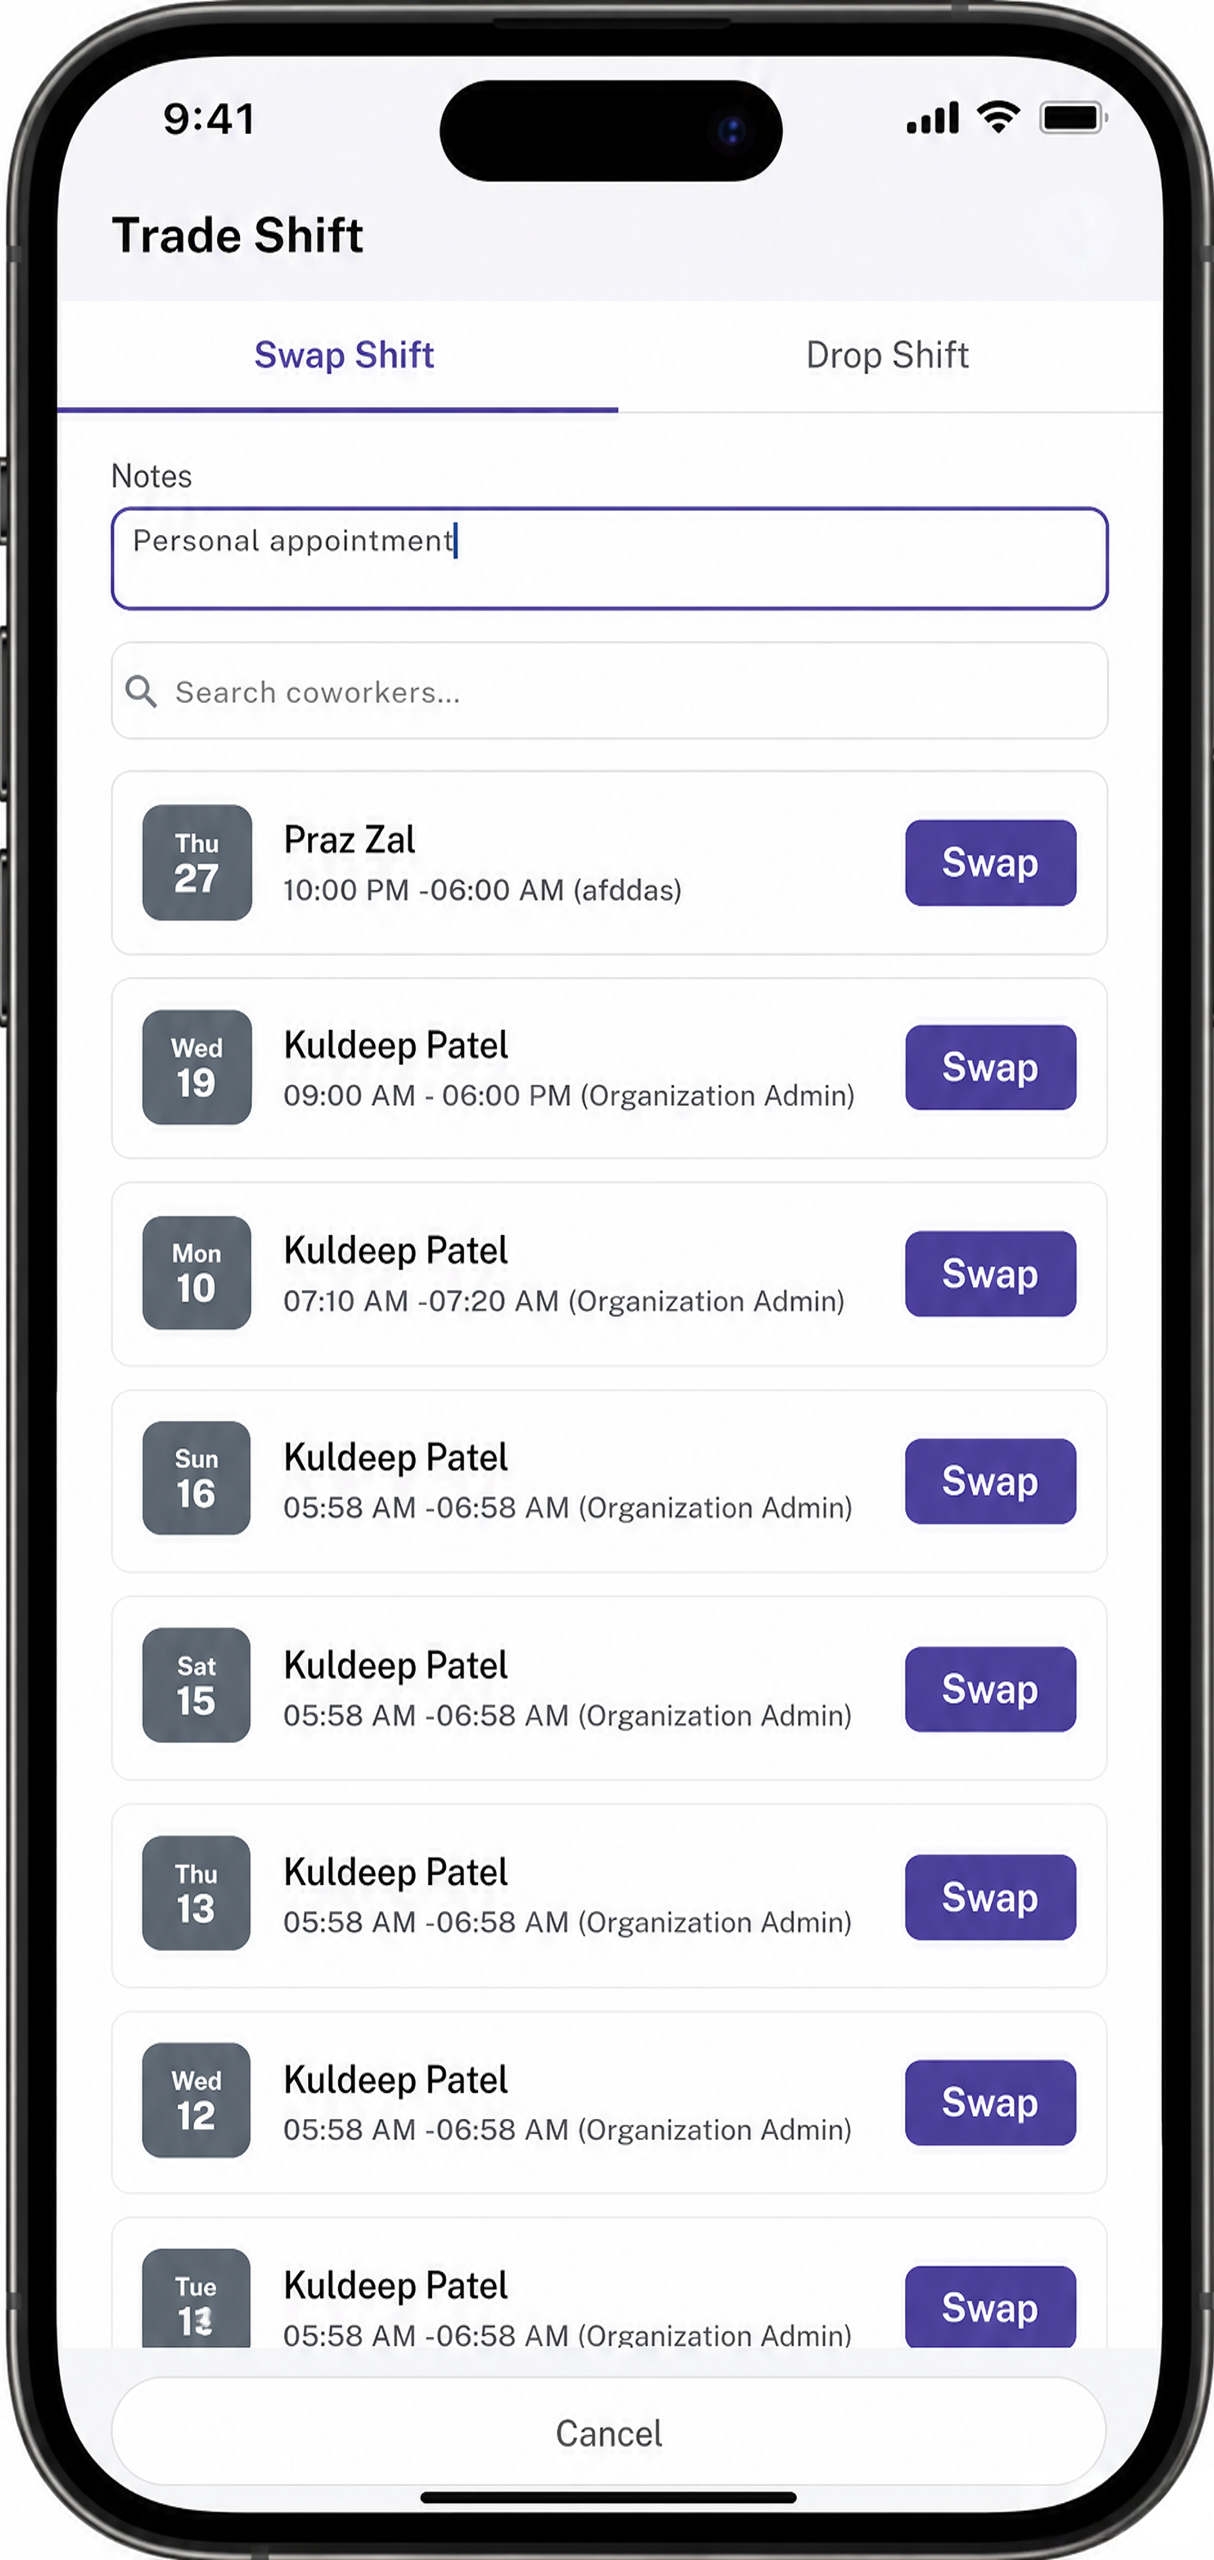
Swap Shift Request
Select an eligible employee and their available shift to submit a swap request.
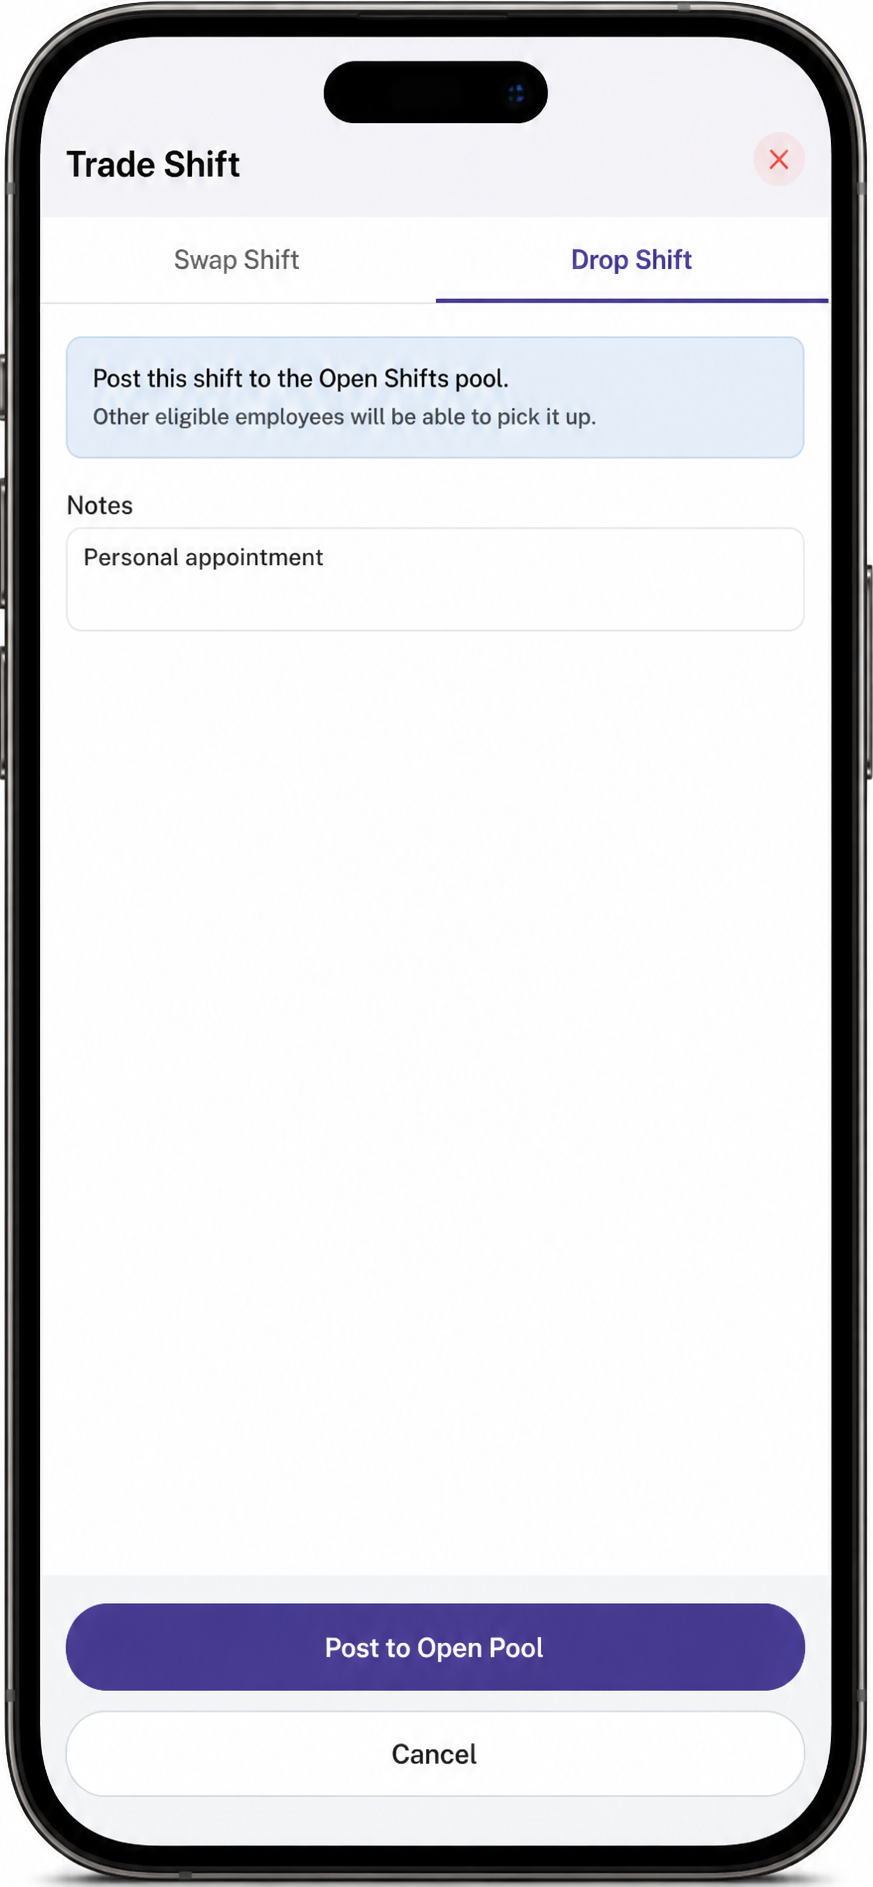
Drop Shift
Give up your scheduled shift so it can become available as an Open Shift.
Swap Shift
The Swap Shift option allows an employee to request an exchange of their scheduled shift with a shift assigned to another eligible employee.
System checks the selected employee's schedule and availability to help prevent scheduling conflicts.
Create a Swap Shift Request
Steps
- Open My Scheduled Week.
- Locate the scheduled shift you want to trade.
- Select the Trade Shift icon.
- Select Swap Shift.
- Select an eligible employee.
- Review the shifts available for that employee.
- Select the shift you want to swap.
- Review the swap details.
- Select Swap.
- Confirm the request.
After submission, the Swap Shift request is sent to the selected employee for approval.
Employee Approval for Swap Shift
After the Swap Shift request is submitted, the selected employee receives the request.
The selected employee can:
- Approve the Swap Shift request.
- Reject the Swap Shift request.
Employee Approves
When the selected employee approves the request:
Employee Approves → Manager Approval Required
The swap is not completed immediately.
The request is sent to the manager for final review and approval in the Scheduling Board.
Employee Rejects
When the selected employee rejects the request:
- The Swap Shift request is rejected.
- The request does not proceed to manager approval.
- Neither employee's schedule is changed.
- Both employees keep their original shifts.
Manager Approval for Swap Shift
After the selected employee approves the request, the manager can review the request from the Scheduling Board.
The manager can review:
- Requesting employee.
- Selected employee.
- Original shift.
- Requested shift.
- Employee availability.
- Existing schedules.
- Potential scheduling conflicts.
- Trade request details.
Approve Swap Shift
If the manager approves the Swap Shift:
- The requesting employee receives the selected employee's shift.
- The selected employee receives the requesting employee's original shift.
- Both shift assignments are updated.
- Both employees' schedules are updated.
- The Swap Shift request is marked Approved.
Reject Swap Shift
If the manager rejects the Swap Shift:
- The shift assignments remain unchanged.
- Both employees keep their original shifts.
- The Swap Shift request is marked Rejected.
Drop Shift
The Drop Shift option allows an employee to request to give up one of their scheduled shifts.
The request is sent to the manager for approval. The shift becomes an Open Shift only after the manager approves the Drop Shift request.
Create a Drop Shift Request
Steps
- Open My Scheduled Week.
- Locate the scheduled shift you want to drop.
- Select the Trade Shift icon.
- Select Drop Shift.
- Review the shift details.
- Select Submit.
- Confirm the request.
After submission, the Drop Shift request is sent to the manager for review.
- Manager Approves → The employee is removed from the shift, and the shift becomes an Open Shift available for eligible employees to claim.
- Manager Rejects → The employee remains assigned to the shift, and no schedule changes are made.
Shift Trade Workflow
Swap Shift Workflow
Employee Selects Trade Shift → Swap Shift → Select Eligible Employee → Select Eligible Shift → Submit Request
Selected Employee Approves → Manager Reviews in Scheduling Board → Manager Approves → Shift Swapped → Both Schedules Updated
Swap Rejection Workflow
Employee Submits Swap Request → Selected Employee Rejects → Request Rejected → No Schedule Change
Manager Rejection Workflow
Selected Employee Approves → Manager Reviews → Manager Rejects → Request Rejected → No Schedule Change
Drop Shift Workflow
Employee Selects Trade Shift → Drop Shift → Submit Drop Shift Request → Manager Reviews
Manager Approves → Employee Removed from Shift → Shift Becomes Open Shift
Manager Rejects → Drop Request Rejected → Employee Remains Assigned to Shift
Important Notes
- Employees can start a Shift Trade request directly from an assigned shift using the Trade Shift icon.
- Swap Shift allows an employee to exchange a shift with another eligible employee.
- Drop Shift allows an employee to give up a scheduled shift.
- A dropped shift becomes an Open Shift that eligible employees can claim.
- For a Swap Shift, the selected employee must approve the request before it proceeds to manager approval.
- If the selected employee rejects a Swap Shift request, the request is rejected and no schedule changes are made.
- The manager provides the final approval for a Swap Shift.
- Manager approval for a Swap Shift updates both employees' shift assignments.
- A claimed Open Shift is assigned only after manager approval.
- Employees' schedules are not automatically changed when a request is submitted.