# Inventory Management
# Item Category
### Overview
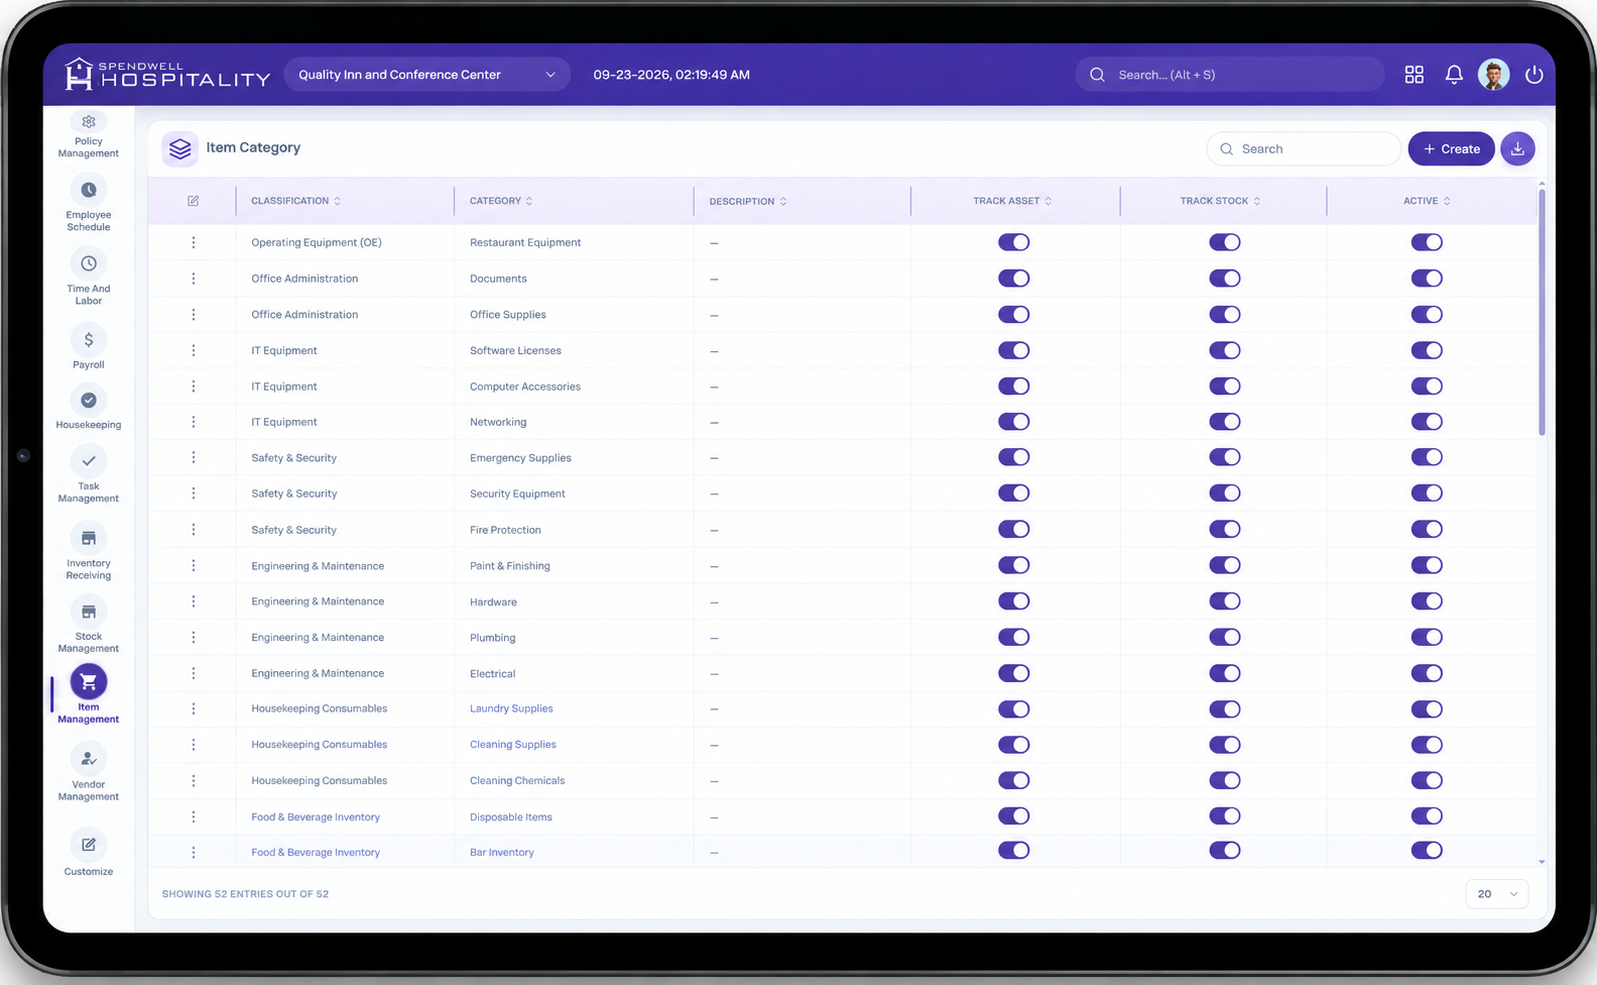
The **Item Category** feature allows to create and manage categories used to organize inventory items within the property.
Item categories provide a high-level classification for inventory items and are used when creating or managing **Item Subcategories** and **Items**.
The Item Category feature is a **single-screen feature** — existing categories are displayed in a list, and new categories can be created from the same screen.
---
### Item Category Screen
[](https://docs.spendwelltechsystem.com/uploads/images/gallery/2026-09/fHximage.png)
The screen provides the following controls:
- **Category** — Displays the name of the inventory category.
- **Active** — Toggle to activate or deactivate the category.
- **Create** — Opens the **Add Item Category** panel for creating a new category.
Administrators can review the configured categories and manage their availability directly from the list.
### Key Fields
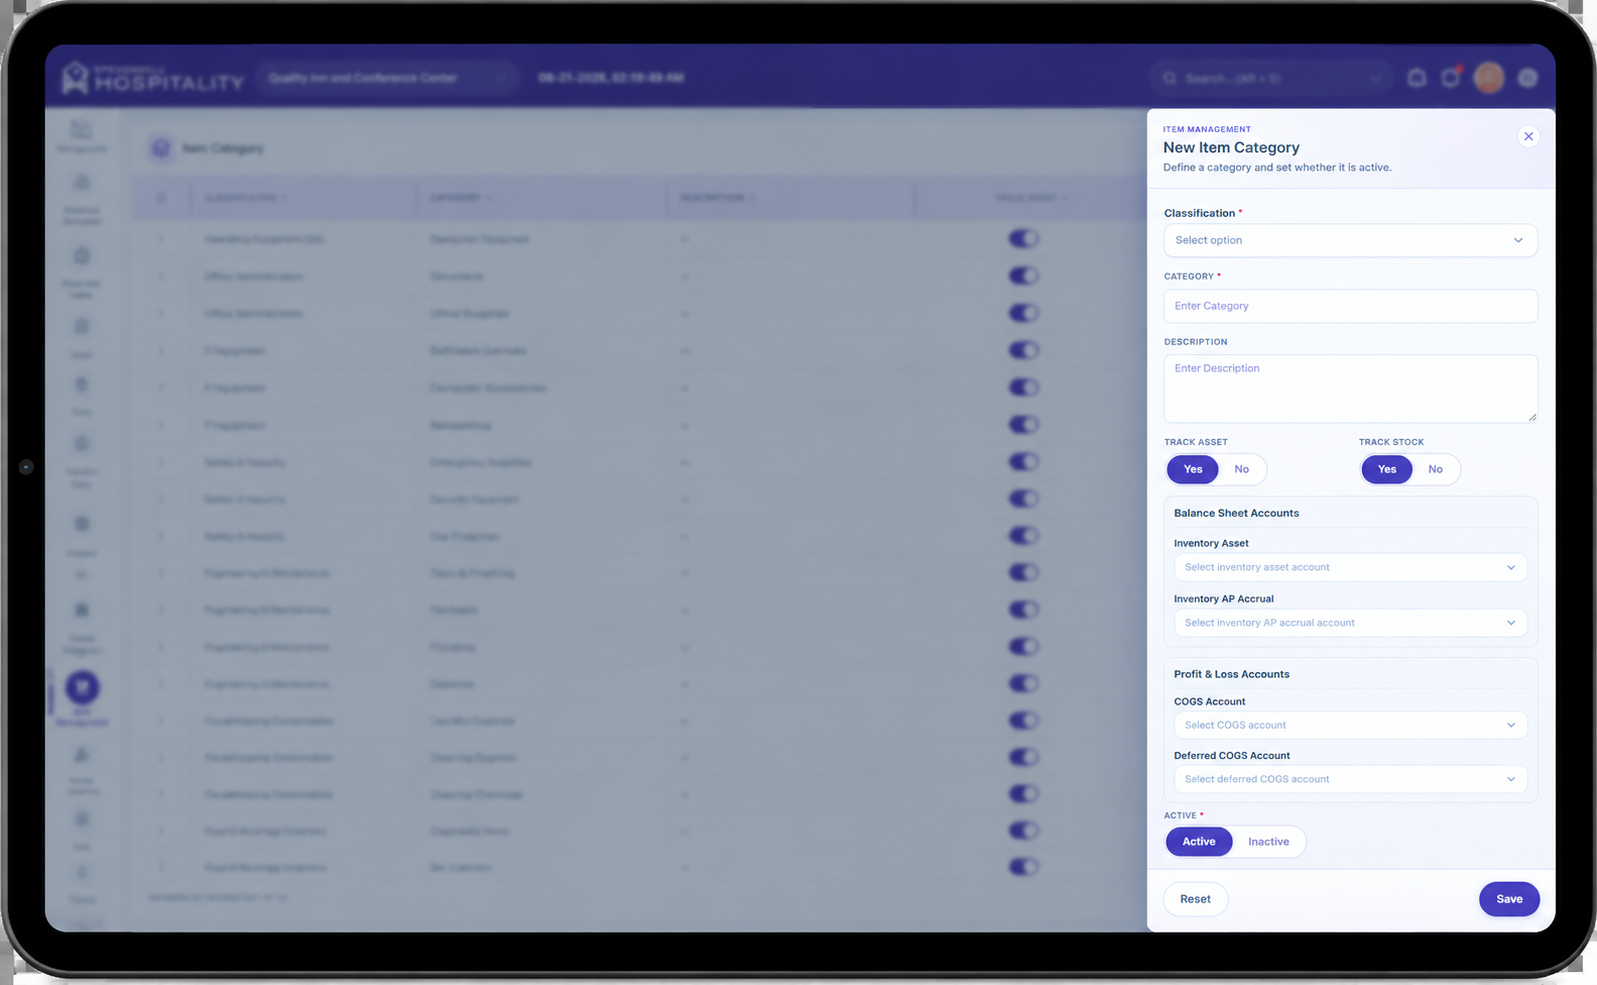
- **Category** — Required field used to enter the name of the inventory category, such as *Asset Category, Consumables, Non-Consumables, Guest Room Accessories,* or *Storage Supplies*.
- **Active** — Controls whether the category is active and available for use within the inventory system.
- **Save** — Saves the newly created category and closes the panel.
- **Save & Add New** — Saves the current category and keeps the panel open so another category can be created.
- **Reset** — Clears the entered information without saving.
- **Create** — Opens the **Add Item Category** panel.
### Steps
##### **Create a New Item Category**
[](https://docs.spendwelltechsystem.com/uploads/images/gallery/2026-09/0xKimage.png)
1. Navigate to **Item Category** from the Inventory Management section.
2. Click the **Create** button.
3. The **Add Item Category** panel opens on the right side of the screen.
4. Enter the required **Category** name.
5. Click **Save** to create the category.
6. Use **Save & Add New** if you want to save the current category and immediately create another category.
7. Use **Reset** to clear the entered information before saving.
### Important Notes
- **Category** is a required field when creating a new item category.
- Categories should be created before configuring their associated **Item Subcategories**.
- Only active categories should be used when creating or managing inventory items.
- Deactivating a category prevents it from being available for new inventory configuration while retaining the existing category record.
- Use clear and consistent category names to make inventory items easier to organize and manage.
- Item categories provide the top-level classification for inventory items and can have multiple **Item Subcategories** associated with them.
# Item Subcategory
### Overview
The **Item Subcategory** feature allows to create and manage subcategories used to further organize inventory items within a property.
Item subcategories provide a more specific classification under an **Item Category** and are used when creating and managing **Items**.
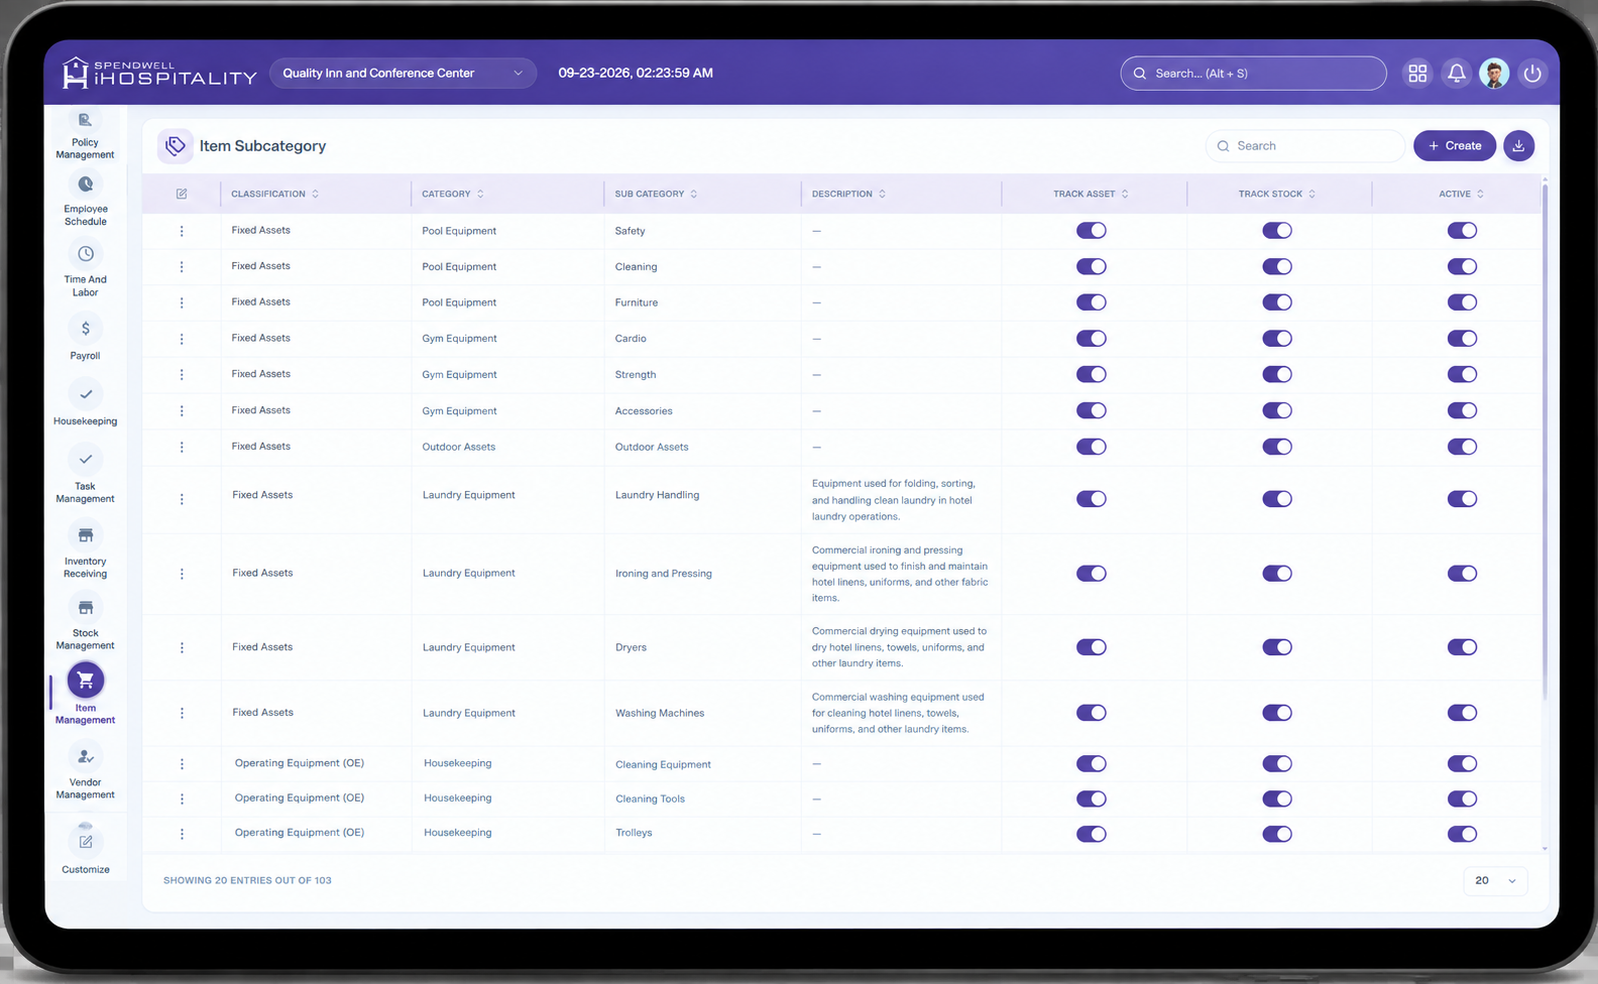
The Item Subcategory feature is a **single-screen feature** — existing subcategories are displayed in a list, and new subcategories can be created from the same screen.
---
### Item Subcategory Screen
[](https://docs.spendwelltechsystem.com/uploads/images/gallery/2026-09/yoRimage.png)
The screen provides the following controls:
- **Category** — Displays the parent item category associated with the subcategory.
- **Sub Category** — Displays the name of the item subcategory.
- **Create** — Opens the **Add Item Sub Category** panel for creating a new subcategory.
Administrators can review the configured subcategories and manage the inventory classification structure from the list.
### Key Fields
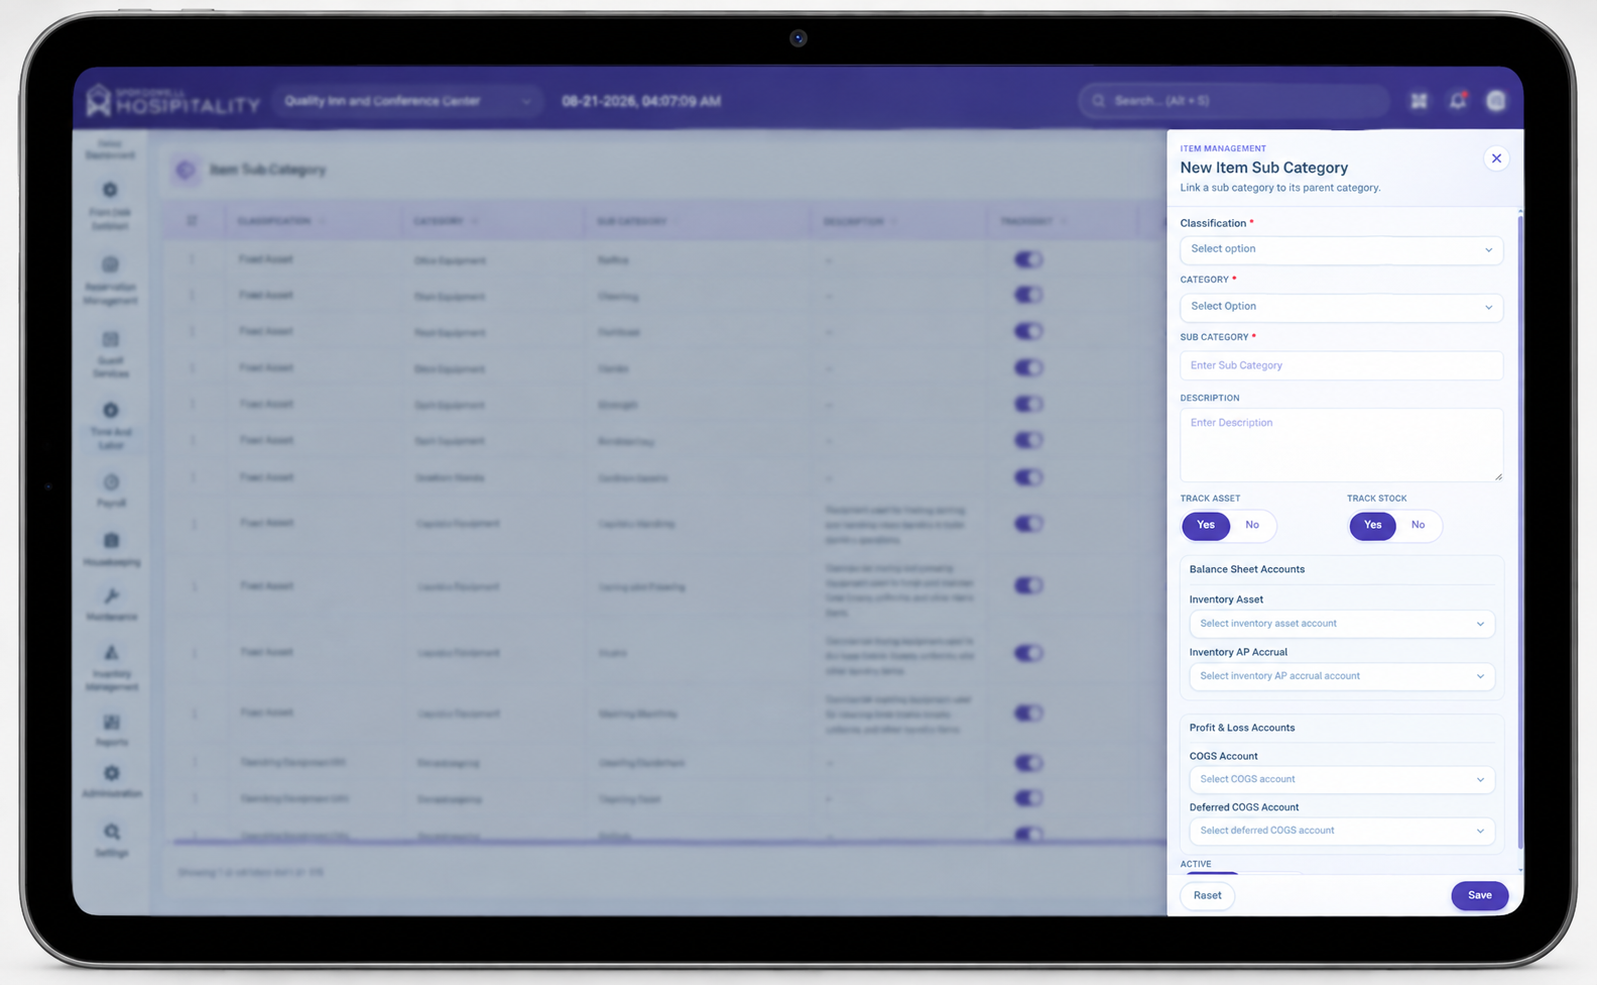
- **Item Category** — Required field used to select the parent category under which the subcategory will be created, such as *Asset Category, Guest Room Accessories, Coffee & Tea Supplies,* or *Water Supplies*.
- **Sub Category** — Required field used to enter the name of the subcategory, such as *Room Asset Sub Category, Electrical Sub Category, Alarm Clock Radio, USB Charging Hub,* or *Water Dispensers*.
- **Save** — Saves the newly created subcategory and closes the panel.
- **Save & Add New** — Saves the current subcategory and keeps the panel open so another subcategory can be created.
- **Reset** — Clears the entered information without saving.
- **Create** — Opens the **Add Item Sub Category** panel.
### Steps
##### **Create a New Item Subcategory**
[](https://docs.spendwelltechsystem.com/uploads/images/gallery/2026-09/H7Bimage.png)
1. Navigate to **Item Subcategory** from the Inventory Management section.
2. Click the **Create** button.
3. The **Add Item Sub Category** panel opens on the right side of the screen.
4. Select the required **Item Category**.
5. Enter the required **Sub Category** name.
6. Click **Save** to create the subcategory.
7. Use **Save & Add New** if you want to save the current subcategory and immediately create another subcategory.
8. Use **Reset** to clear the entered information before saving.
### Important Notes
- **Item Category** and **Sub Category** are required fields when creating a new item subcategory.
- The parent **Item Category** should be created before creating its associated subcategories.
- Each subcategory should be associated with the appropriate parent category to maintain a clear inventory structure.
- Subcategories provide a more detailed classification of items within an item category.
- Use clear and consistent subcategory names to make inventory items easier to identify and manage.
- Multiple subcategories can be created under the same **Item Category**.
- Item subcategories should be configured before creating items that use those classifications.
# Inventory Items
### Overview
The **Inventory Item** feature allows to create and manage inventory items used throughout the property.
Each item is organized under an **Item Category** and **Item Subcategory** to maintain a structured inventory hierarchy.
Items can be configured as either **Global Items** or **Property-Specific Items**:
- **Global Item** — The item is available across **all properties** within the system.
- **Property-Specific Item** — The item is available only at the properties selected by the administrator.
The Item feature is a **single-screen feature** — existing items are displayed in a list, and new items can be created from the same screen.
---
### Item Screen
[](https://docs.spendwelltechsystem.com/uploads/images/gallery/2026-09/qQeimage.png)
The **Item** screen displays all configured inventory items along with their category, subcategory, and property availability.
The screen provides the following controls:
- **Item** — Displays the name of the inventory item.
- **Item Category** — Displays the category associated with the item.
- **Item Subcategory** — Displays the subcategory associated with the item.
- **Global Item** — Indicates whether the item is available across all properties.
- **Property** — Displays the property associated with the item when it is not configured as a global item.
- **Create** — Opens the **Add Item** panel for creating a new inventory item.
Administrators can review existing inventory items and create new items directly from the screen.
---
### Key Fields
- **Item Category** — Required field used to select the category under which the item will be organized.
- **Item Subcategory** — Required field used to select the subcategory under which the item will be organized.
- **Item** — Required field used to enter the name of the inventory item.
- **Global Item** — Determines whether the item is available across all properties.
- **Property** — Used to select the property or properties where the item should be available when **Global Item** is not enabled.
- **Save** — Saves the newly created item and closes the panel.
- **Save & Add New** — Saves the current item and keeps the panel open so another item can be created.
- **Reset** — Clears the entered information without saving.
- **Create** — Opens the **Add Item** panel.
---
### Steps
##### **Create a New Item**
[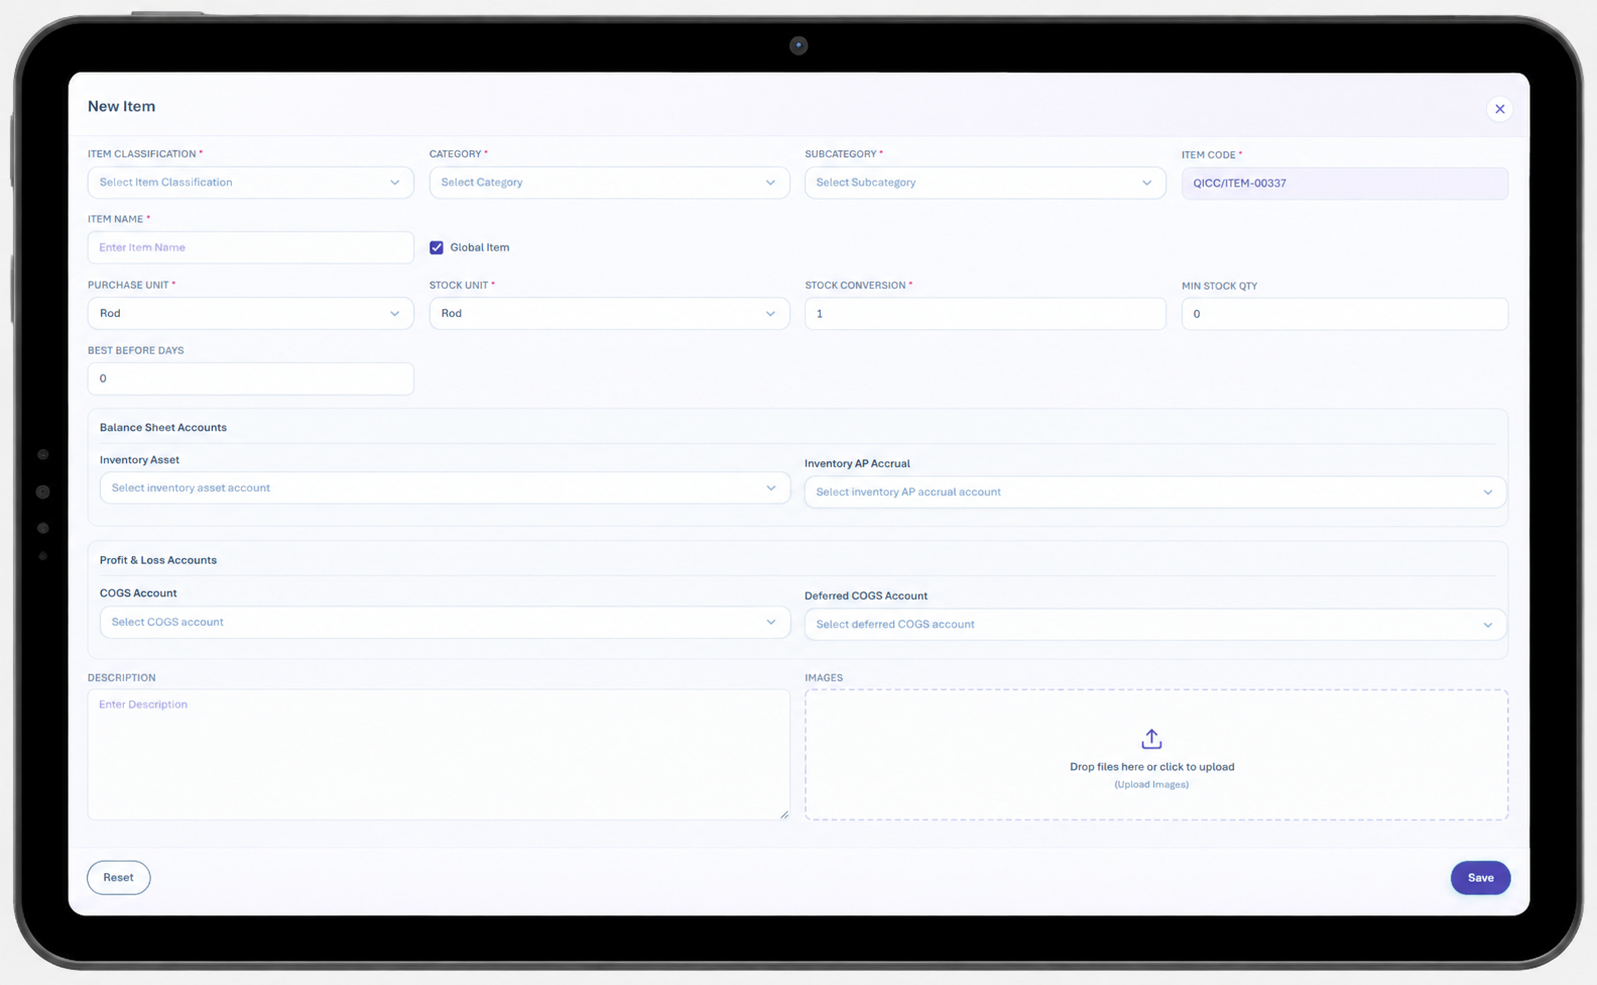](https://docs.spendwelltechsystem.com/uploads/images/gallery/2026-09/eQbimage.png)
1. Navigate to **Item** from the **Inventory Management** section.
2. Click the **Create** button.
3. The **Add Item** panel opens on the right side of the screen.
4. Select the required **Item Category**.
5. Select the required **Item Subcategory**.
6. Enter the required **Item** name.
7. Enable **Global Item** if the item should be available across all properties.
8. If **Global Item** is not enabled, select the required **Property** or properties.
9. Click **Save** to create the item.
10. Use **Save & Add New** to save the current item and immediately create another item.
11. Use **Reset** to clear the entered information before saving.
### Key Fields
- **Item Category** — Required field used to select the main category for the inventory item. The category provides the top-level classification of the item and determines where it belongs within the inventory structure.
- **Item Subcategory** — Required field used to select the subcategory under the selected **Item Category**. The subcategory provides a more specific classification for the inventory item.
- **Item** — Required field used to enter the name of the inventory item. The item name should clearly identify the product or material that will be purchased, stored, and managed in inventory.
- **Global Item** — Determines whether the item is available across all properties.
- When **Global Item** is enabled, the item is available for use across all properties.
- When **Global Item** is disabled, the item is restricted to the specific properties selected by the administrator.
- **Property** — Used to select the property or properties where the item should be available when **Global Item** is disabled. The item can be used only at the selected properties.
- **Purchase Unit** — Defines the unit in which the item is purchased from the vendor. Examples include **Box, Case, Carton, Pack,** or **Each**.
- **Stock Unit** — Defines the unit in which the item is maintained and tracked in inventory. The stock unit can be different from the purchase unit. For example, an item can be purchased by **Box** but tracked in inventory by **Piece**.
- **Stock Conversion** — Defines the number of stock units contained in one purchase unit. The system uses this value to convert the purchased quantity into the inventory stock quantity.
For example:
**Purchase Unit:** Box
**Stock Unit:** Piece
**Stock Conversion:** 80
This means:
**1 Box = 80 Pieces**
If **5 Boxes** are purchased:
**5 × 80 = 400 Pieces**
Therefore, the inventory quantity becomes **400 Pieces**.
- **Minimum Stock Quantity** — Defines the minimum quantity of the item that should be maintained in inventory. This value is used as a reference when determining whether additional stock is required.
For example, if the **Minimum Stock Quantity** is set to **20 Pieces**, the inventory should maintain at least 20 Pieces of the item.
- **Still Best Before Day** — Defines the number of days the item should remain within its acceptable best-before period. This value can be used to monitor the remaining usable period of inventory items and support inventory management based on product freshness or shelf life.
- **Description** — Provides additional information about the inventory item. Administrators can use this field to describe the item, its characteristics, usage, or any other relevant details needed for inventory management.
- **Image** — Allows an image to be associated with the inventory item. The image helps users visually identify the item when viewing or managing inventory records.
- **Save** — Saves the item and its configured information. After saving, the item becomes available according to its **Global Item** or **Property** configuration.
- **Save & Add New** — Saves the current item and keeps the create form open so the administrator can immediately create another item.
- **Reset** — Clears the information entered in the create form without saving the item.
- **Close** — Closes the create form without saving the current changes.
# Store Room
### Overview
The **Store Room** feature allows to create and manage store rooms used to organize and control inventory stock within a property.
Store rooms represent the physical or logical locations where inventory items are stored. Each store room can have its own inventory requirements, including **Minimum Stock Quantity**, **Maximum Stock Quantity**, and assignment rules.
Store rooms are used during the inventory assignment process to determine where approved inventory should be placed and how much stock should be assigned to each location.
The Store Room feature is a **single-screen feature** — existing store rooms are displayed in a list, and new store rooms can be created from the same screen.
---
### Store Room Screen
[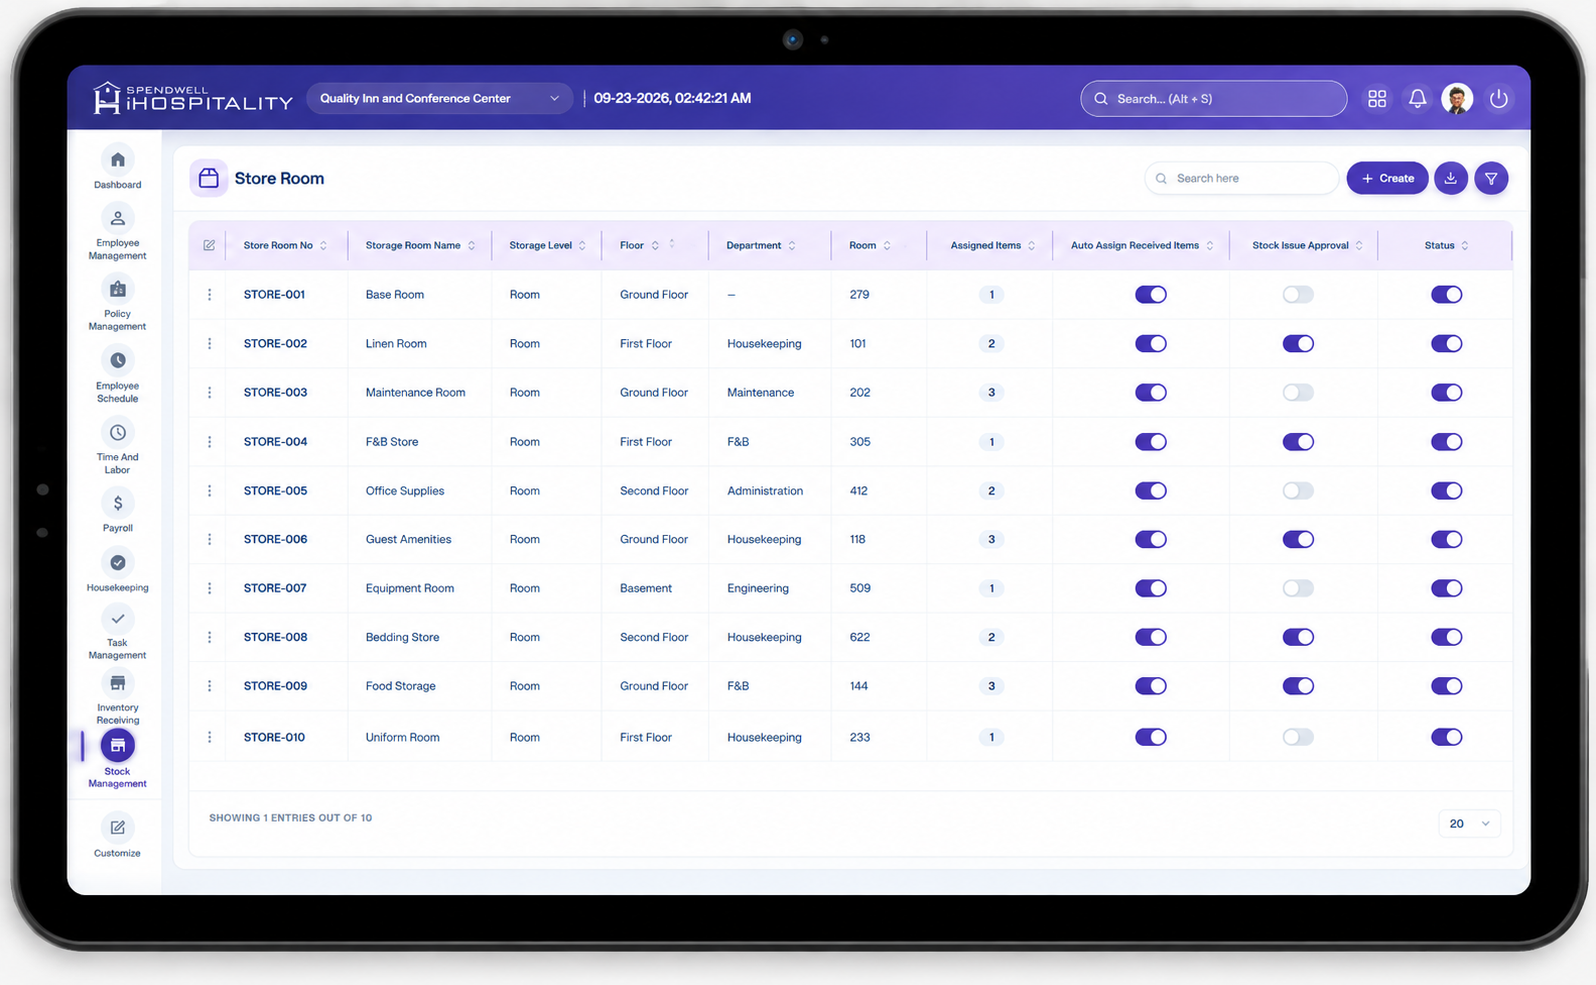](https://docs.spendwelltechsystem.com/uploads/images/gallery/2026-09/Rjeimage.png)
The screen provides the following controls:
- **Store Room** — Displays the name of the configured store room.
- **Create** — Opens the **Add Store Room** panel for creating a new store room.
Administrators can review the configured store rooms and create additional storage locations from the same screen.
### Key Fields
- **Store Room** — Required field used to enter the name of the store room. The name should clearly identify the location where inventory will be stored, such as **Main Store, Housekeeping Store, Kitchen Store,** or **Maintenance Store**.
- **Property** — Identifies the property to which the store room belongs. The store room is available for inventory management within the selected property.
- **Minimum Stock Quantity** — Defines the minimum quantity of an item that should normally be maintained in the store room. This value is used as a reference when determining whether additional inventory needs to be assigned to the store room.
- **Maximum Stock Quantity** — Defines the maximum quantity of an item that should normally be maintained in the store room. This value helps control the amount of inventory assigned to the store room and prevents unnecessary overstocking.
- **Approval Required** — Determines whether inventory assignments to the store room require approval before the stock can be assigned.
- When enabled, the assignment must be reviewed and approved before it is finalized.
- When disabled, the inventory can be assigned without an additional approval step.
- **Auto Assign Received Items** — Determines whether approved received inventory should be automatically assigned to store rooms according to the configured inventory requirements.
- When enabled, the system can calculate and prepare store room assignments based on the required stock levels.
- When disabled, inventory assignment is handled manually.
- **Save** — Saves the store room configuration.
- **Save & Add New** — Saves the current store room and keeps the create form open so the administrator can immediately create another store room.
- **Reset** — Clears the information entered in the create form without saving the store room.
- **Close** — Closes the create form without saving the current changes.
### Steps
##### **Create a New Store Room**
[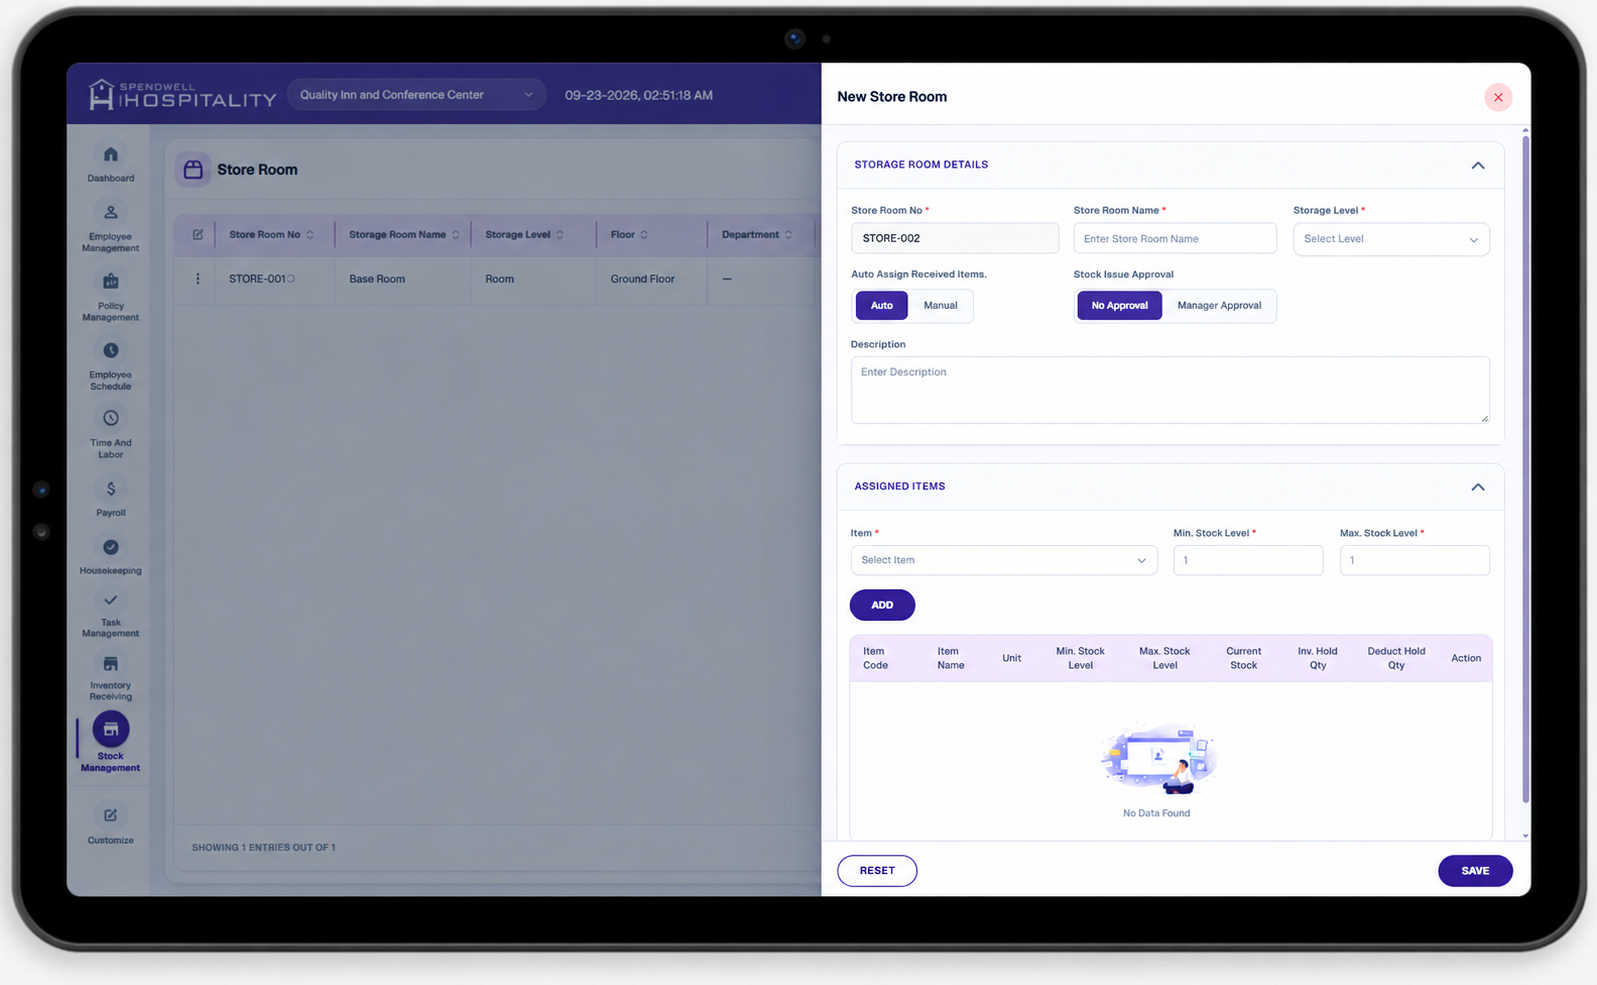](https://docs.spendwelltechsystem.com/uploads/images/gallery/2026-09/ACzimage.png)
1. Navigate to **Store Room** from the Inventory Management section.
2. Click the **Create** button.
3. The **Add Store Room** panel opens on the right side of the screen.
4. Enter the required **Store Room** name.
5. Select the applicable **Property**.
6. Configure the **Minimum Stock Quantity** and **Maximum Stock Quantity** according to the store room's inventory requirements.
7. Configure **Approval Required** based on whether inventory assignments should require approval.
8. Configure **Auto Assign Received Items** if received inventory should be automatically assigned according to the configured stock requirements.
9. Click **Save** to create the store room.
10. Use **Save & Add New** if you want to save the current store room and immediately create another one.
11. Use **Reset** to clear the entered information before saving.
### Store Room Inventory Assignment
Store rooms are used when approved inventory is assigned to storage locations.
The assignment process can use the store room's configured stock requirements to determine the quantity that should be assigned.
For example:
**Maximum Stock Quantity − Current Stock Quantity = Required Assignment Quantity**
If a store room has:
- **Maximum Stock Quantity:** 100 Pieces
- **Current Stock:** 40 Pieces
The required assignment quantity is:
**100 − 40 = 60 Pieces**
When **Auto Assign Received Items** is enabled, the system can use these inventory requirements to prepare the appropriate store room assignment.
### Important Notes
- A store room should be configured for the appropriate **Property** before it is used for inventory assignment.
- **Minimum Stock Quantity** represents the lower inventory level that should normally be maintained.
- **Maximum Stock Quantity** represents the upper inventory level that should normally be maintained.
- Store room stock requirements can be used during automatic inventory assignment.
- When **Approval Required** is enabled, the store room assignment must go through the configured approval process.
- When **Auto Assign Received Items** is enabled, the system can automatically prepare inventory assignments based on store room stock requirements.
- Store rooms should have clear and consistent names so employees can easily identify the correct inventory storage location.
# Inventory Receive
### Overview
The **Inventory Receive** feature allows users to record inventory received from vendors and add the received items into the inventory management process.
Inventory can be received through the following methods:
1. **Fetch from Invoice** — Users can upload a vendor invoice, and the system extracts the available item and purchase information from the invoice.
2. **Fetch from Vendor Email** — When **Vendor Integration** is enabled, the system can automatically fetch vendor invoices from the configured vendor email and use the invoice information to create the inventory receipt.
3. **Manual Entry** — Users can manually select inventory items and enter the purchase quantity and unit price when an invoice is not fetched automatically.
After an inventory receipt is created, it follows the inventory receiving workflow:
**Pending → Approved → Assigned**
- **Pending** — The inventory receipt has been created but has not yet been approved. The received quantity is not added to available stock until approval.
- **Approved** — The receipt has been approved and the received stock is added to inventory.
- **Assigned** — The approved inventory has been assigned to the appropriate **Store Room** according to the configured inventory assignment rules.
### Vendor Integration
When **Vendor Integration** is enabled for a vendor, the system can automatically retrieve vendor invoices from the configured **vendor email**. The invoice information is then used to populate the inventory receiving details, reducing the need for manual data entry.
If vendor email integration is not enabled or an invoice cannot be fetched automatically, users can create the receipt using **Fetch from Invoice** or **Manual Entry**.
### Inventory Receive List
[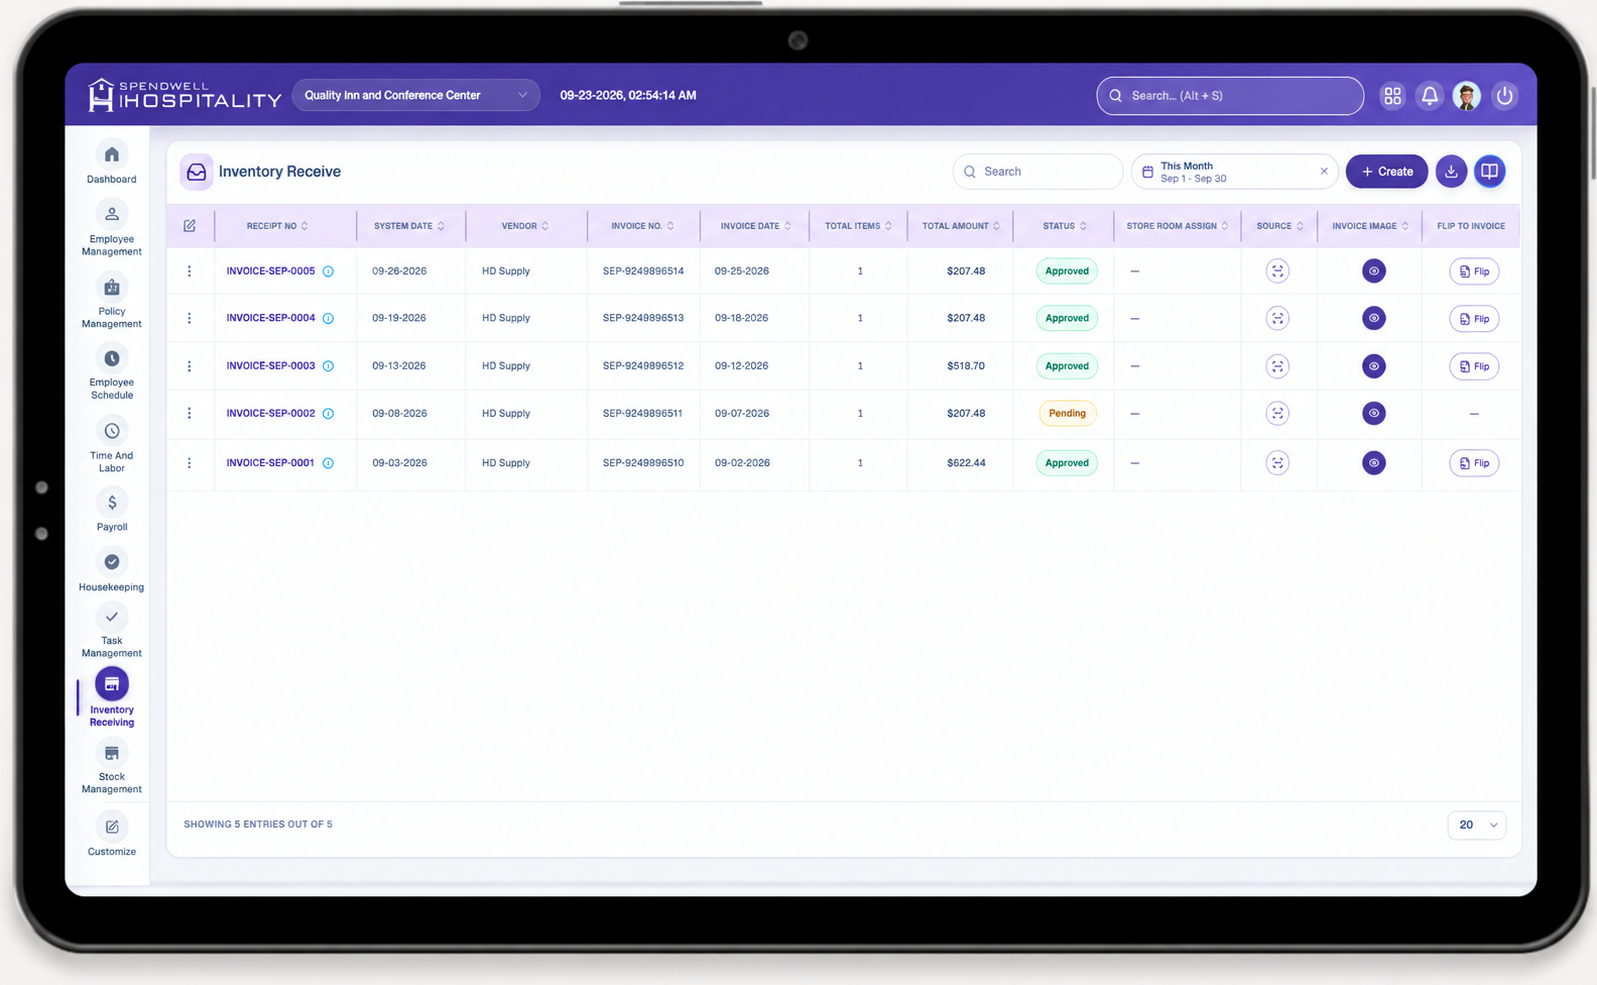](https://docs.spendwelltechsystem.com/uploads/images/gallery/2026-09/2x7image.png)
The list allows users to review the current status of each inventory receipt and identify whether the receipt is pending, approved, or assigned.
The screen provides the following controls and information:
- **Receipt / Invoice Number** — Identifies the inventory receipt or vendor invoice associated with the received inventory.
- **Vendor** — Displays the vendor from whom the inventory was received.
- **Receipt Date** — Displays the date on which the inventory receipt was created or received.
- **Total Items** — Displays the number of inventory items included in the receipt.
- **Total Amount** — Displays the total purchase amount associated with the receipt.
- **Status** — Displays the current stage of the inventory receiving process.
- **Create** — Opens the inventory receive creation process.
### Inventory Receive Status
The Inventory Receive workflow uses the following statuses:
| Status | Description |
|---|
| **Pending** | The receipt has been created but is waiting for approval. Stock is not yet updated as approved inventory. |
| **Approved** | The receipt has been approved and the received stock has been added to inventory. |
| **Assigned** | The approved inventory has been assigned to a Store Room. |
---
## Create Inventory Receive
Click **Create** from the Inventory Receive list to start the receiving process.
The system provides two methods for creating an inventory receipt:
- **Fetch from Invoice**
- **Manual Entry**
These methods are described separately because the information is entered differently.
---
### Fetch from Invoice
[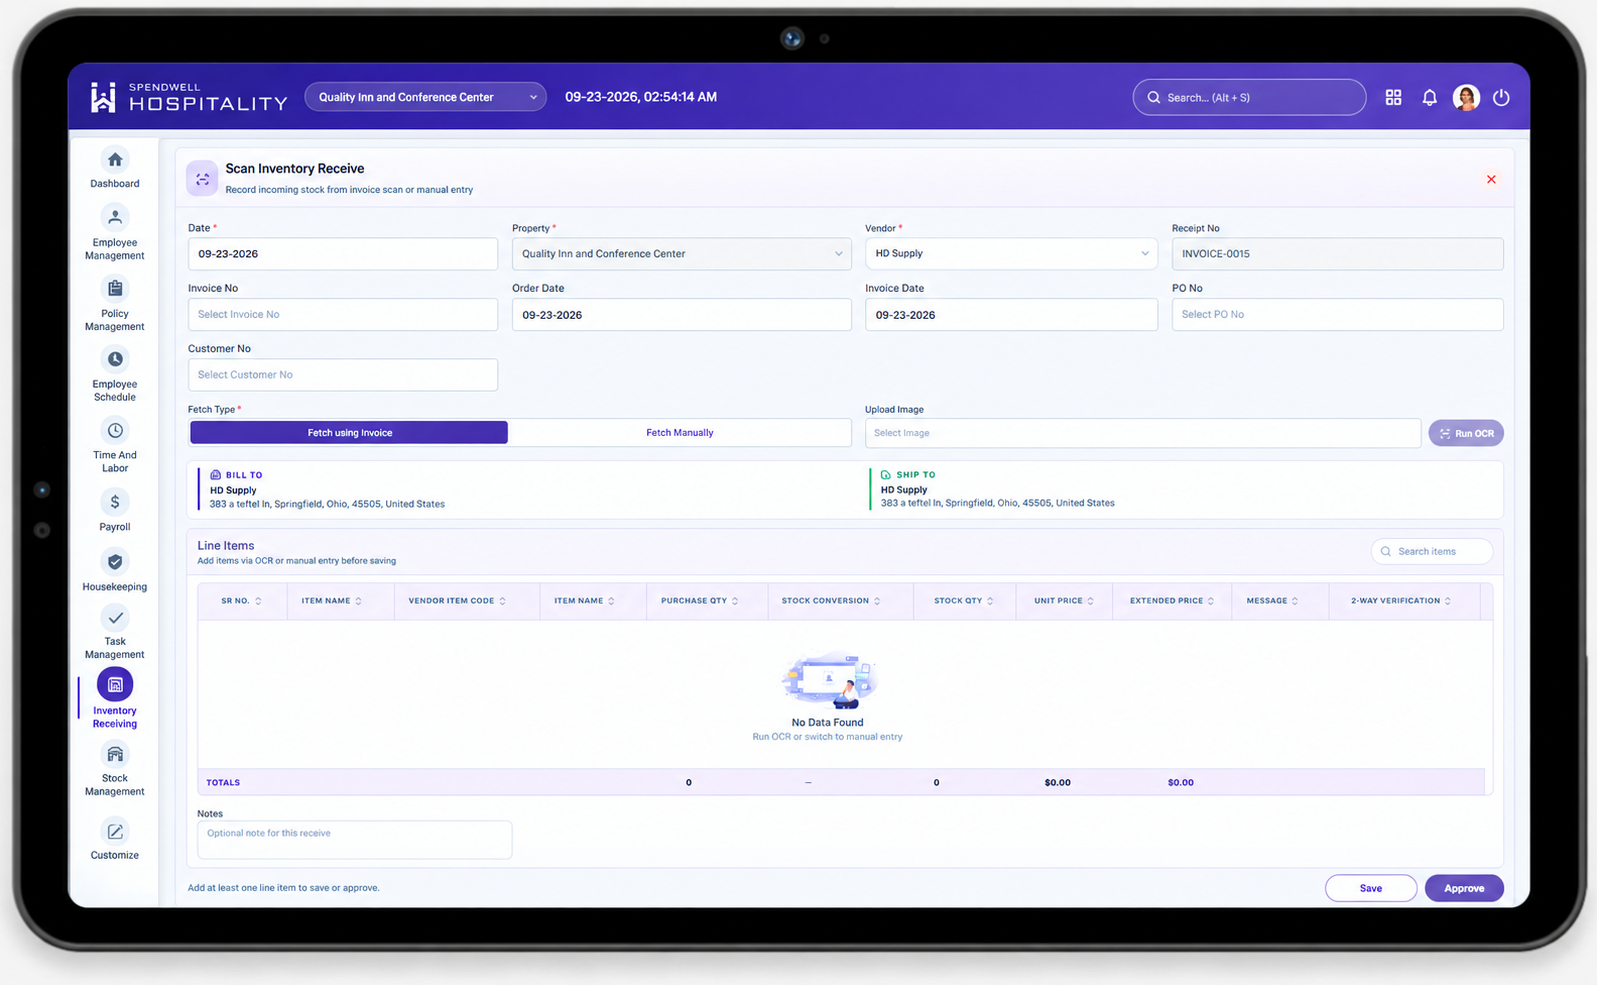](https://docs.spendwelltechsystem.com/uploads/images/gallery/2026-09/1oSimage.png)
The **Fetch from Invoice** option allows users to upload a vendor invoice instead of manually entering every inventory item.
The system reads the uploaded invoice and extracts the available purchase information. The extracted vendor item information is then matched with the inventory item Vendor mapping configured in System.
### Key Fields — Fetch from Invoice
- **Vendor** — Identifies the vendor associated with the invoice. The selected vendor is used to determine the vendor-specific item information and mapping.
- **Invoice** — Used to upload the vendor invoice. The invoice contains the purchase information that the system uses to extract inventory details.
- **Invoice Number** — Identifies the vendor invoice. This value is used to associate the received inventory with the corresponding vendor invoice.
- **Invoice Date** — Represents the date shown on the vendor invoice and helps identify when the purchase was made.
- **Item** — Displays the inventory item identified from the uploaded invoice after the system processes the invoice information.
- **Vendor Item ID / Vendor Item Name** — Represents the item identifier or item name provided by the vendor. The system uses the vendor item information to identify the corresponding SpendWell inventory item.
- **Purchase Quantity** — Represents the quantity purchased from the vendor using the item's configured **Purchase Unit**.
- **Purchase Unit** — Represents the unit in which the vendor supplied the item, such as **Box, Case, Pack,** or **Each**.
- **Stock Quantity** — Represents the quantity that will be maintained in inventory after applying the configured stock conversion.
- **Stock Unit** — Represents the unit in which the item is tracked in inventory.
- **Stock Conversion** — Defines the relationship between the purchase unit and stock unit.
For example:
**1 Box = 80 Pieces**
If the invoice contains:
**Purchase Quantity = 5 Boxes**
the system calculates:
**5 × 80 = 400 Pieces**
Therefore:
**Stock Quantity = 400 Pieces**
- **Unit Price** — Represents the purchase price of one purchase unit according to the vendor invoice.
- **Total Amount** — Represents the total purchase value for the item based on the purchase quantity and unit price.
### Invoice Item Mapping
When an invoice is uploaded, the system uses the vendor item information to identify the corresponding SpendWell inventory item.
The vendor item must be mapped through **Vendor Item Assignment**.
If the system cannot identify or map the item, the corresponding information is highlighted as an error and the receipt should be corrected before it can proceed.
Common validation errors include:
- **Vendor Item Mapping Not Found** — The vendor item has not been mapped to a SpendWell inventory item.
- **Item Not Found** — The extracted item cannot be matched to an existing inventory item.
- **Quantity Missing** — The purchase quantity could not be identified from the invoice.
- **Unit Price Missing** — The purchase unit price could not be identified from the invoice.
Users should resolve all required validation errors before completing the receipt.
---
### Manual Entry
[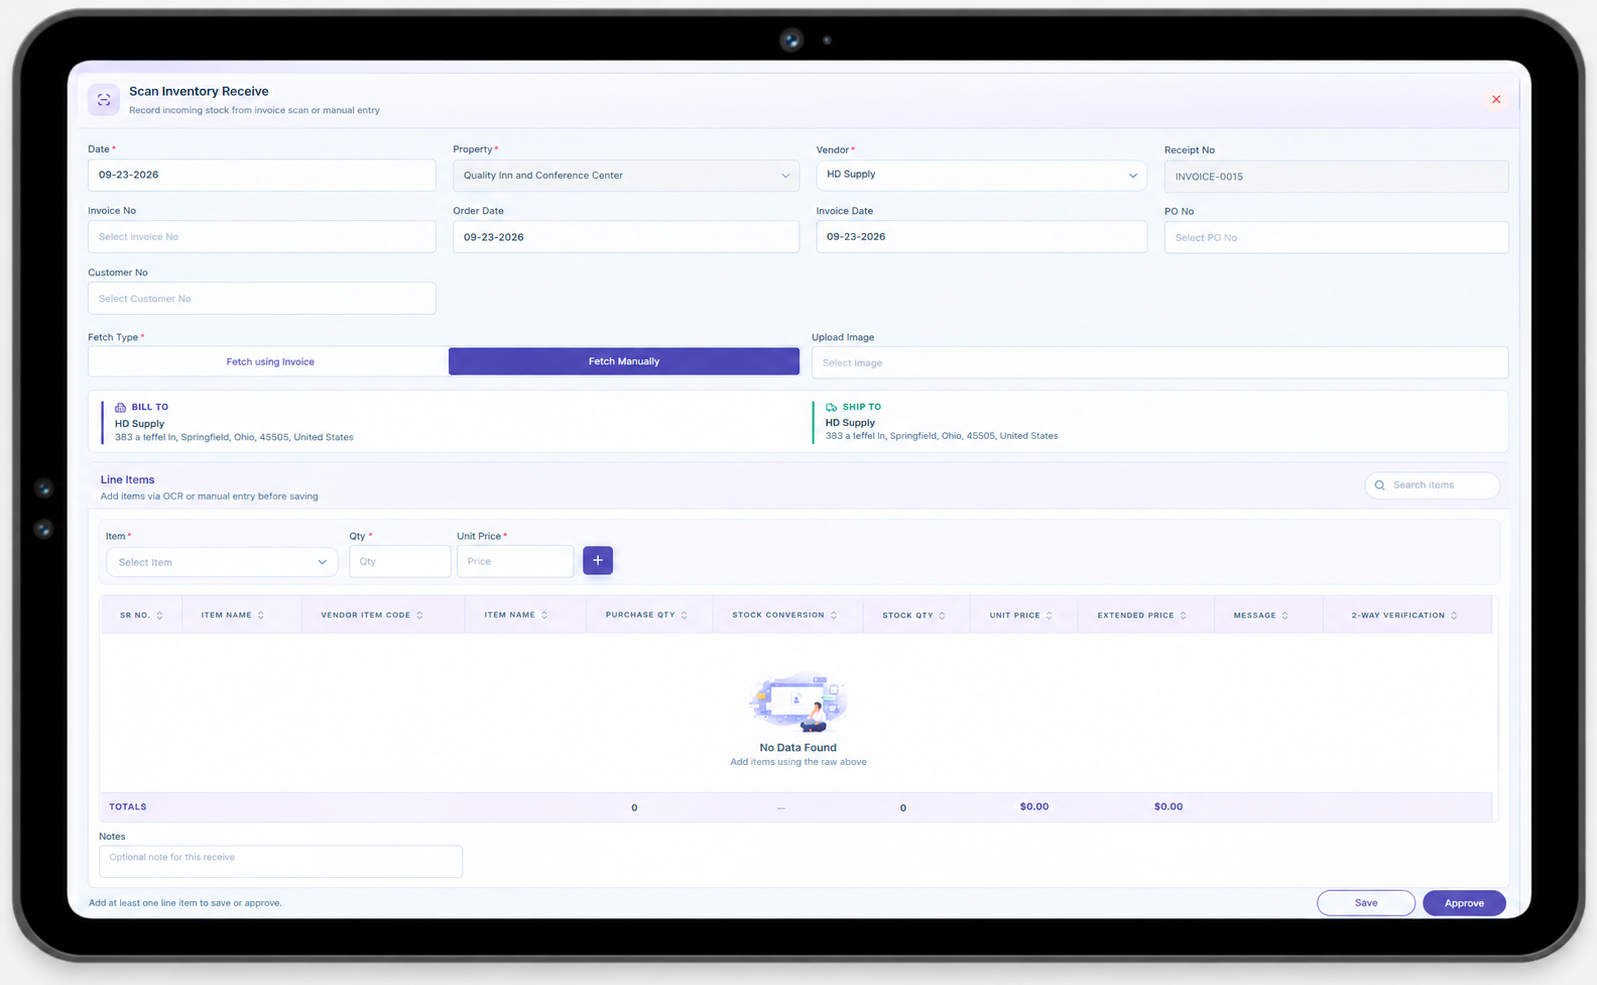](https://docs.spendwelltechsystem.com/uploads/images/gallery/2026-09/Yajimage.png)
**Create Inventory Receive**
Create an inventory receipt by entering the receipt details, selecting the property and vendor, and providing the invoice and purchase information.
[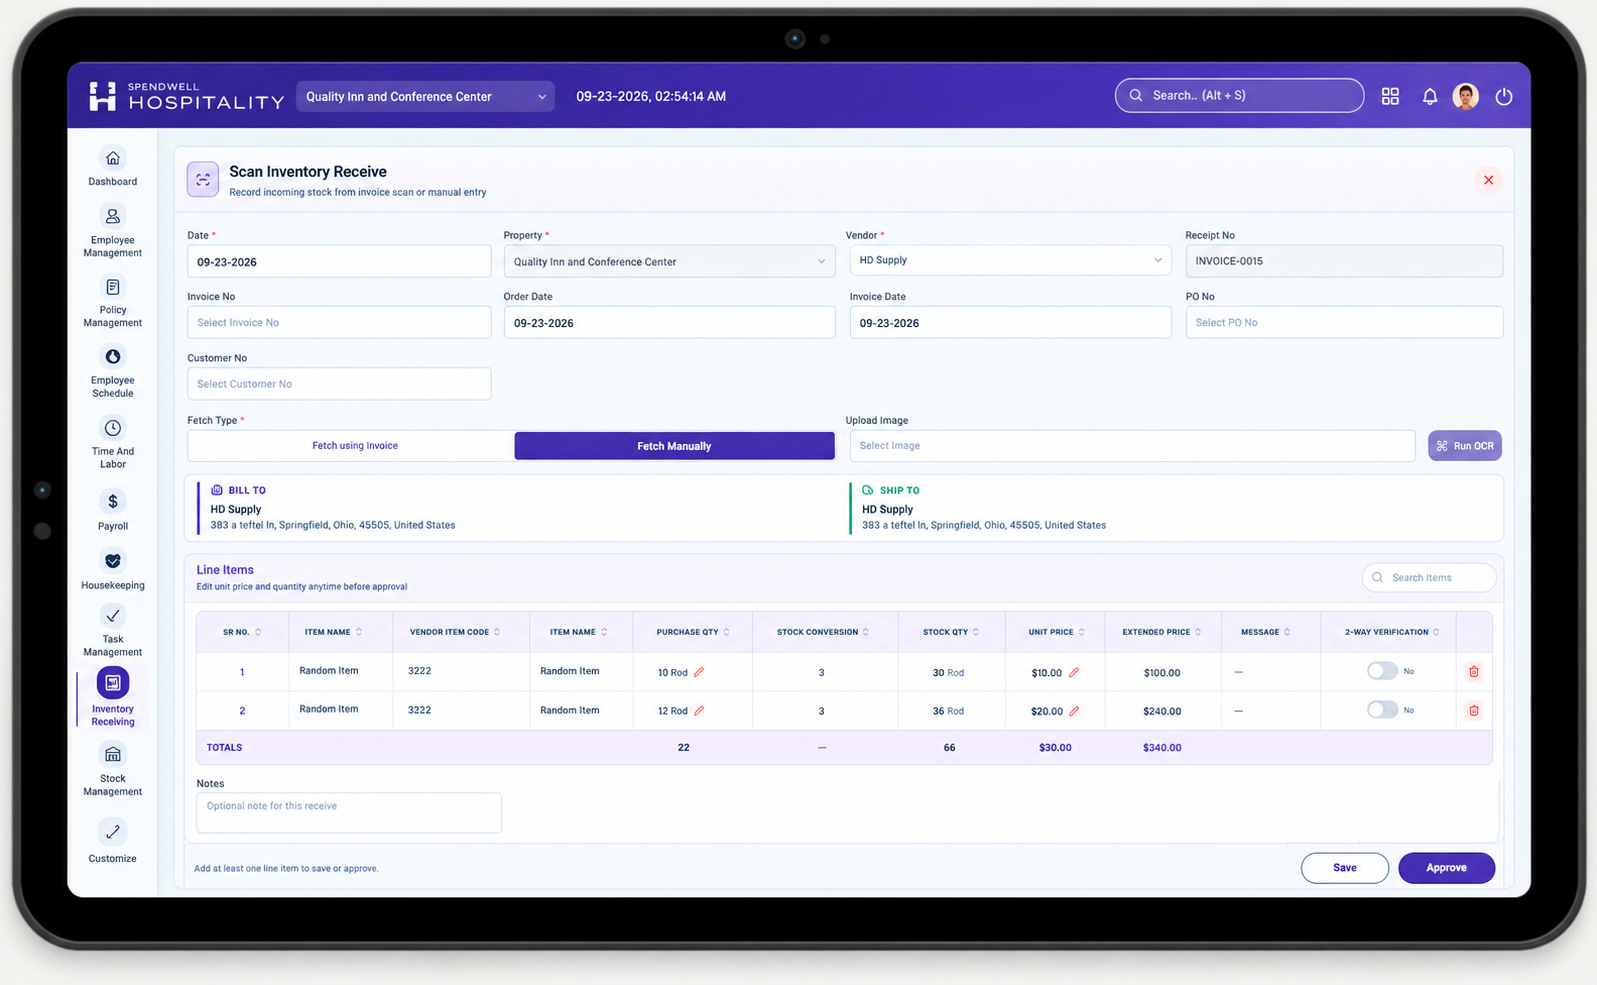](https://docs.spendwelltechsystem.com/uploads/images/gallery/2026-09/dyIimage.png)
**Add Inventory Line Items**
Add inventory items to the receipt by selecting the item and entering the purchase quantity and unit price.
The **Manual Entry** option allows users to create an inventory receipt without uploading an invoice.
This method is useful when the vendor invoice is unavailable, the invoice cannot be processed automatically, or the user needs to enter the received inventory directly.
### Key Fields — Manual Entry
- **Vendor** — Identifies the vendor from whom the inventory was received.
- **Invoice Number** — Identifies the vendor invoice associated with the inventory receipt, when applicable.
- **Invoice Date** — Represents the date of the vendor invoice.
- **Item** — Used to select the inventory item being received. The item is selected from the items configured for the property.
- **Purchase Quantity** — Defines how many purchase units were received from the vendor.
- **Purchase Unit** — Displays the unit in which the item is purchased.
- **Stock Quantity** — Displays the quantity that will be maintained in inventory after applying the stock conversion.
- **Stock Unit** — Displays the inventory unit used to track the item.
- **Stock Conversion** — Defines how the purchase quantity is converted into the stock quantity.
- **Unit Price** — Defines the purchase price for one purchase unit.
- **Total Amount** — Represents the total purchase value for the entered item.
- **Add Item / Add Row** — Allows the user to add the selected inventory item to the receipt and enter additional items.
### Manual Item Entry Example
If an item is configured as:
- **Purchase Unit:** Box
- **Stock Unit:** Piece
- **Stock Conversion:** 80
and the user receives:
**Purchase Quantity = 3 Boxes**
the system calculates:
**3 × 80 = 240 Pieces**
The receipt therefore contains:
**Purchase Quantity:** 3 Boxes
**Stock Quantity:** 240 Pieces
---
## Create and Submit Inventory Receipt
After entering the required inventory information using either **Fetch from Invoice** or **Manual Entry**, the user completes the receipt creation process.
### Steps
1. Navigate to **Inventory Receive** from the Inventory Management section.
2. Click **Create**.
3. Select the required receiving method:
- **Fetch from Invoice**, or
- **Manual Entry**.
4. Select the **Vendor**.
5. Enter or verify the invoice information.
6. Add the inventory items.
7. Verify the **Purchase Quantity**, **Purchase Unit**, **Stock Quantity**, **Stock Unit**, **Stock Conversion**, and **Unit Price**.
8. If using **Fetch from Invoice**, review all extracted items and resolve any mapping or validation errors.
9. If using **Manual Entry**, select the required item and enter the purchase quantity and unit price.
10. Add additional items if required.
11. Review the complete inventory receipt.
12. Save the receipt.
13. The newly created receipt is placed in **Pending** status.
---
# Approve Inventory Receive
[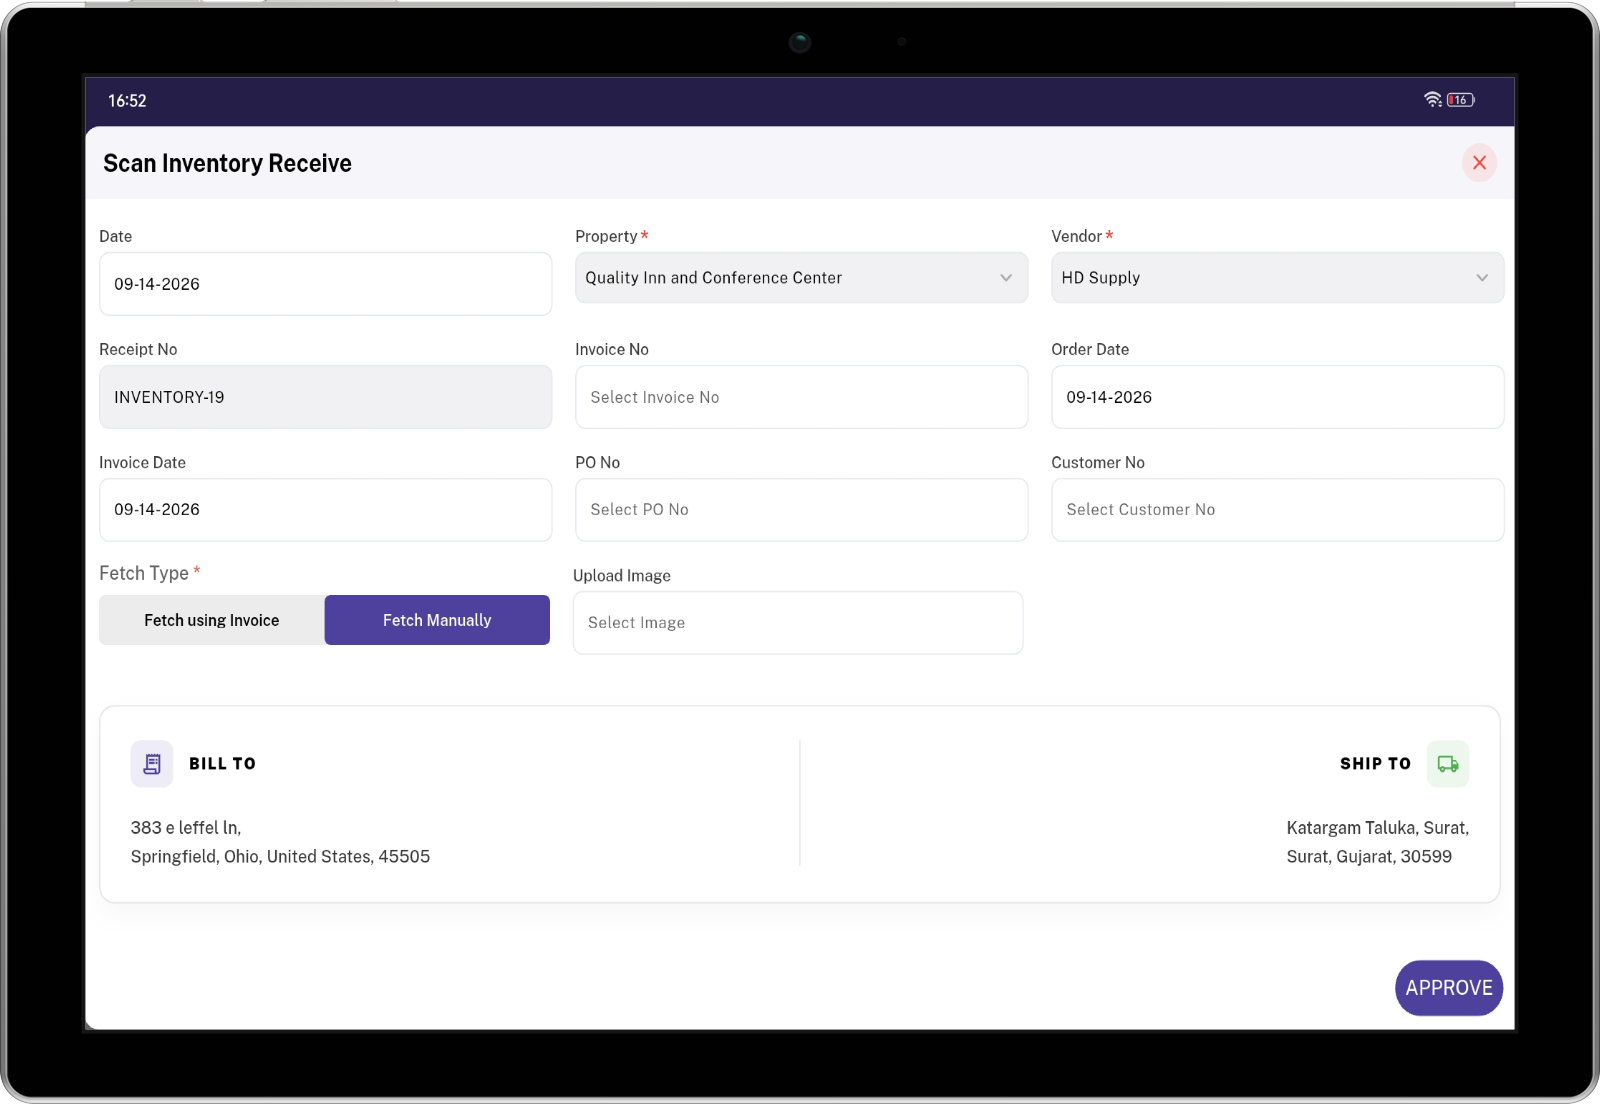](https://docs.spendwelltechsystem.com/uploads/images/gallery/2026-09/u16inventory-manual-create.png)
The **Approve** process confirms that the inventory receipt has been reviewed and that the received inventory can be added to the property's inventory stock.
### Pending Status
When a receipt is created, it initially has the status:
**Pending**
At this stage:
- The receipt has been recorded.
- The received items can be reviewed.
- The receipt has not yet been approved.
- The approved inventory stock has not yet been updated.
### Approval Details
Before approving the receipt, the user should verify:
- Vendor
- Invoice information
- Inventory items
- Purchase quantity
- Purchase unit
- Stock quantity
- Stock unit
- Stock conversion
- Unit price
- Total amount
- Item mapping and validation information
### Approve Steps
1. Open the **Inventory Receive** list.
2. Locate the receipt with **Pending** status.
3. Open the receipt.
4. Review the vendor and invoice information.
5. Review all inventory items and quantities.
6. Verify the purchase and stock unit conversion.
7. Verify the unit price and total amount.
8. Resolve any validation errors, if present.
9. Click **Approve**.
10. The receipt changes from **Pending** to **Approved**.
11. The approved received quantity is added to inventory stock.
---
# Assign Inventory
[ 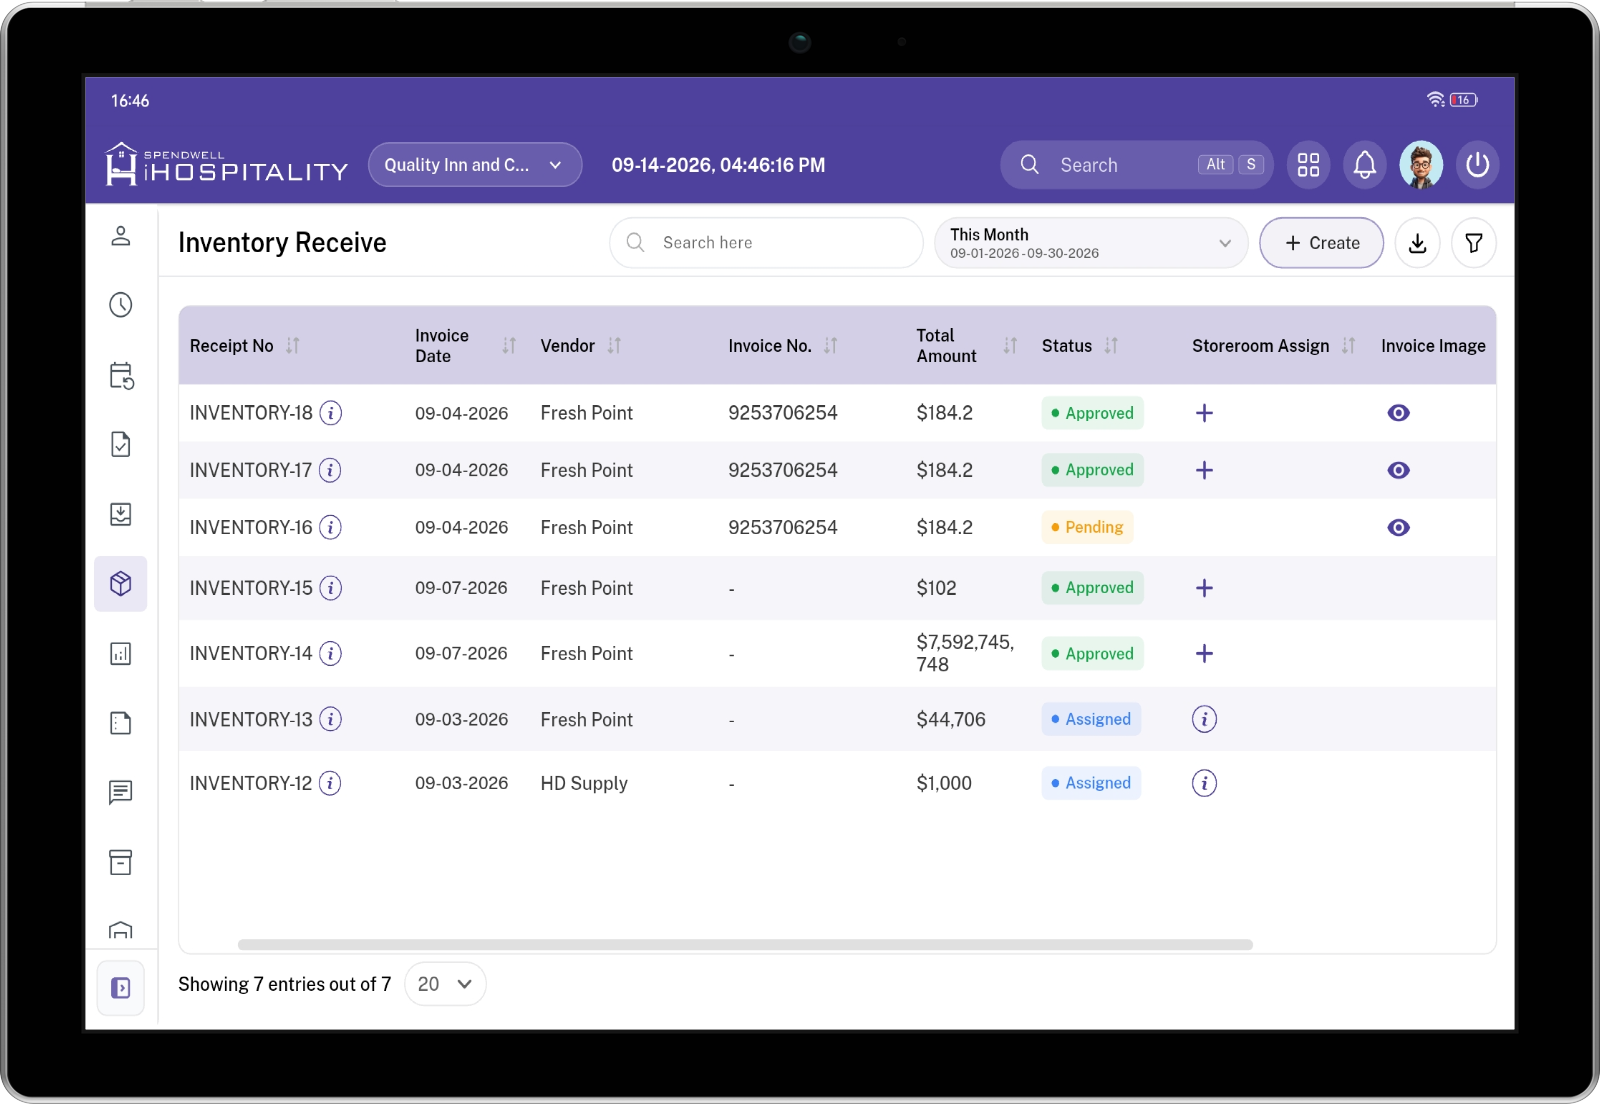 ](https://docs.spendwelltechsystem.com/uploads/images/gallery/2026-09/scaled-1680-/inventory-receive.png)
[ 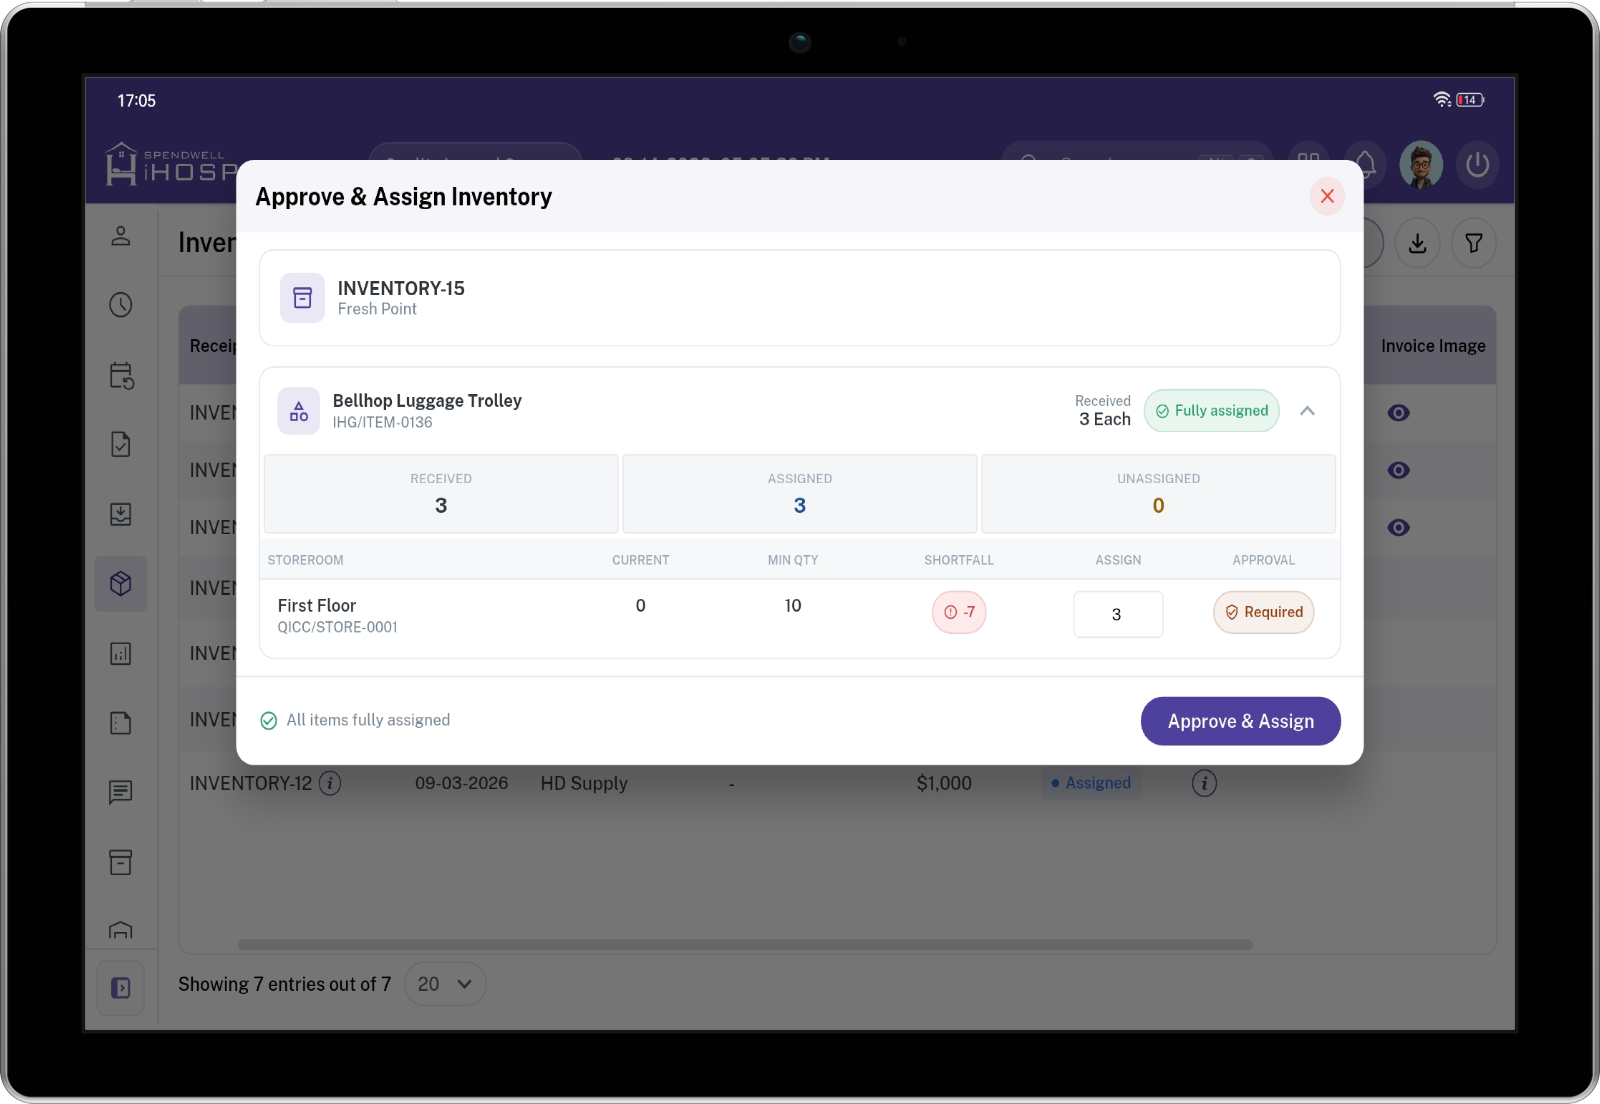 ](https://docs.spendwelltechsystem.com/uploads/images/gallery/2026-09/scaled-1680-/inventory-assign.png)
[ 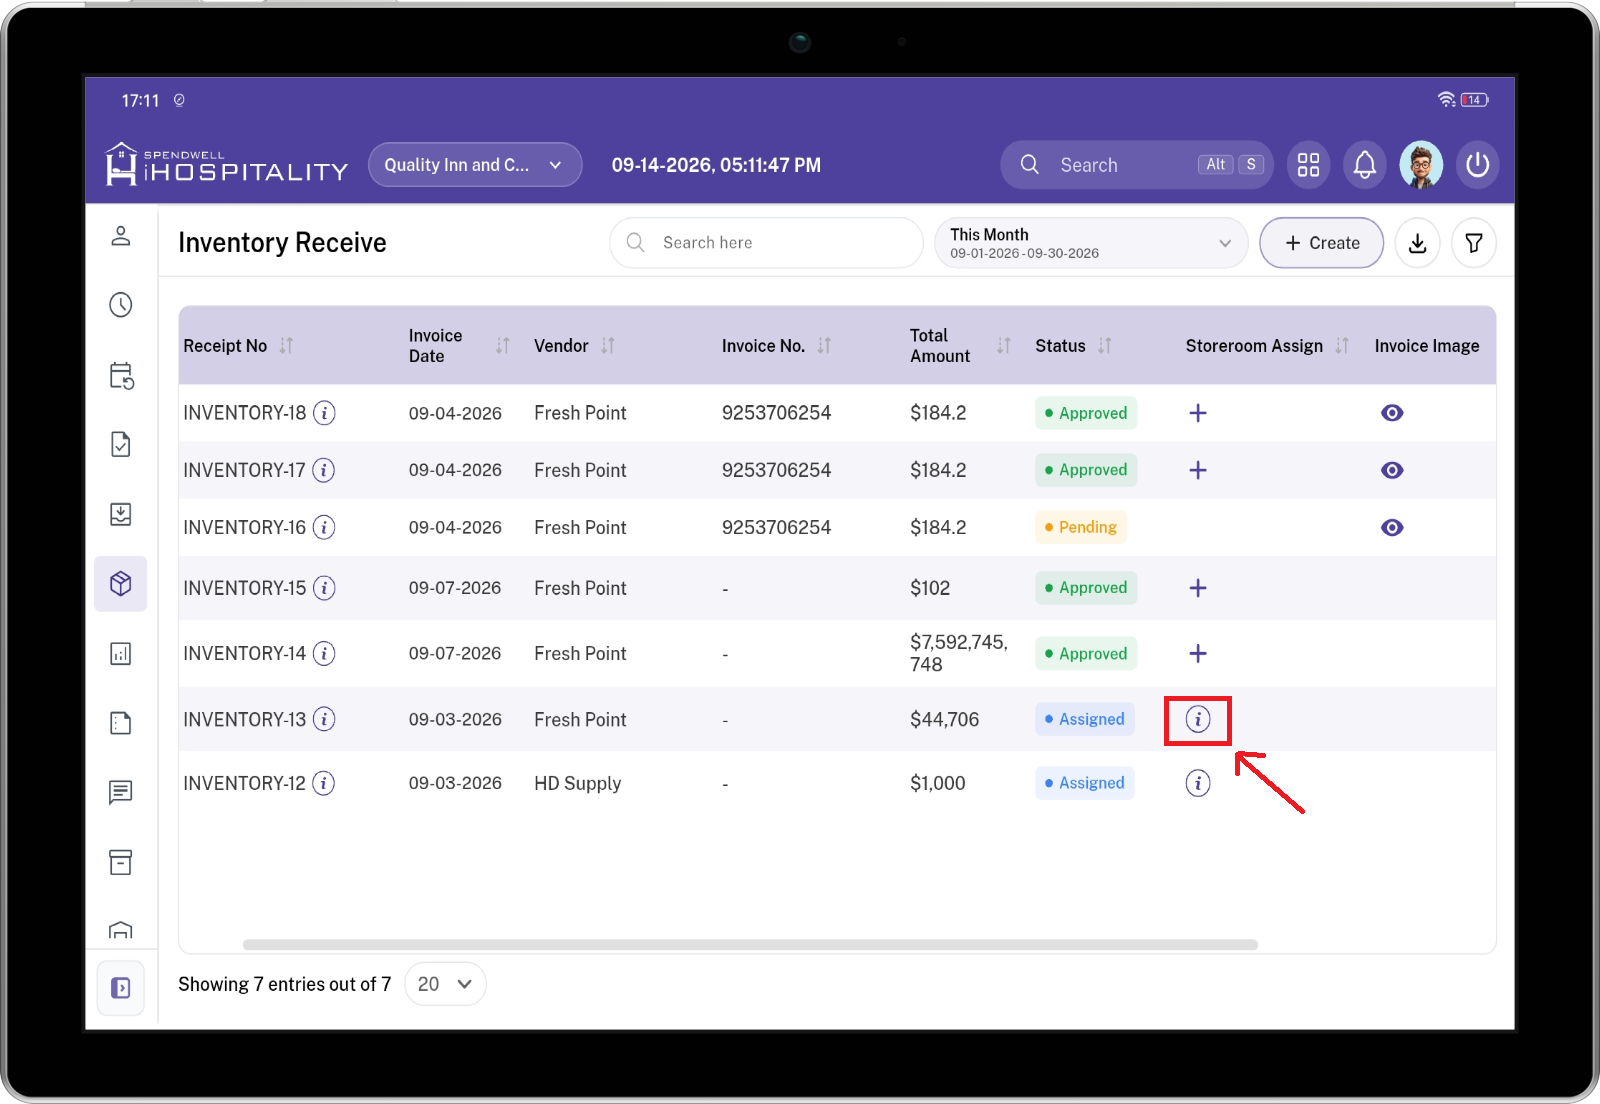 ](https://docs.spendwelltechsystem.com/uploads/images/gallery/2026-09/scaled-1680-/assign-detail-open.png)
[ 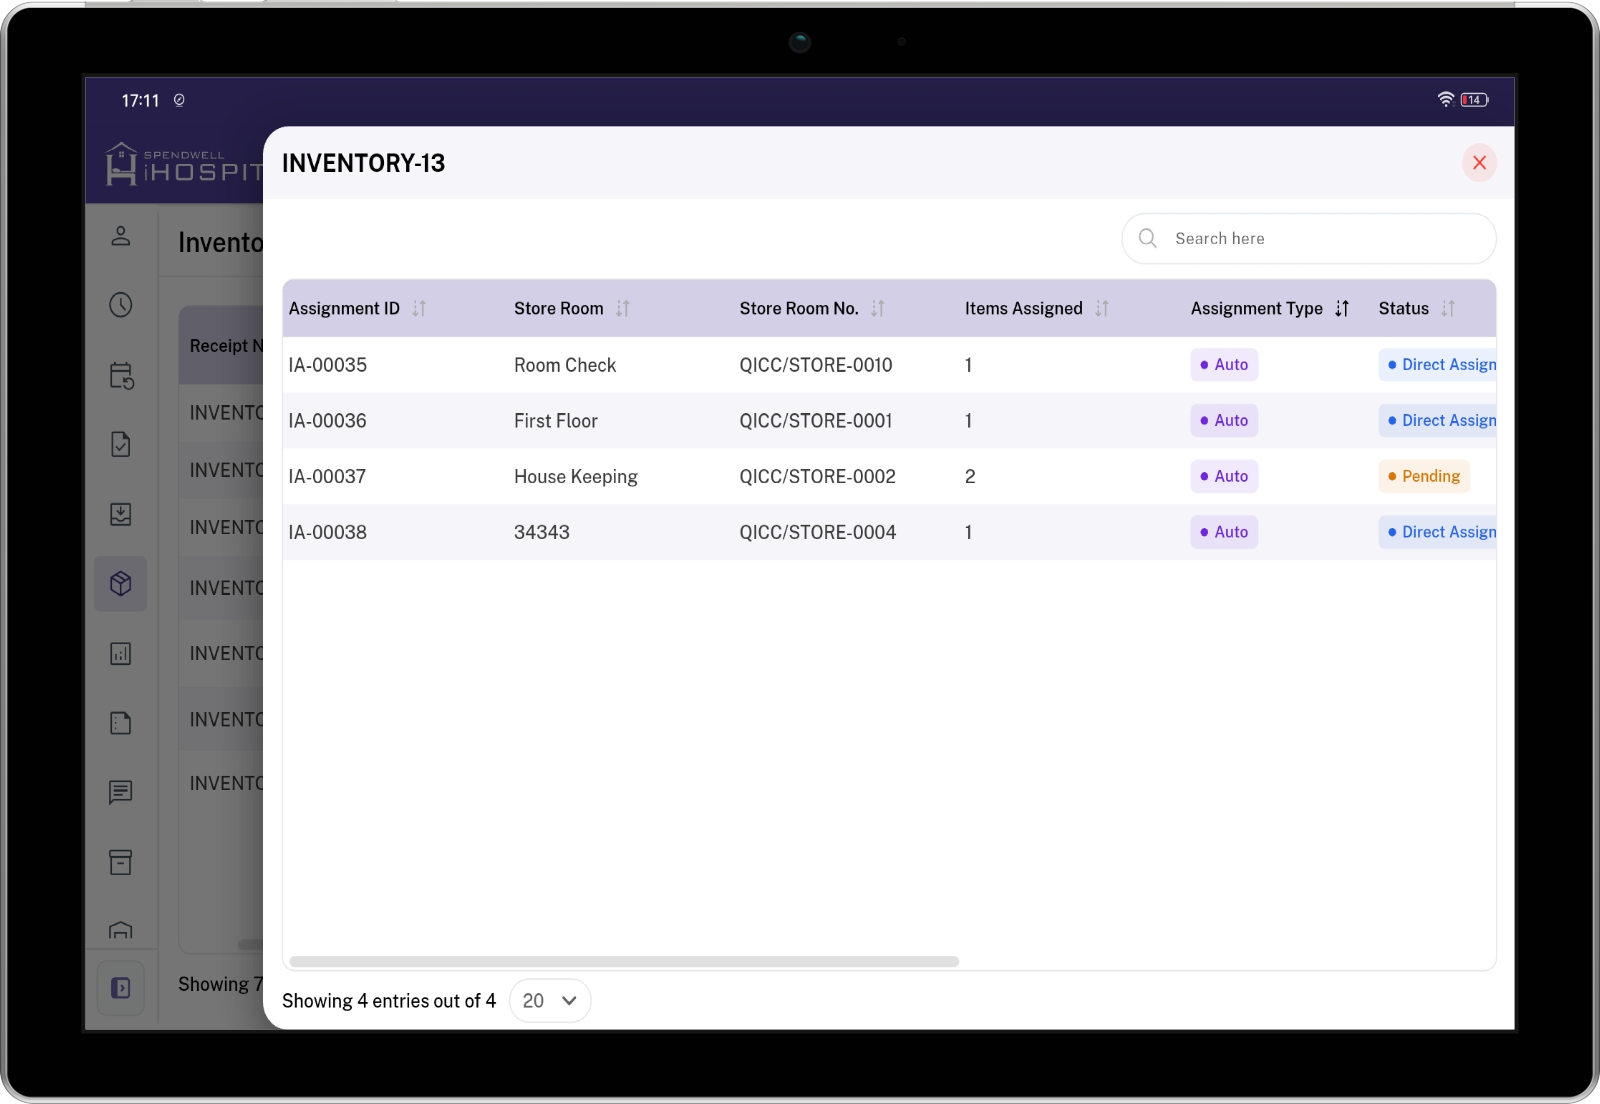 ](https://docs.spendwelltechsystem.com/uploads/images/gallery/2026-09/scaled-1680-/assign-details.png)
| Assignment Type | Description |
|---|
| **Auto** | The assignment is generated from the Inventory Receive → Assign process. |
| **Manual** | The assignment is created directly from the Storeroom Inventory Assign page. |
### Assignment Status
| Status | Description |
|---|
| **Pending** | The assignment has been created and is waiting for approval. The requested quantity is blocked and cannot be assigned to another request. |
| **Approved** | The assignment has been approved and the requested inventory has been assigned to the Store Room. |
| **Rejected** | The assignment has been rejected and the previously blocked quantity has been released back to available stock. |
| **Direct Assigned** | The Store Room does not require assignment approval, so the inventory is assigned immediately. |
---
## Storeroom Inventory Assign List
[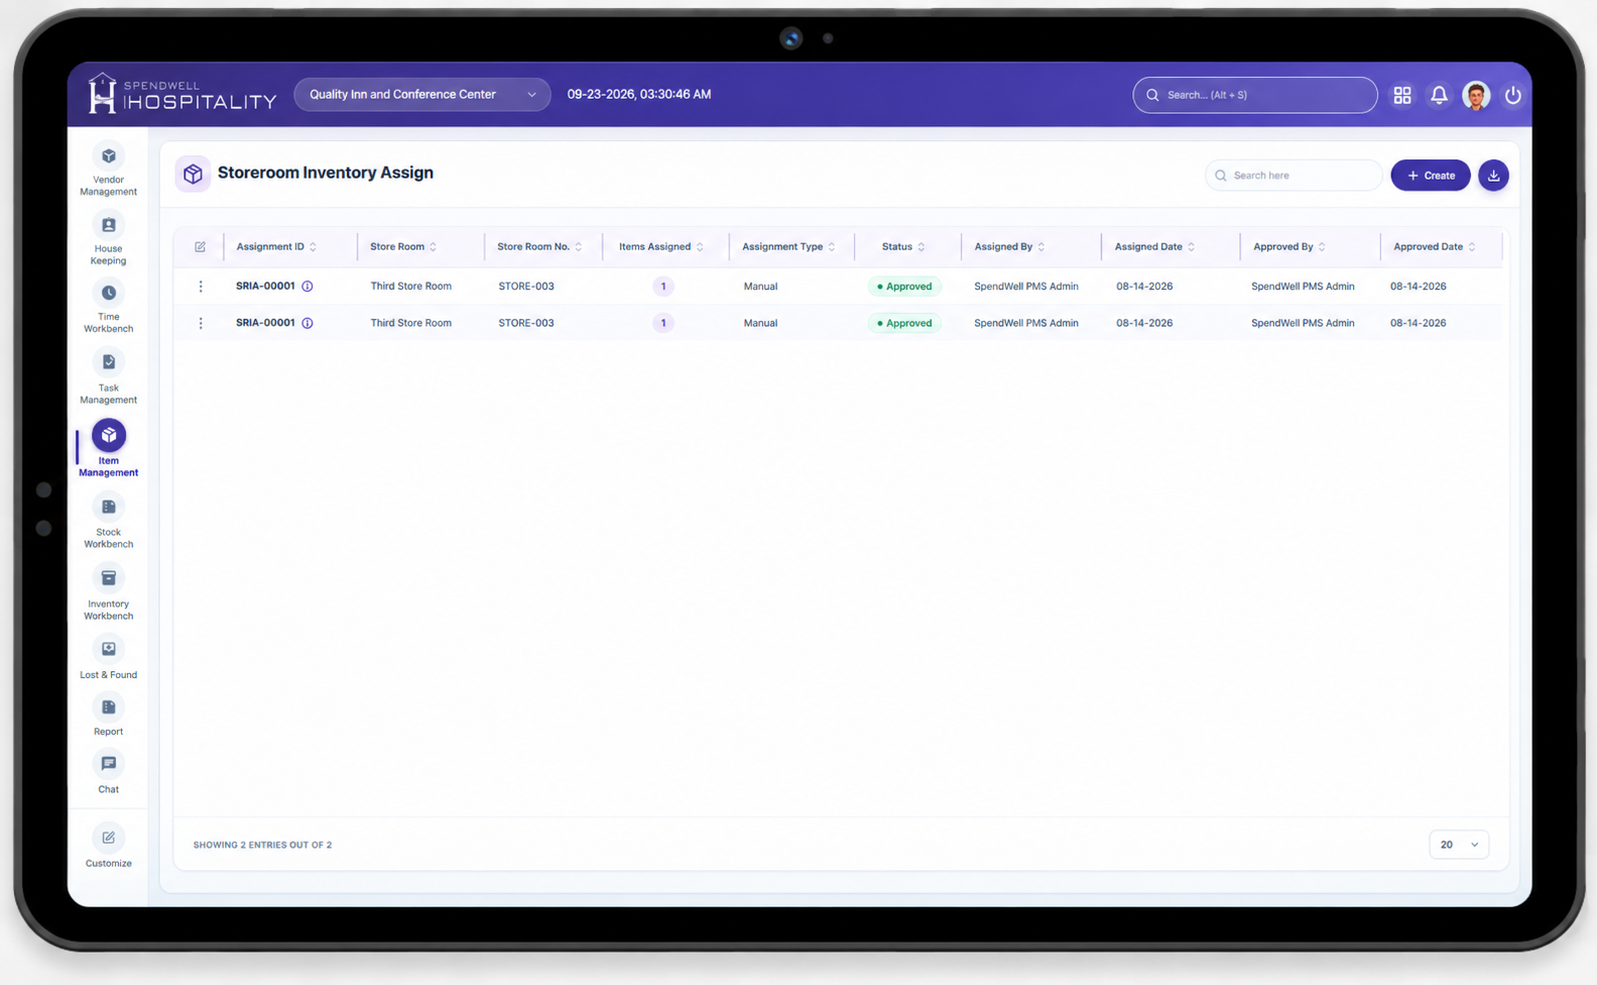](https://docs.spendwelltechsystem.com/uploads/images/gallery/2026-09/H9qimage.png)
The **Storeroom Inventory Assign** list provides a centralized view of inventory assignments created for the property's Store Rooms.
Users can review the Store Room, assignment date, number of items assigned, assignment type, and current assignment status.
The screen provides the following controls and information:
- **Assignment ID** — Identifies the unique inventory assignment record.
- **Assigned Date** — Displays the date on which the assignment was created.
- **Store Room** — Displays the Store Room to which the inventory is assigned.
- **Store Room No.** — Displays the unique Store Room number or code.
- **Items Assigned** — Displays the number of inventory items included in the assignment.
- **Assignment Type** — Displays whether the assignment was created through **Auto** or **Manual** assignment.
- **Status** — Displays the current status of the assignment.
- **Create** — Opens the manual Store Room inventory assignment process.
### Assignment Type
The **Assignment Type** identifies how the assignment was created.
#### Auto
An **Auto** assignment is generated from the **Inventory Receive → Assign** process.
After an Inventory Receive is approved, the user can use the **Assign** function to prepare the approved inventory for Store Room assignment.
The assignment is recorded as:
**Assignment Type = Auto**
#### Manual
A **Manual** assignment is created directly from the **Storeroom Inventory Assign** page.
The user selects the Store Room and enters the quantity to assign for the required inventory items.
The assignment is recorded as:
**Assignment Type = Manual**
---
## Create Storeroom Inventory Assign
[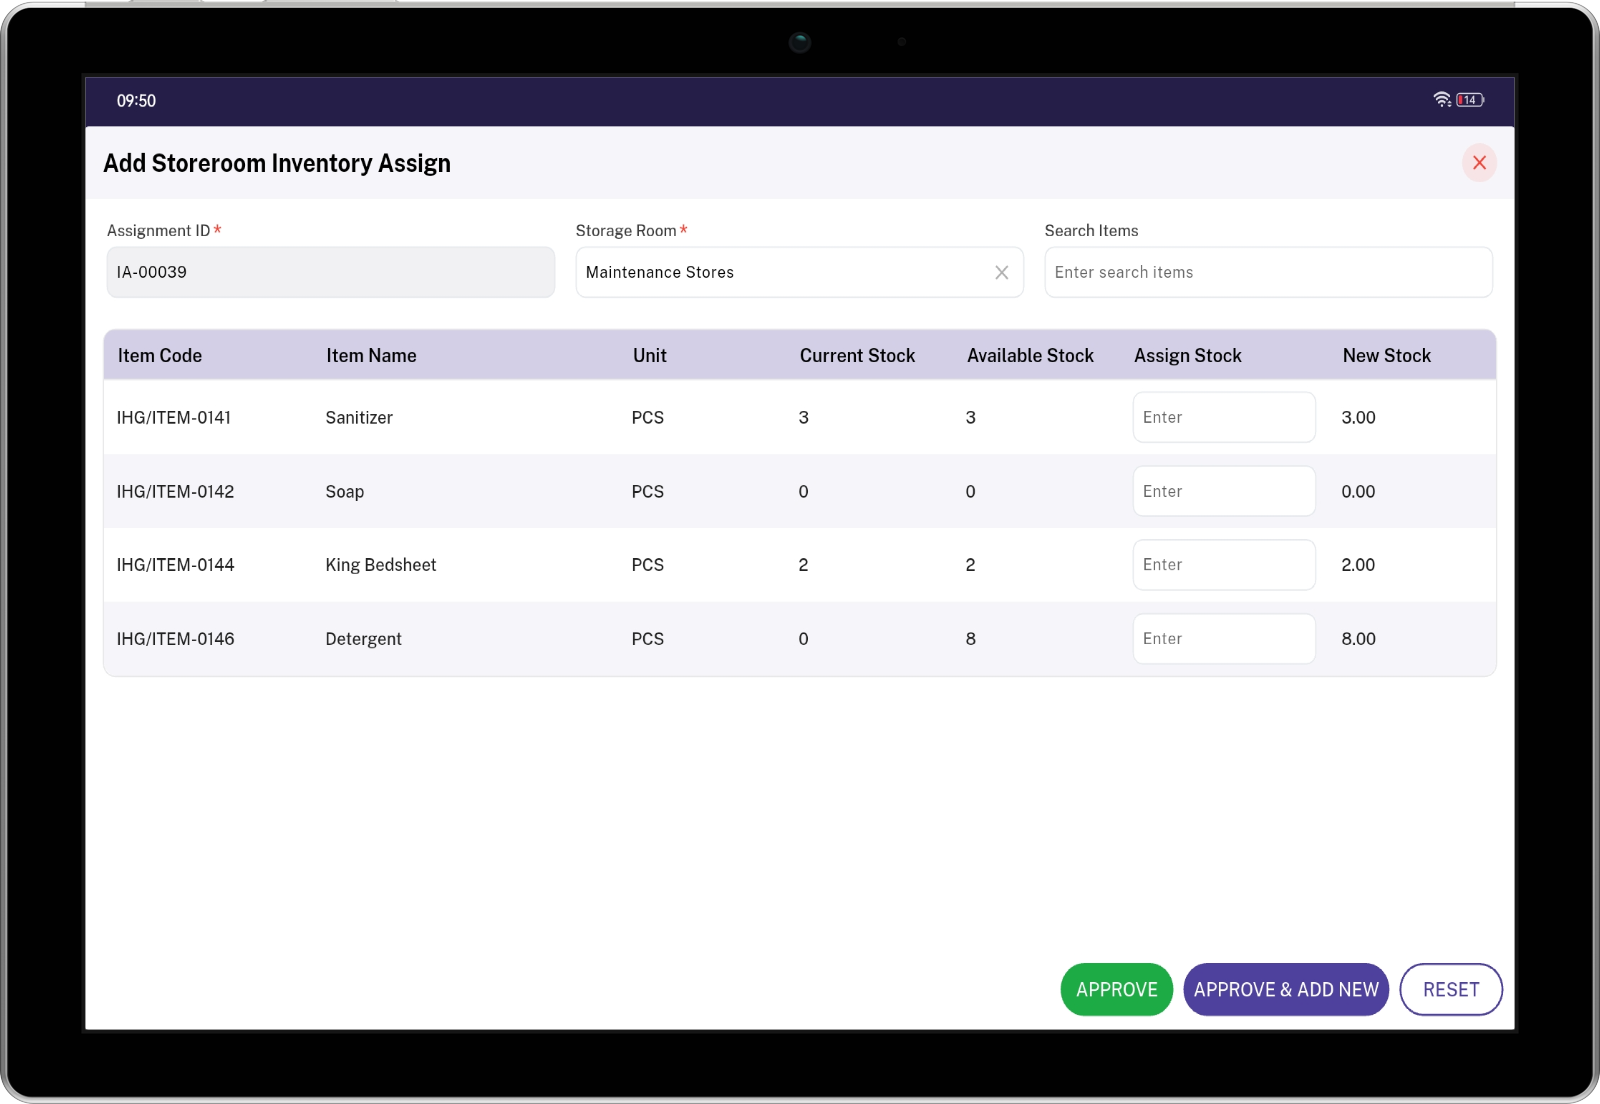](https://docs.spendwelltechsystem.com/uploads/images/gallery/2026-09/storeroominventoryassign-add.png)
Click **Create** from the **Storeroom Inventory Assign** list to create a manual inventory assignment.
The system first requires the user to select the **Storage Room** where the inventory will be assigned.
After the Store Room is selected, the system displays the inventory items and the stock information available for assignment.
### Key Fields
- **Assignment ID** — Displays the unique identifier generated for the inventory assignment.
- **Storage Room** — Used to select the Store Room where the inventory will be assigned.
- **Search Items** — Allows the user to search for a specific inventory item.
After selecting the Store Room, the system displays the inventory items available for assignment.
---
## Store Room Inventory Items
[](https://docs.spendwelltechsystem.com/uploads/images/gallery/2026-09/storeroominventoryassign-add.png)
The inventory table displays the stock information for the selected Store Room.
The table provides the following fields:
- **Item Code** — Identifies the inventory item using its configured unique item code.
- **Item Name** — Identifies the inventory item available for assignment to the Store Room.
- **Unit** — Specifies the stock unit used to maintain the inventory quantity.
- **Current Stock** — Displays the quantity currently assigned to the selected Store Room.
- **Available Stock** — Displays the approved inventory quantity currently available for Store Room assignment.
- **Assign Stock** — Specifies the quantity to be assigned to the selected Store Room.
- **New Stock** — Displays the resulting Store Room stock after the assignment is applied.
## Stock Information
The Store Room assignment screen displays three important stock quantities used to determine how much inventory can be assigned.
### Current Stock
**Current Stock** represents the quantity of the selected inventory item that is currently assigned to the selected Store Room.
For example:
**Current Stock = 3 PCS**
This means that the Store Room currently contains 3 PCS of the item.
### Available Stock
**Available Stock** represents the approved inventory received through the **Inventory Receive** process that is currently available for Store Room assignment.
For example:
**Available Stock = 8 PCS**
This means 8 PCS are currently available to be assigned.
Available Stock represents inventory that has already passed the Inventory Receive approval process and is available for Store Room assignment.
### Assign Stock
**Assign Stock** represents the quantity that the user wants to assign to the selected Store Room.
For example:
**Assign Stock = 5 PCS**
The system validates the requested quantity against the available quantity that can be assigned.
The user cannot assign more inventory than the available stock.
### New Stock
**New Stock** represents the Store Room stock after the requested assignment is completed.
The system calculates New Stock using:
**New Stock = Current Stock + Assign Stock**
For example:
**Current Stock = 3 PCS**
**Assign Stock = 5 PCS**
Therefore:
**New Stock = 3 + 5 = 8 PCS**
After the assignment is completed, the Store Room stock becomes **8 PCS**.
---
## Create Manual Assignment
[](https://docs.spendwelltechsystem.com/uploads/images/gallery/2026-09/storeroominventoryassign-add.png)
The Manual Assignment process allows a user to assign approved inventory directly to a Store Room.
### Steps
1. Navigate to **Inventory Management**.
2. Open **Storeroom Inventory Assign**.
3. Click **Create**.
4. Select the required **Storage Room**.
5. Review the inventory items displayed for the selected Store Room.
6. Review the **Current Stock** for each item.
7. Review the **Available Stock**.
8. Enter the required quantity in **Assign Stock**.
9. Verify the calculated **New Stock**.
10. Verify that the requested quantity does not exceed the available stock.
11. Complete the assignment.
12. The system determines whether the selected Store Room requires assignment approval.
13. If approval is required, the assignment is created with **Pending** status.
14. If approval is not required, the assignment is completed as **Direct Assigned**.
---
# Auto Assignment
[  ](https://docs.spendwelltechsystem.com/uploads/images/gallery/2026-09/scaled-1680-/inventory-receive.png)
[  ](https://docs.spendwelltechsystem.com/uploads/images/gallery/2026-09/scaled-1680-/inventory-assign.png)
| Stock Type | Quantity |
|---|
| Total Available Before Assignment | 10 PCS |
| Pending / Blocked Quantity | 6 PCS |
| Available for Other Assignments | 4 PCS |
The 6 PCS remain reserved for the pending assignment.
Another assignment cannot use those 6 PCS while the request is pending.
---
# Approve Assignment
[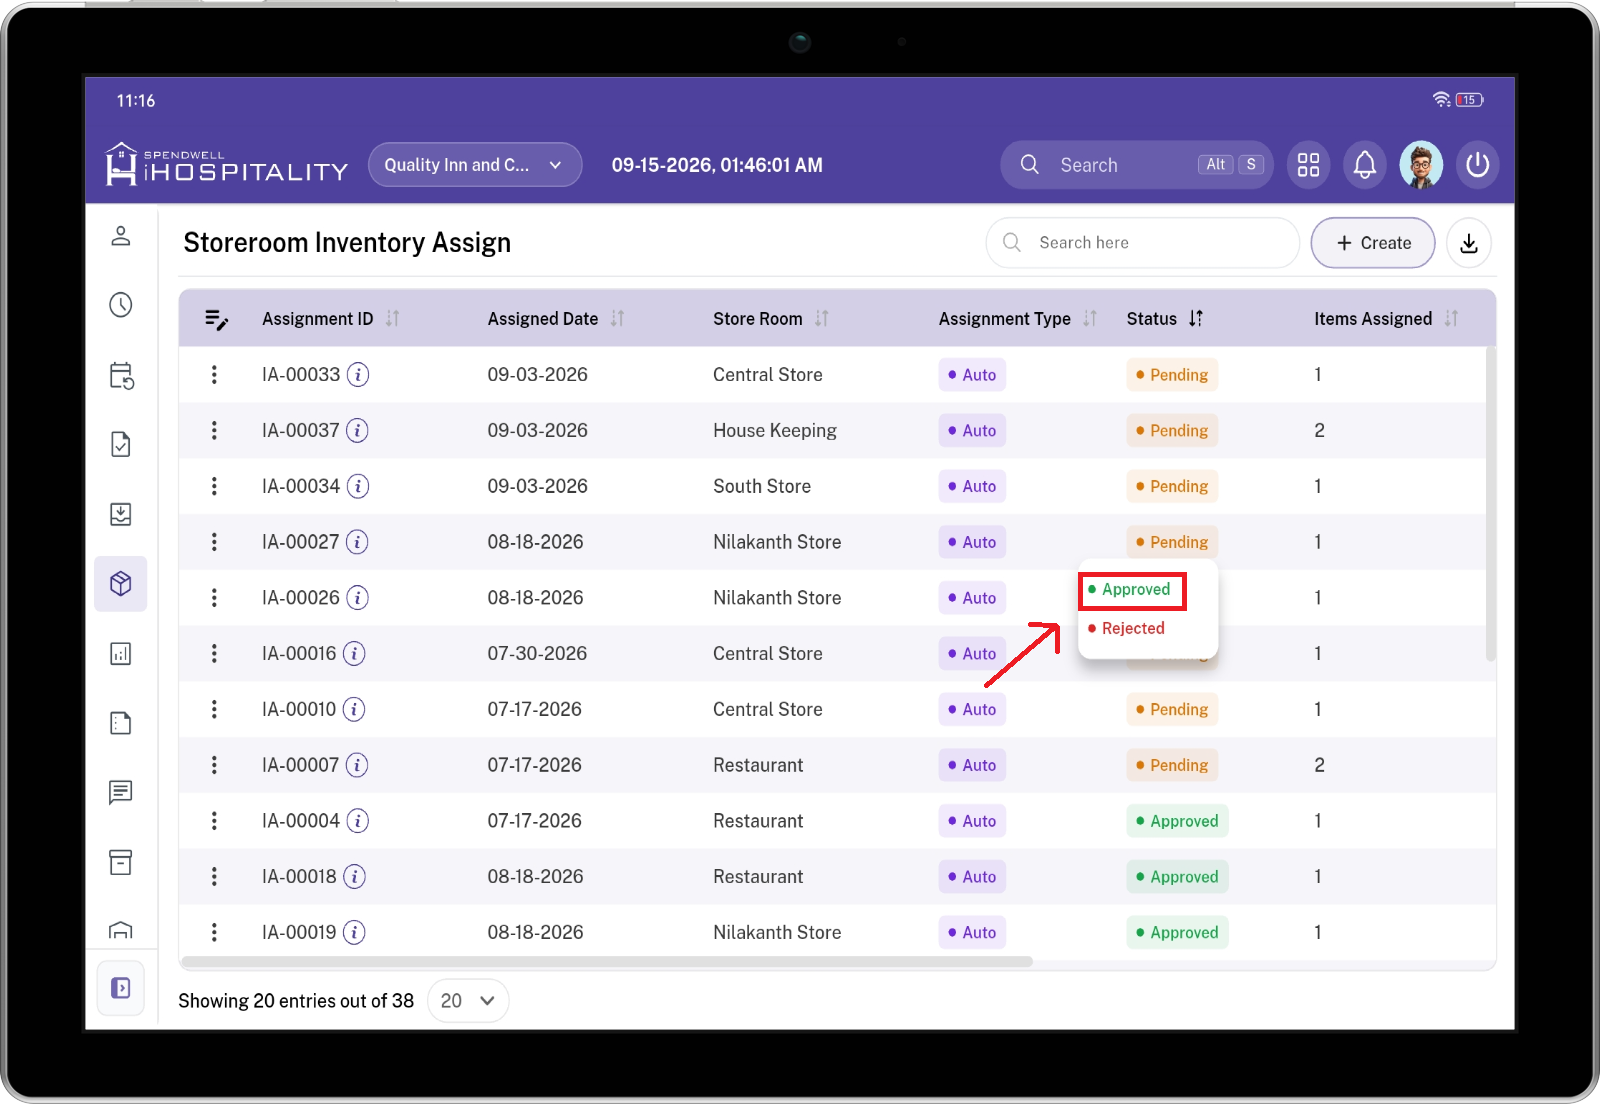](https://docs.spendwelltechsystem.com/uploads/images/gallery/2026-09/storeroominventoryassign-approved.png)
The **Approve** action completes a pending Store Room inventory assignment.
When the assignment is approved:
**Pending → Approved**
The blocked quantity is finalized as Store Room inventory.
### Approve Steps
1. Open **Storeroom Inventory Assign**.
2. Locate the assignment with **Pending** status.
3. Open the assignment.
4. Review the Store Room.
5. Review the inventory items.
6. Verify the assigned quantities.
7. Verify the available stock.
8. Review the resulting Store Room stock.
9. Click **Approve**.
10. The assignment status changes to **Approved**.
11. The blocked quantity is finalized as assigned inventory.
12. The Store Room stock is updated.
### Approval Example
Before approval:
**Current Stock = 3 PCS**
**Assign Stock = 6 PCS**
**Pending Blocked Stock = 6 PCS**
After approval:
**New Stock = 3 + 6 = 9 PCS**
The 6 PCS are now officially assigned to the Store Room.
---
# Reject Assignment
[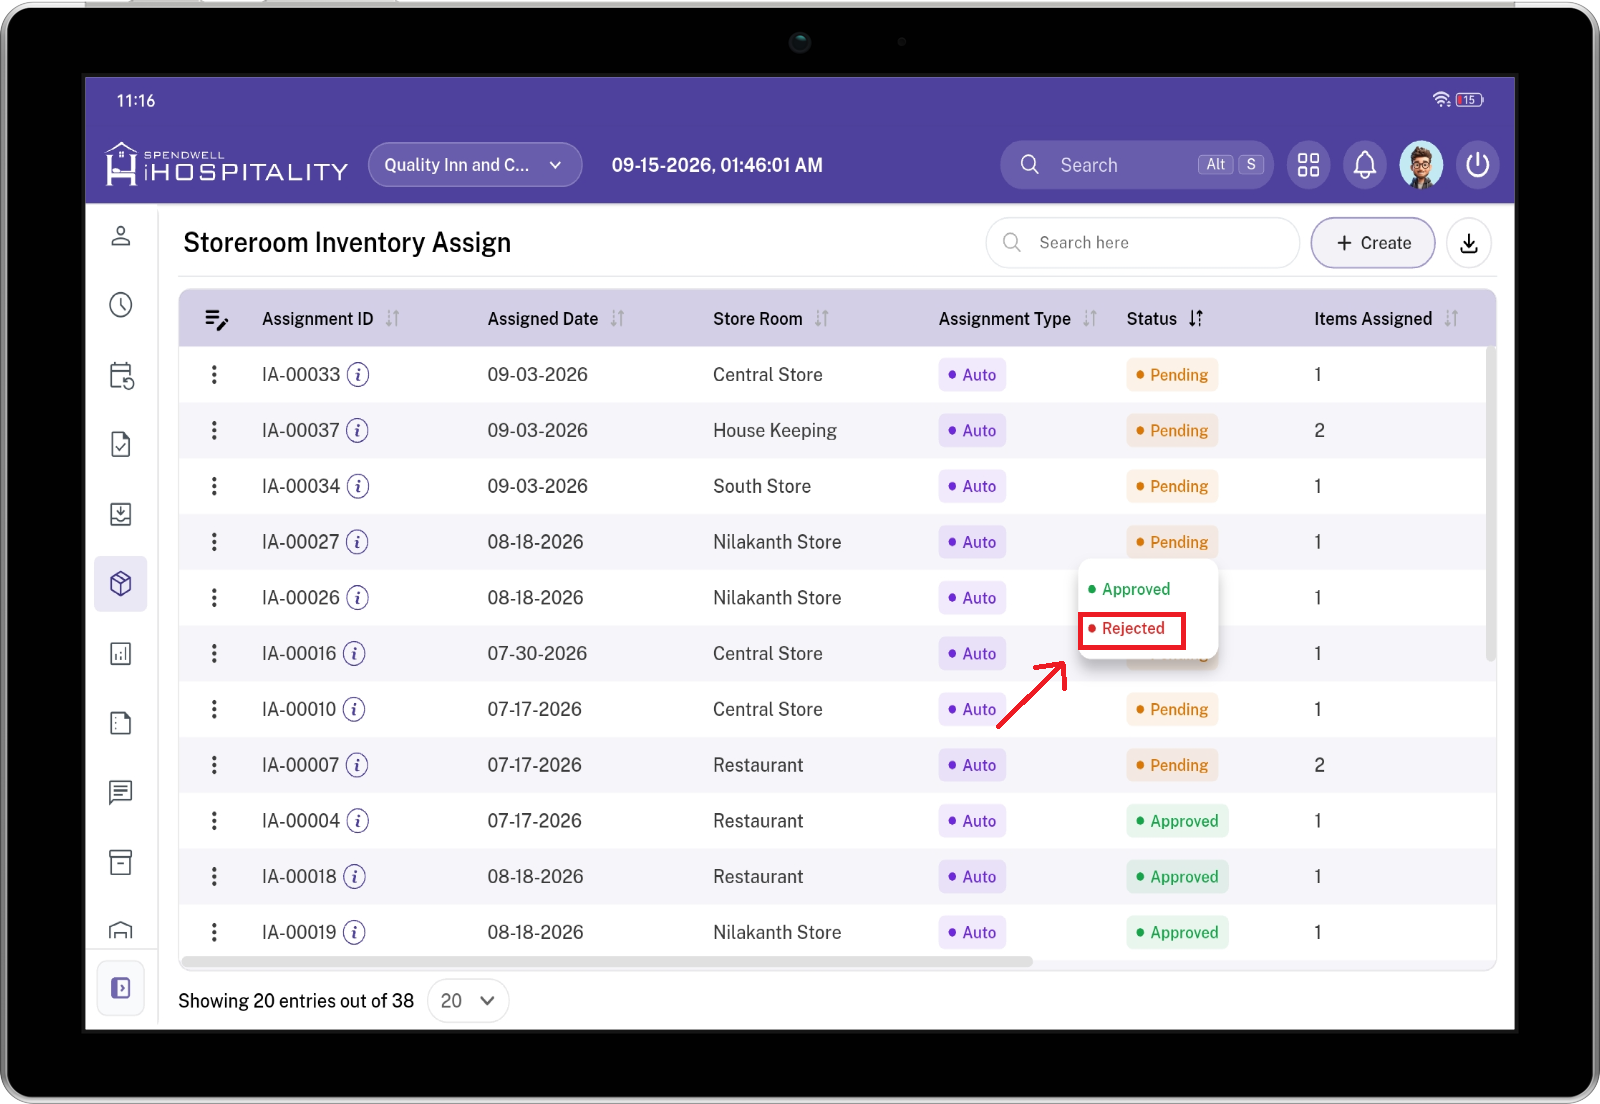](https://docs.spendwelltechsystem.com/uploads/images/gallery/2026-09/storeroominventory-reject.png)
A pending assignment can be rejected when the requested inventory should not be assigned to the Store Room.
When the assignment is rejected:
**Pending → Rejected**
The requested quantity is not added to the Store Room stock.
The blocked quantity is released and becomes available for future assignments.
### Reject Steps
1. Open **Storeroom Inventory Assign**.
2. Locate the assignment with **Pending** status.
3. Open the assignment.
4. Review the Store Room and inventory details.
5. Review the requested quantity.
6. Click **Reject**.
7. The assignment status changes to **Rejected**.
8. The blocked quantity is released.
9. The released quantity becomes available for another assignment.
### Rejection Example
Before rejection:
**Available Stock = 4 PCS**
**Pending Blocked Stock = 6 PCS**
After rejection:
**Available Stock = 10 PCS**
**Pending Blocked Stock = 0 PCS**
The 6 PCS can now be requested by another Store Room assignment.
---
# Direct Assignment
[](https://docs.spendwelltechsystem.com/uploads/images/gallery/2026-09/storeroominventoryassign-add.png)
When **Stock Assignment & Issue Approval** is not required for the selected Store Room, the assignment does not enter Pending status.
The inventory is assigned immediately.
The workflow is:
**Create Assignment → Direct Assigned**
### Direct Assignment Steps
1. Create a Store Room inventory assignment.
2. Select the Store Room.
3. Select or enter the inventory quantity.
4. Verify the available stock.
5. Verify the New Stock quantity.
6. Complete the assignment.
7. The inventory is assigned immediately.
8. The assignment is recorded with **Direct Assigned** status.
### Direct Assignment Example
**Current Stock = 3 PCS**
**Assign Stock = 5 PCS**
The system calculates:
**New Stock = 3 + 5 = 8 PCS**
Because approval is not required:
**Status = Direct Assigned**
The Store Room stock is immediately updated to **8 PCS**.
---
# Assignment Status
The assignment status represents the current state of the Store Room inventory assignment.
| Status | Description |
|---|
| **Pending** | The assignment requires approval. The requested quantity is blocked until the assignment is approved or rejected. |
| **Approved** | The assignment has been approved and the inventory has been assigned to the Store Room. |
| **Rejected** | The assignment has been rejected and the blocked quantity has been released back to available inventory. |
| **Direct Assigned** | The Store Room does not require approval and the inventory has been assigned immediately. |
### Status Flow
When approval is required:
**Pending → Approved**
or
**Pending → Rejected**
When approval is not required:
**Direct Assigned**
---
# Assignment Details
Users can open an assignment from the **Storeroom Inventory Assign** list to review the complete assignment details.
The Assignment Details screen provides information about the Store Room, assigned inventory, quantity, assignment type, user, date and time, and current status.
### Assignment Detail Fields
- **Assignment ID** — Identifies the unique inventory assignment record.
- **Store Room** — Identifies the Store Room to which the inventory is assigned.
- **Store Room No.** — Displays the unique Store Room number or code.
- **Item** — Identifies the inventory item included in the assignment.
- **Assigned Quantity** — Displays the quantity assigned to the Store Room.
- **Stock Unit** — Identifies the unit in which the assigned quantity is maintained.
- **Assignment Type** — Identifies whether the assignment was created through **Auto** or **Manual** assignment.
- **Assigned By** — Identifies the user who created or processed the assignment.
- **Assignment Date / Time** — Records when the assignment was created or processed.
- **Status** — Displays the current status of the assignment.
---
# Assignment Audit Trail
The Storeroom Inventory Assign feature provides an audit trail for inventory movement from approved inventory into Store Rooms.
The assignment record allows users to verify:
- **Assignment ID** — Which assignment was created.
- **Store Room** — Where the inventory was assigned.
- **Store Room No.** — The Store Room reference.
- **Item** — Which inventory item was assigned.
- **Assigned Quantity** — How much inventory was assigned.
- **Stock Unit** — The unit used for the assigned quantity.
- **Assignment Type** — Whether the assignment was Auto or Manual.
- **Assigned By** — Which user created or processed the assignment.
- **Assignment Date / Time** — When the assignment occurred.
- **Status** — The current assignment state.
This provides traceability from:
**Inventory Receive → Approved Inventory → Store Room Assignment**
---
# Inventory Assignment Example
The following example demonstrates the complete Store Room assignment process.
Assume an approved Inventory Receive contains:
**Item:** Sanitizer
**Stock Unit:** PCS
**Available Stock:** 10 PCS
The selected Store Room currently contains:
**Current Stock:** 3 PCS
The user wants to assign:
**Assign Stock:** 5 PCS
The system calculates:
**New Stock = Current Stock + Assign Stock**
**New Stock = 3 + 5 = 8 PCS**
### If Approval Is Required
The assignment is created as:
**Assignment Type = Manual**
**Status = Pending**
The requested 5 PCS are blocked while the assignment is pending.
If the assignment is approved:
**Status = Approved**
**Store Room Stock = 8 PCS**
If the assignment is rejected:
**Status = Rejected**
The 5 PCS are released back to available inventory.
### If Approval Is Not Required
The assignment is created as:
**Assignment Type = Manual**
**Status = Direct Assigned**
The 5 PCS are immediately added to the Store Room stock.
**Store Room Stock = 8 PCS**
---
# Complete Inventory Assignment Flow
[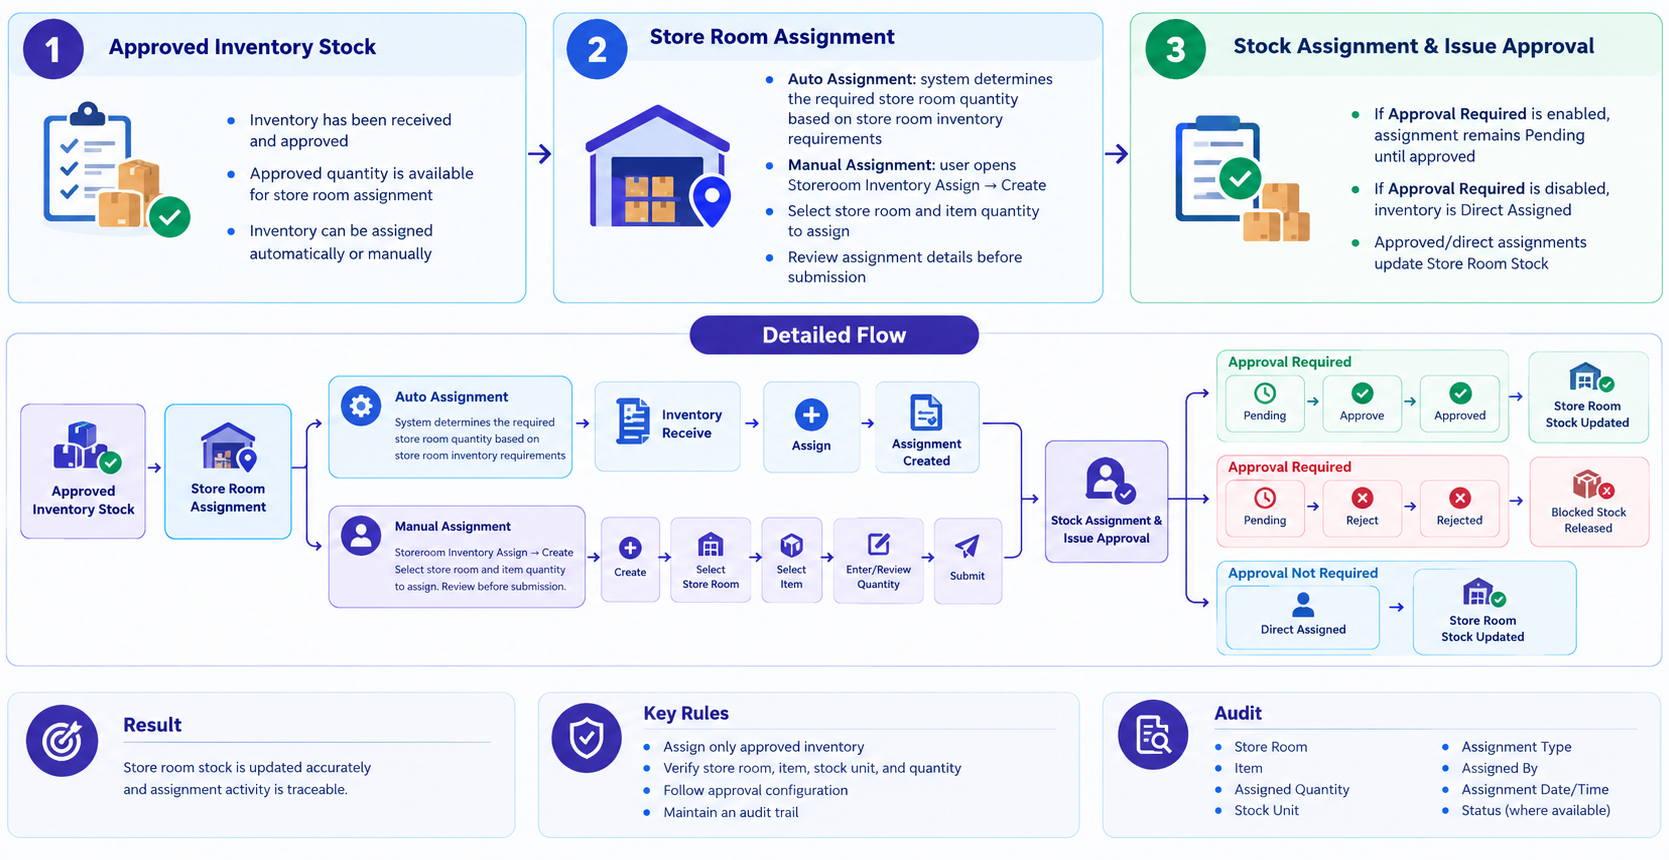](https://docs.spendwelltechsystem.com/uploads/images/gallery/2026-09/storeroominventoryassignflow.png)
# Storeroom Stock Deduction
## Overview
The **Storeroom Stock Deduction** feature allows users to deduct inventory from a configured **Store Room**.
Users can create a deduction by selecting a Store Room, selecting inventory items, entering the quantity to deduct, and providing an optional reason.
The deduction workflow is controlled by the Store Room's **Stock Assignment & Issue Approval** setting.
If approval is required, the deduction remains **Pending** until a manager approves or rejects the request. If approved, the requested quantity is deducted from the Store Room stock. If rejected, the held quantity is released back to the Store Room stock.
If approval is not required, the deduction is processed immediately with **Direct Deducted** status.
## Deduction Status
| Status | Description |
|---|---|
| **Pending** | The deduction request is waiting for approval and the requested quantity is held. |
| **Approved** | The deduction request has been approved and the requested quantity has been deducted from the Store Room stock. |
| **Rejected** | The deduction request has been rejected and the held quantity is released back to the Store Room stock. |
| **Direct Deducted** | The Store Room does not require approval, so the requested quantity is deducted immediately. |
---
## Storeroom Item Stock Deduct List
[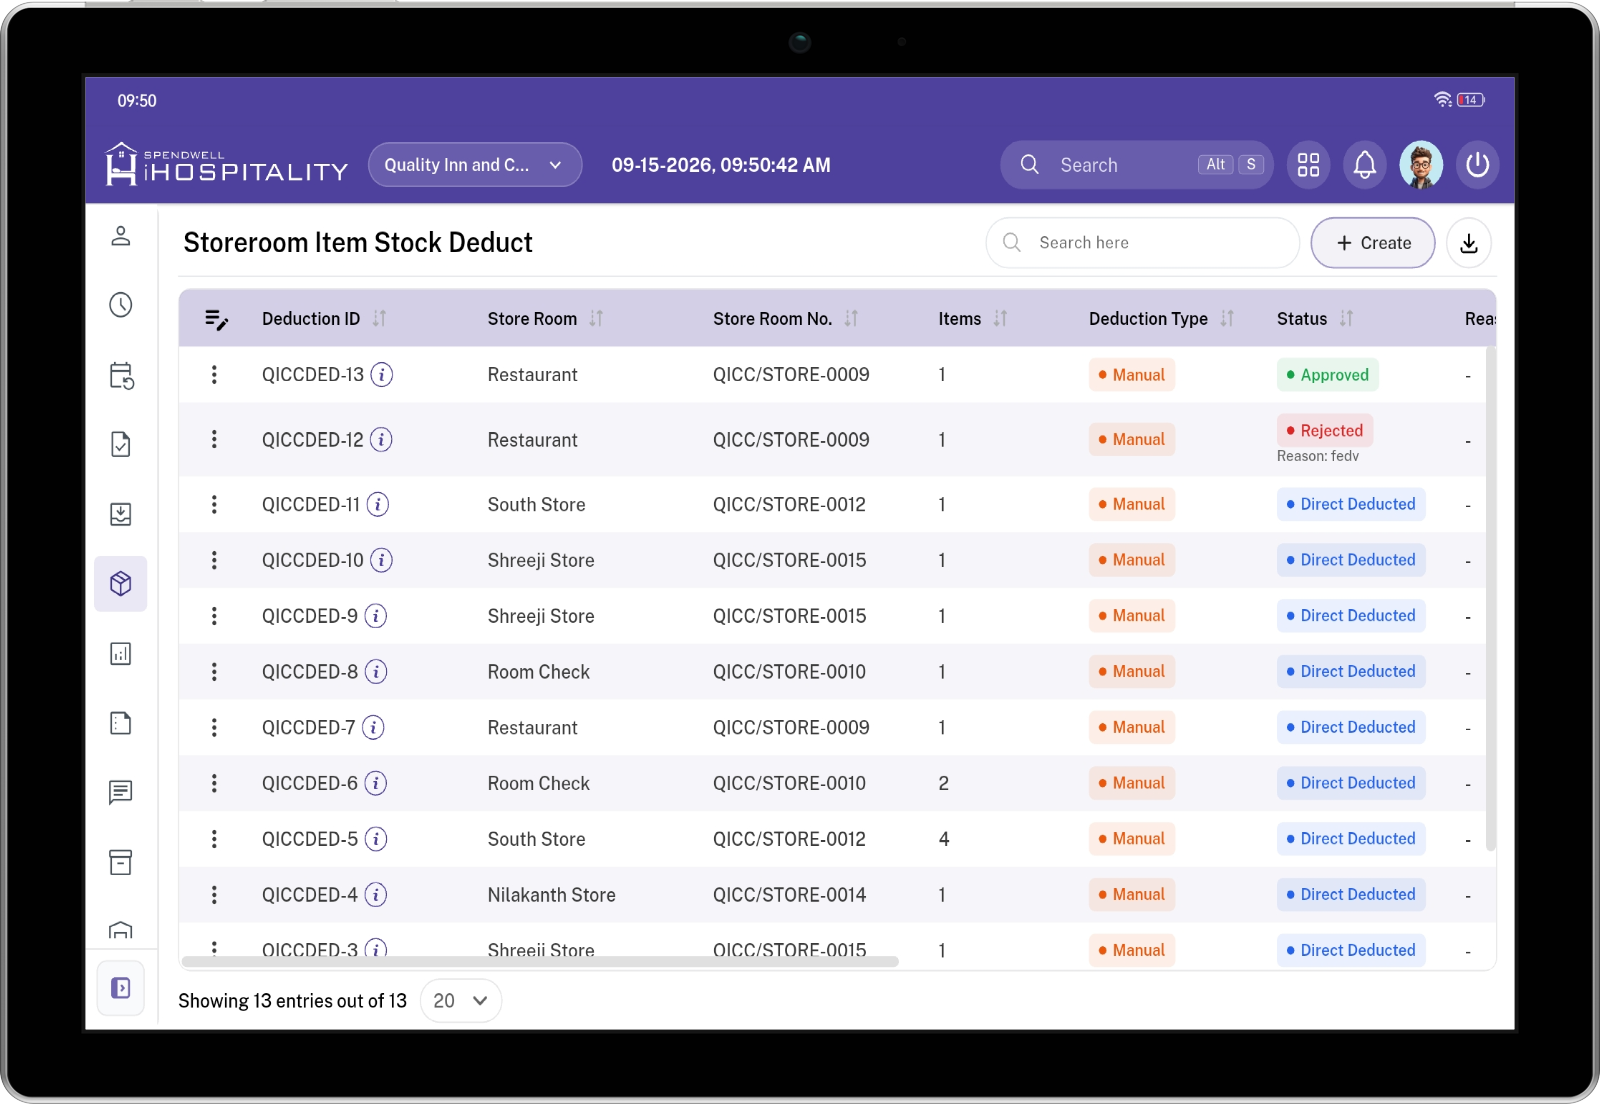](https://docs.spendwelltechsystem.com/uploads/images/gallery/2026-09/storeroominventorydeduct.png)
The **Storeroom Item Stock Deduct** list provides a centralized view of stock deduction records created for the property's Store Rooms.
Users can review deduction details, track the current status, and identify who created and processed each deduction.
### List Fields
- **Deduction ID** — Identifies the unique stock deduction record.
- **Store Room** — Displays the Store Room from which the stock is deducted.
- **Store Room No.** — Displays the unique Store Room number or code.
- **Items** — Displays the number of inventory items included in the deduction.
- **Status** — Displays the current deduction status.
- **Reason** — Displays the reason provided for the deduction.
- **Requested By** — Identifies the user who created the deduction request.
- **Requested Date** — Displays the date on which the deduction request was created.
- **Approved By** — Identifies the user who approved or processed the deduction.
- **Approved Date** — Displays the date on which the deduction was approved or processed.
---
## Create Storeroom Stock Deduction
[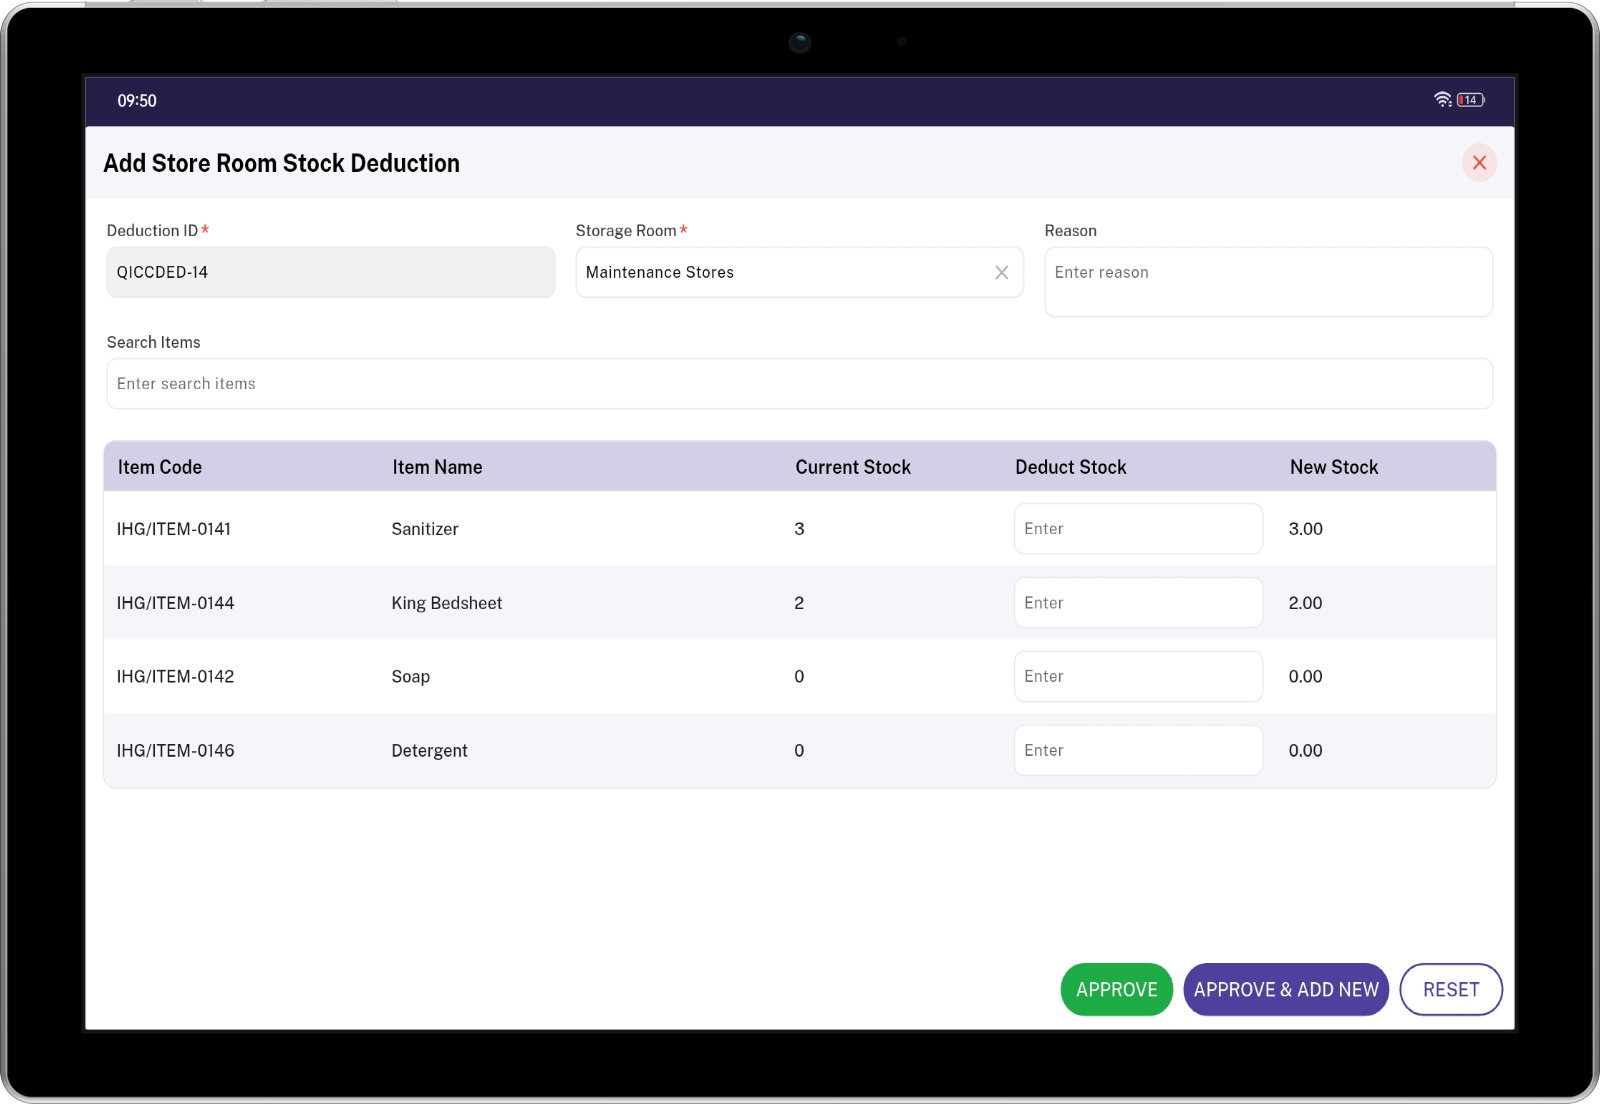](https://docs.spendwelltechsystem.com/uploads/images/gallery/2026-09/storeroominventorydeduct-add.png)
Click **Create** from the **Storeroom Item Stock Deduct** list to create a new stock deduction.
The user selects the Store Room, provides an optional reason, and enters the quantity to deduct for the required inventory items.
### Key Fields
- **Deduction ID** — Displays the unique identifier generated for the stock deduction.
- **Storage Room** — Selects the Store Room from which inventory will be deducted.
- **Reason** — Specifies the reason for the stock deduction.
- **Search Items** — Allows users to search for an inventory item.
---
## Store Room Inventory Items
After selecting the Store Room, the system displays the inventory items currently available in that Store Room.
### Item Fields
- **Item Code** — Identifies the inventory item using its configured item code.
- **Item Name** — Identifies the inventory item available in the Store Room.
- **Store Stock** — Displays the quantity currently available in the Store Room.
- **Deduct Stock** — Specifies the quantity to be deducted from the Store Room.
- **Store New Stock** — Displays the resulting Store Room stock after the deduction.
## Stock Calculation
The system calculates the resulting Store Room stock using:
```text
Store New Stock = Store Stock - Deduct Stock
```
The **Deduct Stock** quantity cannot exceed the available **Store Stock**.
---
## Create Stock Deduction
### Steps
1. Open **Storeroom Item Stock Deduct**.
2. Click **Create**.
3. Select the required **Storage Room**.
4. Enter the **Reason**, if required.
5. Review the inventory items displayed for the selected Store Room.
6. Review the **Store Stock**.
7. Enter the required quantity in **Deduct Stock**.
8. Verify the calculated **Store New Stock**.
9. Submit the deduction.
10. The system checks the Store Room's **Stock Assignment & Issue Approval** configuration.
11. If approval is required, the deduction is created with **Pending** status.
1. If approval is not required, the deduction is processed as **Direct Deducted**.
---
## Stock Assignment & Issue Approval
The **Stock Assignment & Issue Approval** setting determines whether a Store Room stock deduction requires manager approval.
The setting is configured for the Store Room.
### Approval Required
When **Stock Assignment & Issue Approval** is enabled, the deduction request is created with **Pending** status.
The requested deduction quantity is held while the request is pending.
```text
Create Deduction
↓
Pending
↓
Manager Review
↙ ↘
Approve Reject
↓ ↓
Approved Rejected
```
### Approval Not Required
When **Stock Assignment & Issue Approval** is not enabled, the deduction is processed immediately.
```text
Create Deduction
↓
Direct Deducted
↓
Store Room Stock Updated
```
---
## Pending Deduction
When approval is required, the newly created deduction is recorded with **Pending** status.
The requested quantity is placed on hold until the deduction is approved or rejected.
The held quantity cannot be deducted again through another request while the deduction is pending.
### Pending Process
1. User creates a stock deduction.
2. The system validates the requested quantity against the Store Room stock.
3. The deduction is created with **Pending** status.
4. The requested quantity is held.
5. The Store Room stock is not permanently deducted.
6. A manager reviews the pending deduction.
7. The manager approves or rejects the request.
---
## Approve Stock Deduction
[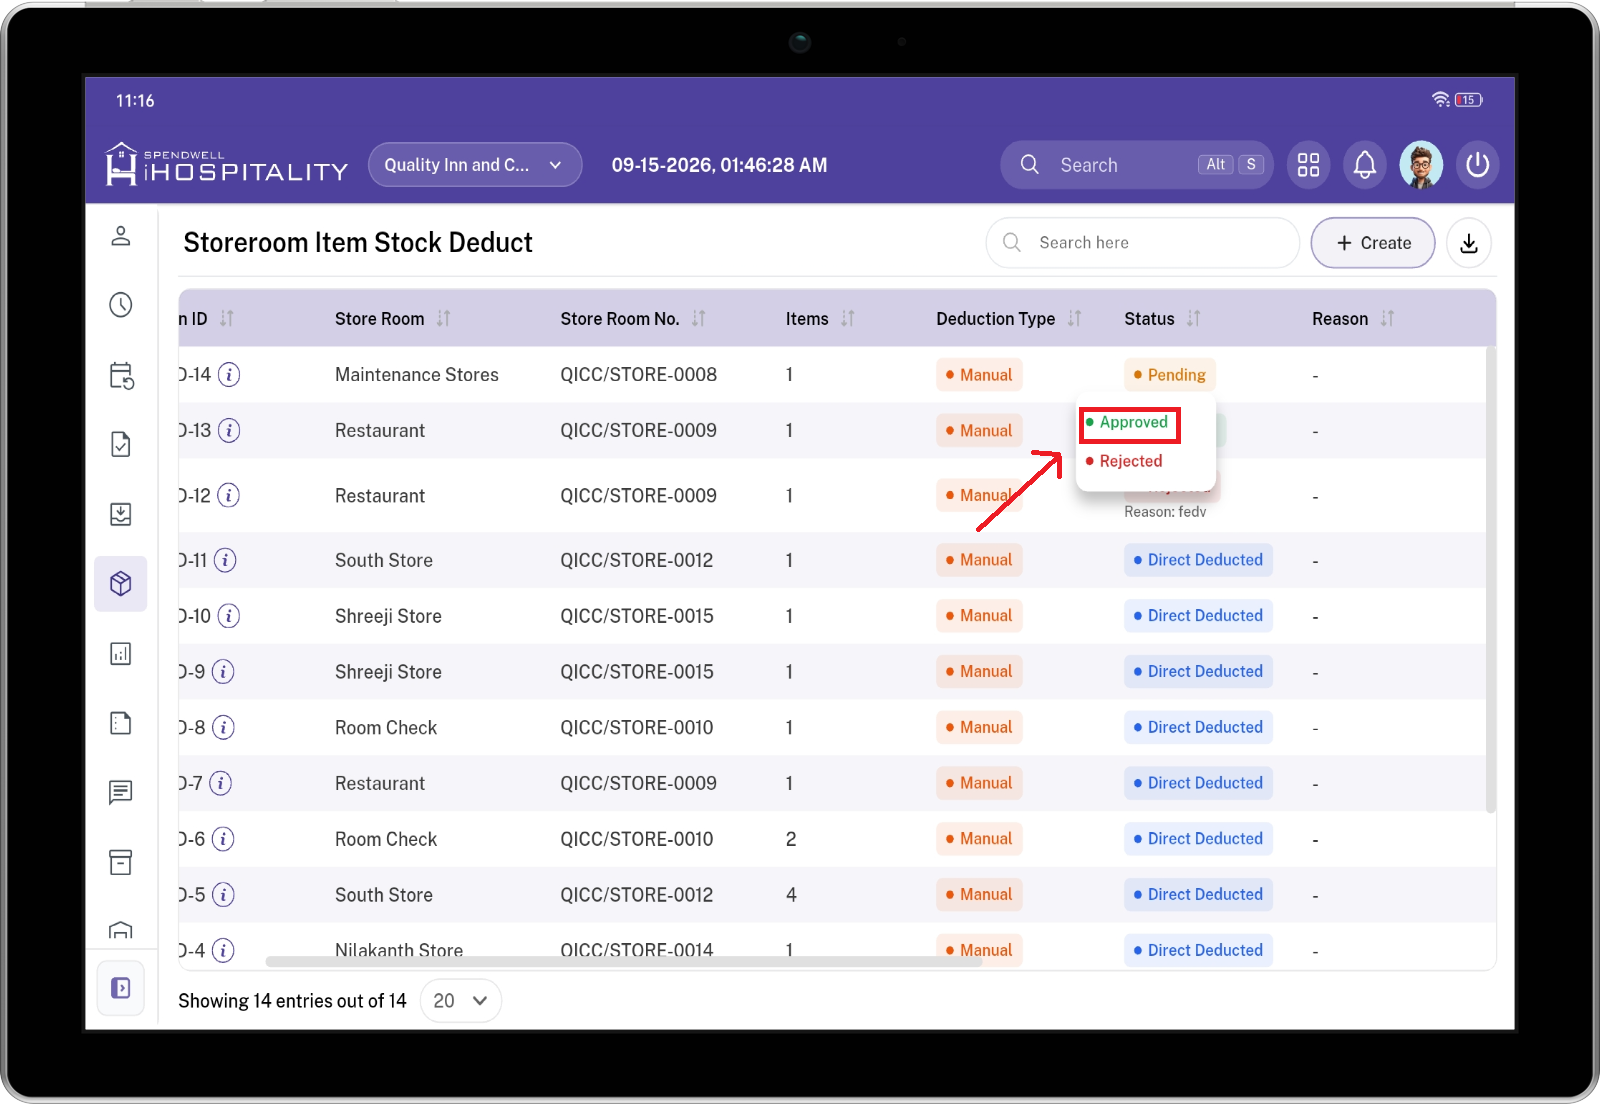](https://docs.spendwelltechsystem.com/uploads/images/gallery/2026-09/storreroominventorydeduct-approved.png)
When a manager approves a pending deduction, the requested quantity is deducted from the Store Room stock.
The status changes from **Pending** to **Approved**.
### Approve Steps
1. Open **Storeroom Item Stock Deduct**.
2. Locate the deduction with **Pending** status.
3. Open the deduction record.
4. Review the Store Room.
5. Review the inventory items.
6. Review the **Store Stock**.
7. Review the **Deduct Stock** quantity.
8. Review the deduction reason.
9. Click **Approve**.
10. The status changes to **Approved**.
11. The requested quantity is deducted from the Store Room stock.
12. The **Store New Stock** is updated accordingly.
---
## Reject Stock Deduction
When a pending deduction is rejected, the requested quantity is not deducted from the Store Room.
The status changes from **Pending** to **Rejected**.
The held quantity is released back to the Store Room stock.
### Reject Steps
1. Open **Storeroom Item Stock Deduct**.
2. Locate the deduction with **Pending** status.
3. Open the deduction record.
4. Review the Store Room and inventory details.
5. Review the requested deduction quantity.
6. Review the deduction reason.
7. Select **Reject**.
8. The status changes to **Rejected**.
9. The held quantity is released.
10. The Store Room stock remains available.
---
## Direct Deduction
When **Stock Assignment & Issue Approval** is not required for the selected Store Room, the deduction is processed immediately.
The deduction is recorded with **Direct Deducted** status.
No manager approval is required.
### Direct Deduction Steps
1. Create a new stock deduction.
2. Select the Store Room.
3. Select the inventory item.
4. Enter the quantity in **Deduct Stock**.
5. Verify the **Current Stock**.
6. Verify the **New Stock**.
7. Submit the deduction.
8. The system deducts the inventory immediately.
9. The deduction is recorded with **Direct Deducted** status.
---
## Deduction Details
Users can open a deduction record from the **Storeroom Item Stock Deduct** list to review the complete deduction information.
### Deduction Detail Fields
- **Deduction ID** — Identifies the unique stock deduction record.
- **Store Room** — Identifies the Store Room from which the stock is deducted.
- **Store Room No.** — Displays the unique Store Room number or code.
- **Item Code** — Identifies the inventory item.
- **Item Name** — Displays the inventory item name.
- **Store Stock** — Displays the Store Room stock before deduction.
- **Deduct Stock** — Displays the quantity requested for deduction.
- **Store New Stock** — Displays the resulting Store Room stock.
- **Reason** — Displays the reason provided for the deduction.
- **Status** — Displays the current deduction status.
- **Requested By** — Identifies the user who created the deduction.
- **Requested Date** — Displays when the deduction was requested.
- **Approved By** — Identifies the user who approved or processed the deduction.
- **Approved Date** — Displays when the deduction was approved or processed.
---
## Request and Approval Tracking
The deduction record maintains request and approval information to provide traceability for each stock deduction.
- **Requested By** — Identifies the user who created the deduction request.
- **Requested Date** — Records when the deduction request was created.
- **Approved By** — Identifies the manager or authorized user who processed the deduction.
- **Approved Date** — Records when the deduction was approved or directly processed.
For a **Direct Deducted** record, the user who processed the deduction is recorded in the processing information.
---
## Complete Stock Deduction Flow
[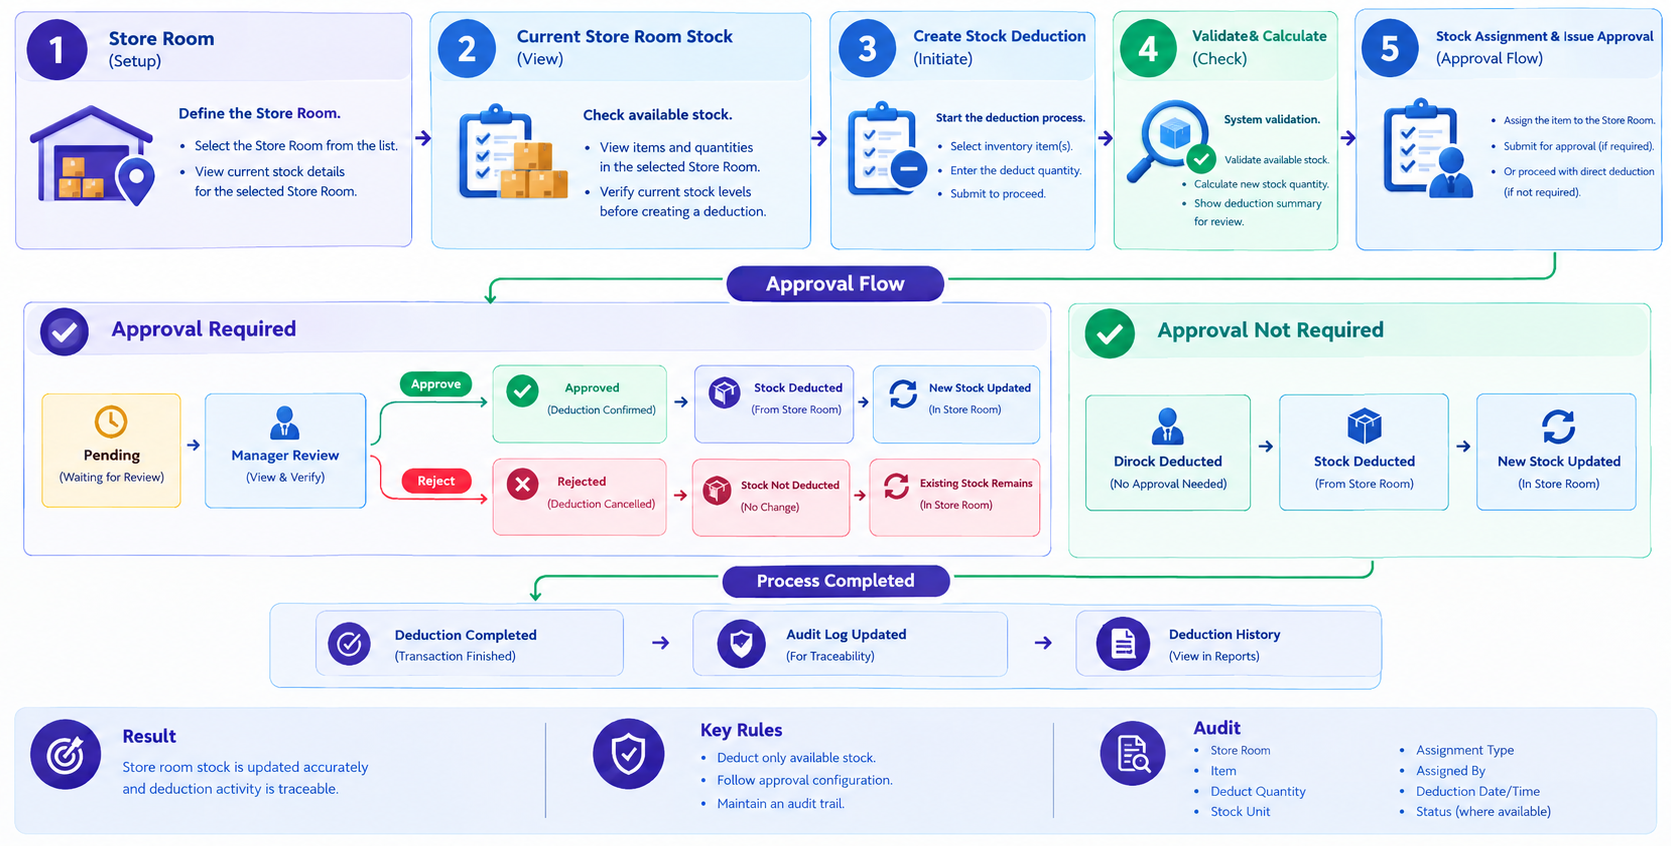](https://docs.spendwelltechsystem.com/uploads/images/gallery/2026-09/storerooominventorydeduct-flow.png)
## Stock Deduction Rules
- **Store Stock** represents the inventory currently available in the selected Store Room.
- **Deduct Stock** represents the quantity requested for deduction.
- **Store New Stock** is calculated as **Store Stock - Deduct Stock**.
- The deduction quantity cannot exceed the Store Room's available stock.
- When approval is required, the deduction remains **Pending** until it is approved or rejected.
- A pending deduction holds the requested quantity.
- **Approve** deducts the held quantity from the Store Room stock.
- **Reject** releases the held quantity back to the Store Room stock.
- When approval is not required, the deduction is recorded as **Direct Deducted** and processed immediately.
- **Requested By** identifies the user who created the deduction.
- **Approved By** identifies the user who approved or processed the deduction.
- **Requested Date** and **Approved Date** provide request and processing history.
- The deduction status represents the current state of the stock deduction.