iHospitality Hub
- Overview
- iHospitality Hub Setup
- Clock In / Clock Out
- Front Desk
- Storeroom Inventory Assignment
- Storeroom Stock Deduction
- Lost & Found
- Maintenance Task
- Housekeeping
Overview
The iHospitality Hub is a shared kiosk and device application within the Spendwell iHospitality Suite. It provides employees with a centralized device, such as a tablet or iPad, to access and perform daily hospitality operations.
An administrator or manager configures a physical device as an iHospitality Hub and selects the modules that should be available on that device. Employees can then identify themselves using their Employee ID and PIN or Face Login and access the available modules.
Each employee's activity is recorded against their individual employee profile, while the Hub credentials remain associated with the physical device.
Key Features
Available Modules
| Module | Description |
|---|---|
| Clock In / Clock Out | Employees record their working hours, take breaks, clock out, and add manual entries to correct missed punches. |
| Front Desk | Employees view and manage tasks assigned to their shift and update task progress from Open → Active → Completed. |
| Maintenance | View and manage assigned maintenance tasks. |
| Housekeeping | View and manage assigned housekeeping tasks. |
| Report Lost Item | Report a guest’s lost item and manage the report. |
| Found Items | Record and manage items found on the property. |
| Storeroom Inventory Assignment | Assign stock items to a storeroom and manage inventory assignments. |
| Storeroom Stock Deduction | Record stock used or consumed by deducting it from storeroom inventory. |
How the iHospitality Hub Works
The iHospitality Hub follows a simple workflow:
-
Hub Setup
An administrator or manager registers the physical tablet or iPad as an iHospitality Hub. -
Module Configuration
The administrator selects the modules that should be available on the Hub. -
Hub Authentication
The device is configured with its Hub credentials. -
Employee Identification
The employee identifies themselves using Employee ID/PIN or Face Login. -
Module Access
The employee sees only the modules enabled for that Hub. -
Perform Activity
The employee performs the required operational activity. -
Activity Tracking
The activity is recorded against the authenticated employee.
Access and Authentication
Hub Authentication
The Hub is associated with the physical device and uses its configured credentials to identify the registered Hub.
Hub credentials belong to the device, not to an individual employee.
Employee Authentication
Employees authenticate themselves separately when accessing Hub modules.
Supported authentication methods include:
- Employee ID and PIN
- Face Login
This allows multiple employees to securely use the same shared device while maintaining individual employee activity tracking.
Important: The employee must have Can iHospitality Hub Login enabled in their user role to access the iHospitality Hub.
Module Access Control
Each Hub can be configured with a specific set of modules based on the operational requirements of the location.
For example:
| Hub Type | Enabled Modules |
|---|---|
| Front Desk Hub | Clock In / Clock Out, Front Desk, Lost & Found |
| Housekeeping Hub | Clock In / Clock Out, Front Desk, Inventory Management |
| Operations Hub | Clock In / Clock Out, Front Desk, Inventory Management, Lost & Found |
Employees can access only the modules configured for the Hub they are using.
iHospitality Hub Setup
Overview
The iHospitality Hub feature allows administrators to register physical devices (tablets/iPads) as "Hubs," give each one its own login credentials, and choose which modules that hub can show. Once a hub is signed in, employees use it throughout the day for the modules it was given access to.
Note: an employee can only sign in to a hub at all if their assigned User Role has Can iHospitality Hub Login enabled (see the User Role page). Hub Modules (below) then control which modules that hub shows once someone is signed in.
iHospitality Hub List
The iHospitality Hub list screen shows every hub registered for the property.
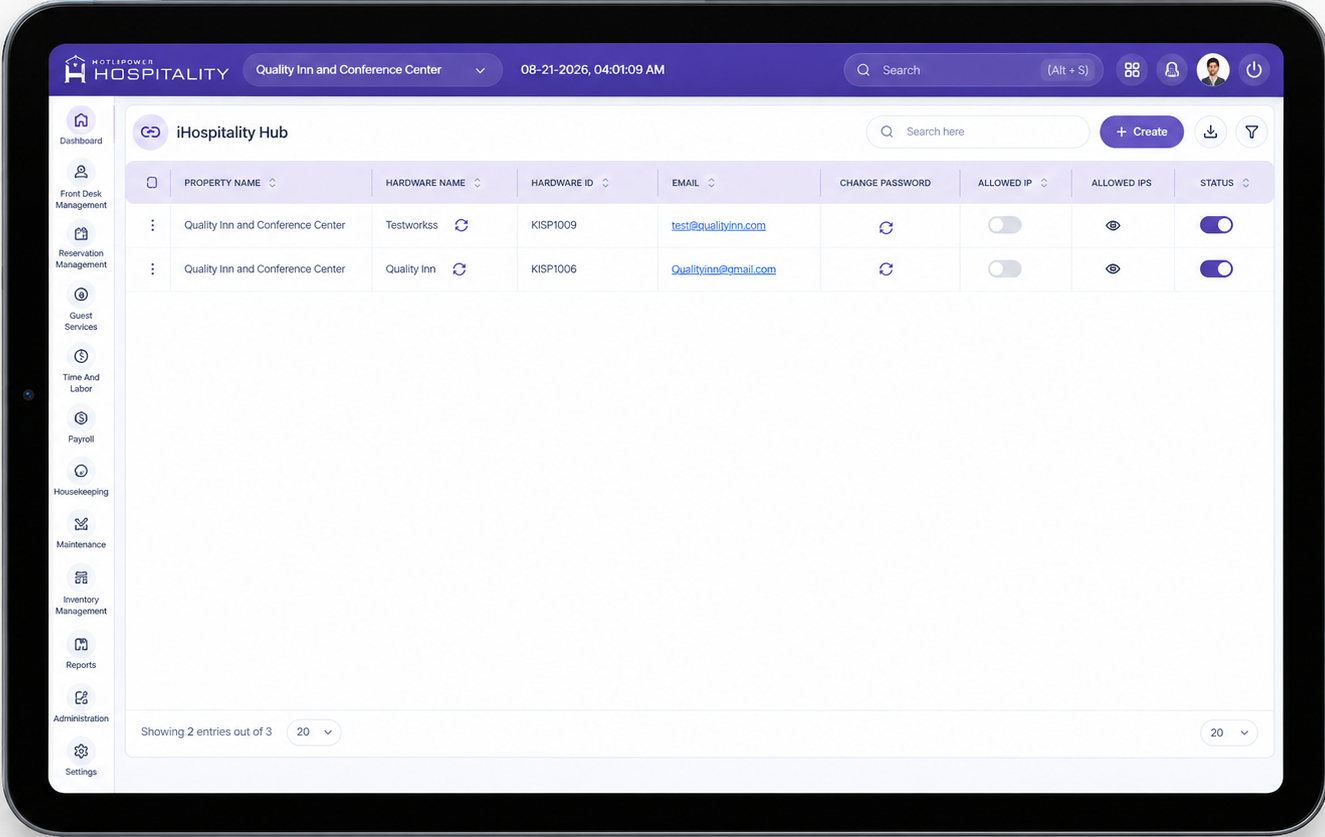
| Column | Description |
|---|---|
| Hardware Name | Name given to the device at registration, with a Reset icon next to it. |
| Hardware ID | Unique, system-generated ID for the device. |
| Login email assigned to the hub. | |
| Change Password | Icon to trigger a password reset for this hub's login. |
| Allowed IP | Toggle to restrict this hub's login to specific IP address(es) — see Key Fields below. |
What the Reset icon does: A Hardware ID is bound to one physical device at a time — once a tablet has signed in with a hub's credentials, that Hardware ID is locked to that specific device and can't simply be signed into on a different tablet. The Reset icon un-binds the Hardware ID from its current device, freeing that Hardware ID up to be activated on a different physical device. Until it's reset, one Hardware ID = one device only.
From this screen, administrators can search, filter, export the list, and click + Create to register a new hub.
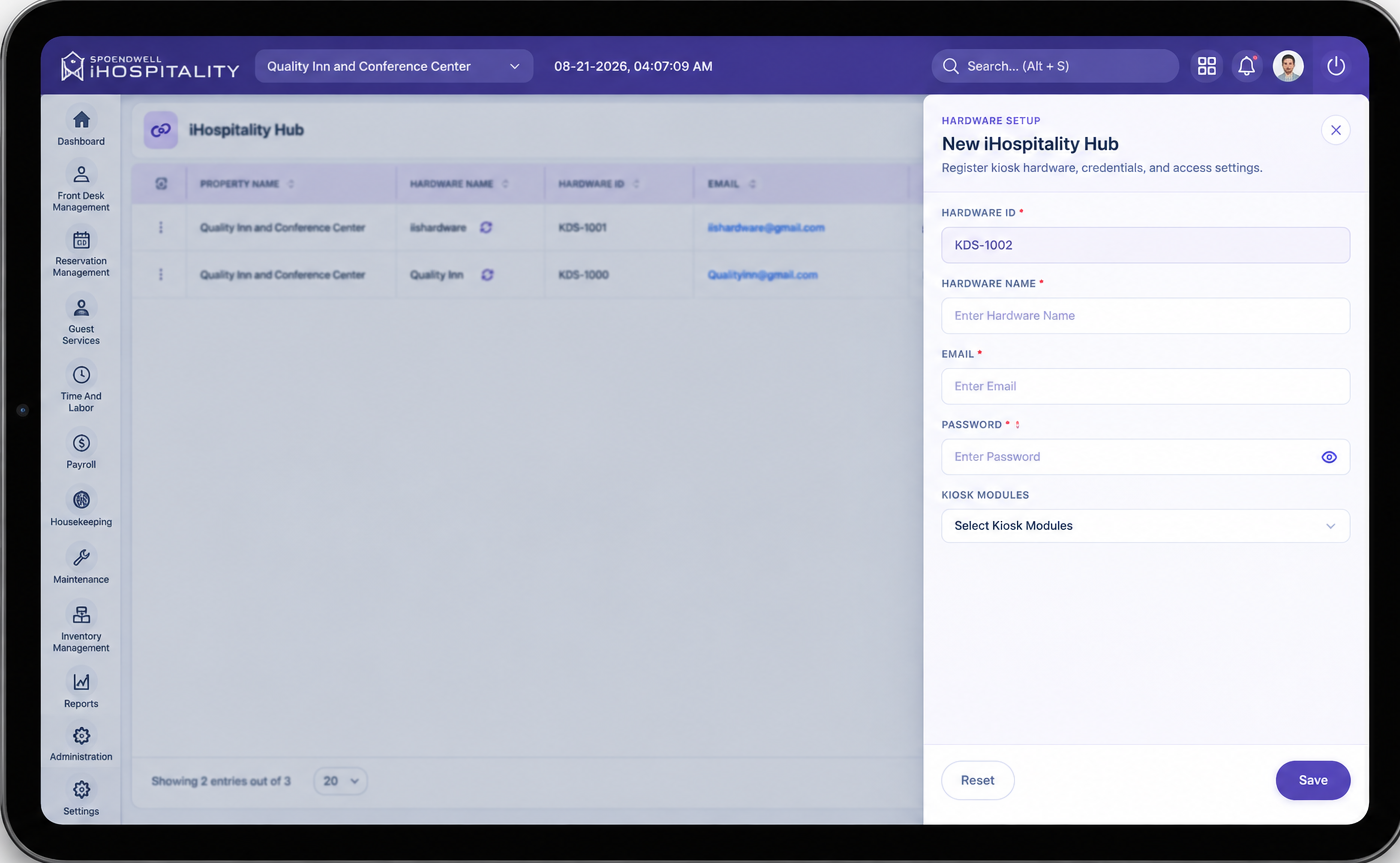
Create Hub Credentials ("New iHospitality Hub")
Click + Create on the list screen to open the registration form.
Key Fields
- Hardware ID — Auto-generated unique ID for the device (e.g.
QICC/AH-004). Read-only. - Hardware Name — The name you give this device so you can recognize it in the list, e.g., "IIS Kiosk."
- Email — The login email this hub will use to sign in on the device. This is a device-level login, separate from any individual employee's login.
- Password — The login password this hub will use to sign in on the device.
- Hub Modules — Multi-select list of the modules this hub is allowed to show once signed in: Clock In / Clock Out, Workforce Tasks, Lost & Found, and Inventory Management. Use Select All / Deselect All to check or clear everything at once.
- Save — Registers the hub and closes the form.
- Save & Add New — Registers the hub and reopens a blank form to add another one.
- Reset — Clears everything typed or selected in the form (Hardware Name, Email, Password, Hub Modules) without saving. It does not affect any hub already saved.
Steps
- Go to iHospitality Hub in the admin panel.
- Click + Create.
- Enter the Hardware Name, Email, and Password.
- Under Hub Modules, check every module this hub should have access to.
- Click Save (or Save & Add New to immediately register another hub).
Sign In on the Device
Three things happen on the physical device, in order: switch to the right hub → enter its credentials → the hub's own module page opens.
Step 1 — Open the App and Switch to the Hub
Open the iHospitality app on the tablet/iPad. On the sign-in screen, press and hold the Spendwell iHospitality logo — this is how you tell the device which registered hub it should sign in as.
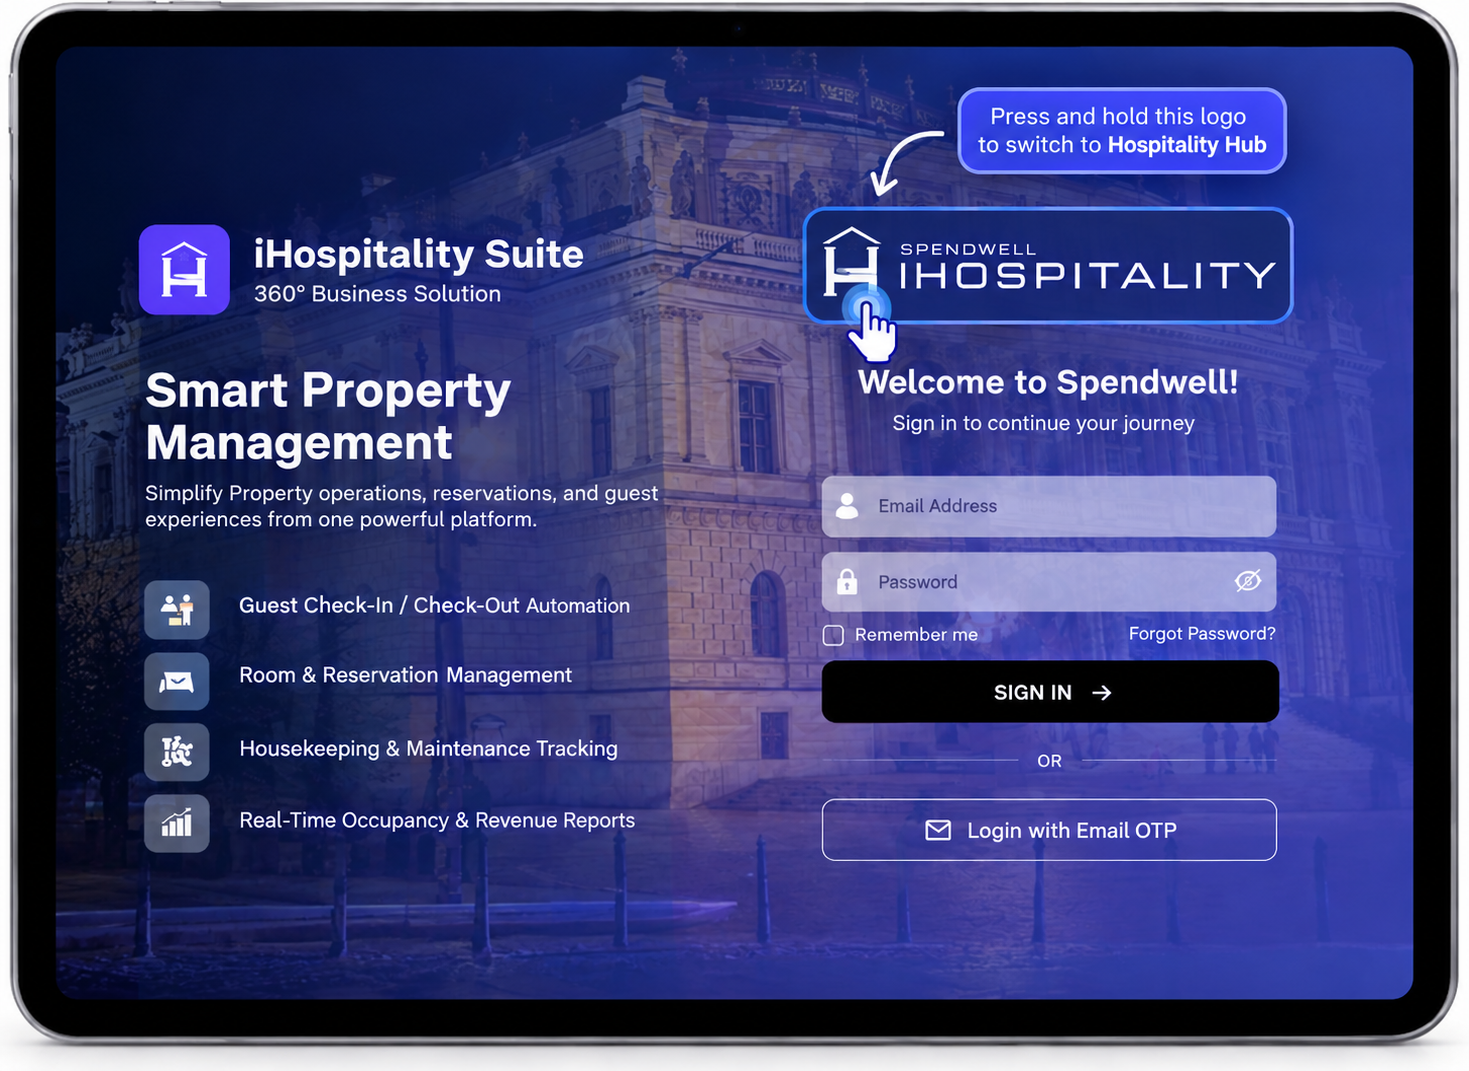
What this screen means: long-pressing the logo opens the hub-switching action. Use this both the first time a device is set up and any time you need to reassign the same device to a different hub.
Step 2 — Enter the Hub's Credentials
Enter the hub's Email and Password (the credentials created in the form above), then tap SIGN IN.
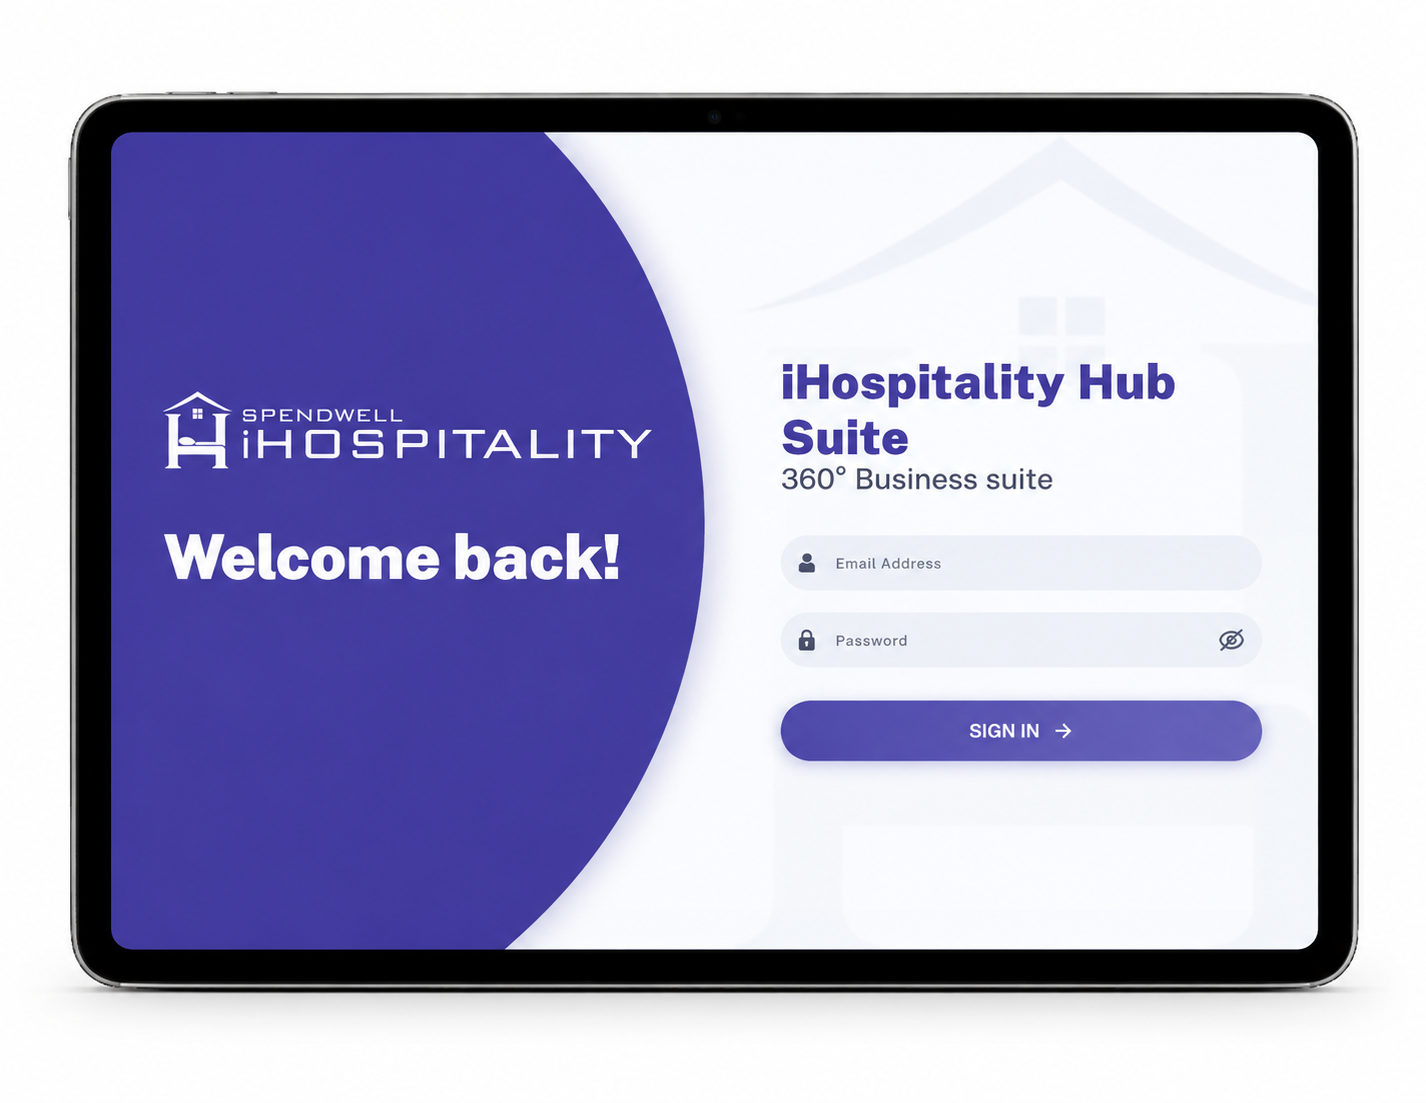
What this screen means: this is the hub's own device-level login — not an individual employee's login. Any employee using the device afterward still identifies themselves separately inside each module.
Step 3 — The Hub's Module Page Opens
Once signed in, the home screen loads, showing tiles only for the modules checked under Hub Modules when this hub was created.
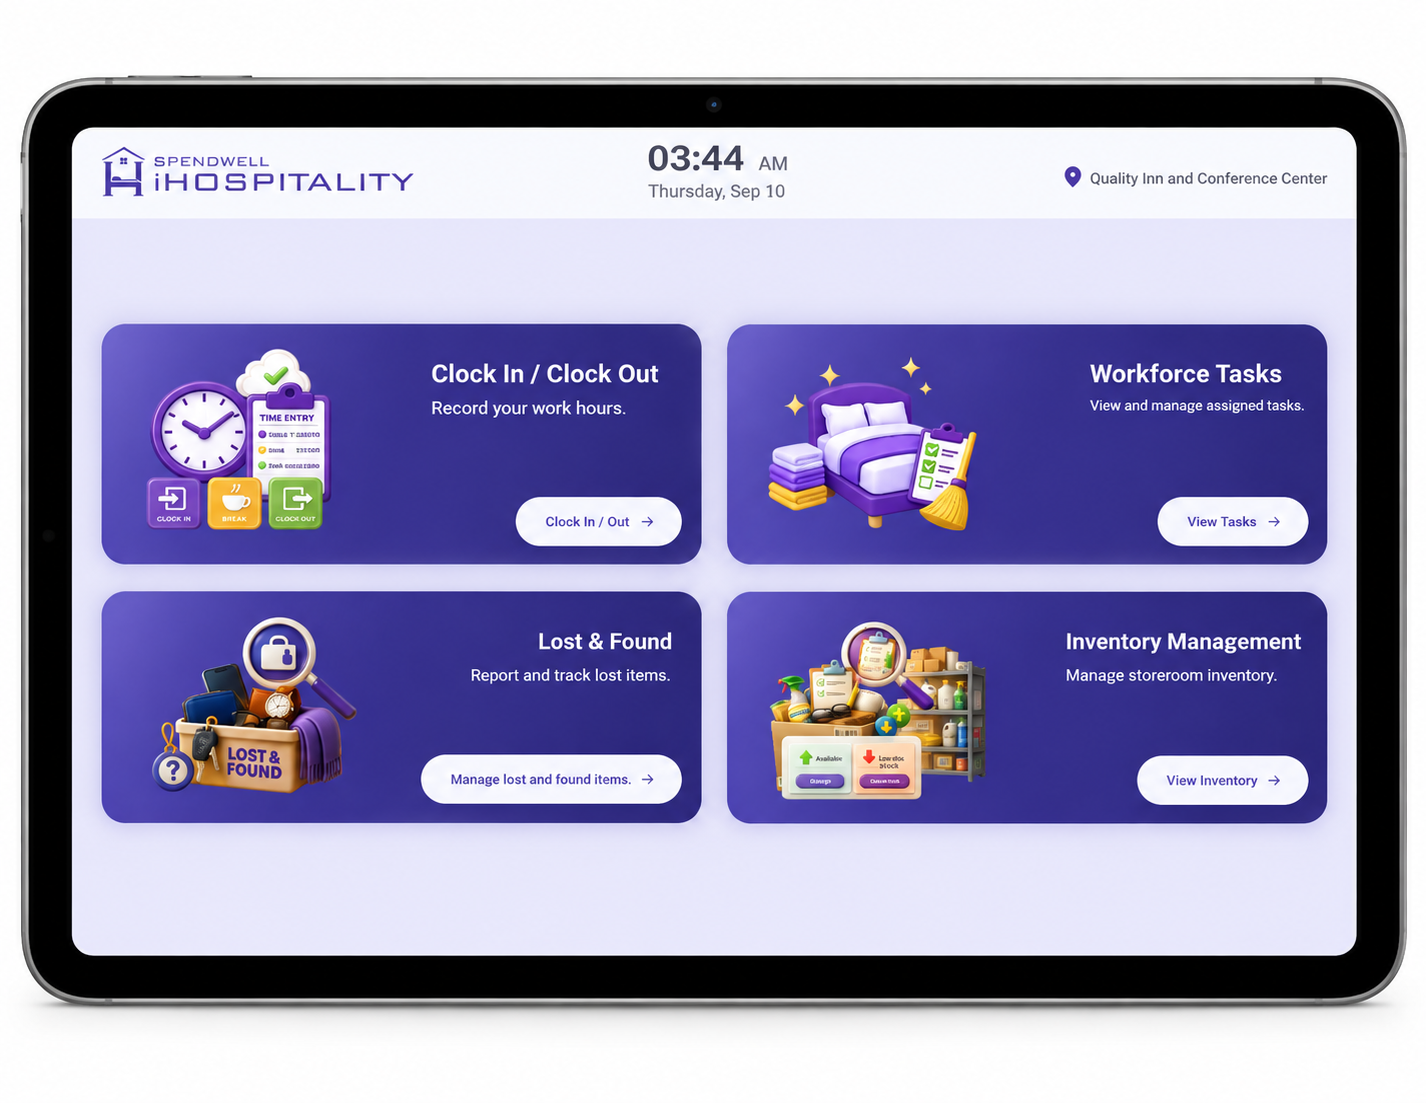
What this screen means: this is the hub's home screen for daily use. Employees tap a tile here and identify themselves (Employee ID/PIN or face login) to use that specific module.
Important Notes
- A hub's credentials (Email/Password) belong to the device, not to an individual employee — every employee who uses that hub still identifies themselves separately (Employee ID/PIN or face login) when using a module.
- An employee also needs Can iHospitality Hub Login enabled on their User Role to be able to sign in to any hub — Hub Modules alone won't grant access if that role-level permission is off.
- Only the modules checked in Hub Modules for a given hub will appear on that device — other hubs can have a different set enabled.
- Reset (on the create/edit form) only clears the form in progress; it never changes a hub that's already been saved.
- Reset (the icon on the hub list, next to Hardware Name) is different — it unbinds that Hardware ID from the device it's currently activated on, so the same Hardware ID can be signed into on another physical device. Without resetting it first, a Hardware ID stays locked to the one device it's already active on.
- The long-press-the-logo action (Sign In, Step 1) is used both for a device's first-time sign-in and for later switching an already-set-up device to a different hub.
Clock In / Clock Out
Overview
The Clock In / Clock Out module on the iHospitality Hub allows employees to record their work hours directly from a shared kiosk device. An employee taps the module, identifies themselves with their Employee ID/PIN (or face login), and can clock in, take a break, clock out, or add a manual entry if a punch was missed — all without needing their own device.
This module only appears on hubs where Clock In / Clock Out was checked under Hub Modules, and only for employees whose User Role has Can iHospitality Hub Login enabled — see the iHospitality Hub – Setup page.
Clock In / Clock Out Screen
After signing in, the employee sees their personal weekly time log.
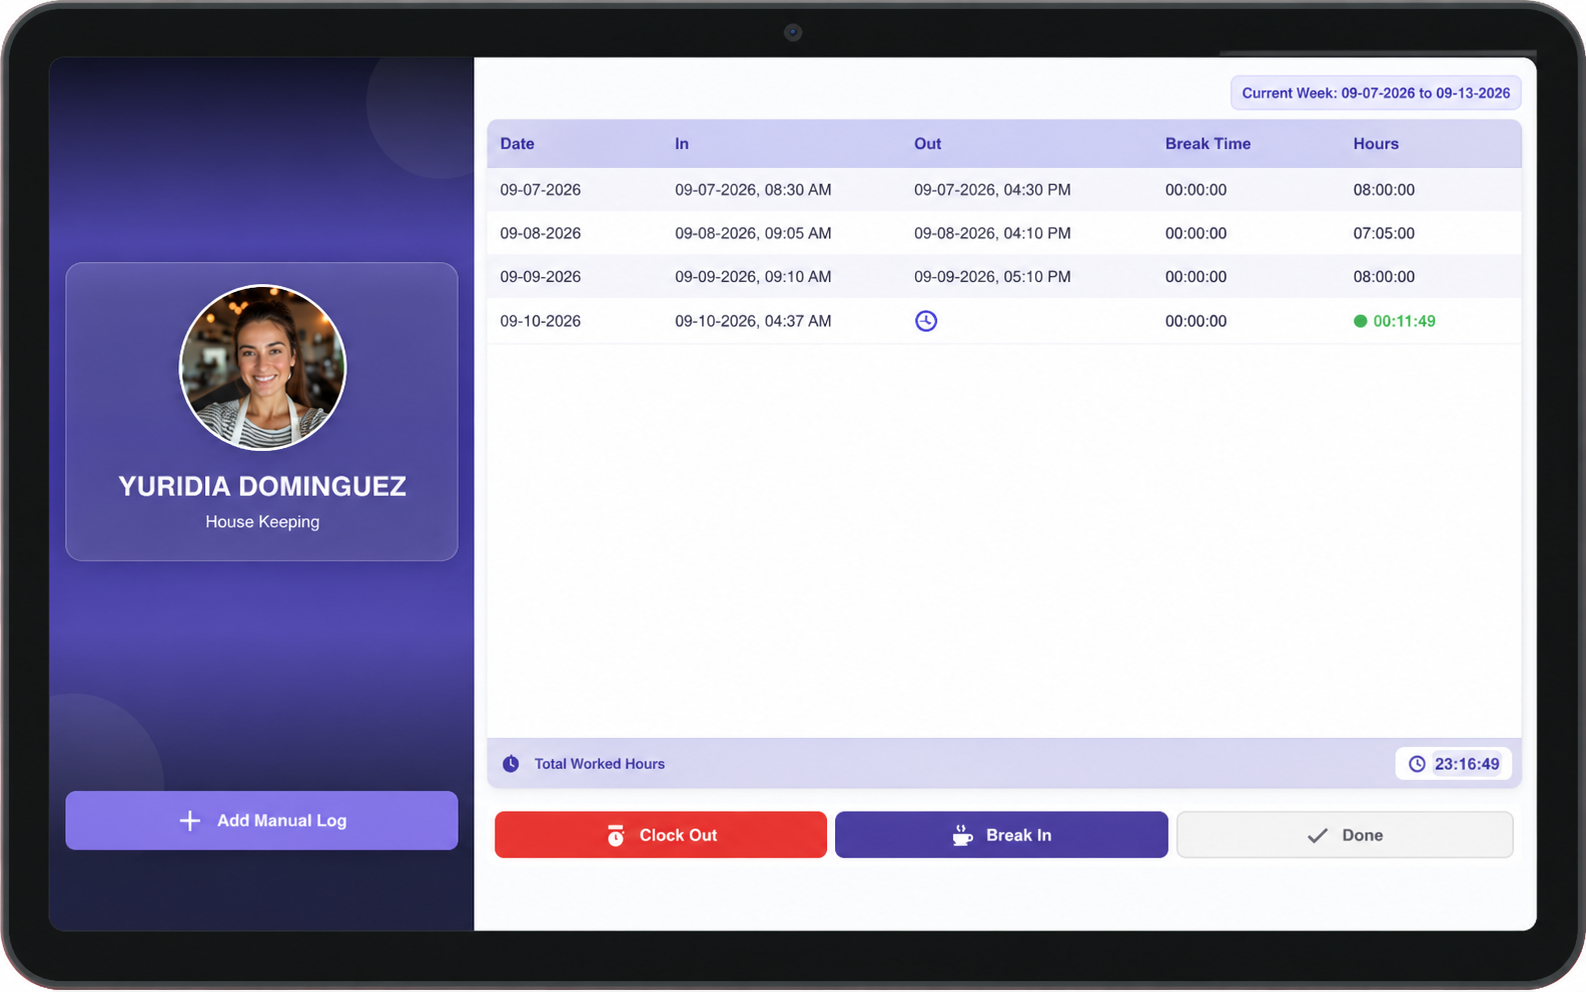
What this screen means: this is the signed-in employee's own weekly log — not a shared log for the hub. Clock Out, Add Manual Log, and Done are all available directly from here.
Key Information
- Employee profile — Shows the signed-in employee's name and role (e.g. "Arav Patel — Hotel Manager").
- Current Week — The date range for the week currently being displayed.
- Date — The day the entry belongs to.
- In — Timestamp of the clock-in for that day.
- Out — Timestamp of the clock-out for that day (blank while the shift is still open).
- Break Time — Total break duration logged for that day.
- Hours — Total hours worked for that day, updates live while clocked in.
- Total Worked Hours — Running total for the current week, shown at the bottom of the screen.
Actions
Employees can take the following actions from this screen:
- Clock In — Starts the employee's shift and begins tracking hours.
- Break — Starts a break during an open shift; ending the break resumes the shift clock. Break duration is tracked separately in Break Time and does not count toward Hours.
- Clock Out — Ends the current shift.
- Add Manual Log — Lets the employee add or correct a time entry, e.g. when a clock-in or clock-out was missed (regularization).
- Done — Returns to the hub home screen.
Steps — Clock In
- On the hub home screen, tap Clock In / Clock Out.
- Identify yourself with your Employee ID/PIN or face login.
- Tap Clock In.
- The shift starts; the day's row in the log begins tracking time.
Steps — Take a Break
- From the weekly log screen, tap Break.
- The break starts; break time accumulates in Break Time instead of Hours.
- Tap the same control again to end the break and resume the shift.
Steps — Clock Out
- From the weekly log screen, tap Clock Out.
- The shift ends; the day's Out time and Hours are finalized.
- Tap Done to return to the hub home screen.
Steps — Add Manual Log (Regularization)
- From the weekly log screen, tap Add Manual Log.
- Select the date and enter the correct In/Out time(s) that were missed.
- Save the entry.
- The corrected entry appears in that day's row in the weekly log.
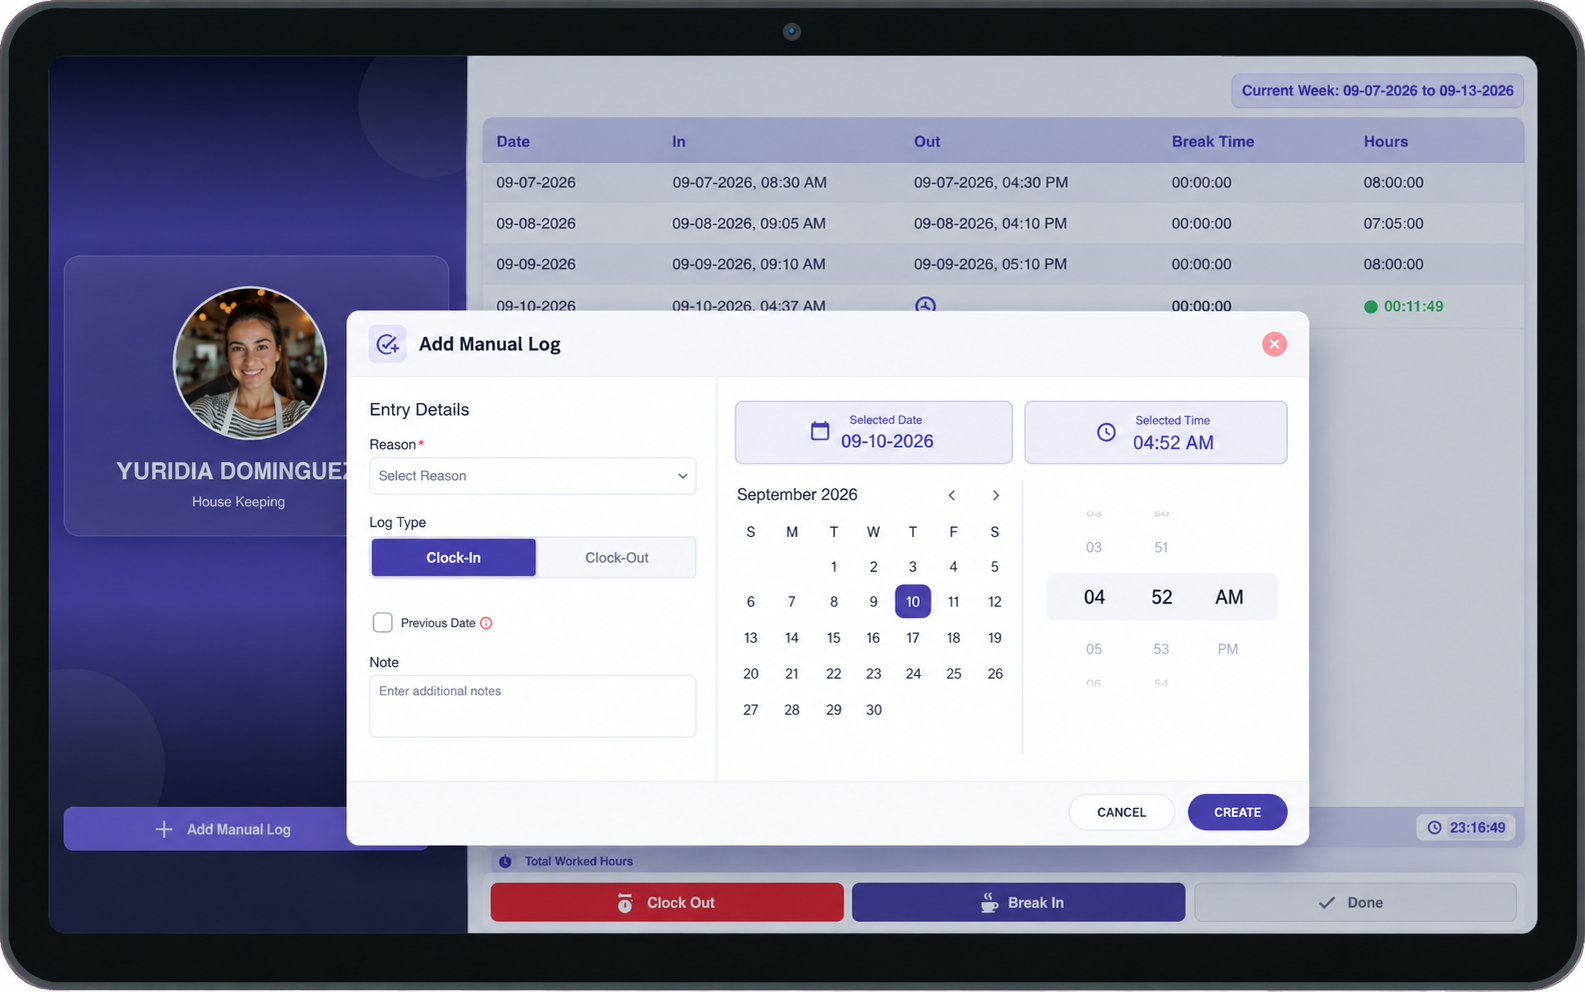
What this screen means: this is the Add Manual Log form used to fix a missed punch — an employee can enter the correct In/Out time(s) for a past date instead of asking a manager to edit the record separately.
Workflow
Employee taps Clock In / Clock Out → Identifies via PIN/face → Clock In → (optional) Break → Clock Out → Done
If a punch was missed on a prior day: Weekly log → Add Manual Log → Enter correct time(s) → Save → Entry corrected
Important Notes
- Every action is tied to the employee who signed in on the hub — the shared device itself does not have its own time log.
- Break Time is tracked separately from Hours; time spent on break does not count as worked hours.
- Add Manual Log is the way to fix a missed clock-in or clock-out after the fact, rather than needing a manager to edit the record elsewhere.
- Total Worked Hours reflects the current week only and resets each week according to the property's configured week range.
- This module only appears on hubs where Clock In / Clock Out was checked under Hub Modules — see the iHospitality Hub – Setup page.
Front Desk
Overview
The Front Desk module on the iHospitality Hub lets employees view, work on, and track the tasks assigned to their shift — organized by category (Cleaning, Quality Assurance, Food Preparation, etc.) and tracked through Open → Active → Completed. Employees can start a live timer on a task, attach notes/files, reassign it, and a manager can close out the day once everything is done.
This module only appears on hubs whereFront Desk was checked under Hub Modules, and only for employees whose User Role has Can iHospitality Hub Login enabled — see the iHospitality Hub – Setup page.
Front Desk Screen (Board View)
After signing in and tapping Front Desk, the employee sees a board of tasks for the selected date, shift, and category.
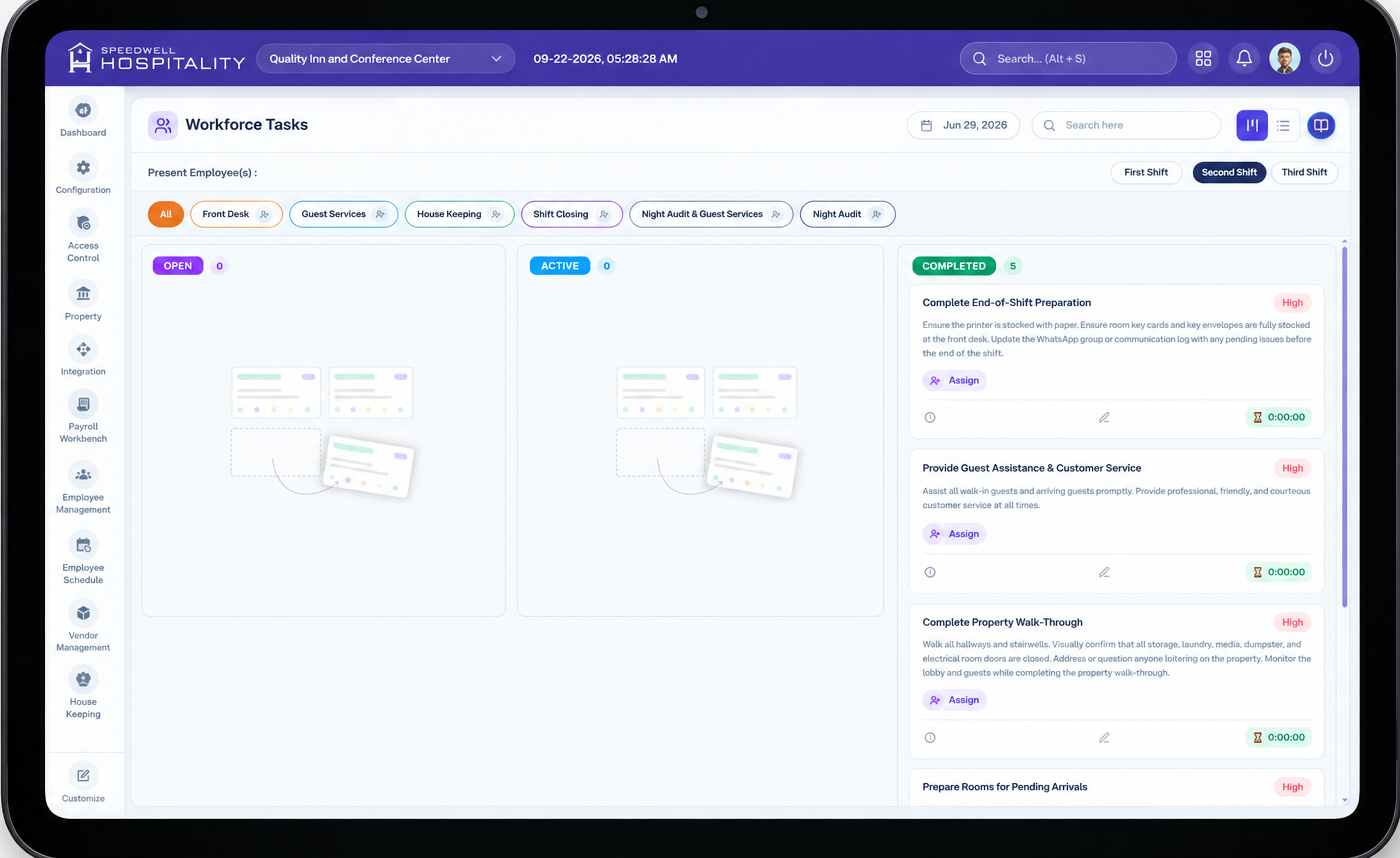
What this screen means: this is the default board view — tasks are grouped into three columns by status, and can be filtered by shift and category using the controls above the board. Click any screenshot on this page to open it full-screen.
Key Information
| Element | Description |
|---|---|
| Date picker | Selects which day's tasks are shown (defaults to today). |
| Search | Searches tasks by name. |
| View toggle | Switches between Board view (kanban, shown above) and List view (see below). |
| Close Day (lock icon) | Opens the Close Day confirmation — see Actions below. |
| Present Employee(s) | Shows the employee(s) currently on shift as avatar chips, for quick reference when assigning tasks. |
| Shift filter | Morning / Evening Shift / Night Shift — only tasks for the selected shift are shown. |
| Category tabs | Cleaning, Quality Assurance, Food Preparation, Plating & Serving, Cleaning & Sanitization, Safety & Compliance. Selecting a tab filters the board to that category's tasks; the + person icon on each tab assigns an employee to that whole category. |
| Board columns | OPEN, ACTIVE, COMPLETED, each with a live count of tasks in that state. |
Task Card
Each task card shows:
| Element | Description |
|---|---|
| Title & priority | Task name plus a priority badge (Low / Medium / High). |
| Description | Optional short explanation of the task. |
| Estimation | Target/planned time for the task (e.g. 00:36:00). |
| Assignee | Avatar showing the assigned employee's initials (e.g. "YD"). |
| Timer (Active tasks only) | Elapsed time with Pause and Stop controls once the task has been started. |
Icon row (bottom of every card):
| Icon | Action |
|---|---|
| 🕐 History | View the task's activity/status log. |
| 📎 Attachment | View files attached to the task. |
| ✏️ Edit | Opens Notes & Attachments (see Actions below). |
| 👤 Assign | Assign or reassign the task to a different employee. |
| → Move to next stage | Advances the task (Open → Active → Completed). |
List View
Switching to list view shows the same tasks as a table, grouped by category, with more detail visible per row.
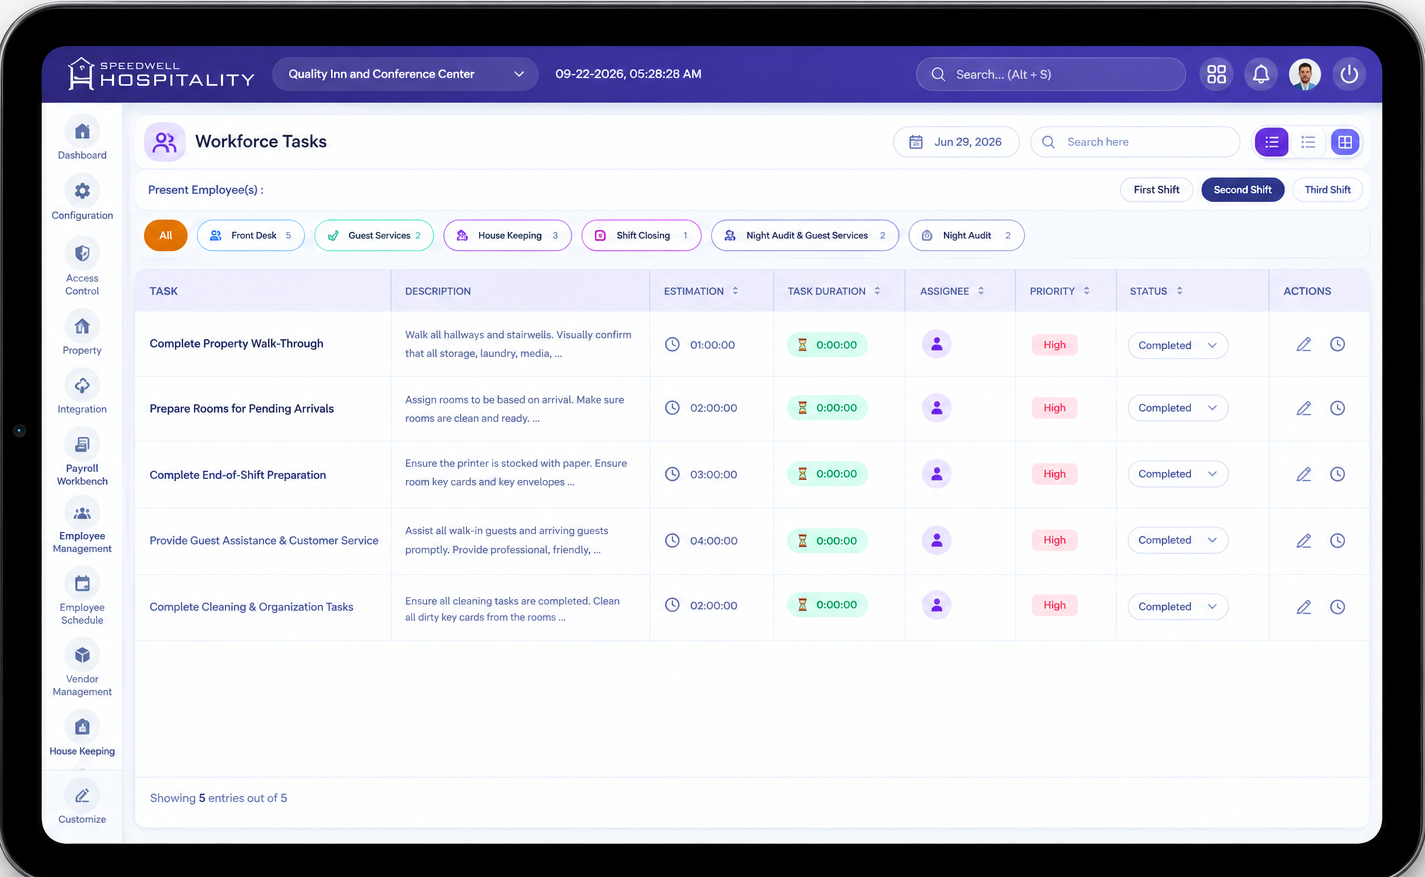
What this screen means: each category (e.g., "Quality Assurance") is an expandable group; if a category has no tasks for the selected shift, it shows "No Data Found!".
| Column | Description |
|---|---|
| Task | Task name. |
| Description | What the task involves. |
| Estimation | Target/planned time for the task. |
| Task Duration | Actual time spent — shows a live running timer with Play/Pause/Stop for an active task. |
| Assignee | Avatar of the employee assigned to the task. |
| Priority | Low / Medium / High, color-coded. |
| Status | Dropdown — Open / Active / Completed. Changing this here has the same effect as tapping the → arrow on the board. |
| Document | Attachment icon — view files attached to the task. |
| Notes & Attachments | Edit icon — opens the same Notes & Attachments form as the board view. |
| Info | Opens the task's full details (see Actions below). |
Actions
Start, Pause, and Stop a Task's Timer
- On the board, find the task under OPEN and tap the → arrow to move it to ACTIVE (or change its Status to Active in list view).
- Once active, a timer control appears on the card showing elapsed time, with Pause (⏸) and Stop (⏹) buttons.
- Tap Pause to temporarily stop timing without ending the task; tap again to resume.
- Tap Stop, or move the task to COMPLETED, once the work is done.
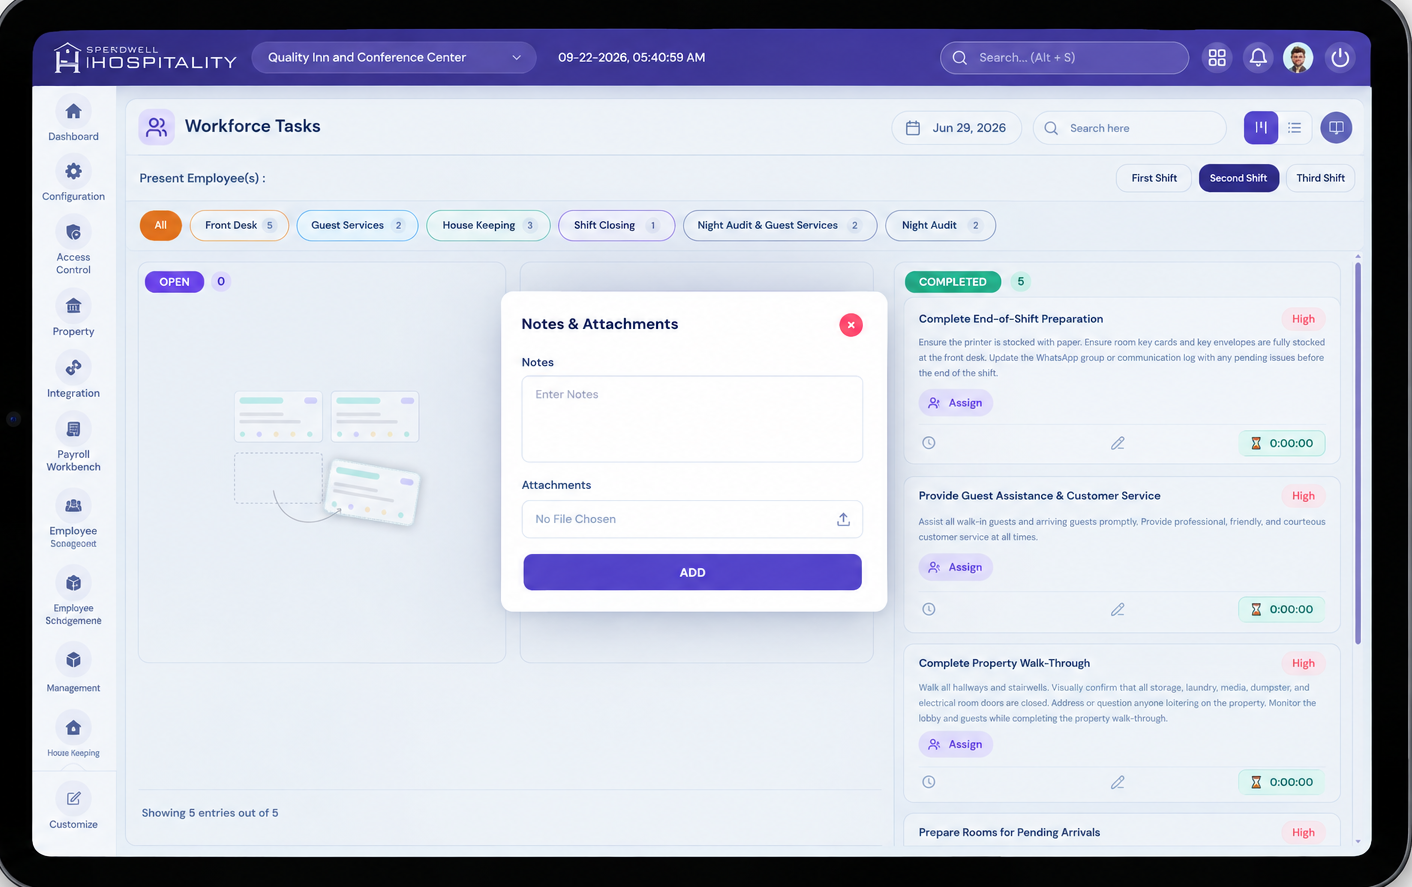
Add Notes & Attachments to a Task
-
On a task card (or its row in list view), tap the Edit icon.
-
The Notes & Attachments form opens.
-

What this screen means: Notes lets you add a free-text comment about the task; Attachments lets you upload a supporting file (e.g., a photo).
-
Enter a note and/or choose a file to attach.
-
Tap ADD to save it to the task.
View Task Details (Info)
-
Tap the Info icon (list view) on any task.
-
A full detail modal opens for that task — everything about it and who worked on it, in one place.
-

What this screen means: the header shows the task name, its ID (e.g.
BASC-00140), current stage, priority, and shift. Below that, Task Details and Task Employees show two different things — what the task is, and who actually worked on it.
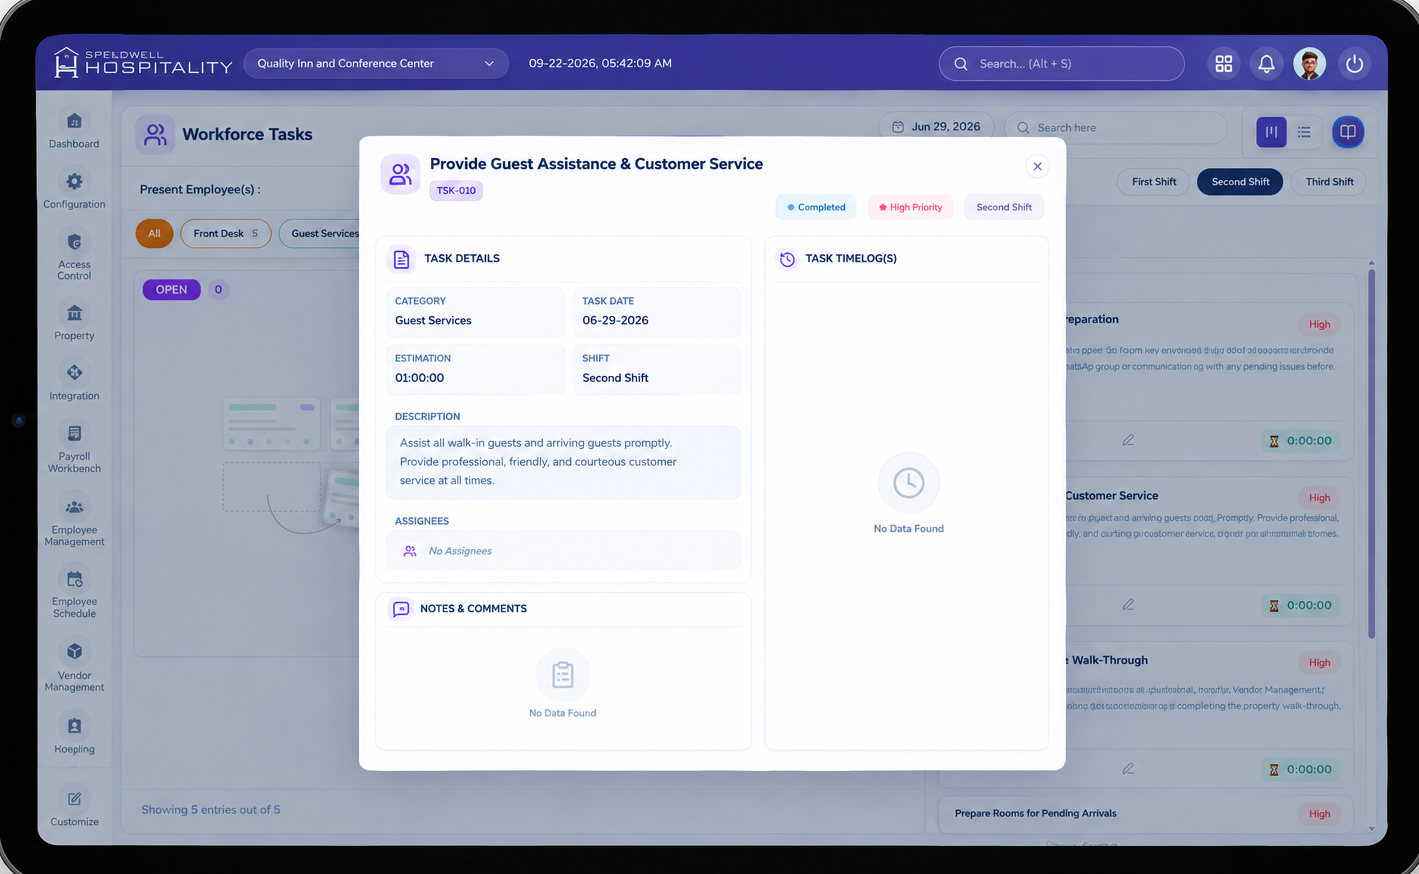
Task Details (left panel)
| Field | Description |
|---|---|
| Task Type | The category the task belongs to, e.g., "Quality Assurance." |
| Due Date | The date the task is scheduled for. |
| Start Time / End Time | The task's planned start and end time. |
| Description | What the task involves, plus its estimated duration (e.g. "80 mins"). |
| Assigned To | Avatar of the employee currently assigned. |
| Notes & Attachments | Every note/file added to this task, shown with who added it and when. |
Task Employees (right panel)
| Field | Description |
|---|---|
| Employee name | Who actually worked the task. |
| Start / End | The actual time this employee started and ended work on the task — this is real timer activity, not the planned Start/End Time on the left. |
| Check-in / Check-out | The date/time this employee checked in and checked out of the task. |
Assign or Reassign a Task
- On a task card, tap the person/Assign icon (or use the + person icon on a category tab to assign a whole category).
- Choose the employee to assign the task to from those present on shift.
- The task's Assignee avatar updates to reflect the new assignment.
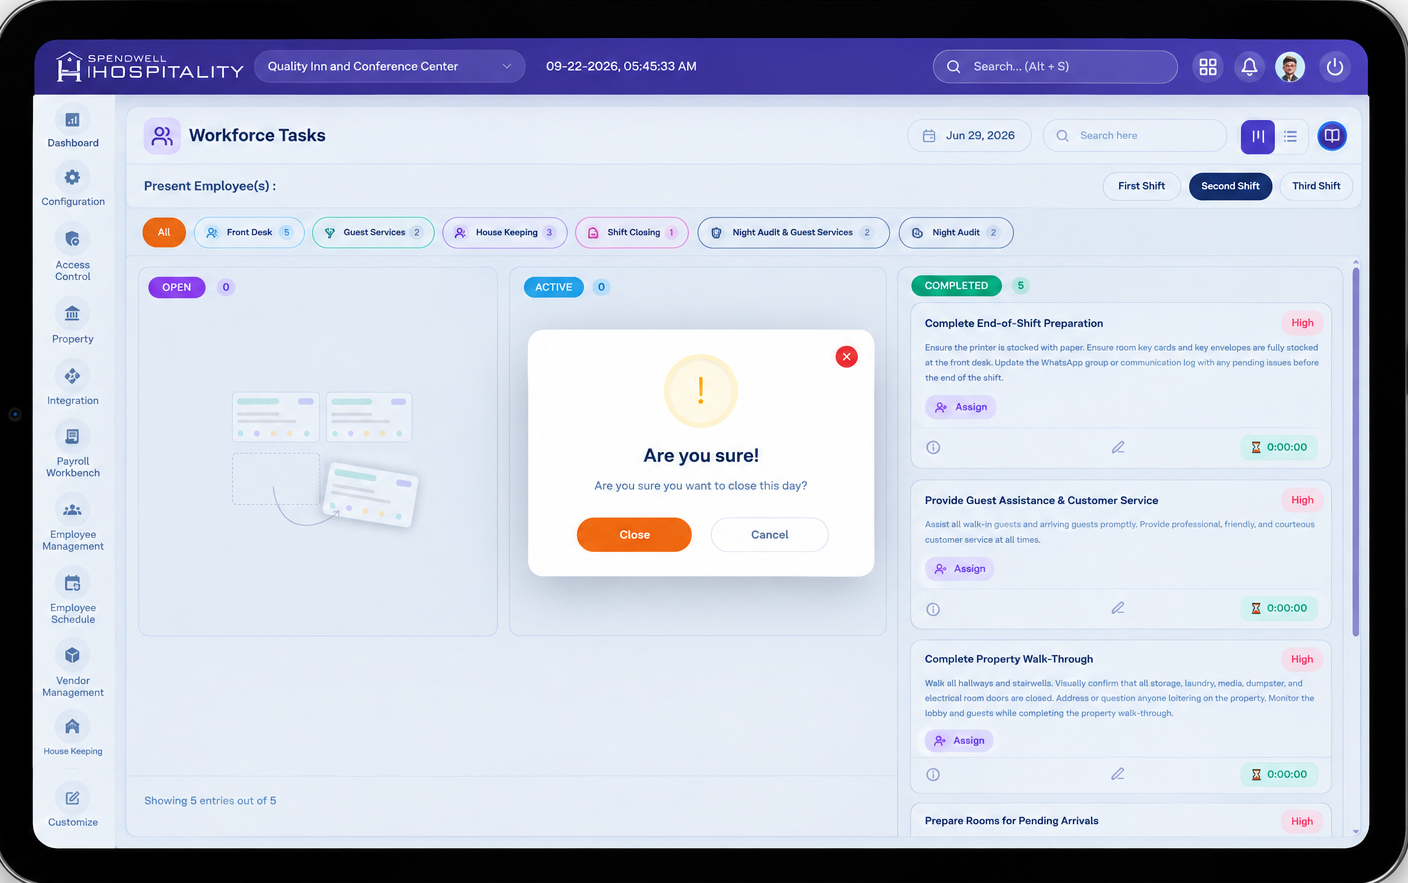
Close the Day
Once all of the shift's tasks are handled, a manager can close out the day so no further changes are made to it.
-
Tap the lock icon in the top-right of the Workforce Tasks screen.
-
A confirmation appears: "Are you sure you want to close this day?"
-

What this screen means: this is a safeguard against accidentally locking a day's tasks — tap CANCEL to back out, or CLOSE to finalize it.
-
Tap CLOSE to confirm, or CANCEL to go back without closing the day.
Workflow
Employee taps Front Desk → Identifies via PIN/face → Selects shift & category → Task moves Open → Active (timer starts) → Pause/Resume as needed → Completed (timer stops)
To document work along the way: Task card → Edit icon → Notes & Attachments → Enter note / attach file → ADD
At end of shift: Lock icon → Are you sure? → CLOSE
Important Notes
- Moving a task's status can be done either from the board (→ arrow) or from the Status dropdown in list view — both do the same thing.
- The timer on an Active task tracks actual time spent, separately from the task's Estimation (its planned/target time) — useful for comparing planned vs. actual effort.
- Present Employee(s) only shows employees currently on shift, so assignment is limited to people actually available to do the work.
- Close Day is a safeguard action — always confirm before finalizing, since it's meant to lock in that day's task activity.
- This module only appears on hubs where Front Desk was checked under Hub Modules — see the iHospitality Hub – Setup page.
Storeroom Inventory Assignment
The Storeroom Inventory Assignment module on the iHospitality Hub lets employees manage a storeroom's stock directly from a shared kiosk device — Assigning new stock into a storeroom. Form-based actions update that storeroom's item counts once approved.
This module only appears on hubs where Storeroom Inventory Assignment was checked under Hub Modules, and only for employees whose User Role has Can iHospitality Hub Login enabled — see the iHospitality Hub Setup page.
Storeroom Inventory Assignment Screen
After signing in and tapping Storeroom Inventory Assignment, the employee sees the option.
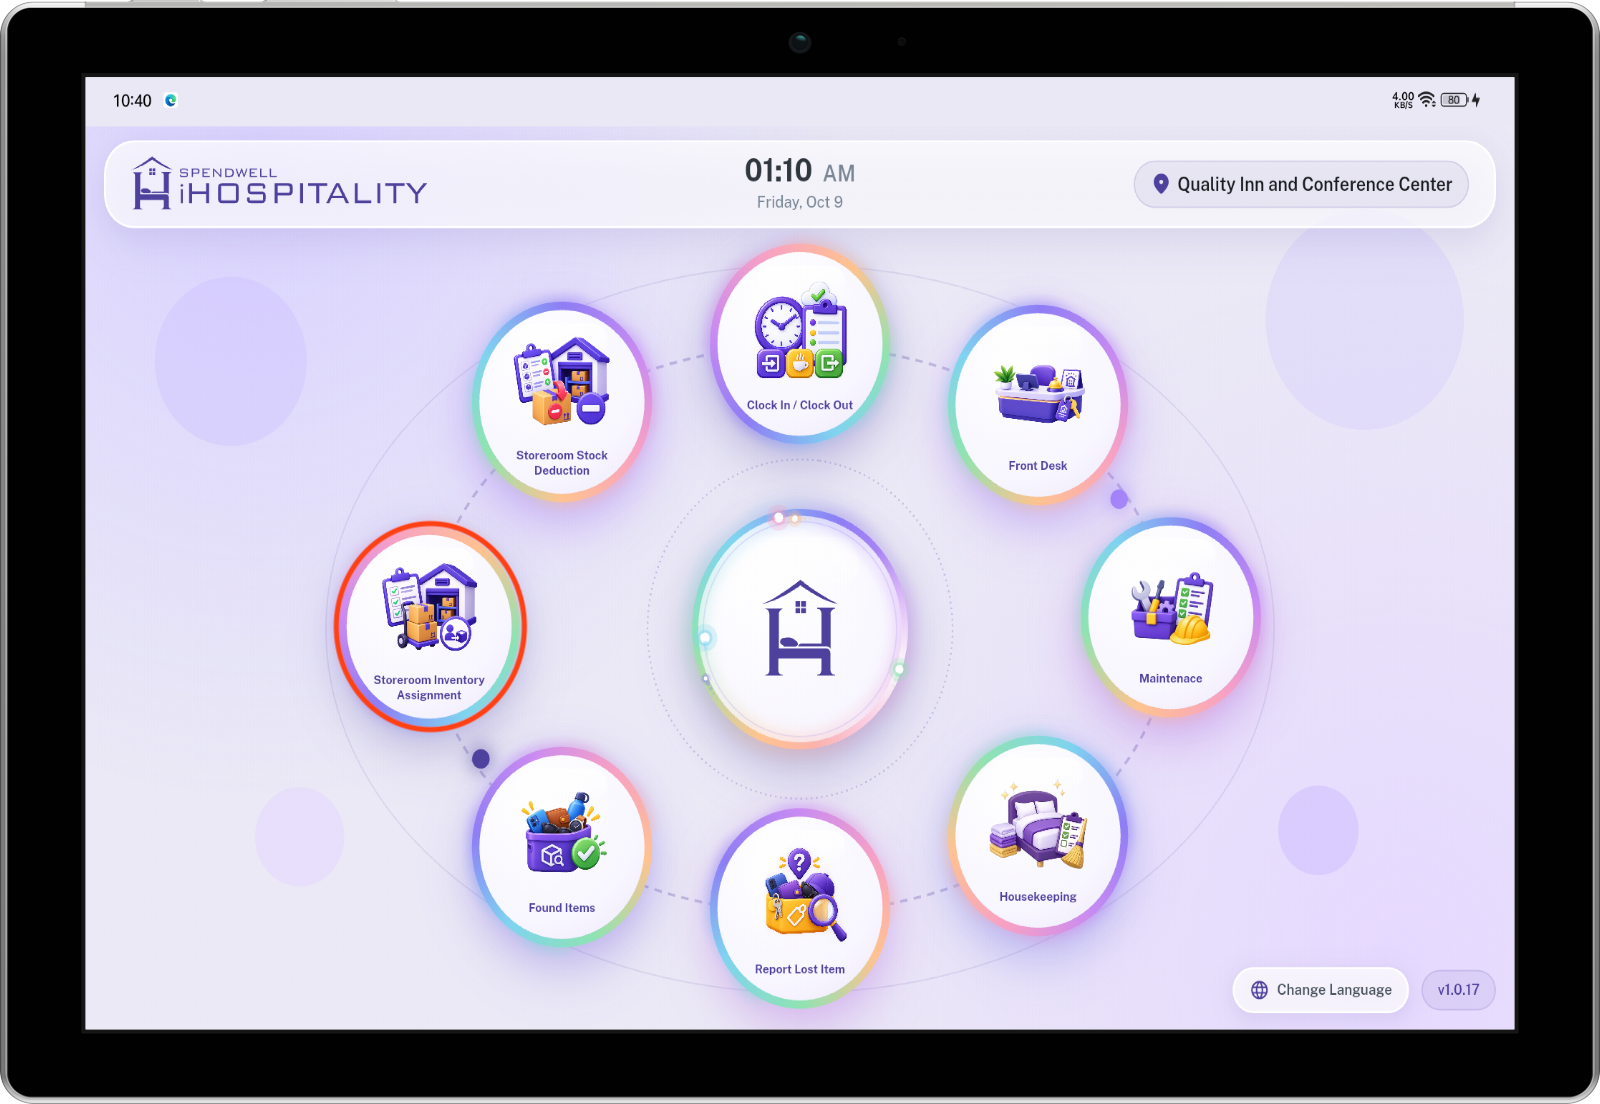
What this screen means: pick Assign Inventory to add stock into a storeroom. Which action to take depends on what the employee is there to do — receiving new stock vs. logging what was used.
Assign Inventory
Adds stock into a chosen storeroom.
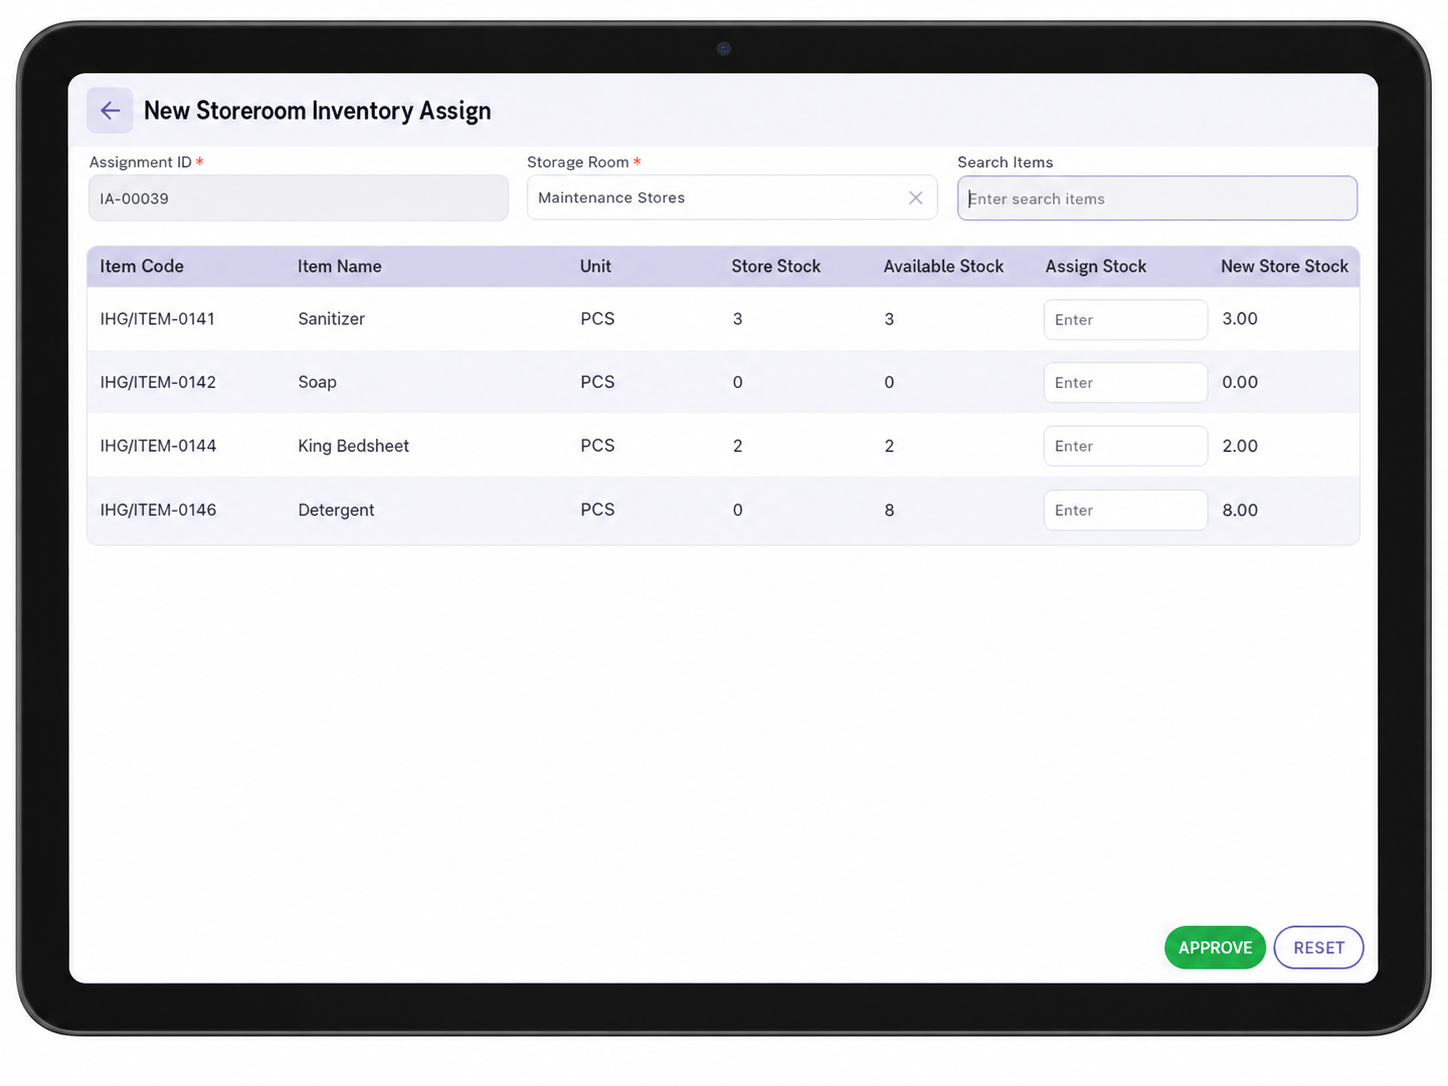
What this screen means: Choose the storeroom, then enter how much of each item to add. The screen shows both what's currently in that storeroom and what's available to assign, before anything is approved.
Key Fields
| Field | Description |
|---|---|
| Assignment ID | Auto-generated, e.g. IA-00039. Read-only. |
| Storage Room | Required — the storeroom this assignment is for, e.g., "Maintenance Stores." |
| Search Items | Search box to find items to add to the table below. |
| Item Code / Item Name / Unit | Identifies the item and its unit of measure (e.g. PCS). |
| Store Stock | The quantity of this item currently in this storeroom, before this assignment. |
| Available Stock | The quantity of this item available from overall inventory to be assigned into this storeroom. |
| Assign Stock | The quantity the employee wants to assign into this storeroom — editable input. |
| New Store Stock | Auto-calculated preview of what the storeroom's stock will become once approved: Store Stock + Assign Stock. |
Steps
- Tap Assign Inventory from the Inventory Management screen.
- Select the Storage Room to assign stock into.
- Use Search Items to find the item(s), or scroll the table.
- For each item, enter the quantity to add in Assign Stock. New Store Stock updates automatically to show the result.
- Tap APPROVE to confirm the assignment, or RESET to clear the form.
Workflow
Employee taps Storeroom Inventory Assignment → Identifies via PIN/face → Selects Storage Room → Enters quantities per item → Reviews New/Store New Stock → APPROVE
Important Notes
- Store Stock always refers to what's currently in the selected storeroom — it's the starting point for both Assign and Deduct.
- On the Assign form, Available Stock comes from overall inventory, not the storeroom itself — it's how much could be assigned, separate from what's already there.
- New Store Stock (Assign) and Store New Stock (Deduct) are both previews calculated automatically as you type — nothing is updated in the system until APPROVE is tapped.
- RESET clears the form without saving; it does not undo an assignment/deduction that was already approved.
- This module only appears on hubs where Inventory Management was checked under Hub Modules — see the iHospitality Hub – Setup page.
Storeroom Stock Deduction
The Storeroom Stock Deduction module on the iHospitality Hub lets employees manage a storeroom's stock directly from a shared kiosk device — deducting stock that's been used or consumed. Form-based actions update that storeroom's item counts once approved.
This module only appears on hubs where Storeroom Stock Deduction was checked under Hub Modules, and only for employees whose User Role has Can iHospitality Hub Login enabled — see the iHospitality Hub Setup page.
Storeroom Stock Deduction Screen
After signing in and tapping Storeroom Stock Deduction, the employee sees two options.
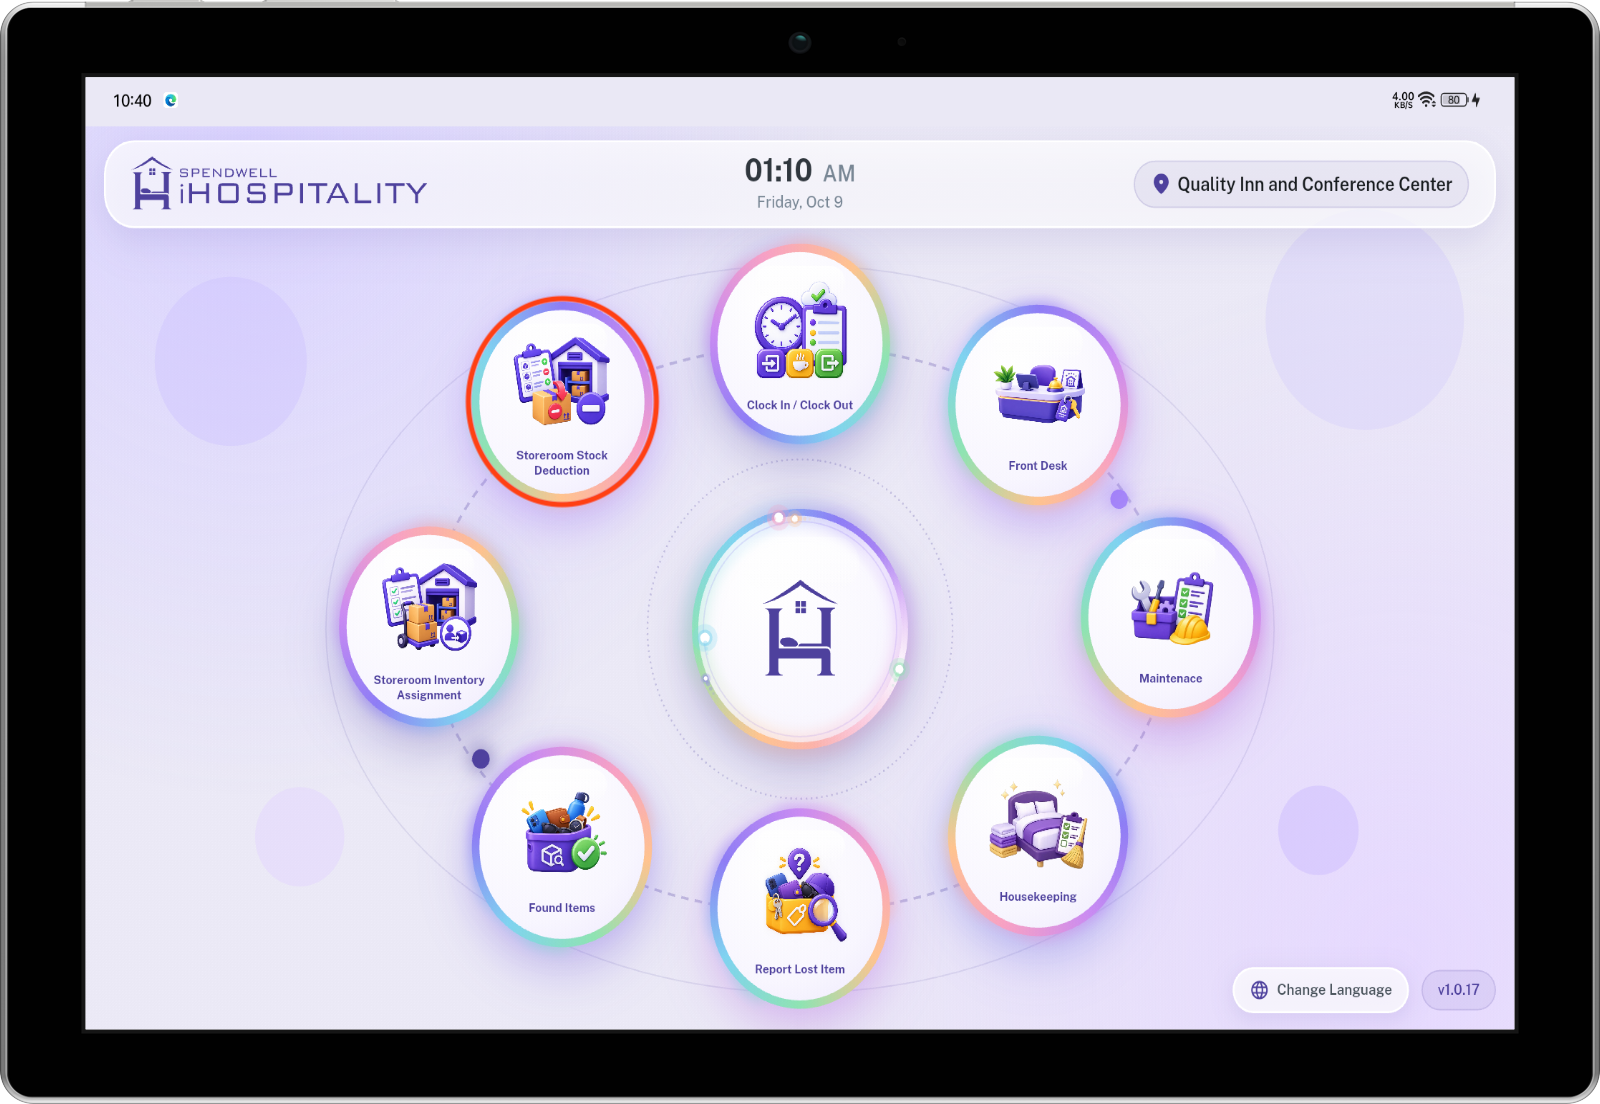
What this screen means: Deduct Stock removes stock that's been used or consumed. Which action to take depends on what the employee is there to do — receiving new stock vs. logging what was used.
Deduct Stock
Removes stock from a chosen storeroom once it's been used or consumed.
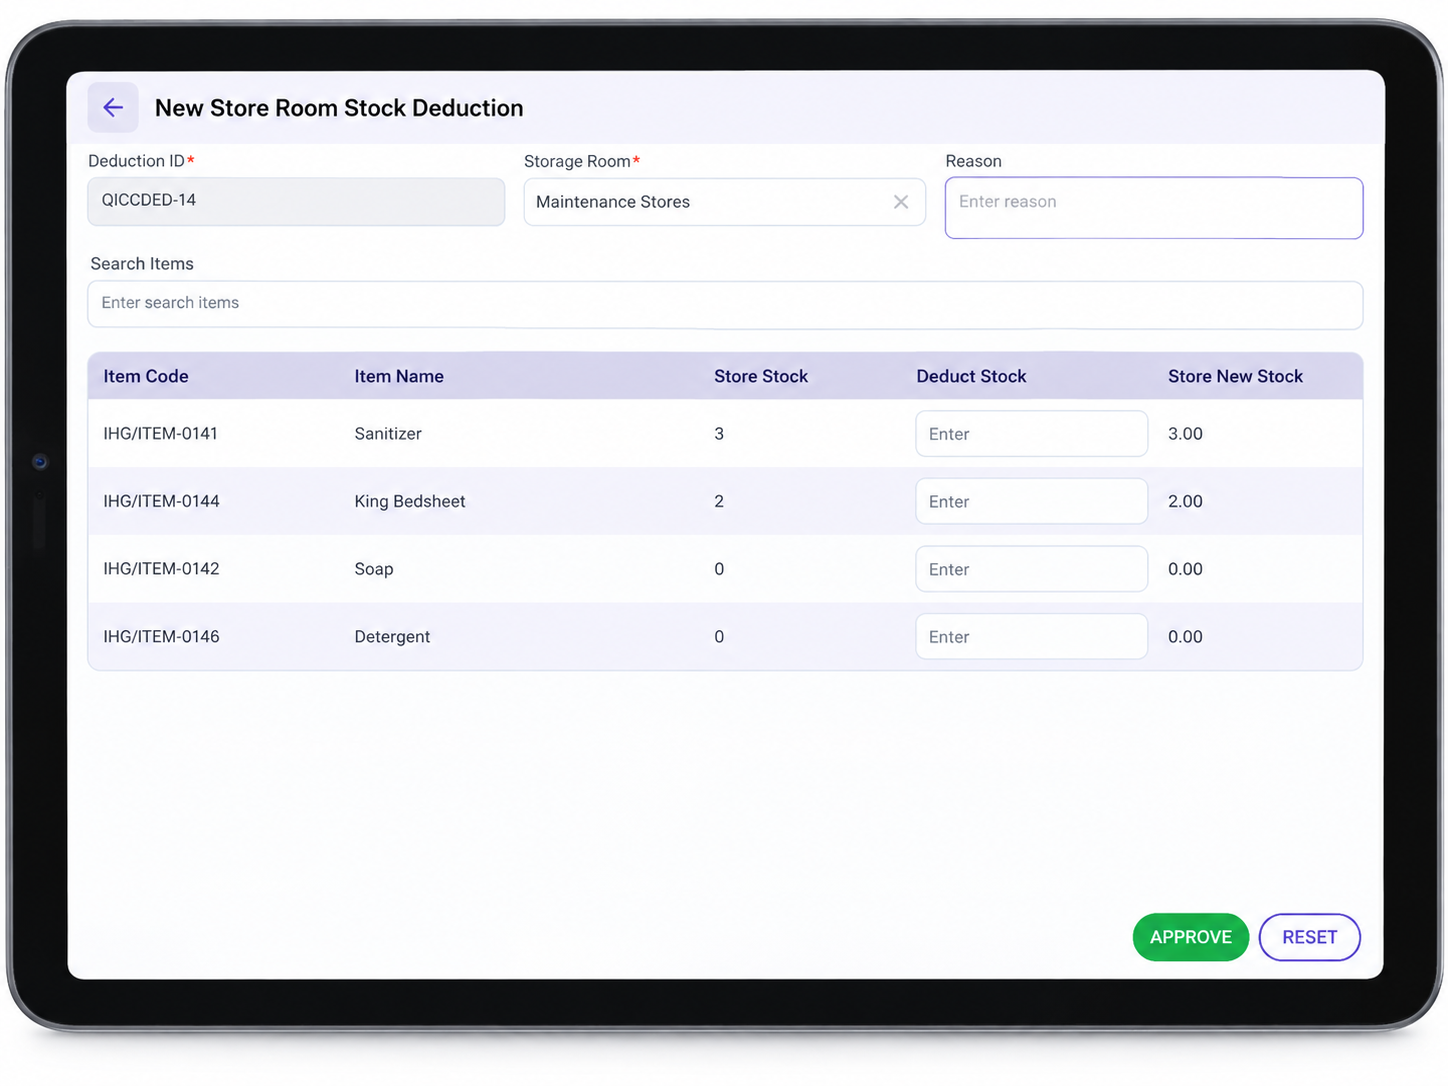
What this screen means: Choose the storeroom and enter how much of each item was used — the form shows the resulting stock level before you approve it.
Key Fields
| Field | Description |
|---|---|
| Deduction ID | Auto-generated, e.g. QICCDED-14. Read-only. |
| Storage Room | Required — the storeroom this deduction is for, e.g., "Maintenance Stores." |
| Reason | Free-text field to note why the stock is being deducted. |
| Search Items | Search box to find items to add to the table below. |
| Item Code / Item Name | Identifies the item. |
| Store Stock | The quantity of this item currently in this storeroom, before this deduction. |
| Deduct Stock | The quantity the employee wants to remove — editable input. |
| Store New Stock | Auto-calculated preview of what the storeroom's stock will become once approved: Store Stock − Deduct Stock. |
Note: The Deduct Stock table has fewer columns than the Assign table — there's no Unit or Available Stock column here, since deduction only concerns what's already in this storeroom.
Steps
- Tap Deduct Stock from the Inventory Management screen.
- Select the Storage Room the deduction is coming from.
- Enter a Reason for the deduction.
- Use Search Items to find the item(s), or scroll the table.
- For each item, enter the quantity used/consumed in Deduct Stock. Store New Stock updates automatically to show the result.
- Tap APPROVE to confirm the deduction, or RESET to clear the form.
Workflow
Employee taps Storeroom Stock Deduction → Identifies via PIN/face → Selects Storage Room → Enters quantities per item → Reviews New/Store New Stock → APPROVE
Important Notes
- Store Stock always refers to what's currently in the selected storeroom — it's the starting point for both Assign and Deduct.
- On the Assign form, Available Stock comes from overall inventory, not the storeroom itself — it's how much could be assigned, separate from what's already there.
- New Store Stock (Assign) and Store New Stock (Deduct) are both previews calculated automatically as you type — nothing is updated in the system until APPROVE is tapped.
- RESET clears the form without saving; it does not undo an assignment/deduction that was already approved.
- This module only appears on hubs where Inventory Management was checked under Hub Modules — see the iHospitality Hub Setup page.
Lost & Found
Overview
The Lost & Found module on the iHospitality Hub enables staff to report guest lost-item claims and to record and manage items recovered on property. Both workflows are completed directly from a shared kiosk device, with each report or record time-stamped and attributed to the employee who created it.
This module only appears on hubs where Lost & Found was checked under Hub Modules, and only for employees whose User Role has Can iHospitality Hub Login enabled — see the iHospitality Hub – Setup page.
Lost & Found Screen
After signing in and tapping Lost & Found, the employee sees two options.
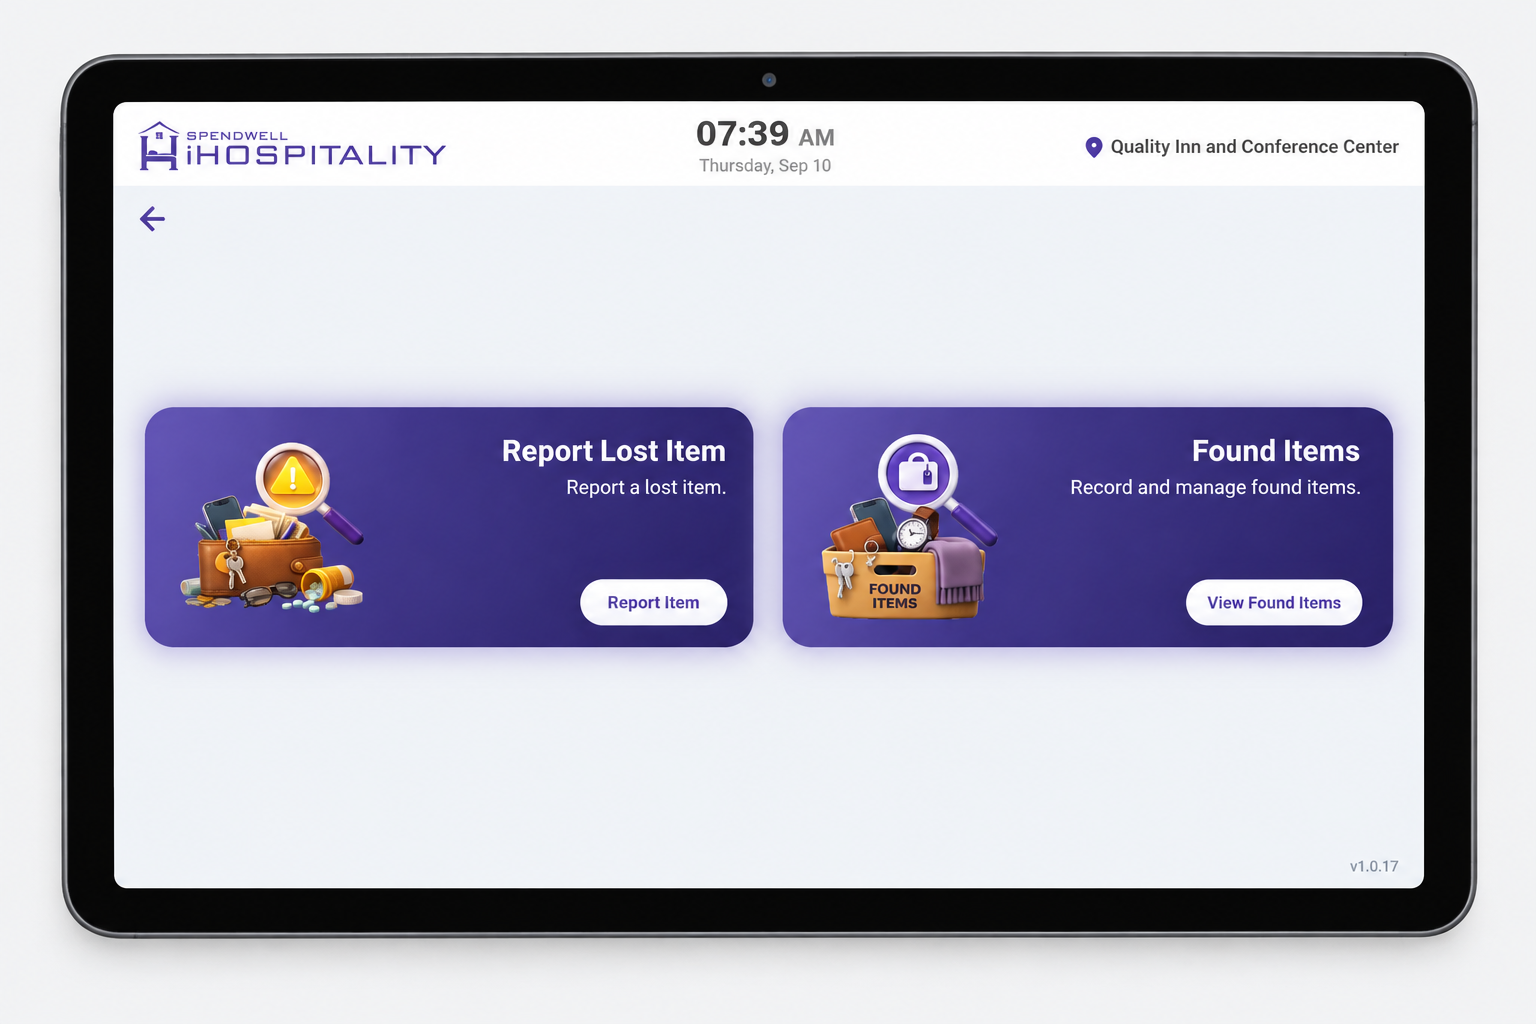
What this screen means: pick Report Lost Item when a guest has lost something, or Found Items to log or manage an item that's been found.
| Option | What it does |
|---|---|
| Report Lost Item | Log a report for an item a guest has lost. |
| Found Items | Record a newly found item, or view/manage items already logged as found. |
Report Lost Item
Lost Item List
Tapping View Found Items—equivalent for lost reports — opens the Lost Item list — every lost item report logged for the property.
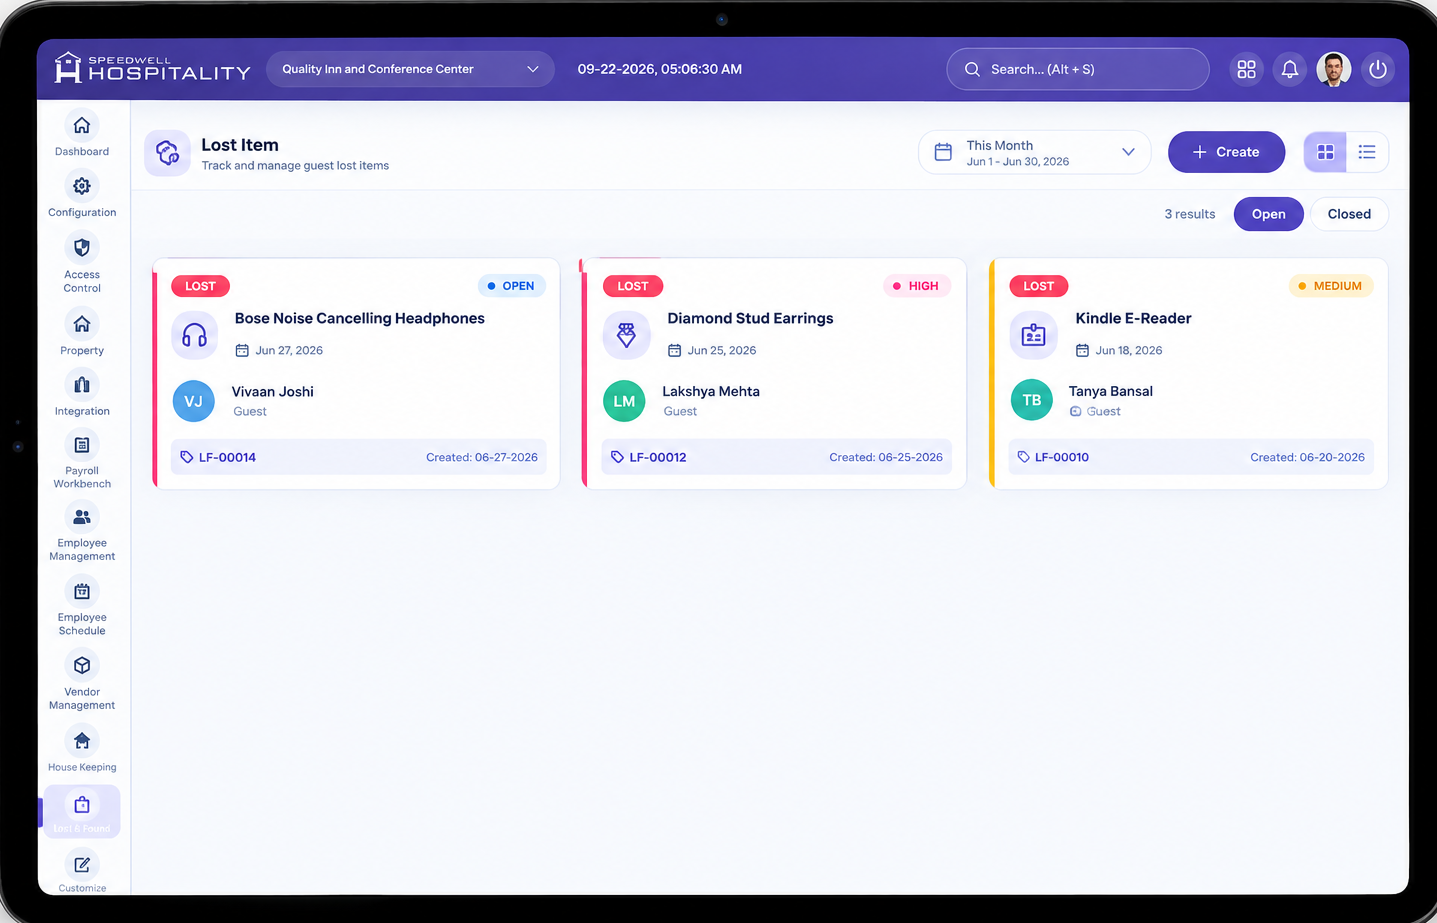
| Element | Description |
|---|---|
| Open / Closed tabs | Filter reports by status. |
| Date range filter | e.g., "This Month," with a specific date range shown underneath. |
| Search | Search existing reports. |
| + Create | Opens the New Lost Request form (below). |
| Priority badge | Low / Medium / High. |
| Item name | What was lost, e.g., "Shoes," "Car key." |
| Lost at | Room number(s) or area where the item was lost. |
| Reporter | Avatar initials + name of the guest who reported it. |
| L&F ID | Unique reference code for the report, e.g. L&F-00036. |
| Date | When the report was logged (e.g. "Today"). |
| View (eye icon) | Opens the full report — only shown on some cards. |
| Delete (trash icon) | Deletes the report. |
New Lost Request Form
Tap + Create (or Report Item from the Lost & Found screen) to log a new lost item report.
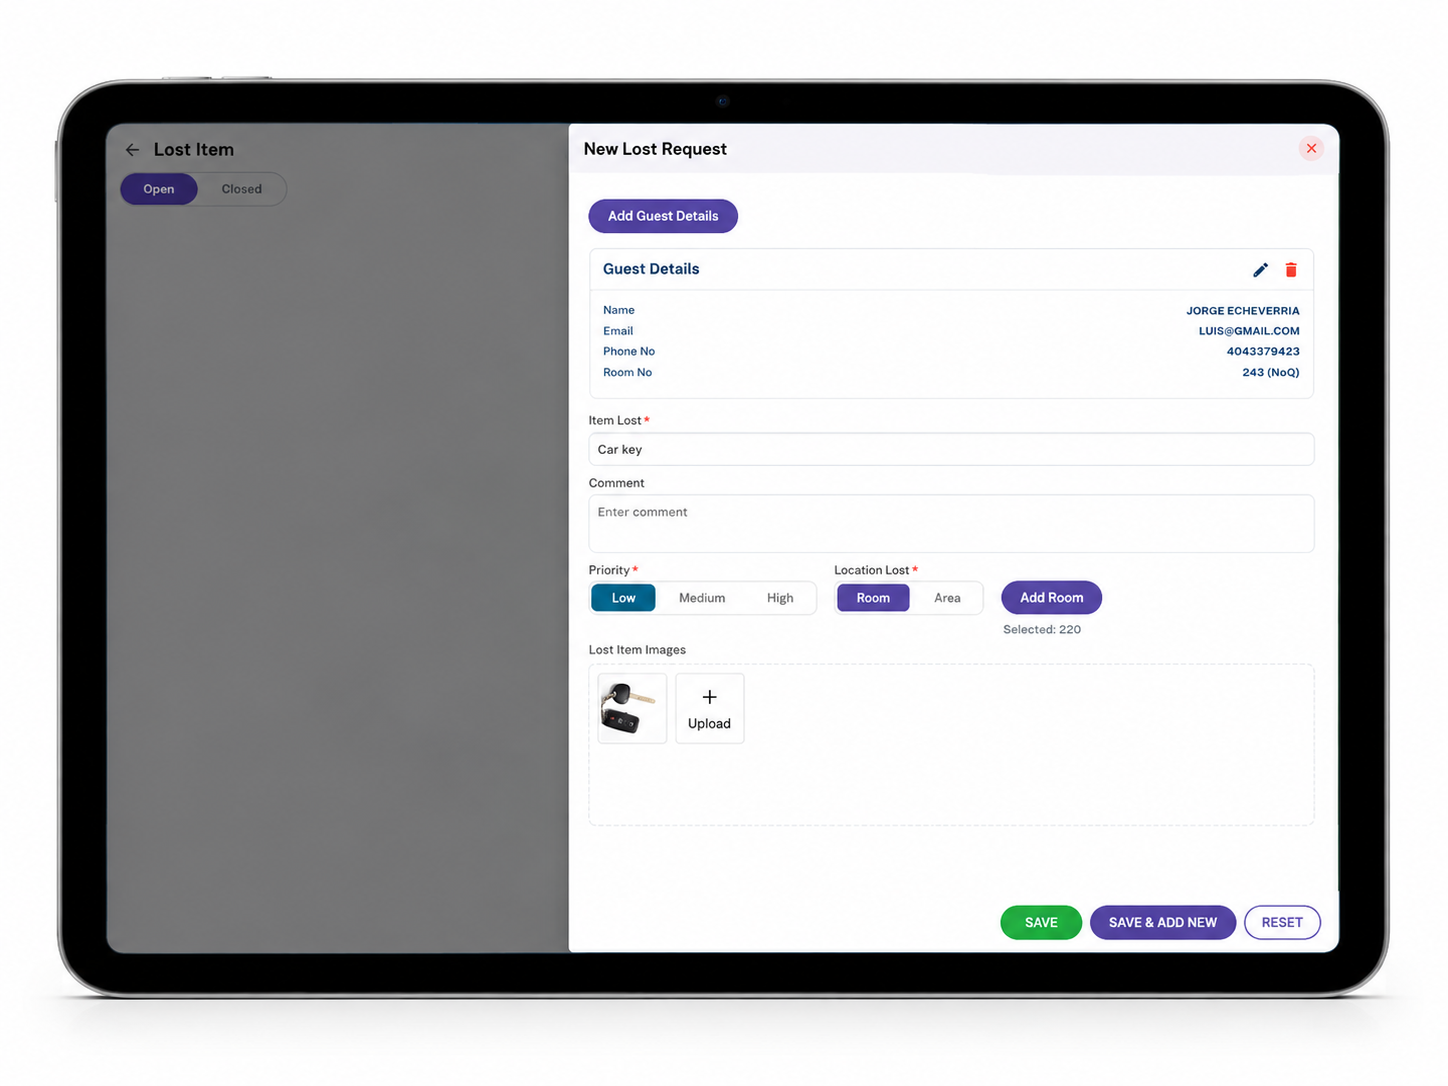
| Field | Required | Description |
|---|---|---|
| Add Guest Details | — | Button that adds a Guest Details card to the form — Name, Email, Phone No., and Room No. — so the report is tied to the guest who lost the item. |
| Item Lost | Yes | What was lost, e.g., "Car key." |
| Comment | No | Free-text notes about the item or the loss. |
| Priority | Yes | Low / Medium / High. |
| Location Lost | Yes | Room or Area — then Add Room to select the specific room/area. The selection appears as "Selected: 220." |
| Lost Item Images | No | Upload one or more photos of the item, or a reference photo, via + Upload. |
Steps
- From the Lost & Found screen, tap Report Item (or + Create from the Lost Item list).
- Tap Add Guest Details and fill in the guest's Name, Email, Phone No., and Room No.
- Enter the Item Lost and an optional Comment.
- Select the Priority.
- Select Room or Area under Location Lost, then tap Add Room to choose the specific location.
- Upload a photo under Lost Item Images if available.
- Tap SAVE (or SAVE & ADD NEW to log another report immediately).
Found Items
New Found Request Form
Tap View Found Items from the Lost & Found screen, then + Create to log a newly found item. 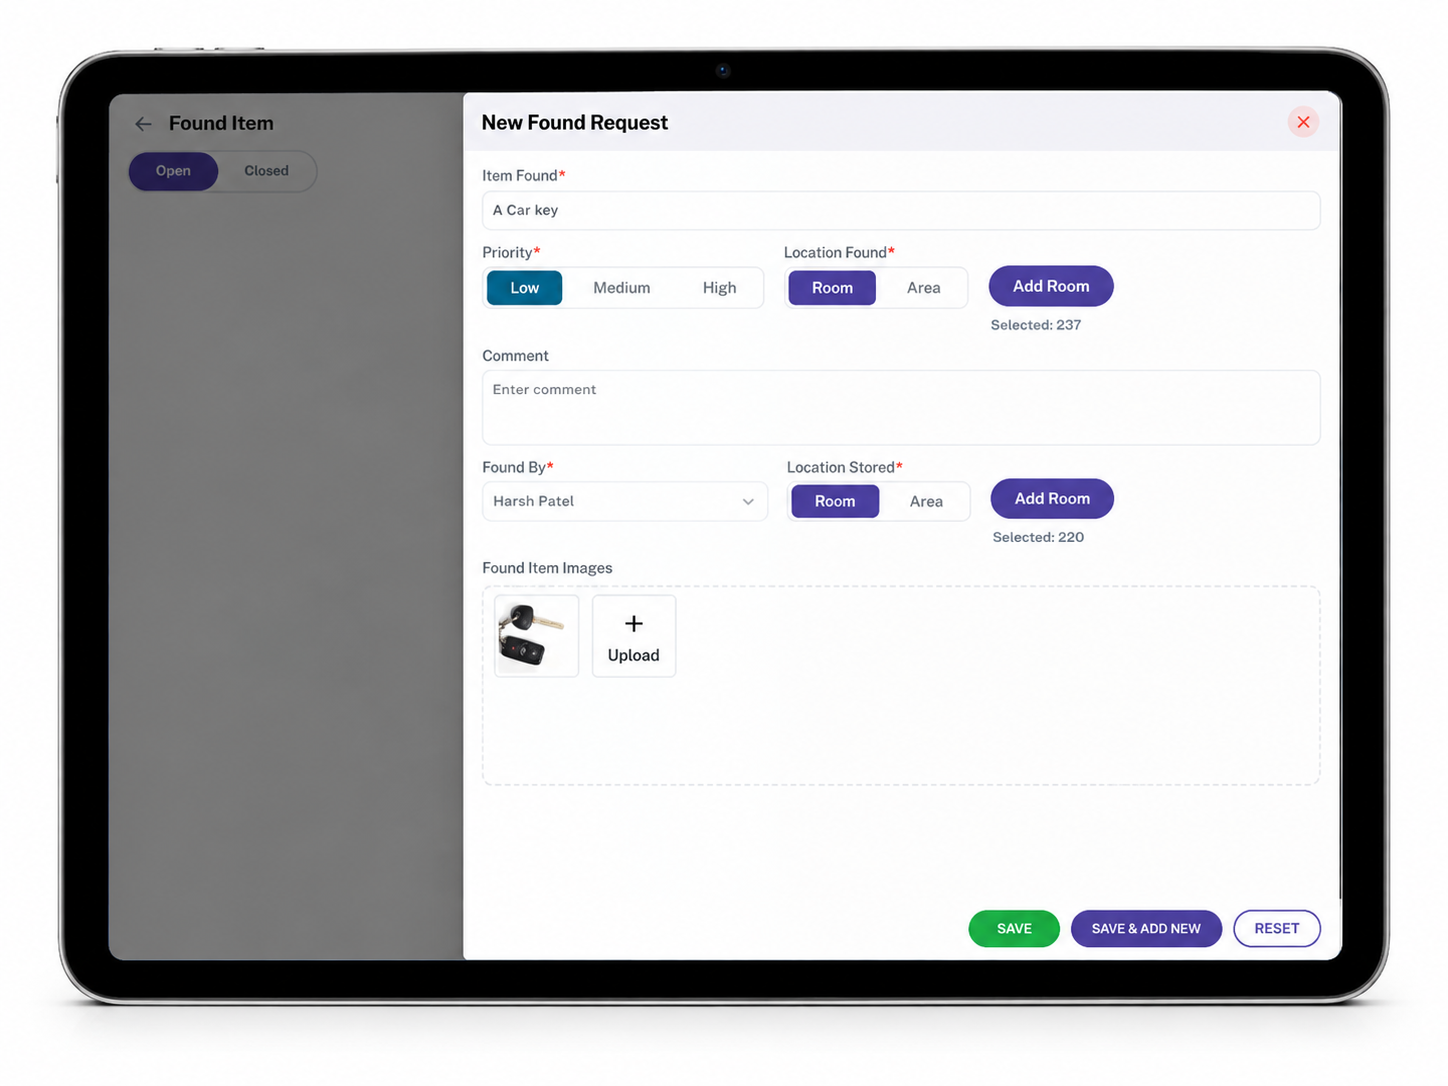
| Field | Required | Description |
|---|---|---|
| Item Found | Yes | What was found, e.g., "A Car key." |
| Priority | Yes | Low / Medium / High. |
| Location Found | Yes | Room or Area where the item was found, then Add Room to select the specific location. |
| Comment | No | Free-text notes about the item. |
| Found By | Yes | The employee who found the item, selected from a dropdown. |
| Location Stored | Yes | Room or Area where the item is currently being kept; then Add Room to select the specific location. |
| Found Item Images | No | Upload one or more photos of the item via + Upload. |
Steps
- From the Lost & Found screen, tap View Found Items, then + Create.
- Enter the Item Found and select a Priority.
- Select Room or Area under Location Found, then Add Room to choose the specific location.
- Enter an optional Comment.
- Select who found it under Found By.
- Select Room or Area under Location Stored, then Add Room to choose where it's being kept.
- Upload a photo under Found Item Images if available.
- Tap SAVE (or SAVE & ADD NEW to log another item immediately).
The Found Items list itself (Open/Closed tabs, cards, search, date filter) is expected to follow the same layout as the Lost Item list above — to be confirmed against the live screen before publishing.
Workflow
Report a lost item: Employee taps Lost & Found → Report Item → Add Guest Details → Enter Item Lost, Priority, Location Lost → (optional photo) → SAVE
Log a found item: Employee taps Lost & Found → View Found Items → + Create → Enter Item Found, Priority, Location Found, Found By, Location Stored → (optional photo) → SAVE
Important Notes
- A lost report is tied to the guest who reported it (Guest Details); a found report is tied to the employee who found it (Found By) — they capture different information because they start from different situations.
- Found Items tracks two separate locations — Location Found (where it turned up) and Location Stored (where it's being kept now) — don't confuse the two when logging a found item.
- The eye icon on a Lost Item card opens that report's full details; not every card shows it, which may depend on whether the report has additional detail to view.
- This module only appears on hubs where Lost & Found was checked under Hub Modules — see the iHospitality Hub – Setup page.
Maintenance Task
This is the daily board. A technician starts the job, works through the checklist, and pauses before leaving. An inspector checks the work when the category requires it. A supervisor assigns the work order before it starts.
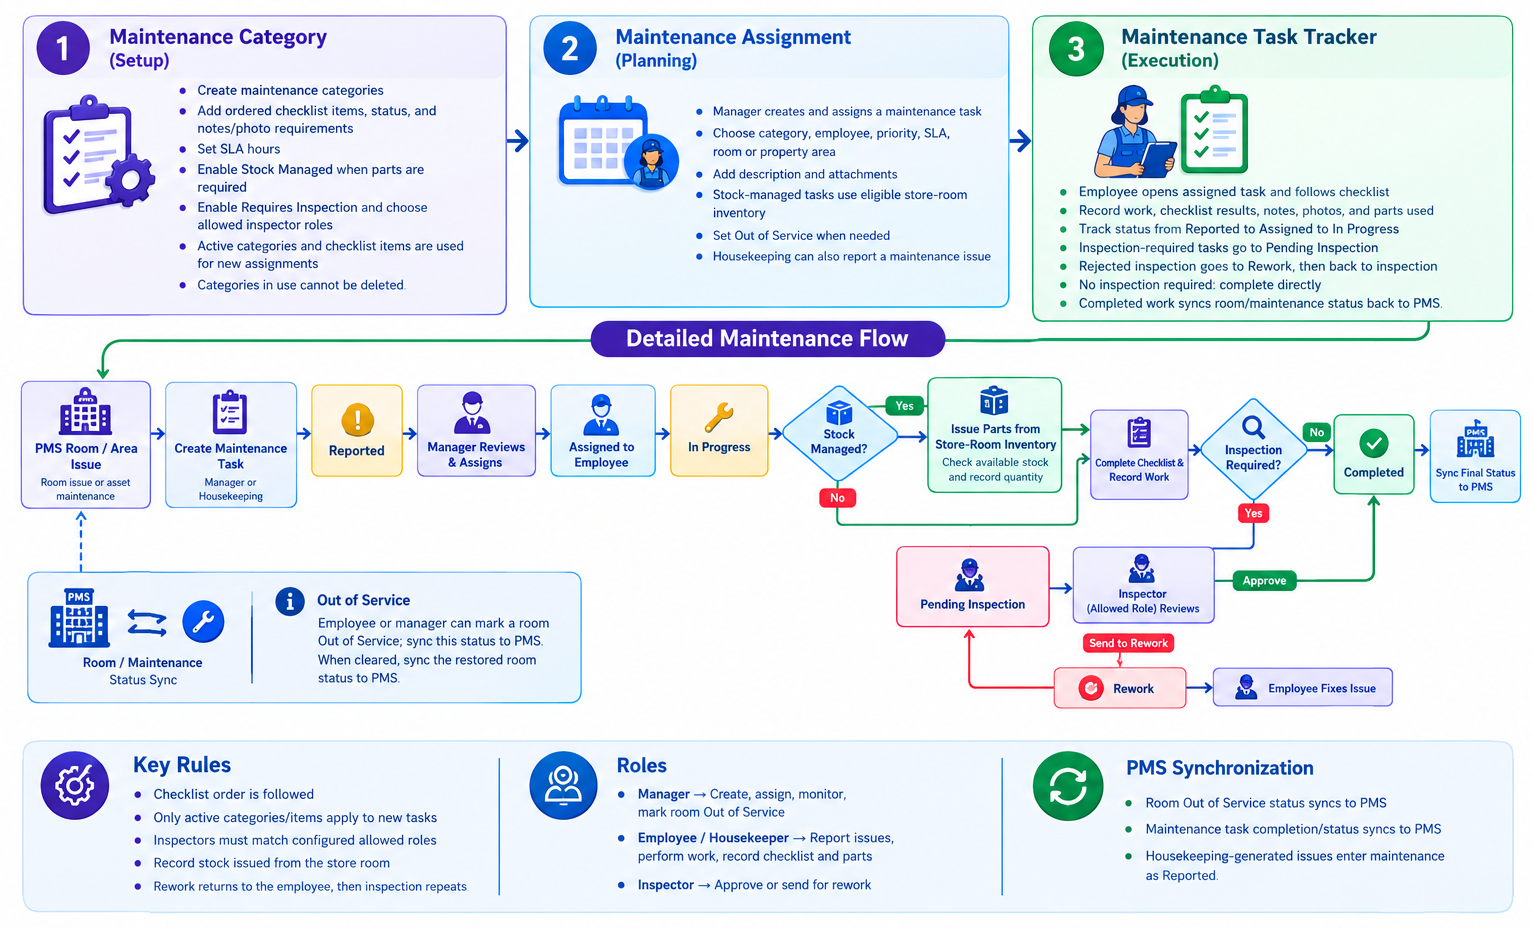
Open this from Maintenance. You can use a list or a board with one column per stage.
Maintenance Task has two views. The icons in the top-right corner switch between them. Desktop opens in Kanban View. A phone opens in Plain View. The search, the reported date range, and the filters stay the same in both.
Switch the view
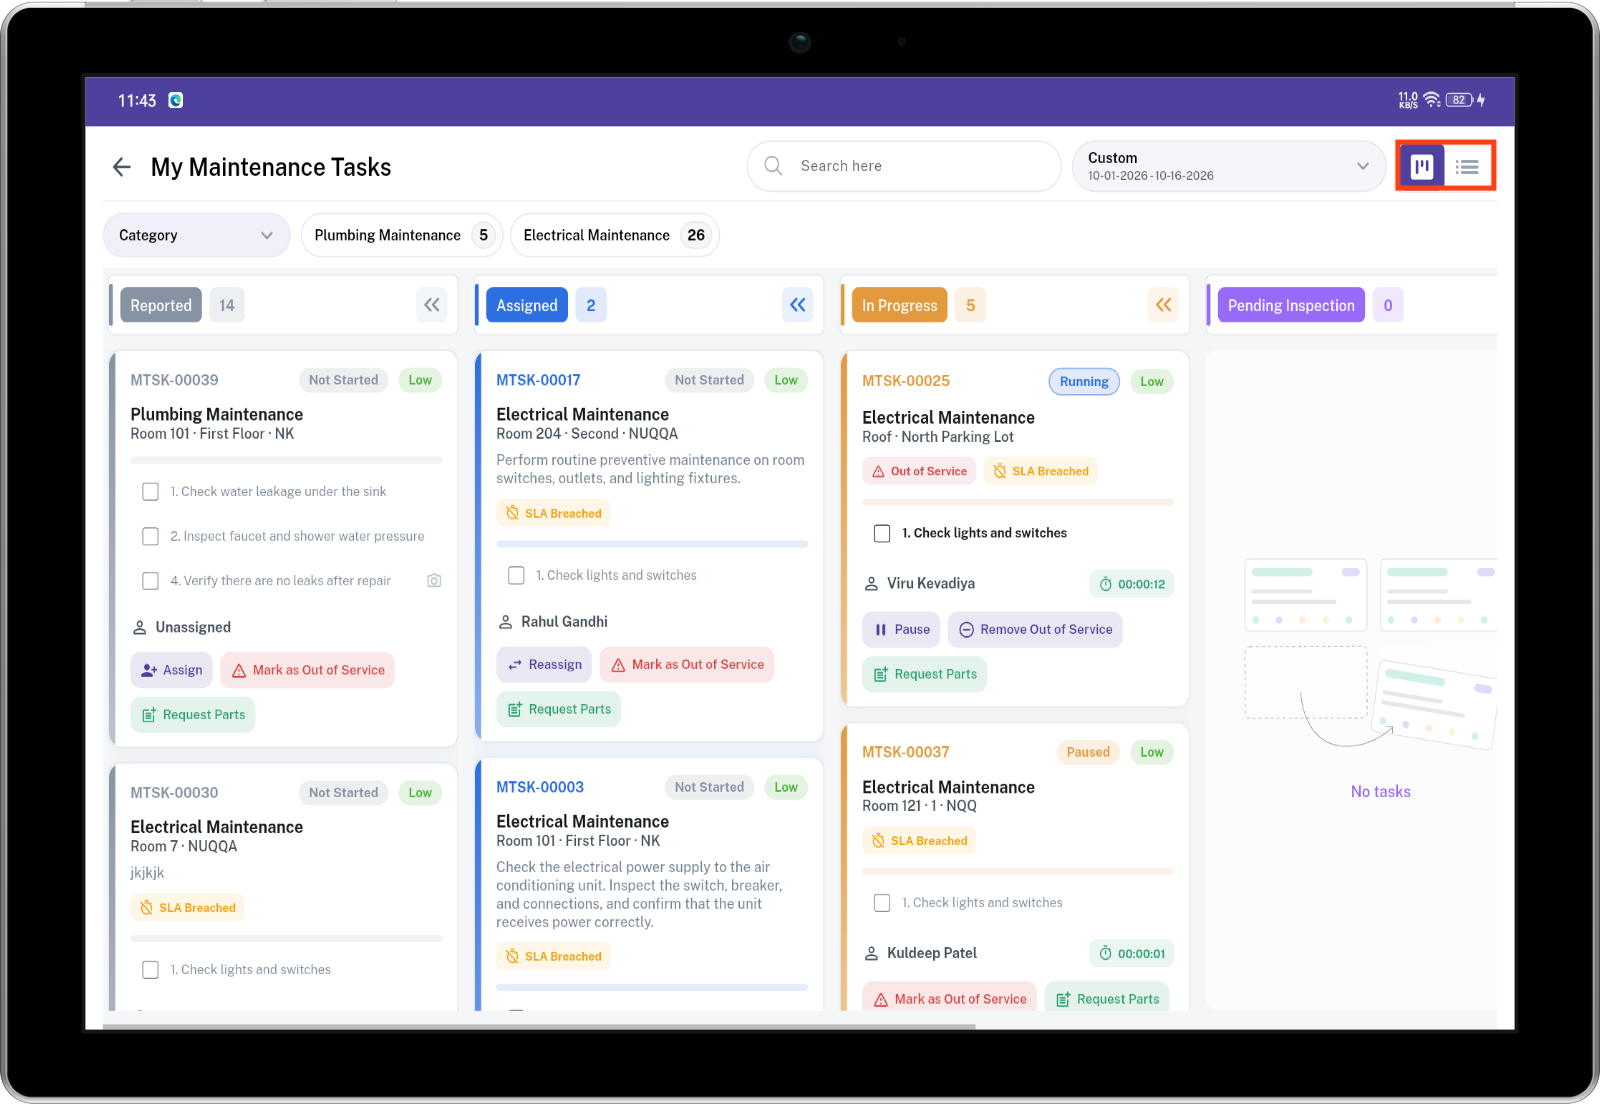 The board icon is Kanban View. The list icon is Plain View. Tap one to change the layout. The same work orders stay on screen. Only the way they are arranged changes.
Kanban View
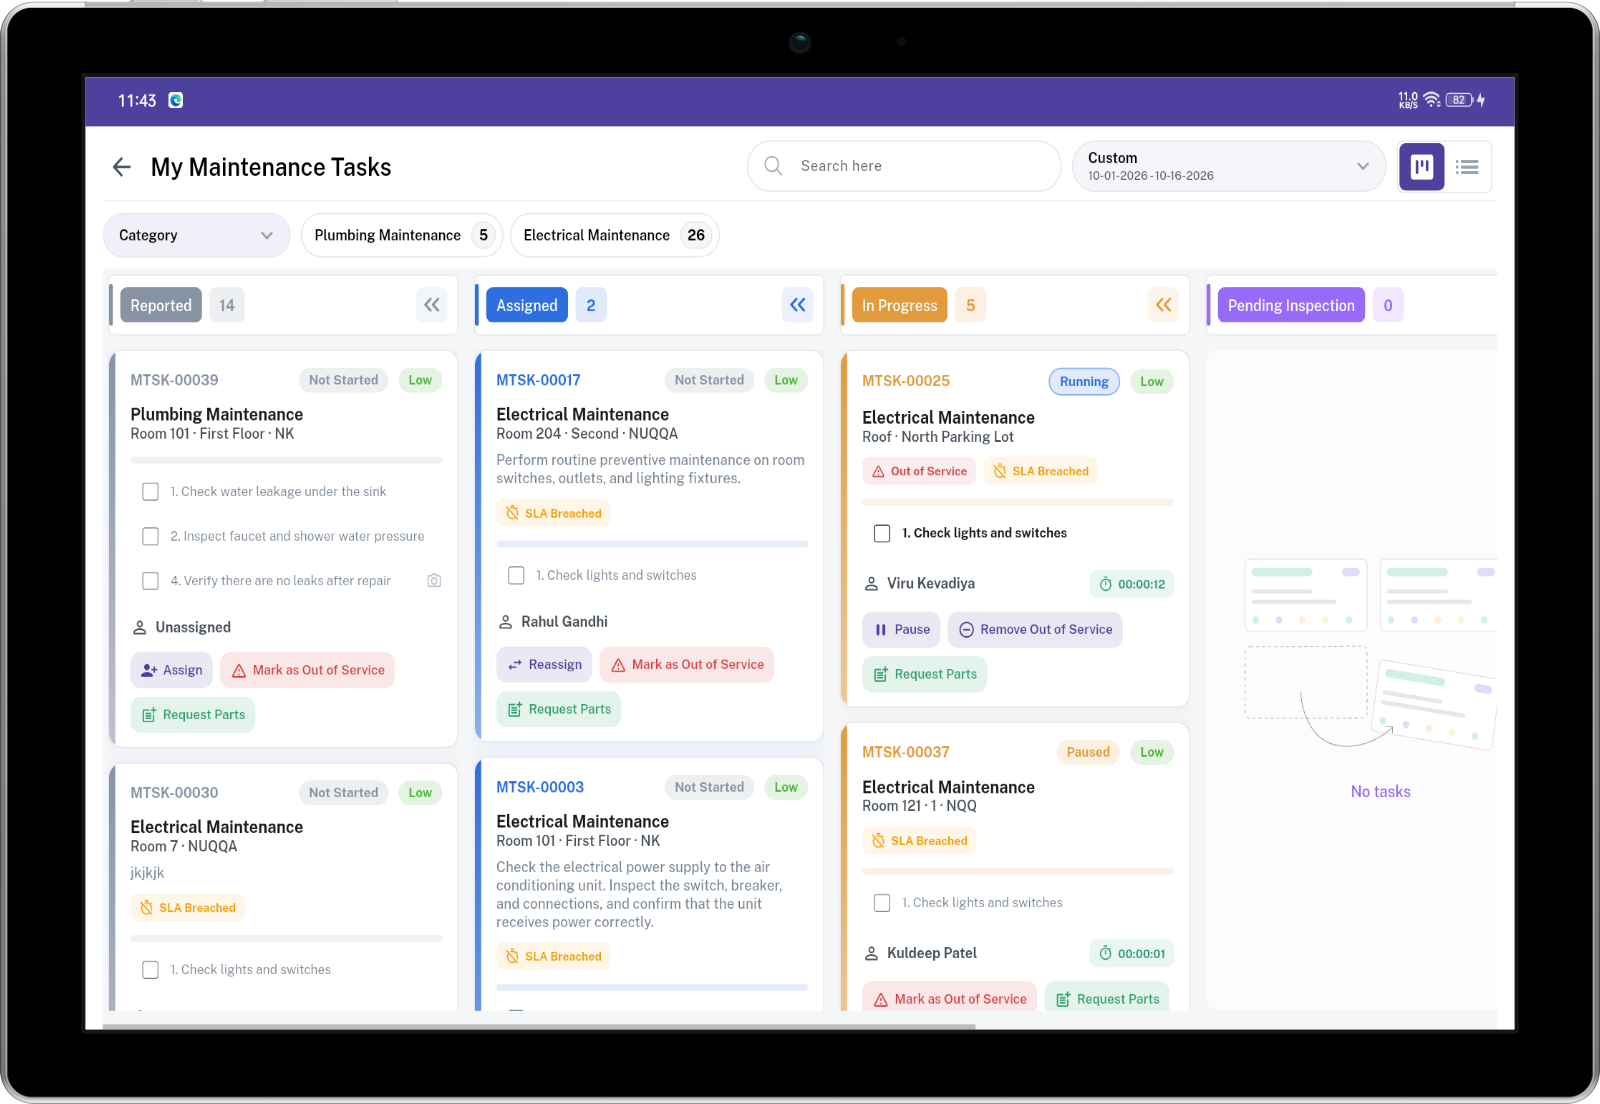
Kanban View is the column board. One column is one stage. Cards sit in the column that matches where the work is now. Each column has its own color, name, and count. Scroll inside a column to load more cards for that stage only.
Drag a card into the next allowed column to move it. Drag a Reported card onto Assigned to assign it to yourself. A card in Pending Inspection is not dragged to Rework or Completed. Those moves happen by marking checklist steps.
| Column | What it means |
|---|---|
| Reported | Created. No technician yet. |
| Assigned | A technician is named. Work has not started. |
| In Progress | The technician is working, or has paused. |
| Pending Inspection | The technician is done. Inspection has not started, or is underway. |
| Rework | The inspector sent one or more steps back. |
| Completed | Closed. It stays closed. |
Plain View
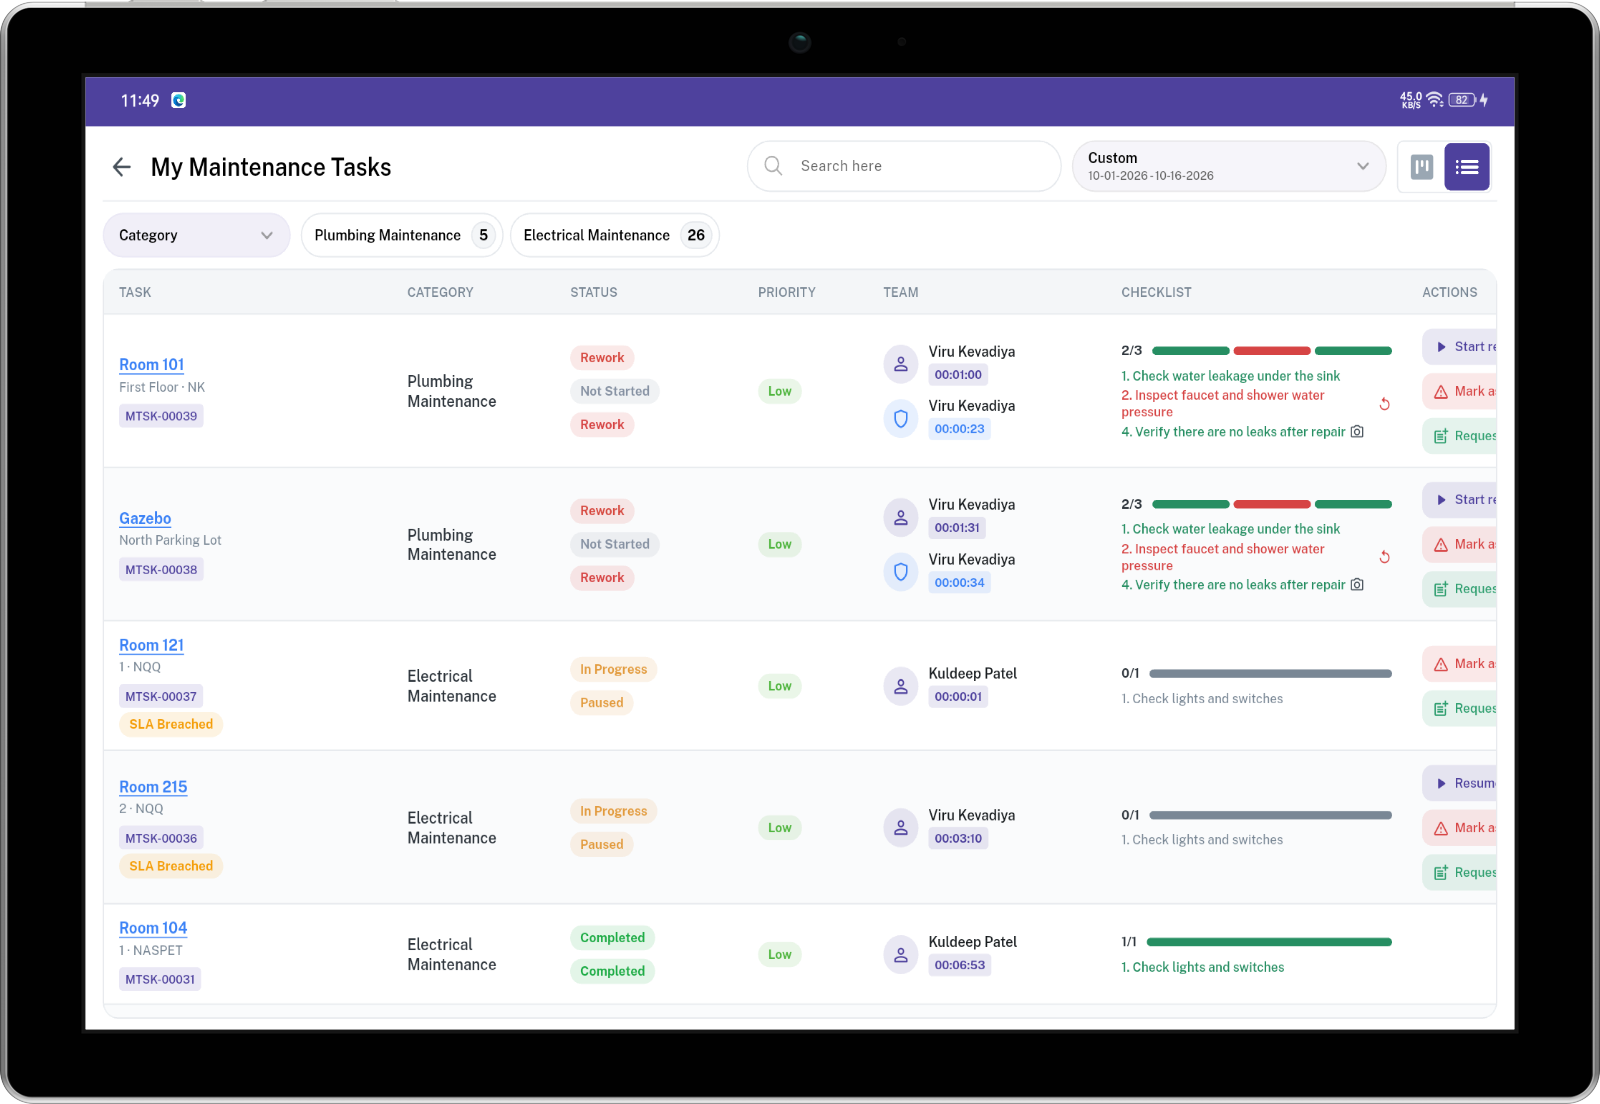
Plain View is one table. There are no columns to drag between. Newest reported work orders are first. Load more at the bottom brings the next page.
| Column | What it shows |
|---|---|
| Task | Work order code, room or area, and stage |
| Category | Maintenance category |
| Status | Timer status: Not Started, Running, Paused, or Completed |
| Priority | Low, Medium, High, or Critical |
| Team | Technician and the inspector when one has started |
| Checklist | How many steps are done |
| Actions | The same buttons as on the Kanban card for that stage |
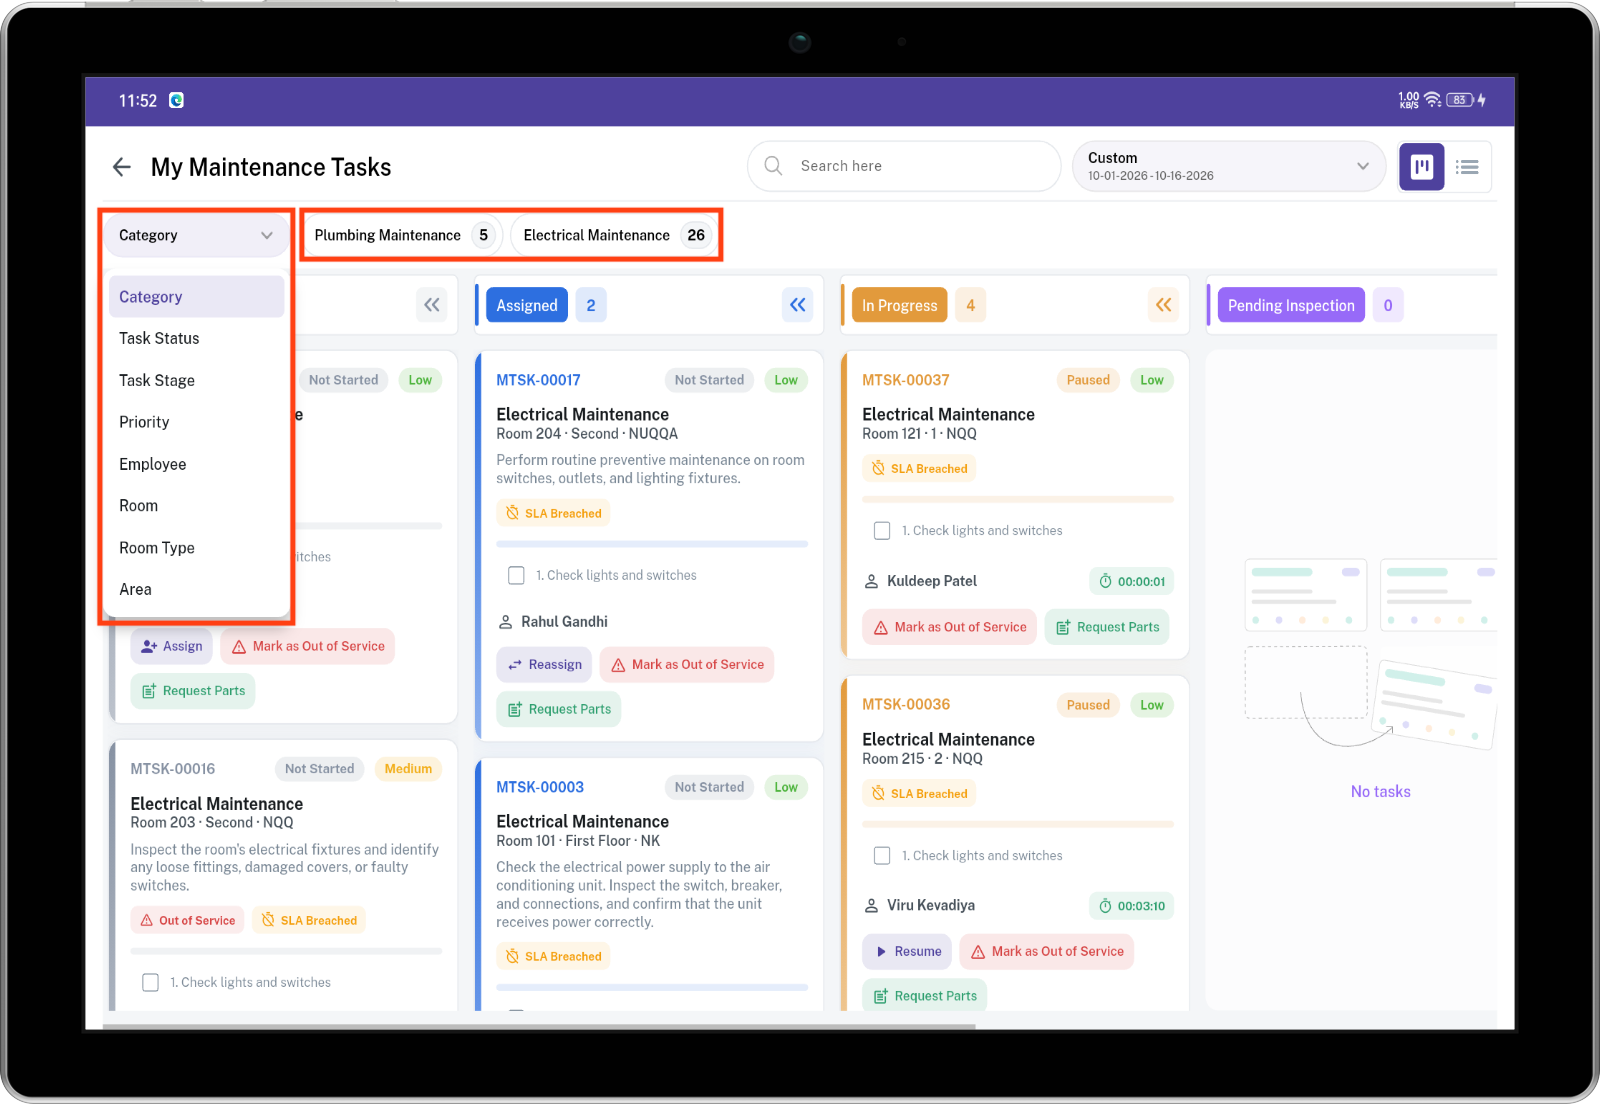
Filters
Switch between list and columns. The columns follow the order above. Each column loads more work orders as you scroll. The list is newest reported first.
Filters, each with a count of matching work orders:
- Category
- Timer status
- Column
- Priority
- Employee
- Room
- Room type
- Area
Choosing a category narrows the other filters. The date range uses the reported date.
A card shows the code, category, room or area, priority, technician, time target, and checklist progress.
Stage and timer
The stage is the column. The timer status is whether work inside that column is stopped, running, or paused.
A work order can sit in In Progress while the timer is Paused. Pausing does not move it to another column.
| Order | Stage | Meaning |
|---|---|---|
| 1 | Reported | Created, and no technician is assigned. |
| 2 | Assigned | A technician is named. The timer has not started. |
| 3 | In Progress | The technician is working or has paused. |
| 4 | Pending Inspection | The technician is done. An inspector has not started, or is inspecting now. |
| 5 | Rework | The inspector sent one or more steps back. |
| 6 | Completed | Closed. It stays closed. |
Timer
| Timer status | Meaning |
|---|---|
| Not Started | The timer for this column has not been started. |
| Running | The timer is running. |
| Paused | The timer is paused. The time already counted is kept. |
| Completed | Used when the column is Completed. |
| Column | Timer you will see |
|---|---|
| Reported | Not Started |
| Assigned | Not Started |
| In Progress | Running or Paused |
| Pending Inspection | Not Started while waiting, then Running or Paused during the inspection |
| Rework | Not Started until the technician starts again |
| Completed | Completed |
Two clocks are kept separate:
- Work time counts while the technician’s timer is running in In Progress.
- Inspection time counts while the inspector’s timer is running in Pending Inspection.
A person can have one running work timer and one running inspection timer. Starting a second timer of the same kind prompts them to confirm. Confirming pauses the other job and starts this one.
How a work order moves
- A technician can be changed only in Reported and Assigned.
- In Progress goes to Completed when inspection is not required and every checklist step is done.
- In Progress goes to Pending Inspection when inspection is required and every checklist step is done.
- From Pending Inspection, Rework and Completed happen by marking checklist steps, one at a time. The card is not dragged there.
- Completed cannot be edited, deleted, or moved.
Who sees which work orders
| Login | What the board shows |
|---|---|
| Admin | Every work order at the property. |
| Supervisor, with full edit rights | Work assigned to them and to people in roles under them, work they reported, inspection work their role may see, and unassigned work. |
| Technician or inspector, with self-edit rights | Work assigned to them, work they reported, and inspection work they are allowed to see. |
Inspection work appears for you in Pending Inspection, Rework, and Completed when an inspection is required and either you have already started that inspection, or nobody has started it and your job role is one of the category’s inspection roles.
For the maintenance person
You are the technician named on the work order. Start, Pause, Resume, and Start Rework are shown to you.
| Column | What you do |
|---|---|
| Assigned | Tap Start. The card moves to In Progress and your work time starts. |
| In Progress, timer running | Tap Pause when you leave the job. |
| In Progress, timer paused | Tap Resume. |
| In Progress, and there is no checklist | Tap Send for Inspection when inspection is required. Tap Complete when it is not. |
| Rework | Tap Start Rework, then fix the steps the inspector sent back. |
If another job of yours is already running, confirm to pause that one and start this one.
Checklist
While your timer is running, mark steps from the top. You can mark only the next step that is still waiting or was sent back.
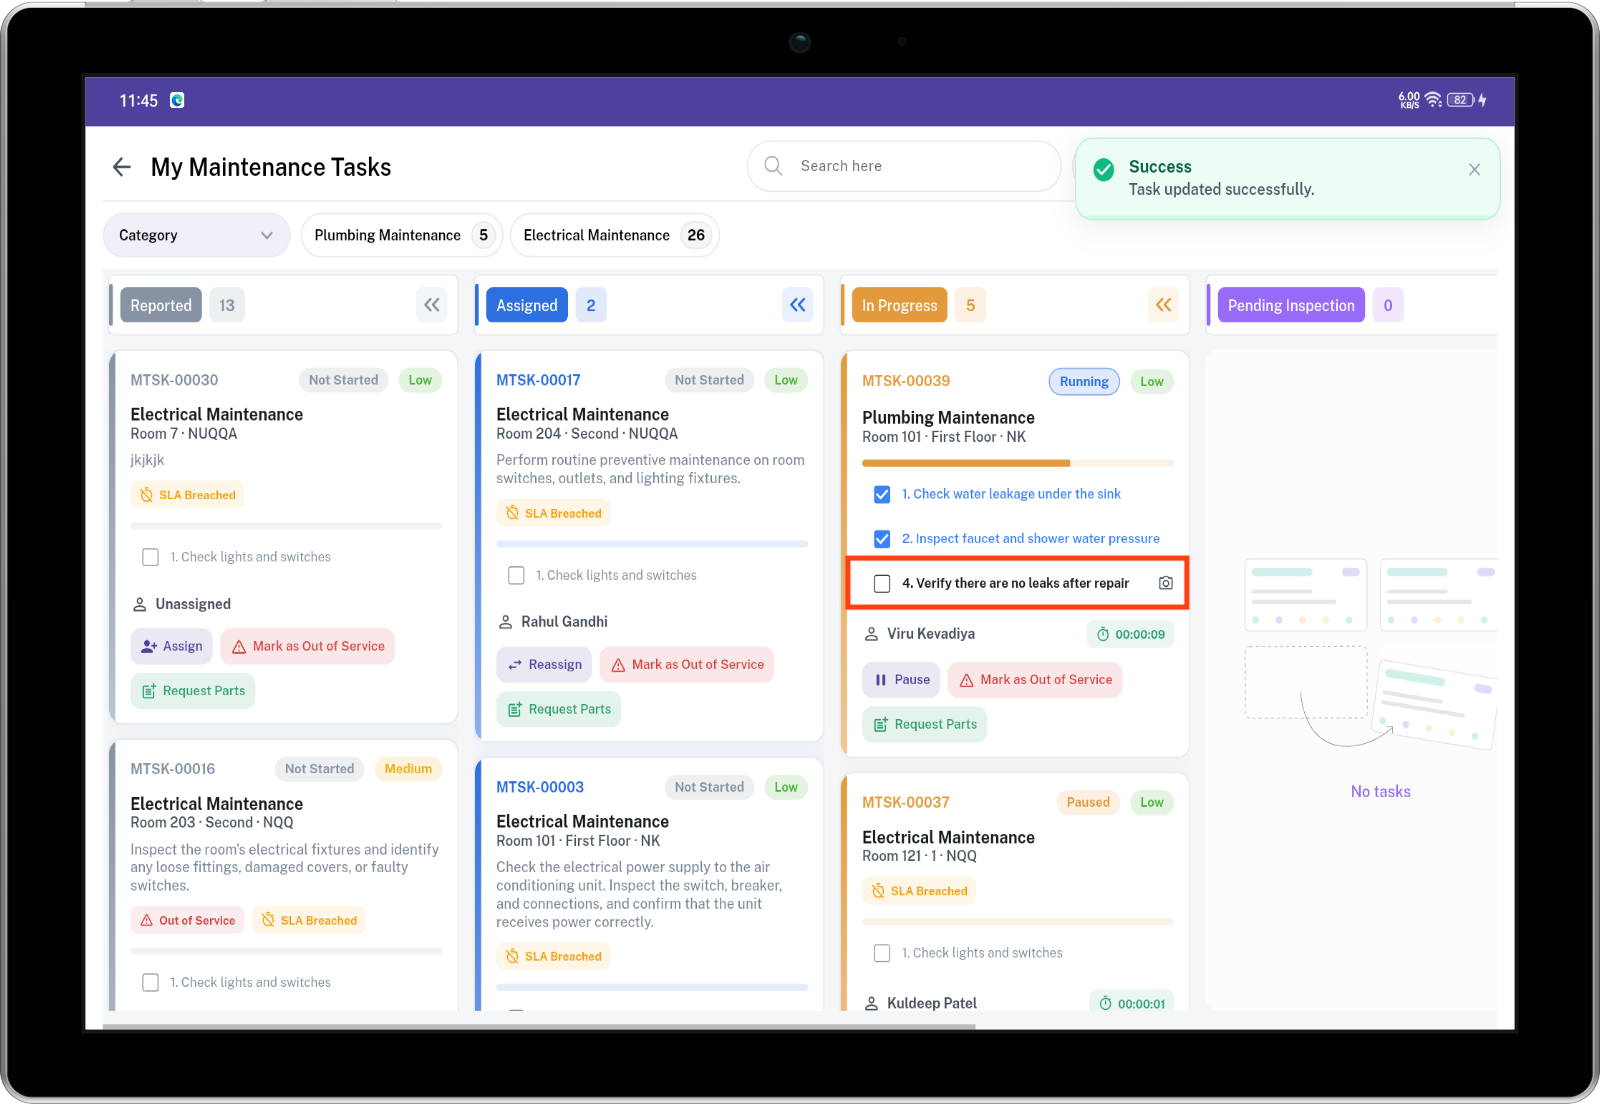
- When inspection is required, a step you finish becomes Completed. The inspector still has to accept it.
- When inspection is not required, a step you finish becomes Approved.
- When the step requires notes and photos, add a note or a photo. Saving with both empty is rejected.
When every step is Completed or Approved:
- Inspection required: the card moves to Pending Inspection.
- Inspection not required: the card moves to Completed.
On Rework, approved steps stay approved. Redo the steps that were sent back. When those are finished again, the card returns to Pending Inspection.
You can open a finished step to read its notes and photos.
Checklist colors
| Color | Meaning |
|---|---|
| Gray | Waiting, or not the step anyone can mark right now. |
| Black | The step it is your turn to mark. |
| Blue | The technician marked it done. It is waiting for inspection, or inspection was not required. |
| Green | Approved. |
| Red | Sent back for rework. While the technician is redoing that step, it is shown as the current step instead of red. |
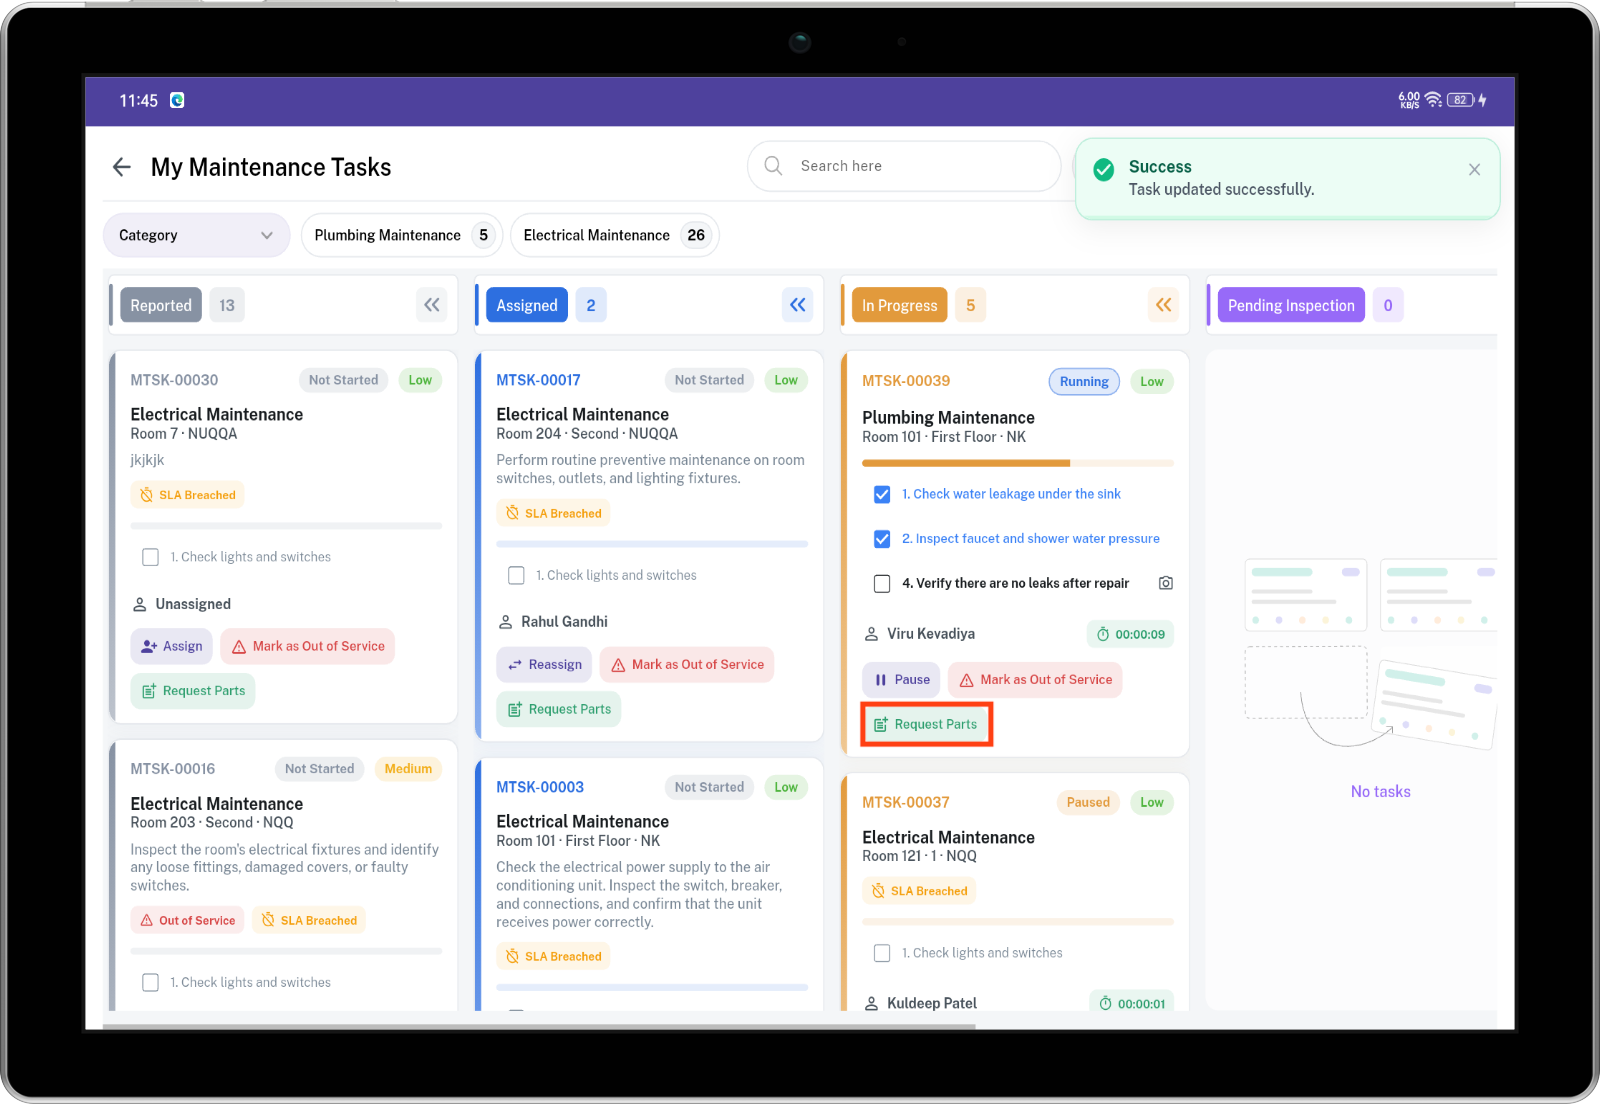
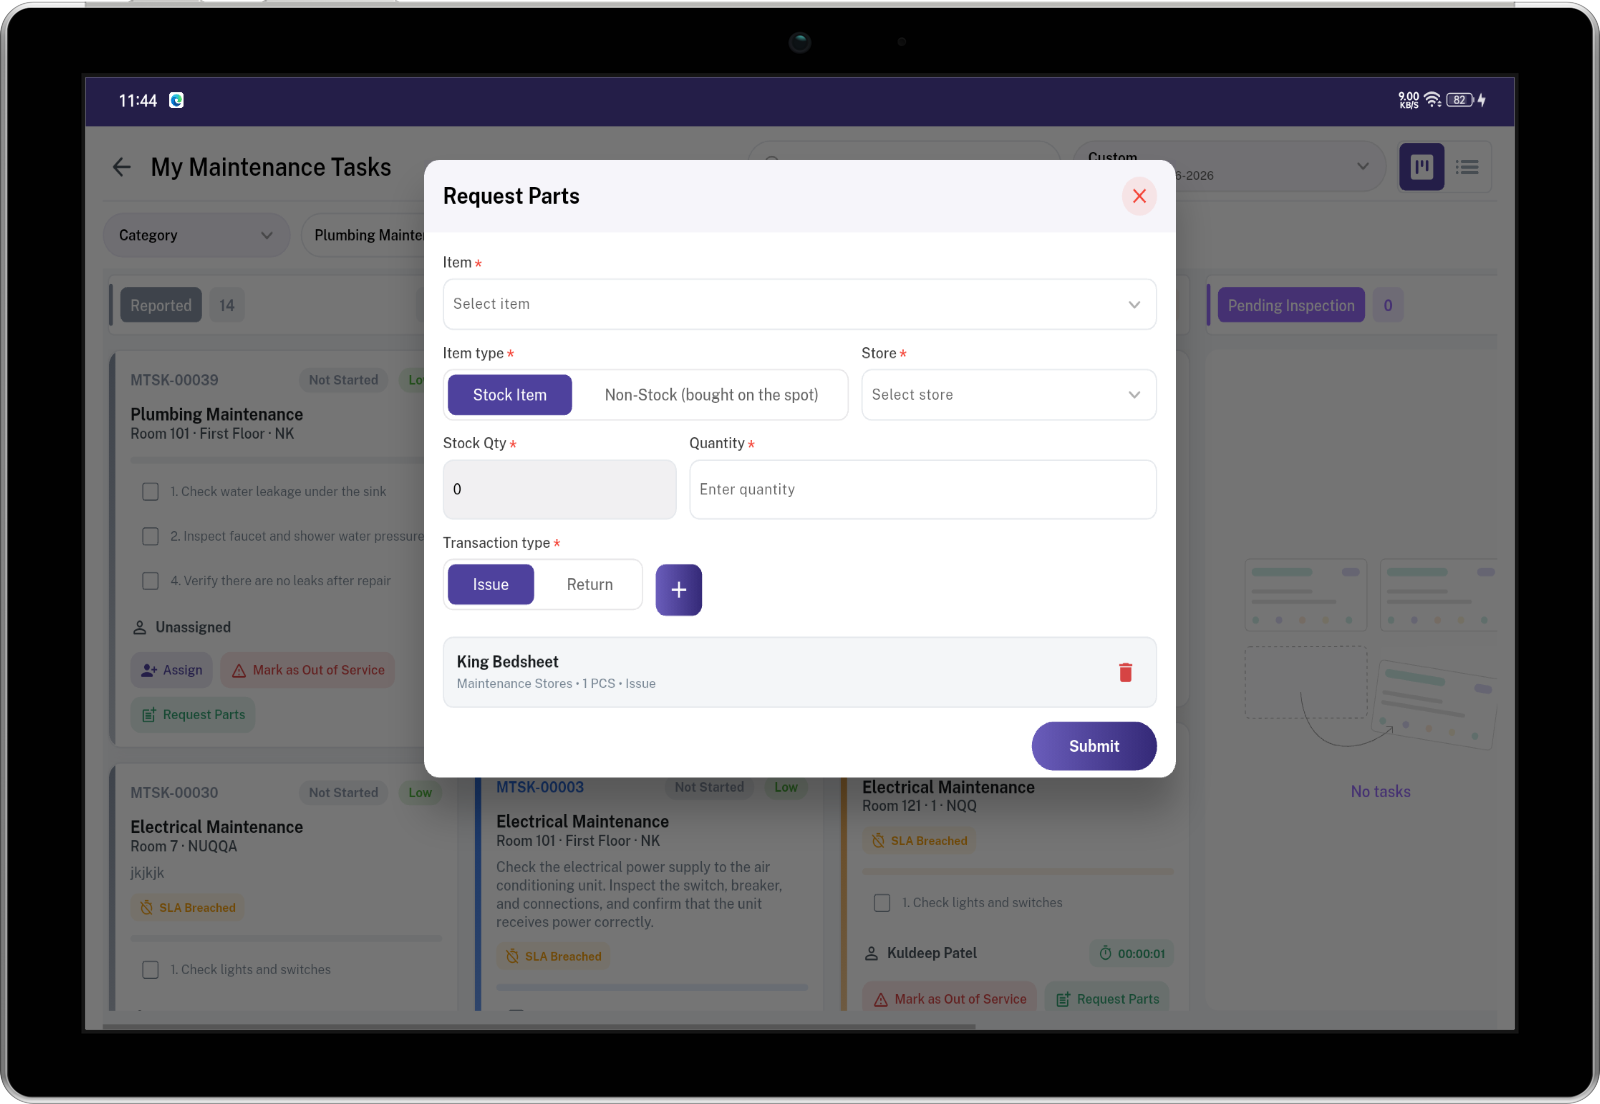
Parts
Request Parts is available after the work order has left Reported and before it is Completed, for a person allowed to update that work order.
For each part:
- Choose an item, or Other / Not Found when the part is not in the system.
- For a stock item, choose a storeroom that still has quantity available.
- Enter the quantity and the unit.
- Choose Issue for parts used, or Return for parts put back.
- A part bought on the spot does not need a storeroom balance.
Room out of service
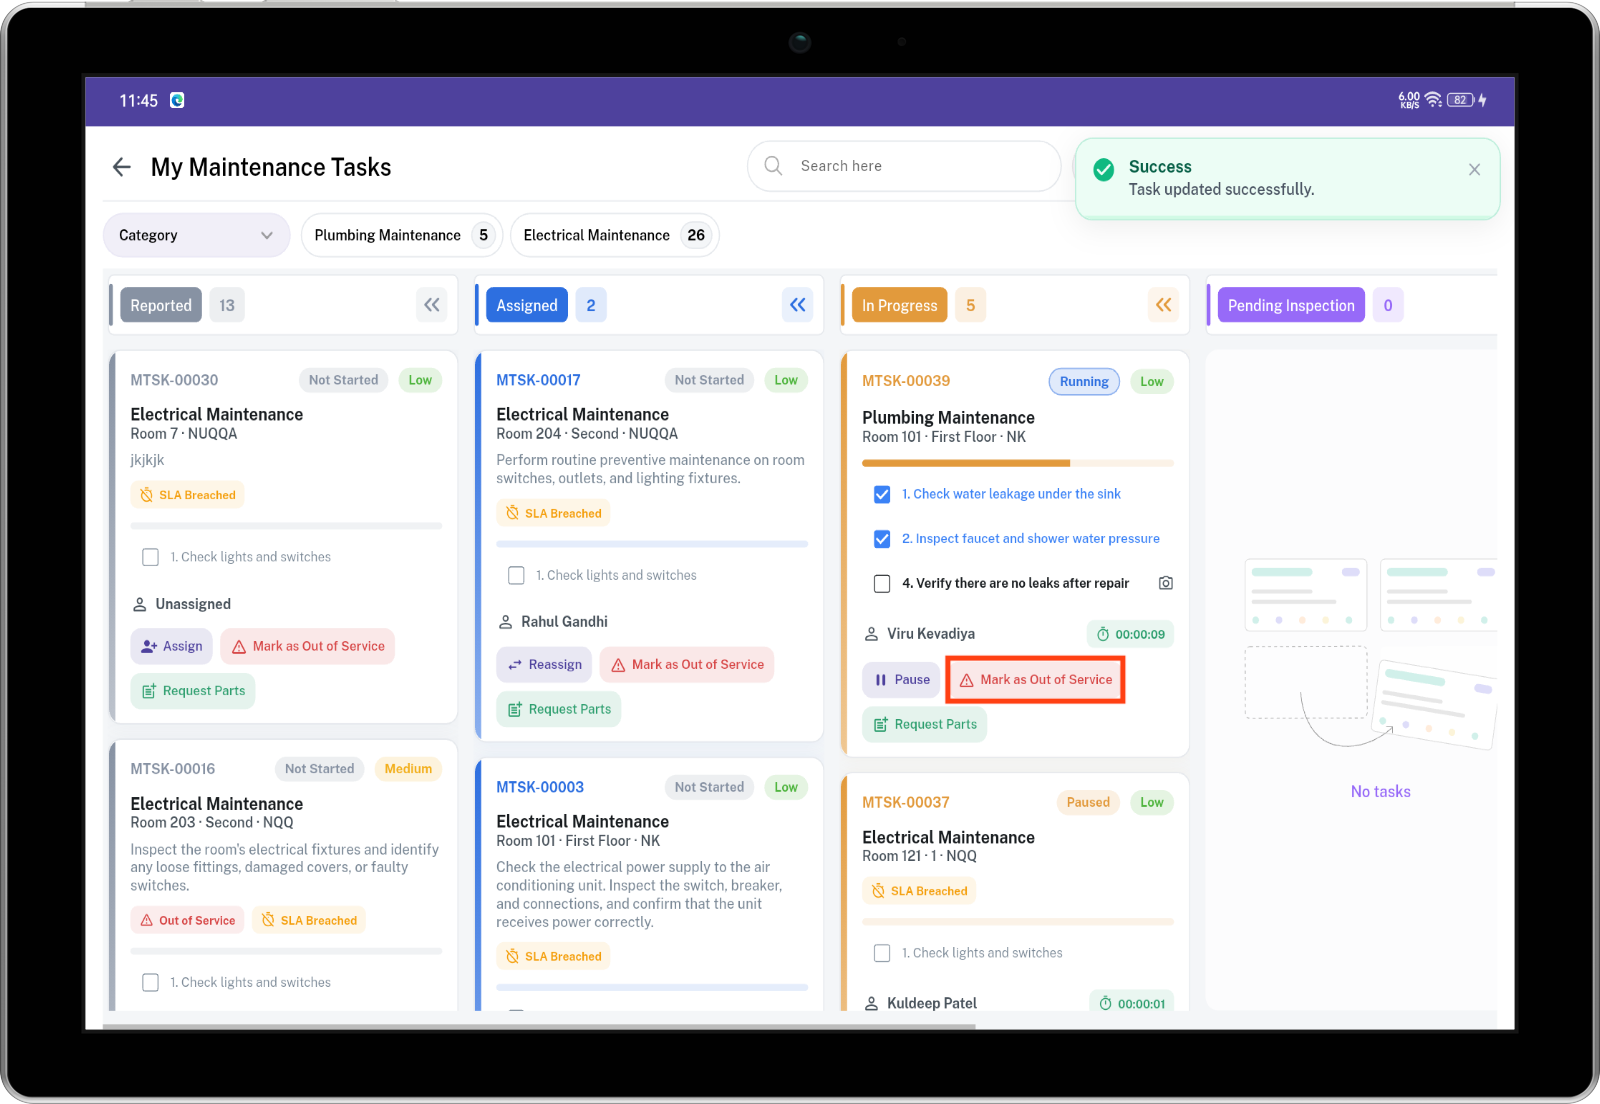
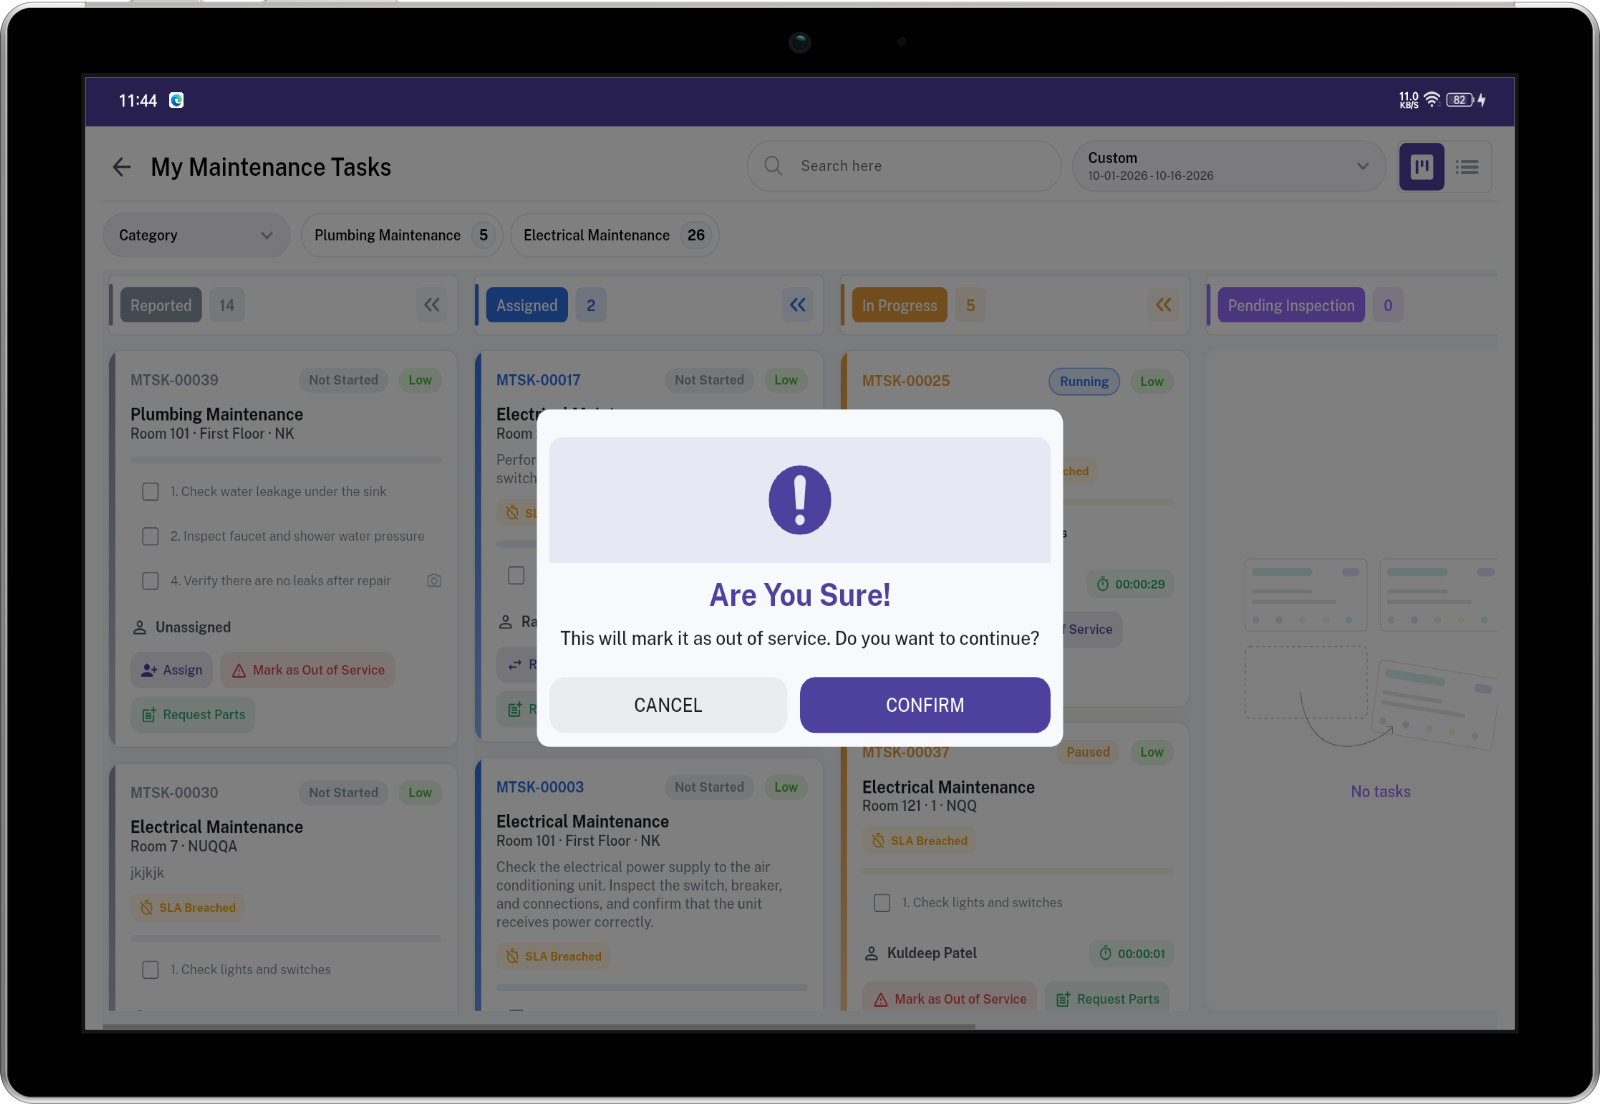
On a guest-room work order, Mark Out of Service takes the room out of order. Back in Service puts it back. This stays available until the work order is completed by a person allowed to assign that work order.
A public area has no room, so this action is rejected. Turning the same setting on or off a second time is rejected.
The room is updated in SpendWell. Sending that change to the hotel system is switched off.
For the inspector
You work in Pending Inspection. You see a work order there when its category requires inspection, and your role is allowed to inspect it, or you are already the inspector on it.
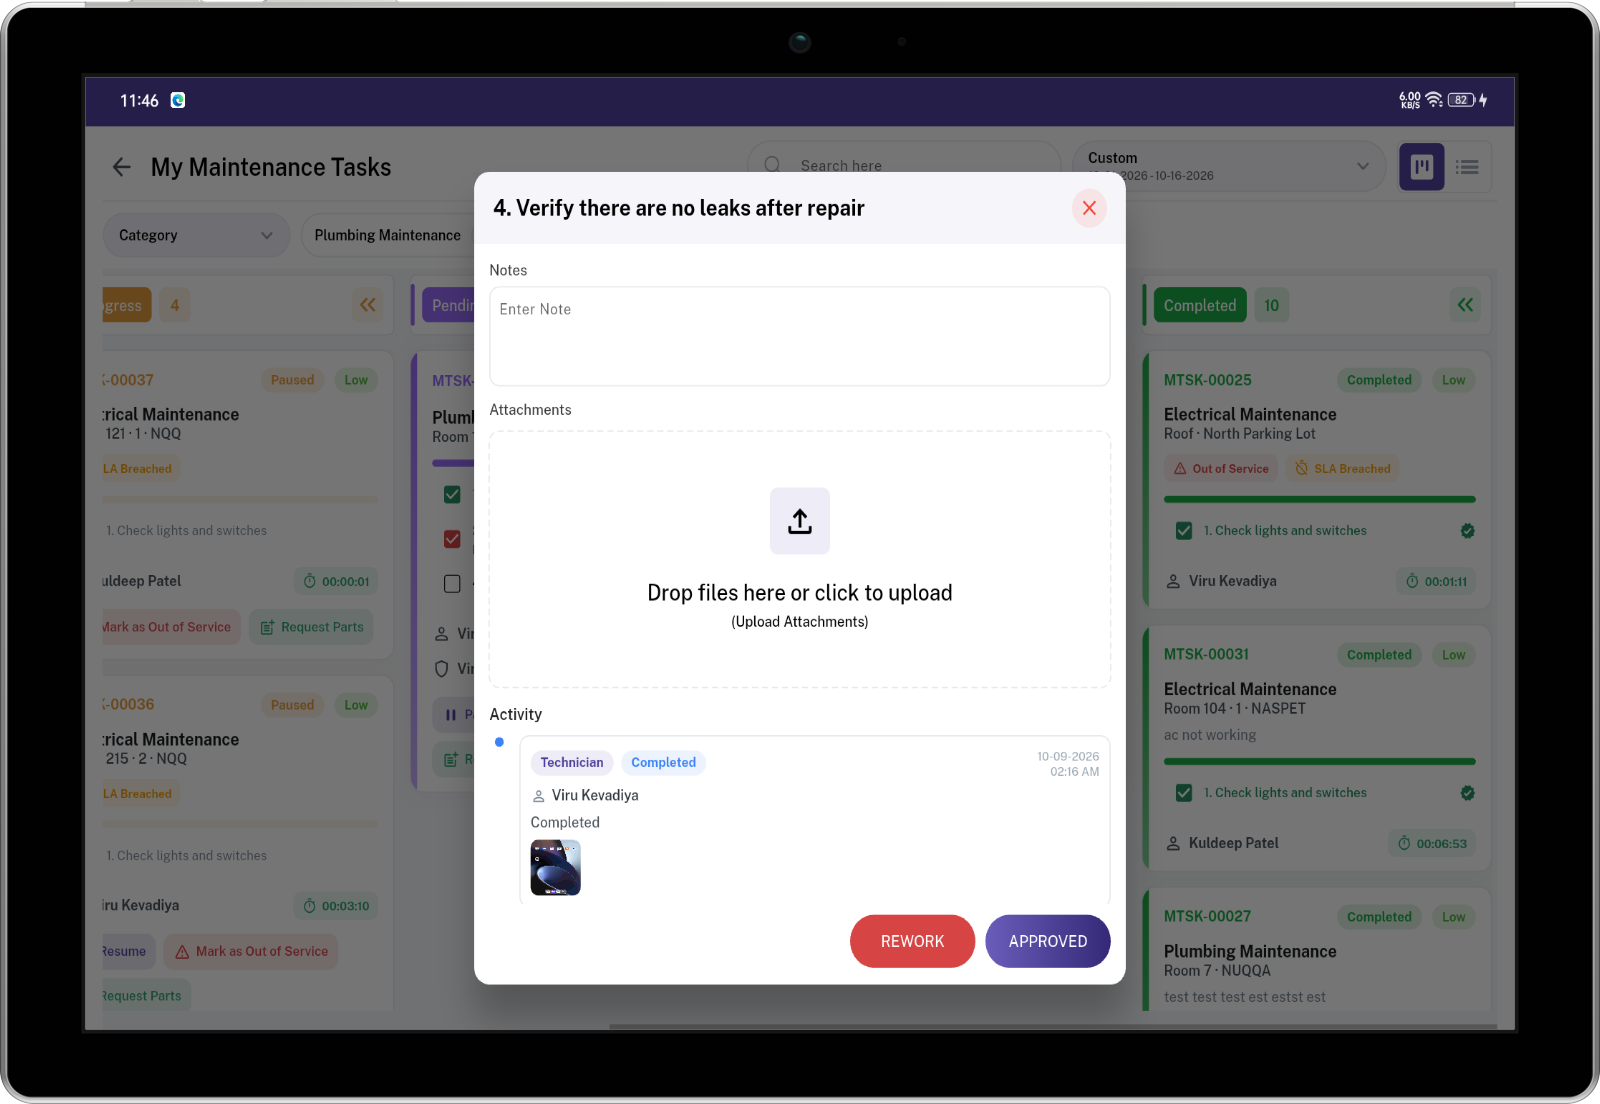
Start the inspection
- Open the work order. The timer is Not Started.
- Tap Start Inspection. Your name is saved on the work order. The inspection stays with you.
- Use Pause and Resume the same way the technician does. If you already have another inspection running, confirming pauses that one.
The inspection has to be started before the work order can be approved or sent back. An admin can act as well. Another inspector does not take over after you have started.
Mark each step
Go through the steps the technician marked Completedin order.
| Choice | When to use it |
|---|---|
| Approved | That step is acceptable. |
| Rework | The technician must do that step again. Add a note or a photo. |
The whole card is not dragged to Rework or Completed. When the last step is marked:
- Every step Approved: the work order moves to Completed. The technician and the person who reported it are told it was approved.
- Any step Rework: the work order moves to Rework. The technician is told. The work order is marked as rework.
When the technician finishes those steps, the work order comes back to Pending Inspection with you still as the inspector. Approved steps stay approved. Check the steps they redid.
A category that does not require inspection never enters this column. The technician closes it.
For the person who assigns work
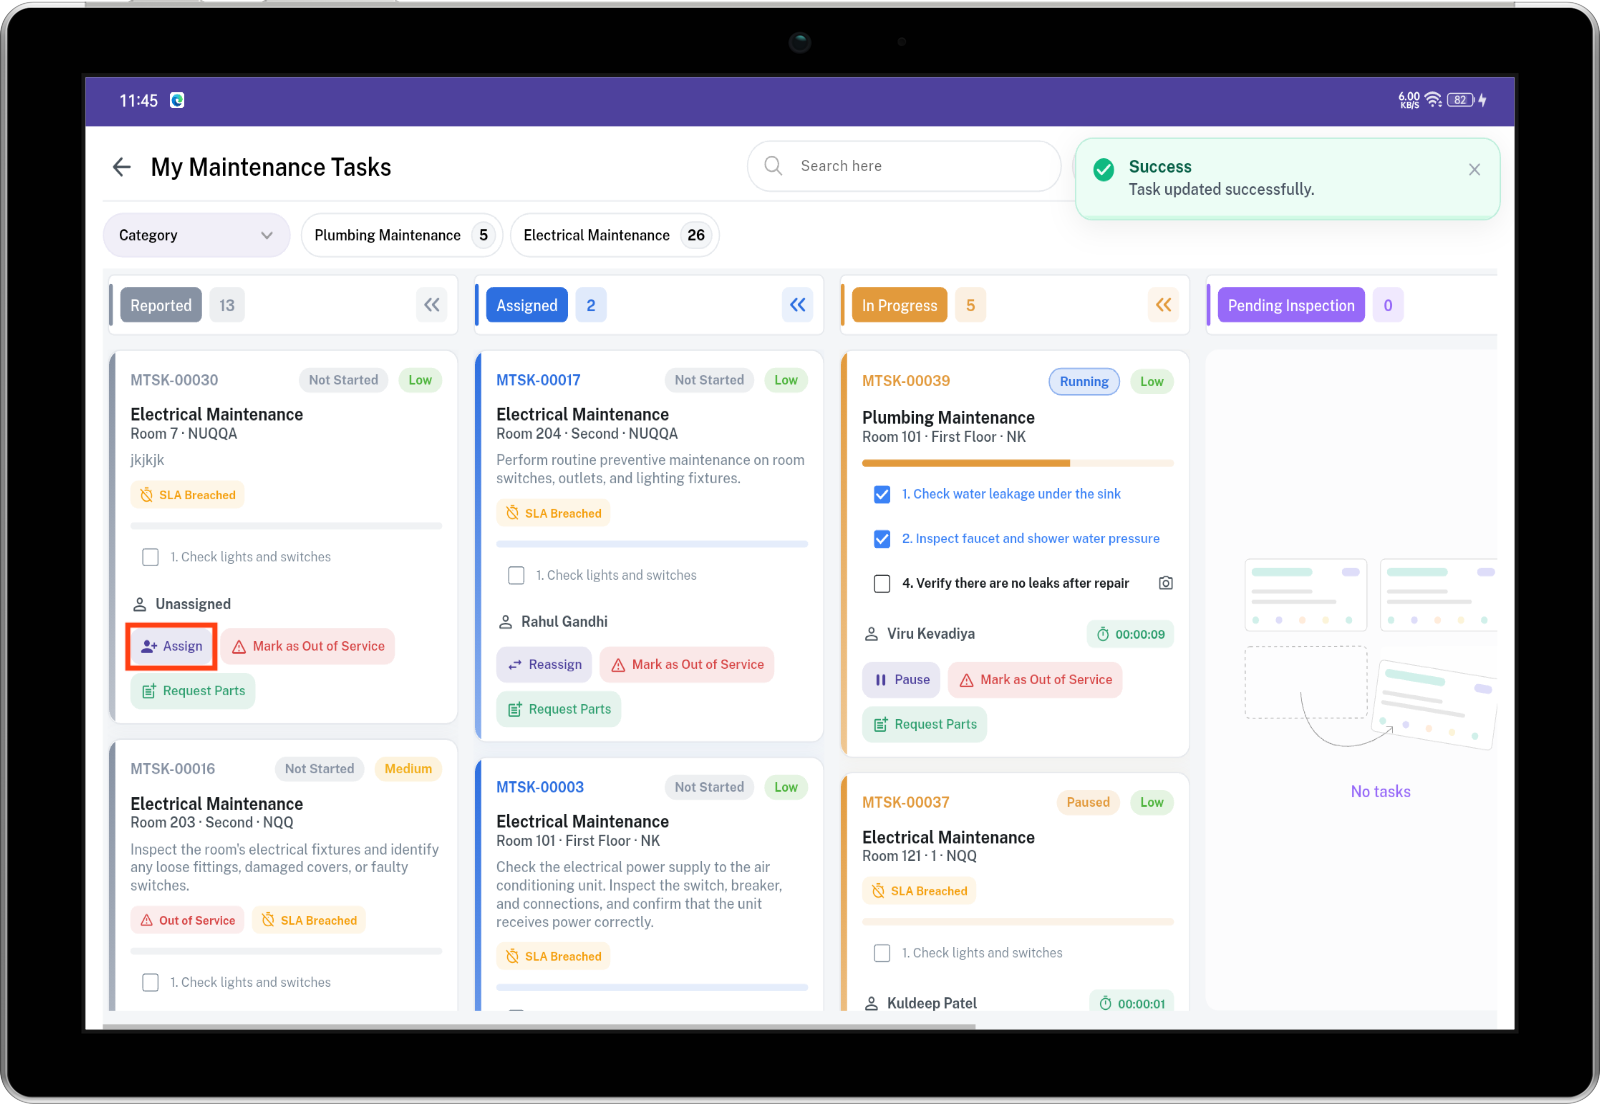

| Action | When it is available |
|---|---|
| Assign on a Reported card | Only active employees whose department is Maintenance are shown. The card moves to Assigned and that person is notified. |
| Drag a Reported card onto Assigned | Assigns it to you. |
| Reassign on an Assigned card | Before the timer starts. The previous technician is told it was removed. The new technician is told it is theirs. |
| Clear the technician | The card returns to Reported. |
Details
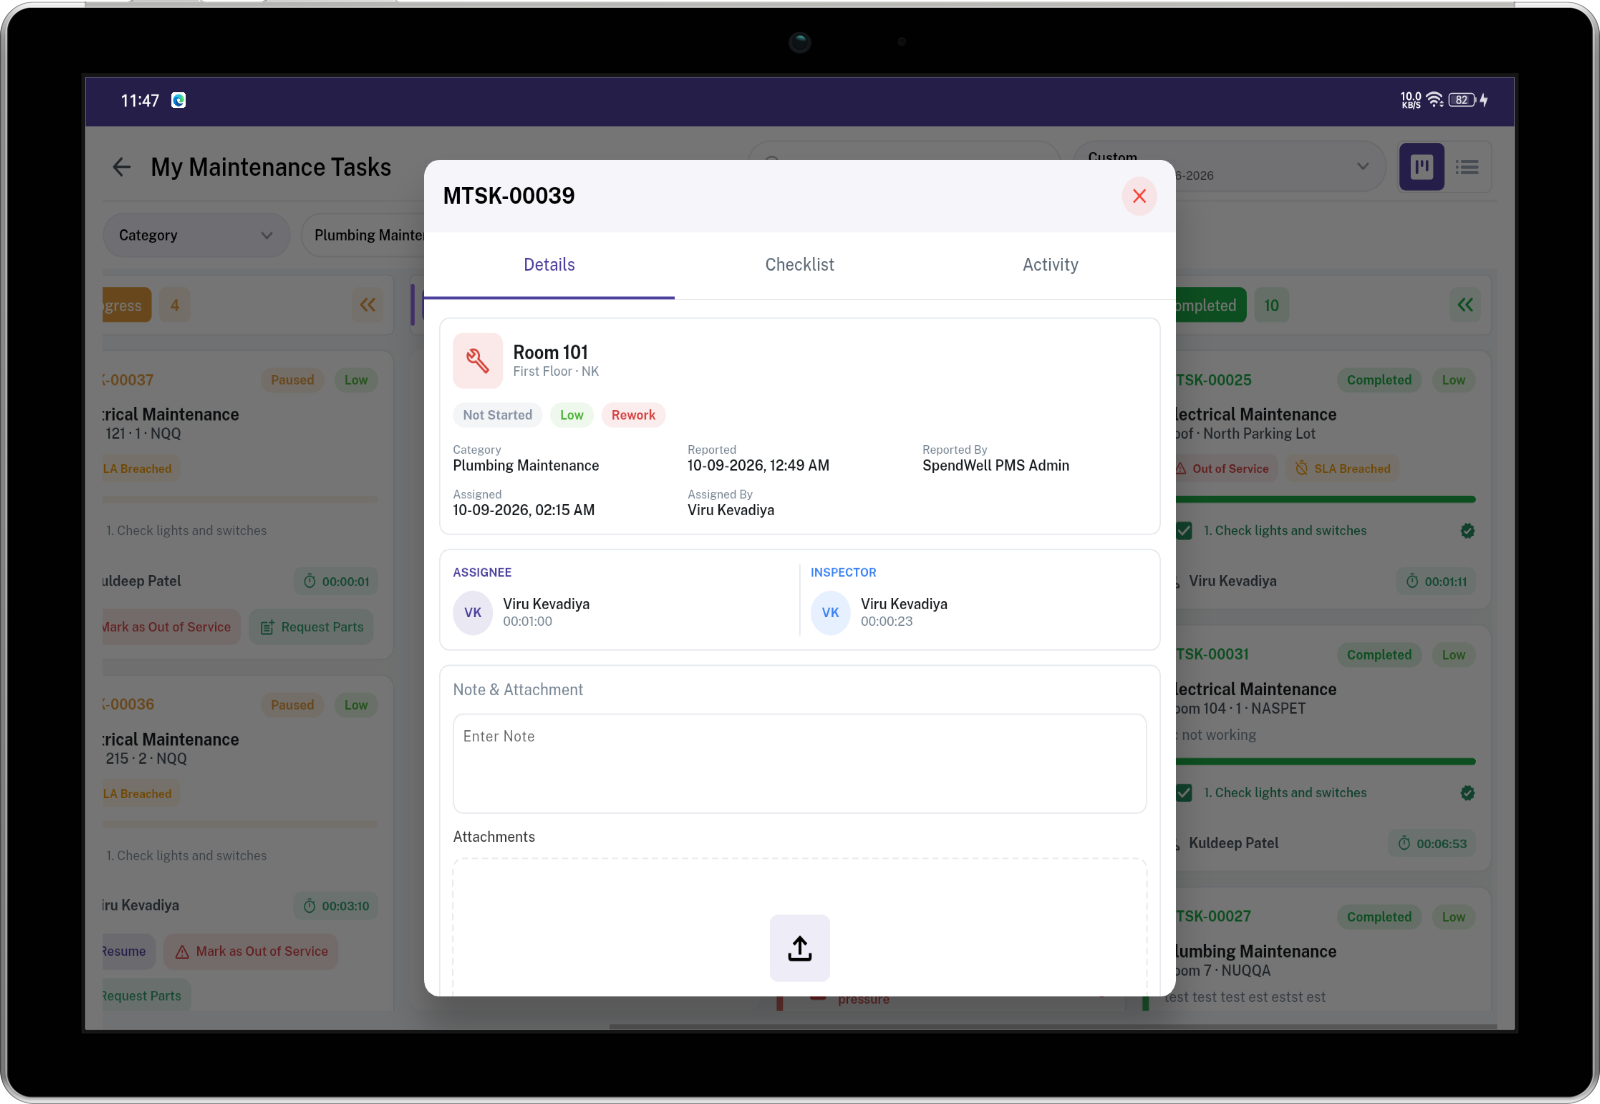
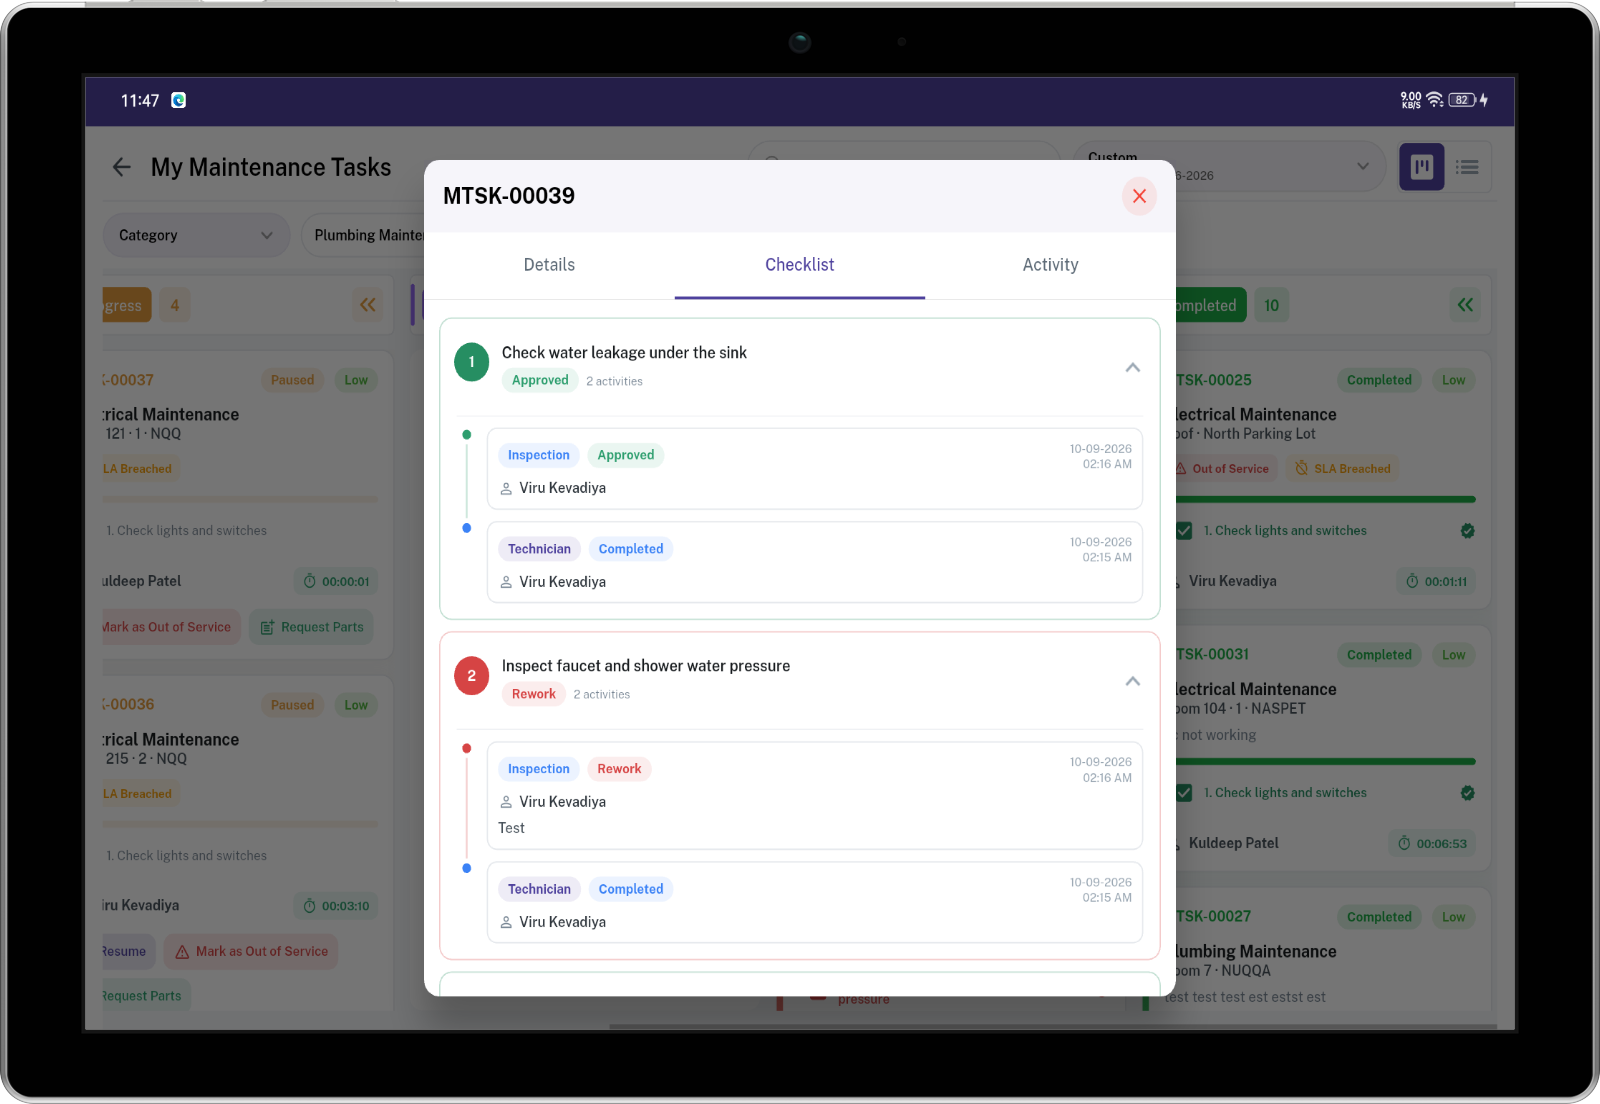
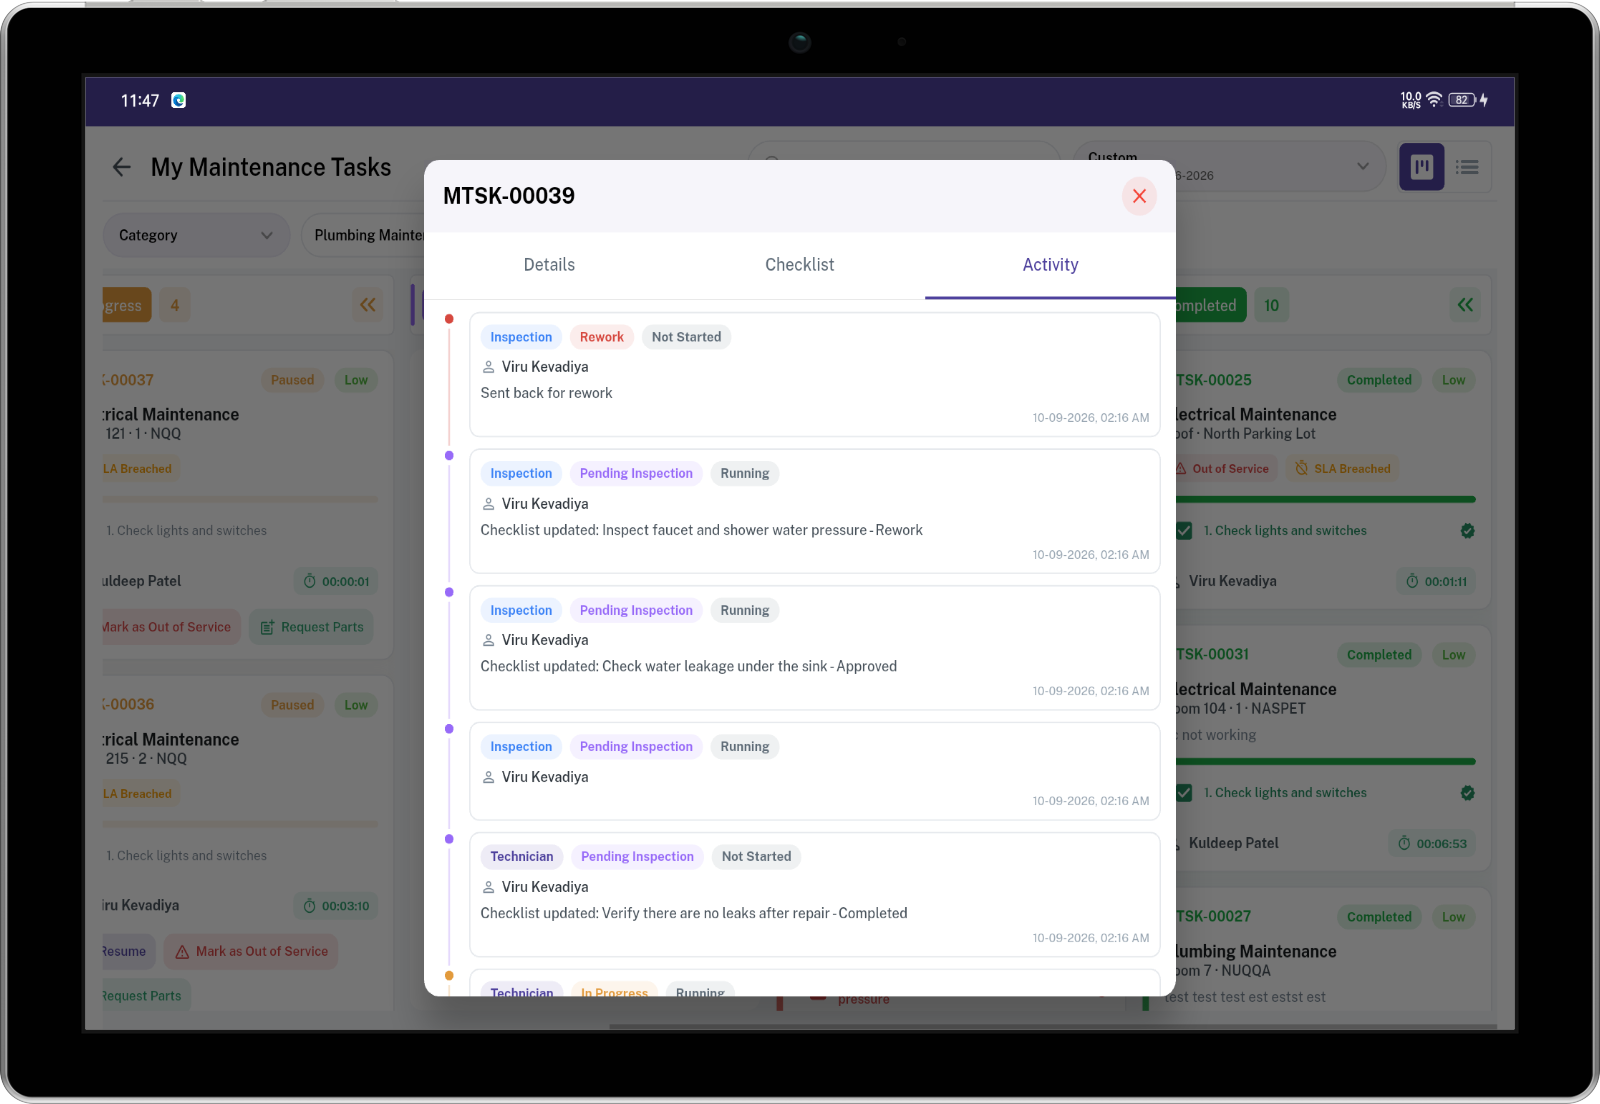
Tap the work order code. Three tabs open.
- Details shows location, priority, who reported it, who it is assigned to, the time target, and the dates.
- Checklist lists every step and its result.
- Activity is the history, newest first: assign, start, pause, checklist, parts, inspection, and out of service.
Notifications
You are not notified about an action you just performed.
| What happened | Who is told |
|---|---|
| Assigned | The new technician |
| Technician removed | The person who was removed |
| Ready for inspection | Everyone at the property in the allowed inspector roles, until someone starts it. After that, the inspector who started it. |
| Sent back for rework | The technician |
| Approved | The technician and the person who reported it |
| Completed by the technician, with no inspection | The technician and the person who reported it |
The notification opens Maintenance Task.
One job from report to close
Category Plumbing. Time target: 4 hours. Inspection is required. The inspector role is Maintenance Inspector. Steps: shut off the water, replace the supply line (note or photo required), test for leaks.
- Housekeeping reports a leak in room 109 and does not pick a technician. The card is in Reported. The due time is four hours after the report. All three steps are waiting.
- The Maintenance Inspector assigns Ramesh. The card moves to Assigned. Ramesh is notified.
- Ramesh taps Start. The card is In Progress and his timer is running.
- He completes the three steps in order and attaches a photo of the supply line. The card moves to Pending Inspection. People in the Maintenance Inspector role are notified.
- Priya taps Start Inspection. She approves the first and third steps and sends the supply line back with a note. The card moves to Rework. Ramesh is notified.
- Ramesh taps Start Rework, redoes the supply line, and attaches a new photo. The card returns to Pending Inspection.
- Priya approves the supply line. Every step is approved. The card moves to Completed. Ramesh and the housekeeper who reported it are notified.
If that category did not require inspection, finishing the steps in step 4 would approve them and move the card straight to Completed.
Housekeeping
Housekeeping Task Tracker is the working screen for assigned rooms. Housekeepers use it to start, pause, and complete cleaning. Inspectors use it to review rooms that need inspection.
From this screen, you can:
- See assigned rooms grouped by employee and date
- Track cleaning and inspection time
- Complete checklist items, one by one
- Add notes and photos
- See payroll (rate, payable, paid/unpaid)
Tasks come from Housekeeping Assignment. This screen is used to do the work, not to create new assignments.
Housekeeping Task Tracker Screen
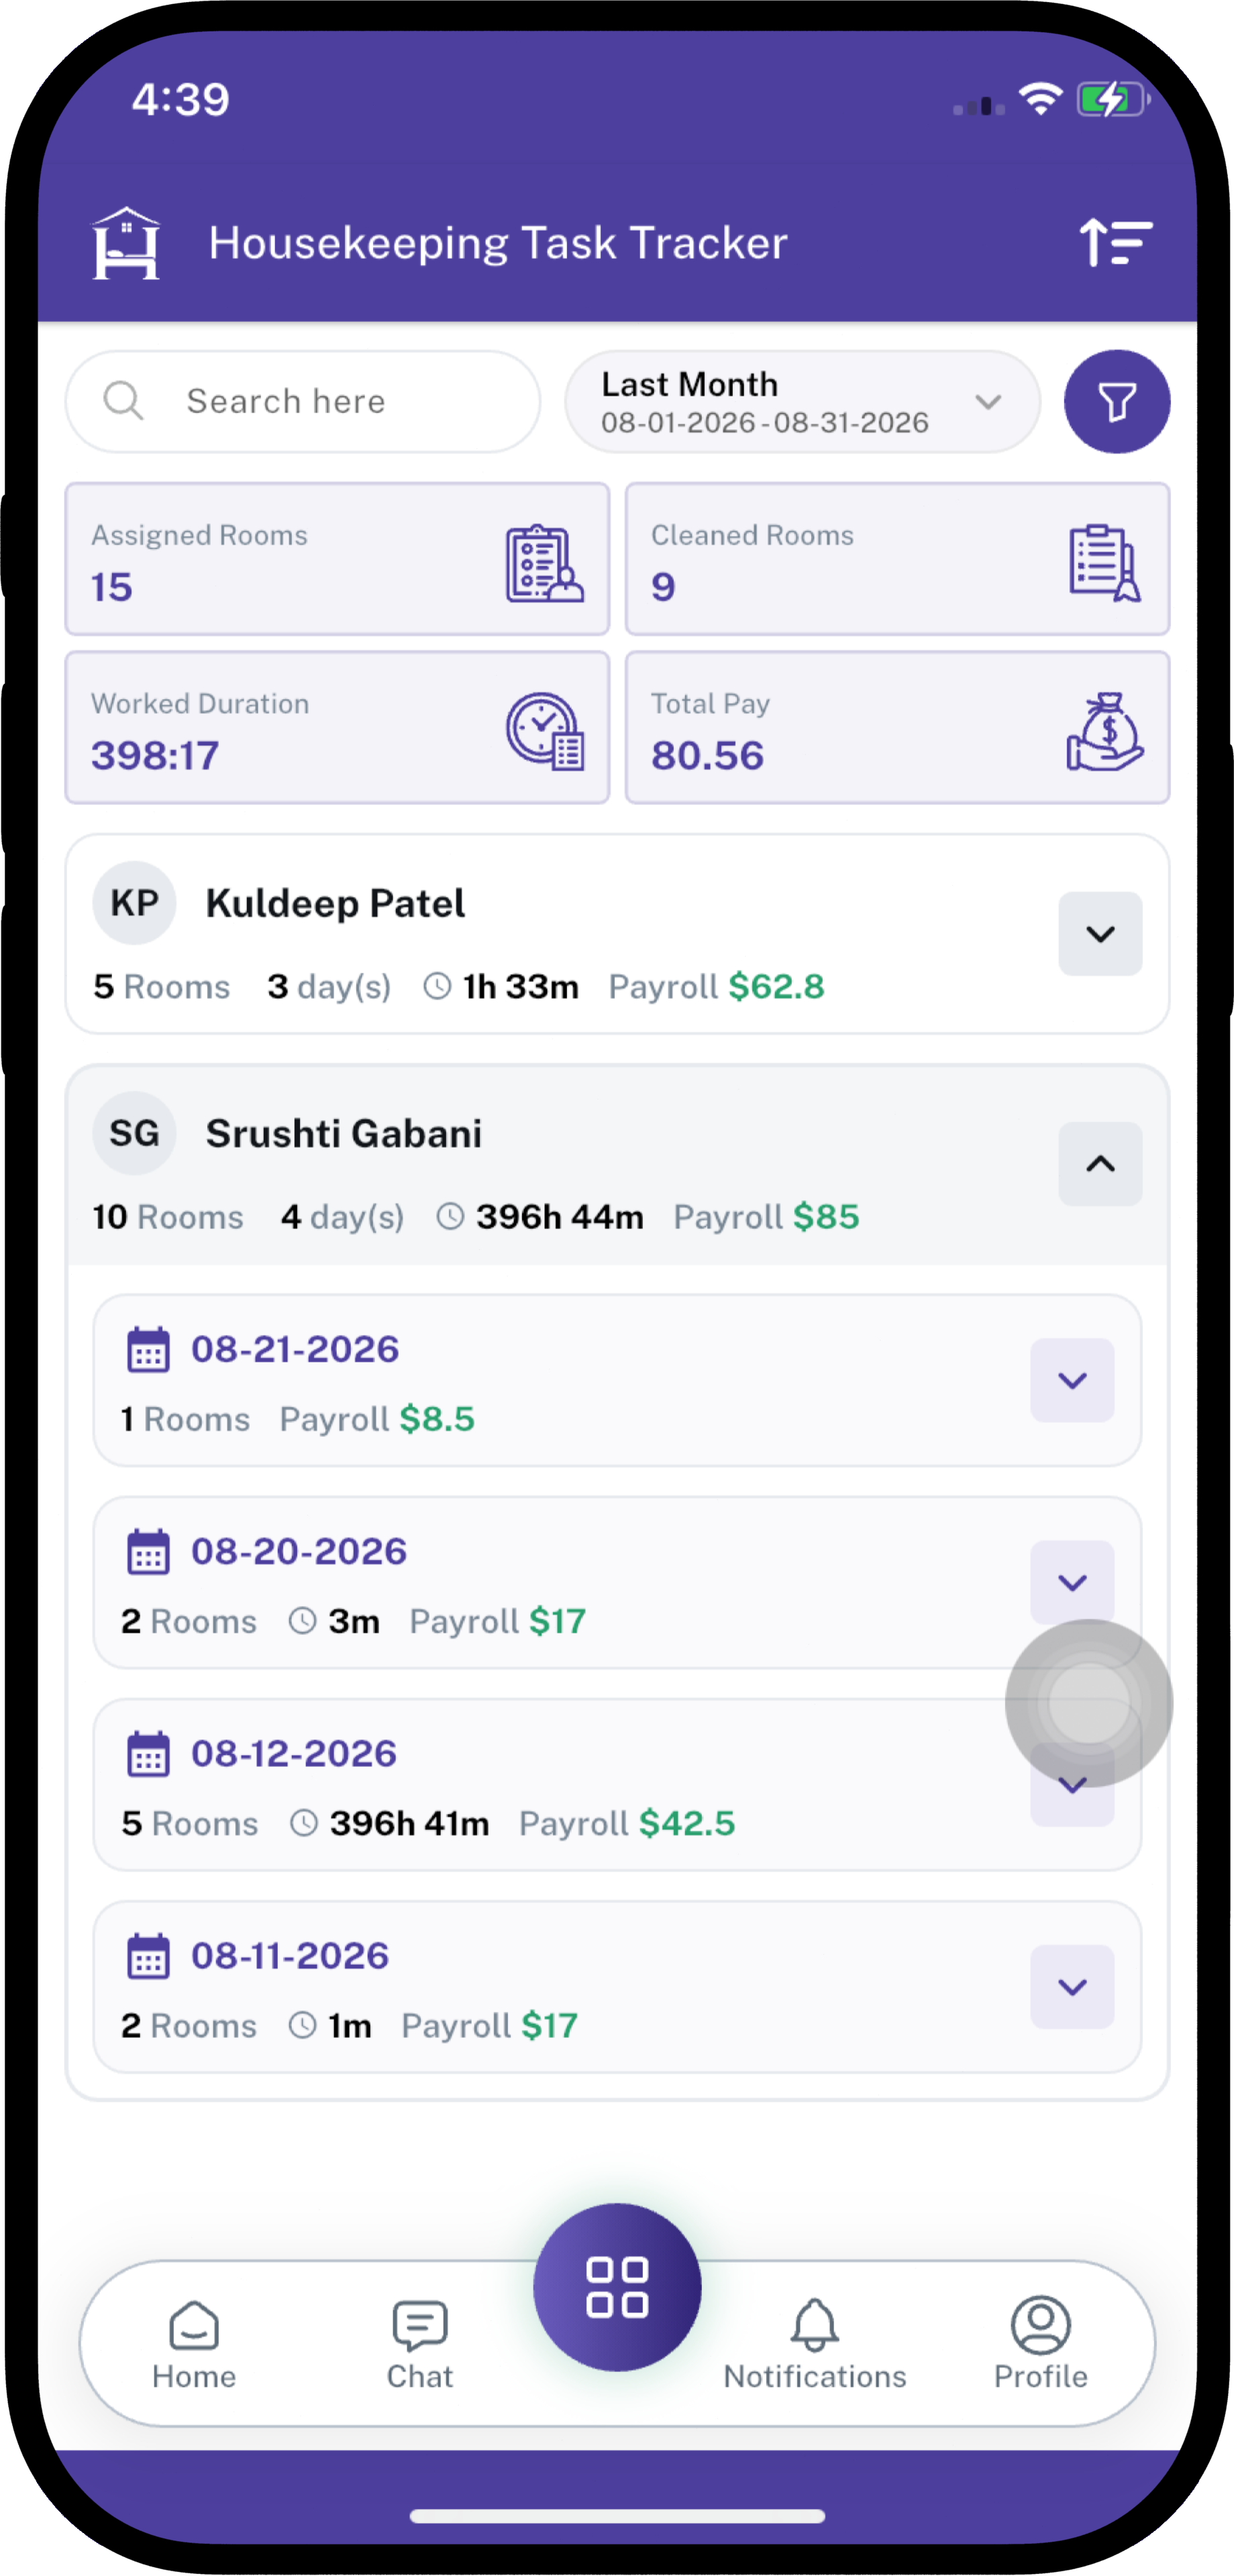
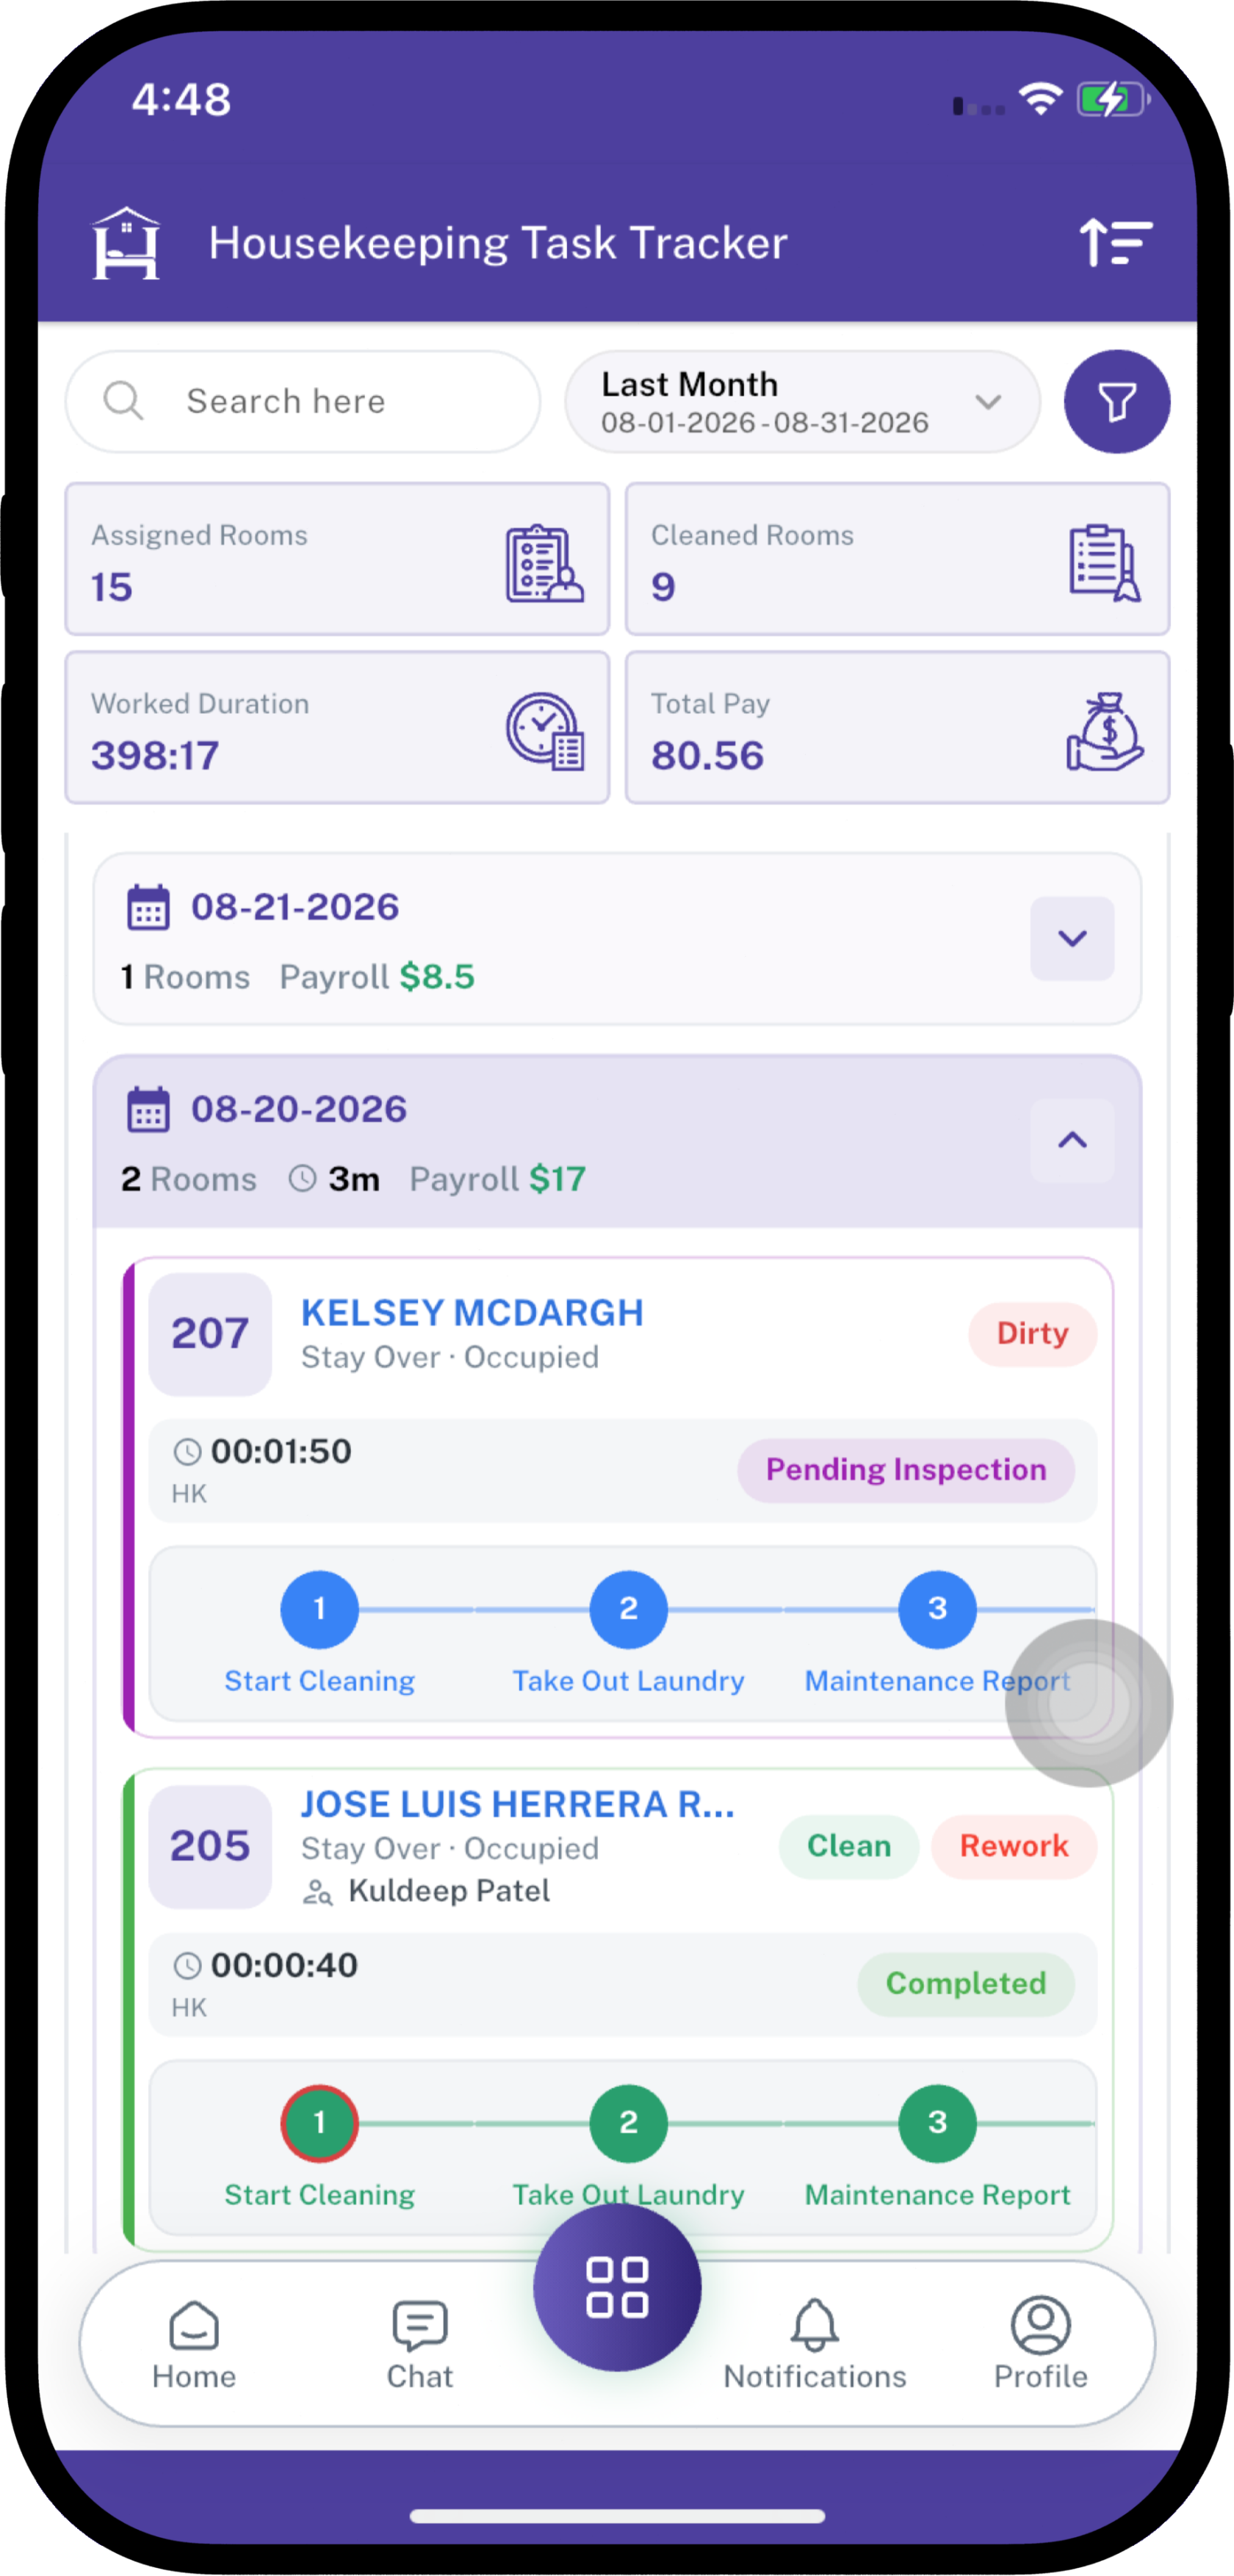
The screen shows summary cards at the top, then a list of employees and their rooms for the selected date range.
If you are logged in as a housekeeper and only your own tasks are shown, the employee card is skipped. You go straight to your dates and rooms.
Filters
| Filter | What it does |
|---|---|
| Duration | Date range for the list (default is Today). |
| Search | Find rooms, guests, assignment codes, or employees. |
| Employee | Show tasks for selected employees. |
| Housekeeping Category | Show tasks for selected cleaning types. |
| Status | Show tasks by work status (Assigned, Cleaning, and so on). |
| HK Status | Show Dirty or Clean rooms. |
On mobile, tap the filter icon to show or hide filters.
Summary Cards
These cards use the same filters as the list.
| Card | What it means |
|---|---|
| Assigned Rooms | How many rooms are in the current filter. |
| Cleaned Rooms | How many of those rooms are Completed. |
| Worked Duration | Total cleaning time recorded. |
| Total Pay | Pay for completed rooms only (employee rate per room). |
How the list is organized
Work is grouped in three levels:
- Employee — name, number of rooms, number of days, total time, payroll
- Date — rooms assigned on that day, time, and payroll for that day
- Rooms — each assigned room with status, checklist, and actions
Tap an employee to open dates. Tap a date to open the room list.
Key Fields — Room List
| Field | What it means |
|---|---|
| Room | Room number. Also shows guest name (tap to open details), floor, and assignment code. |
| Category | Housekeeping category for this room (e.g., Deep Cleaning). |
| Task Status | Current work status. Tap the status to see allowed actions (Start, Pause, Submit, Complete). |
| HK Status | Room cleanliness: Dirty or Clean. Becomes Clean when the task is completed. |
| Checklist | Step-by-step tasks for this room. Tap the next step to complete it. Shows "-" if there is no checklist. |
| Priority | Low, Medium, or High. |
| Guest Status | Stay Over, Departed, and similar. Shows "-" if none. |
| Room Type | Type of the room. |
| Room Status | Occupied, Vacant, and similar. |
| HK Time / Est. | Actual cleaning time, plus estimated time. Time counts up while status is Cleaning. |
| Insp. Time / Est. | Inspection time and estimate. Shown only if inspection is required and you are allowed to inspect. Also shows the inspector name when assigned. |
| Rate | Pay rate per room for the assigned employee. |
| Payable | Amount due. Shown only after the task is Completed. Otherwise 0. |
| Payment | Not payable (not completed), Unpaid, or Paid. |
On mobile, each room is a card with play / pause / complete buttons instead of a table.
Task Status
| Status | Simple meaning |
|---|---|
| Assigned | Task is given. Work has not started. |
| Cleaning | Housekeeper timer is running. |
| Paused | Housekeeper paused the timer. |
| Waiting on review | Cleaning is done. Waiting for inspection. |
| Inspecting | Inspector timer is running. |
| Inspection paused | Inspector paused the timer. |
| Rework | Inspector sent the room back. Housekeeper must clean again. |
| Completed | Work is finished. Room is marked Clean. |
A Rework tag can still show after the housekeeper starts again, so you know the room was sent back once.
Who can do what
Housekeeper (assigned employee)
- Can start, pause, and resume their rooms.
- Completes checklist items in order (next pending or rework item only).
- If the category does not require inspection, finishing the last checklist item (or using Complete) marks the room Completed.
- If the category requires inspection, finishing the last checklist item (or using Submit for Review) sets status to Waiting on review. The housekeeper cannot mark the room complete.
Inspector
Inspection is allowed when:
- The room requires inspection, and
- Status is Waiting on review, Inspecting, or Inspection paused, and
- You are the assigned inspector, or your user role is allowed for that category, or you are an admin.
The first person who starts the inspection is saved as the inspector for that room. After that, only that inspector can continue.
Inspectors can:
- Start/pause inspection
- Approve or send back each checklist item
- Complete the room (all items approved) or send the whole room to Rework
Checklist
Checklist items come from the Housekeeping Category. Only Active items are on the task.
| Checklist status | What it means |
|---|---|
| Pending | Not done yet. |
| Completed | The housekeeper finished the item. Waiting for inspection (if required). |
| Rework | Inspector sent this item back. |
| Approved | Inspector approved the item. |
Rules
- You can tap only the next item in order.
- Labels under the steps appear only if Display Checklist Labels is on for that category.
- If Require Notes & Photos is on, or you are inspecting, a notes window opens before the item is saved.
- Inspectors must add notes or photos to send an item back for Rework. Approve does not require notes.
- When the housekeeper finishes all items:
- Inspection required → status becomes Waiting on review
- Inspection not required → status becomes Completed
- When the inspector finishes all items:
- Any item is Rework → whole task becomes Rework
- All items Approved → whole task becomes Completed

Task Details
Tap the guest name (or the room card on mobile) to open details. There are three tabs.
Details
- Room, guest, floor, guest status, room status
- Assignment code, date, room type, category
- Task status, HK Status (Dirty / Clean), priority, rework tag
- Housekeeper name and time (actual + estimated)
- Inspector name and time (if inspection is required)
- Rate, payable, and payment status
- Description (if the assignment had one)
- Note and Attachment — add a comment and photos/videos (not available after Completed)
- Previous notes from the team
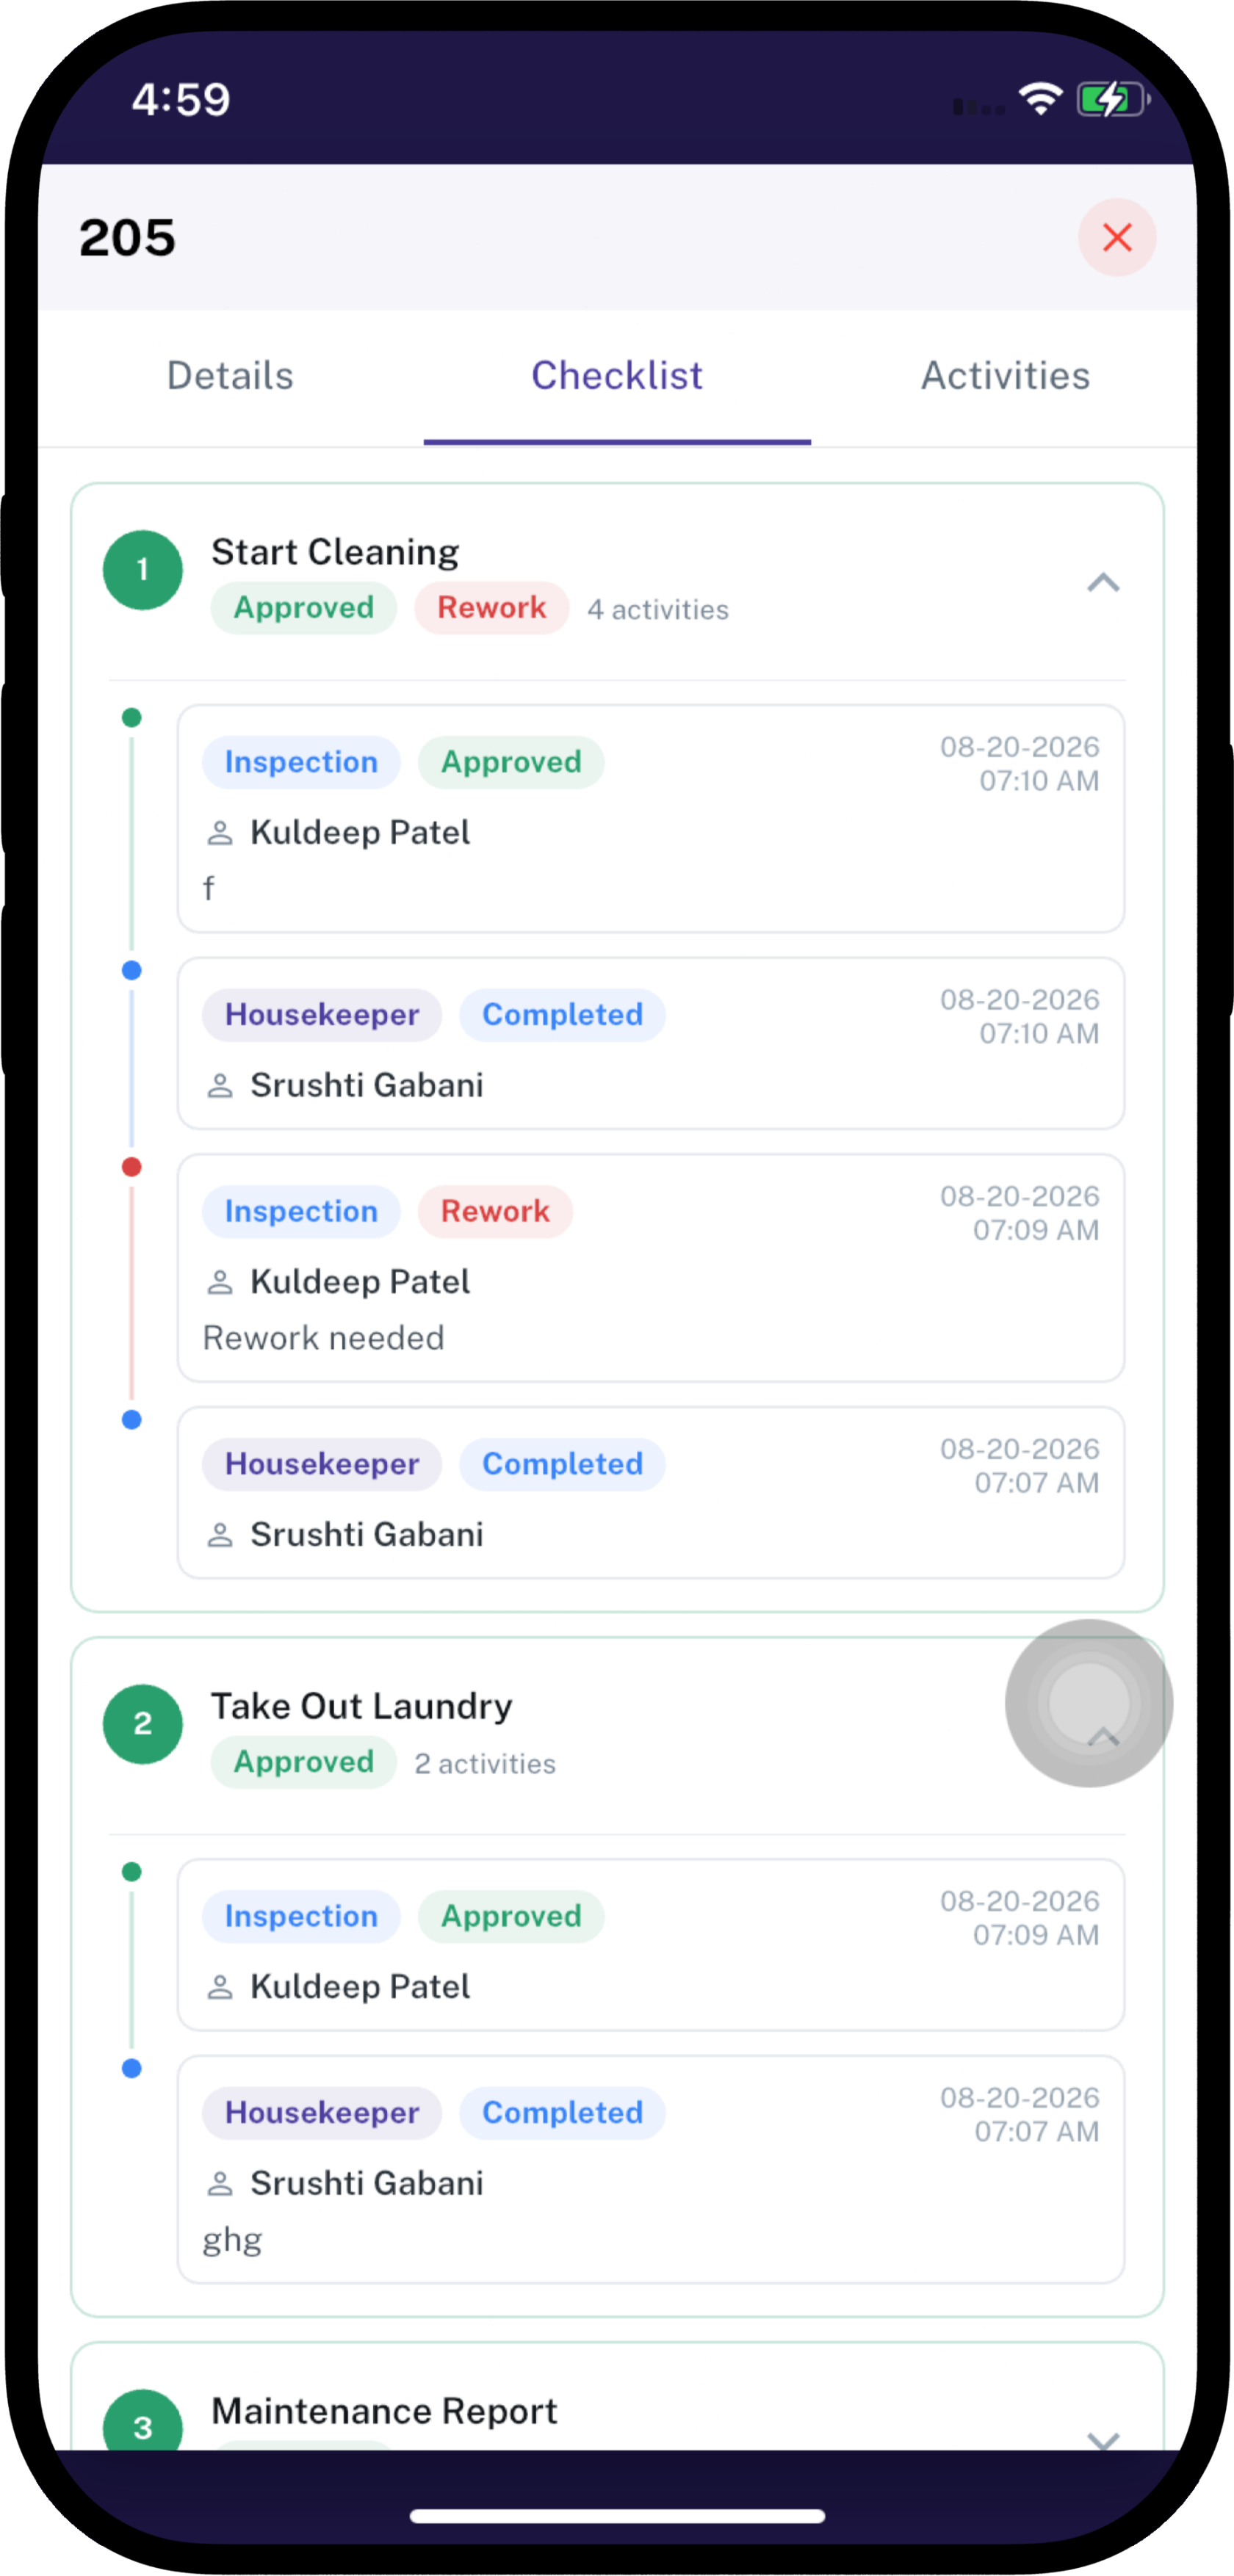
Checklist
Full list of checklist items with status, time, and activity history. Expand an item to see who completed, approved, or sent it back.
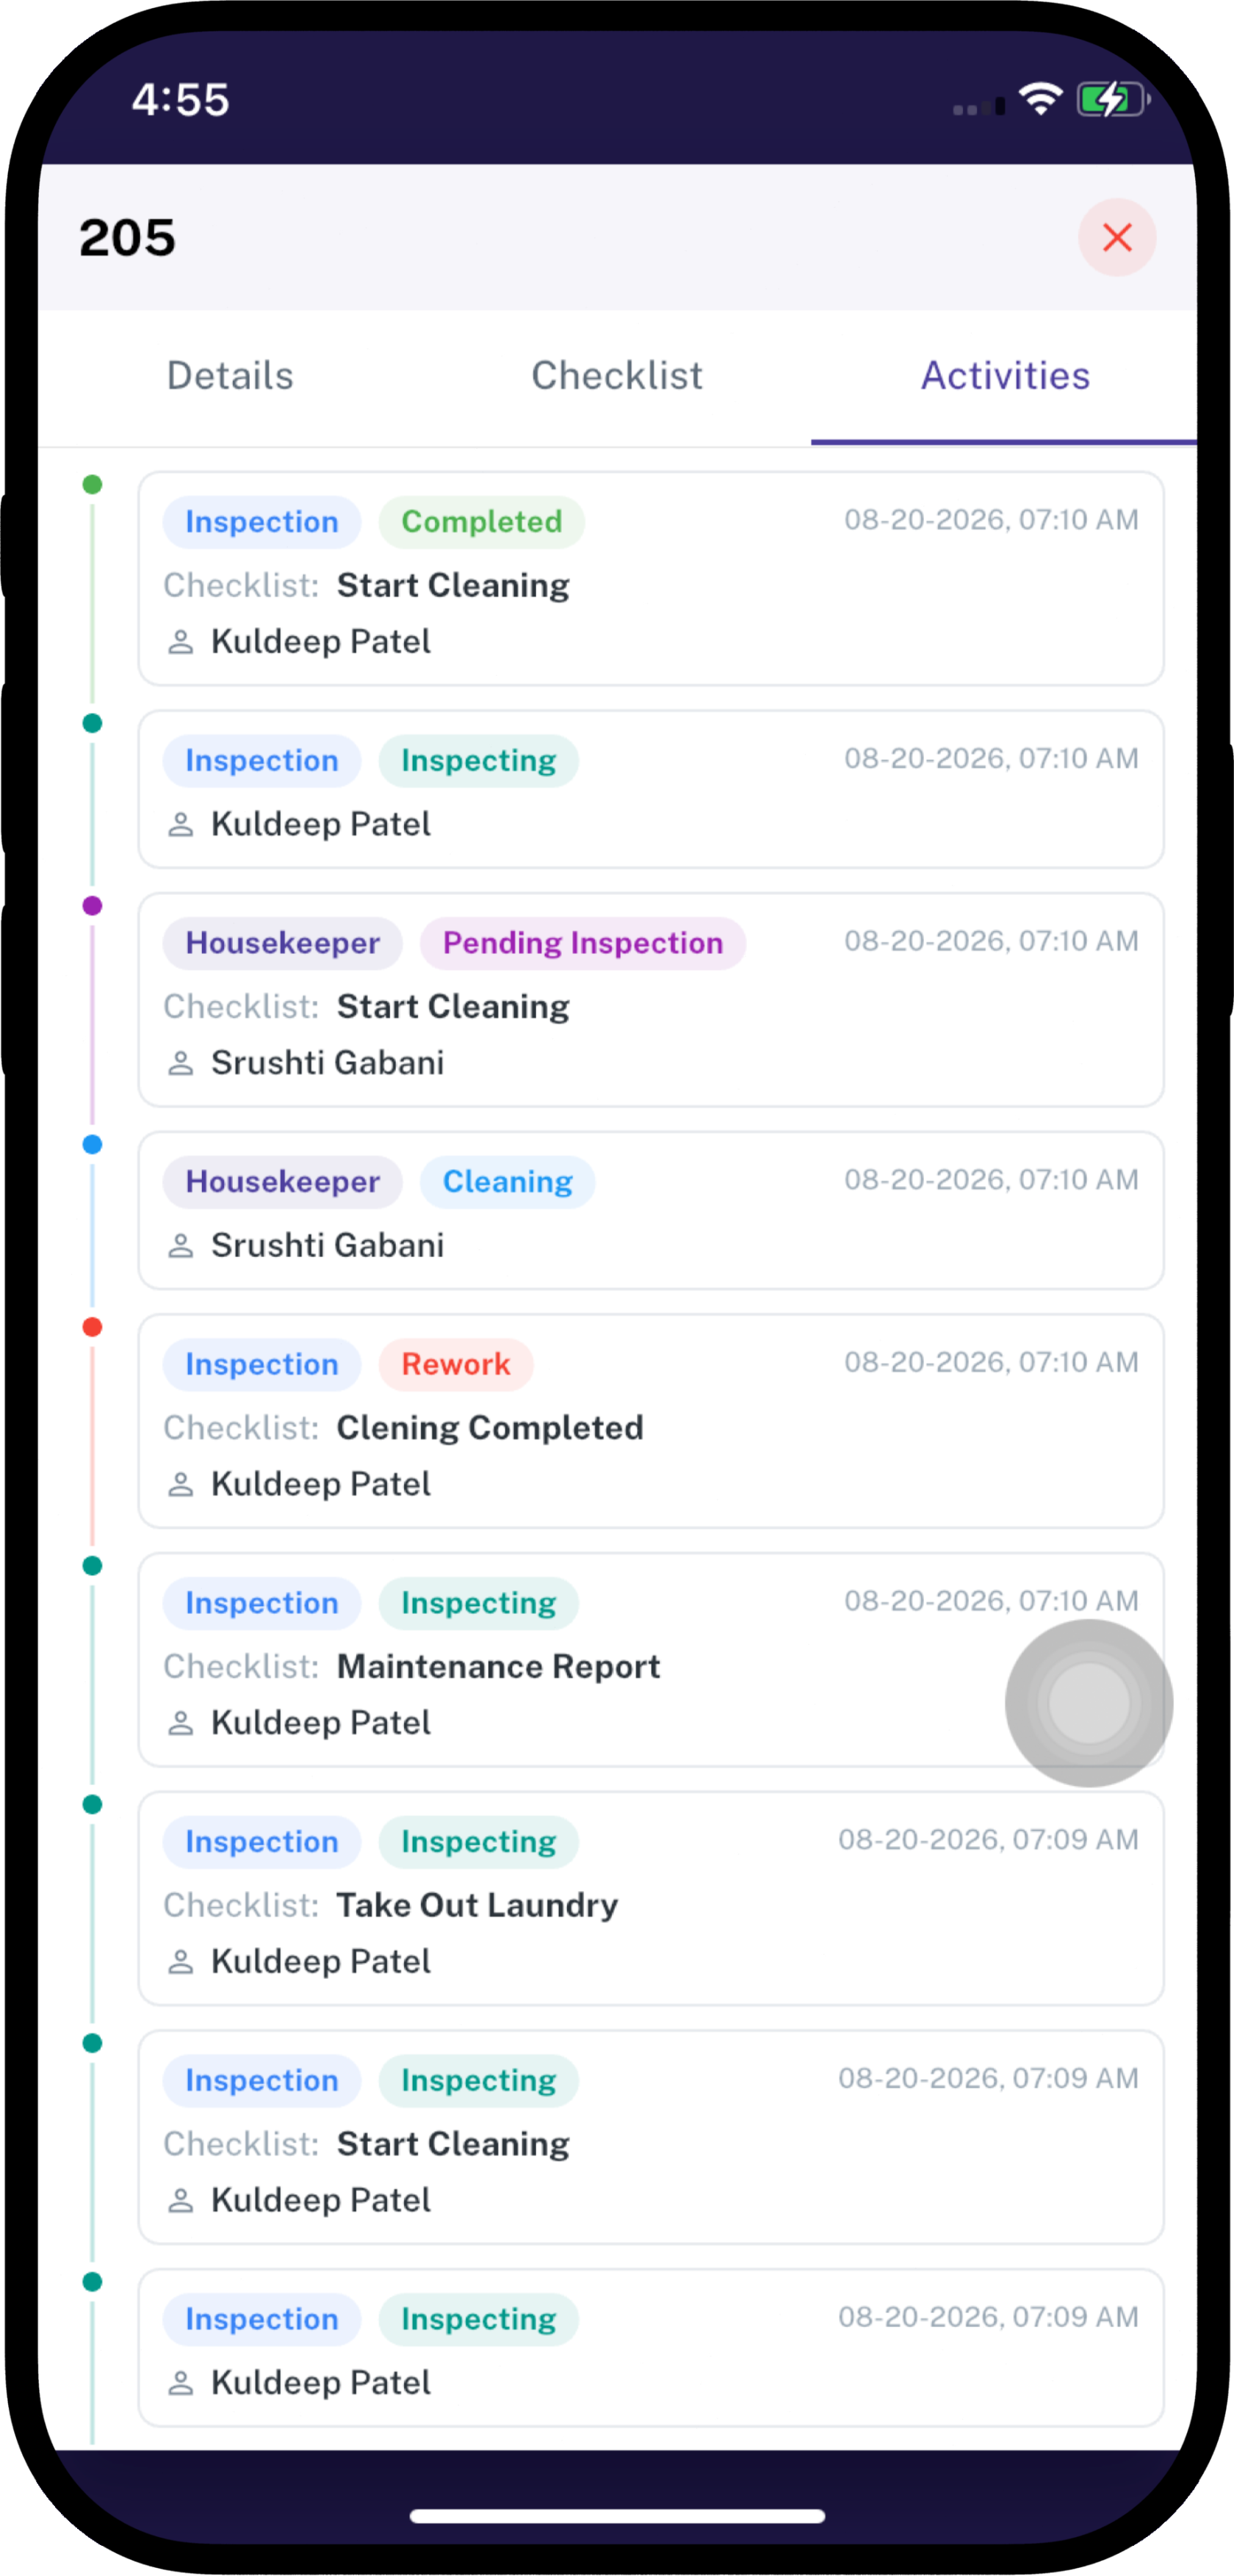
Activities
Timeline of status changes (started cleaning, paused, inspection started, and so on).
Checklist Notes Window
Opens when a housekeeper must add notes/photos, or when an inspector reviews an item.
| Role | Buttons |
|---|---|
| Housekeeper | Complete |
| Inspector | Rework and Approve |
If notes and files are both empty (except Approve), the system shows: Please add notes or files.
One timer at a time
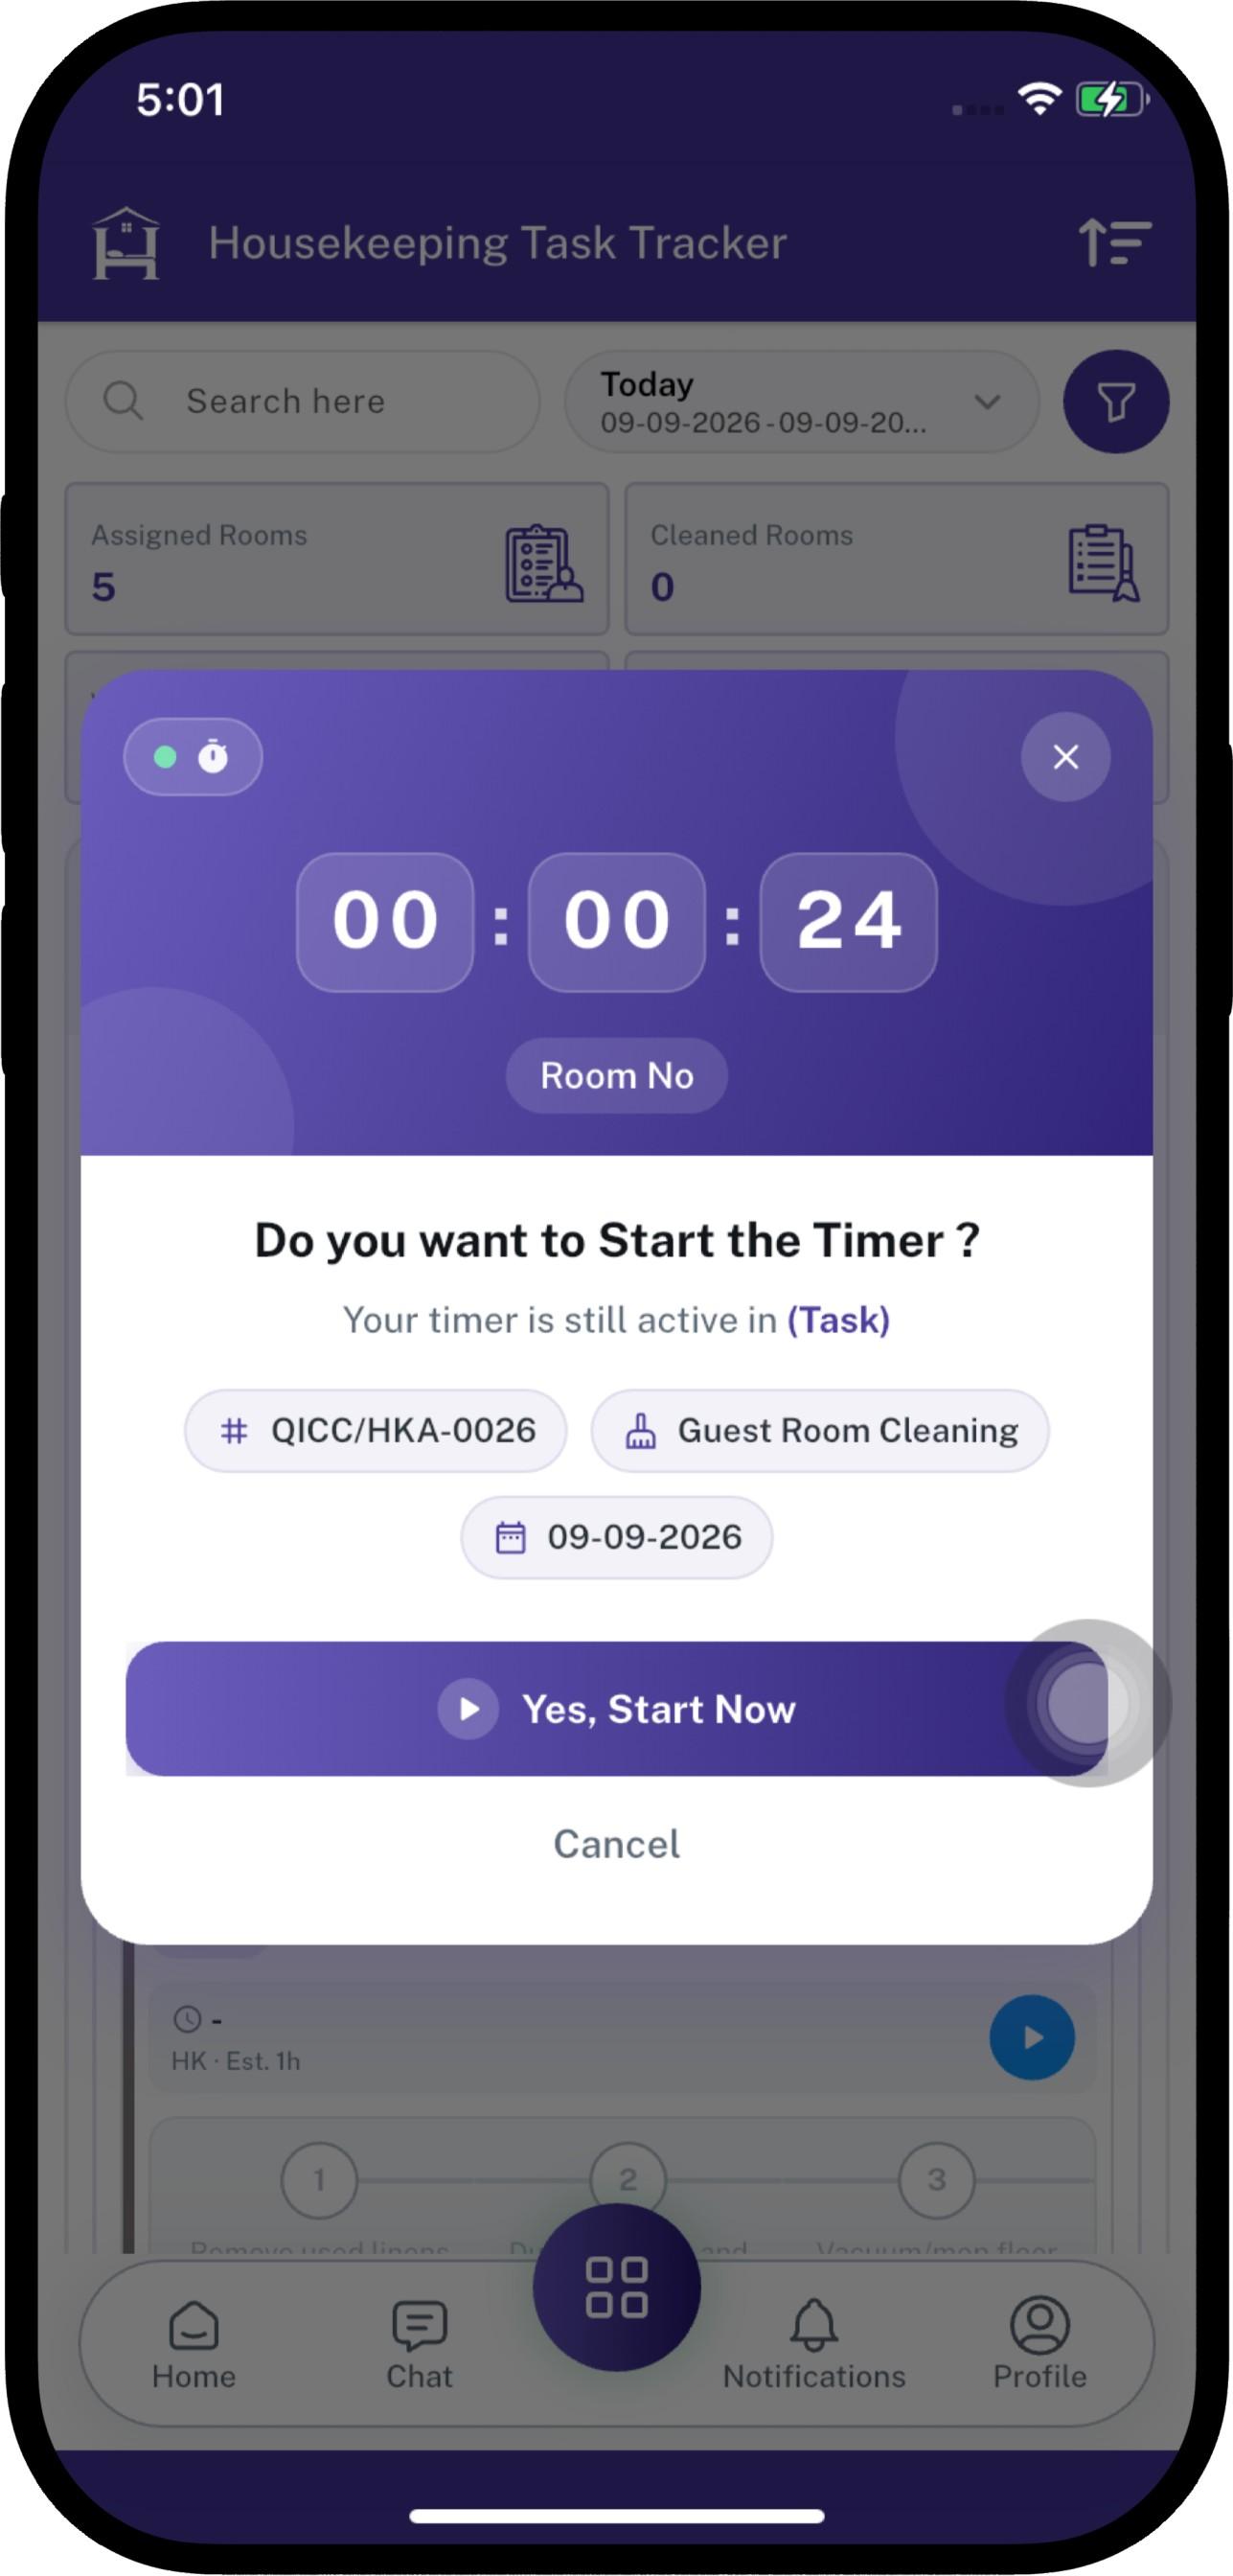
A housekeeper can have only one Cleaning timer running. An inspector can have only one Inspecting timer running.
If you start another room while a timer is already running, a pop-up shows the running task and its live time.
- Yes, Start Now — pauses the other task and starts this one
- Cancel — keeps the other timer running
Steps
Clean a room (housekeeper)
- Open Housekeeping Task Tracker.
- Set Duration (usually Today).
- Open your name, then the date, then the room.
- Tap Task Status → Cleaning (or the play button on mobile).
- Complete checklist items in order. Add notes and photos if asked.
- If inspection is not required, the last item (or Complete) finishes the room.
- If inspection is required, the last item (or Submit for Review) sends the room to inspection. Confirm when asked.
- If the inspector sends the room back, status becomes Rework. Start Cleaning again and redo the items marked Rework.
Inspect a room (inspector)
- Open Housekeeping Task Tracker.
- Find rooms in Waiting on review.
- Tap Task Status → Inspecting.
- Review each completed checklist item. Choose Approve or Rework.
- When all items are done, the room is Completed (all approved) or Rework (any item sent back).
- You can pause inspection and resume later.
Add a note on a room
- Open the room Details.
- Under Note and Attachment, type a note and/or add photos or video.
- Click Save.
You cannot add notes after the task is Completed.
Notifications
| What happened | Who is notified |
|---|---|
| Room submitted for inspection | Assigned inspector, or all users with the allowed inspector role |
| Room sent back for rework | Assigned housekeeper |
| Room inspected and approved | Assigned housekeeper |
You are not notified for your own action.
Important Notes
- This screen does not create assignments. Create them in Housekeeping Assignment.
- You only see rooms you are allowed to see: your own tasks, people under you (if you have that right), or rooms you may inspect.
- Only the assigned housekeeper can start or pause cleaning (admins/users with full rights can also update).
- Only the assigned inspector (or allowed role/admin) can inspect.
- You cannot skip checklist items. Finish them in display order.
- If a checklist exists, Submit for Review and Complete are done through the checklist, not from the status menu.
- A room that requires inspection cannot be marked complete by the housekeeper.
- Completing a task marks the room as Clean.
- Payable amount appears only when status is Completed. Total Pay on the summary cards also counts completed rooms only.
- Time keeps counting on screen while Cleaning or Inspecting is active.
- If another timer is running, you must confirm Start Now before the new timer starts.
- After Completed, the status cannot be changed.