Administrator Guide
User Role Hierarchy
Overview
The User Role Hierarchy defines how user roles are organized and how one role is connected to another. It helps administrators build a clear reporting and access structure by adding or removing roles under a selected parent role.
A typical hierarchy can look like:
Open User Role Hierarchy
- Open the Configuration menu.
- Select User Role Hierarchy.
- The existing role structure is displayed as connected role cards.
- Select a role card to manage the roles below it.
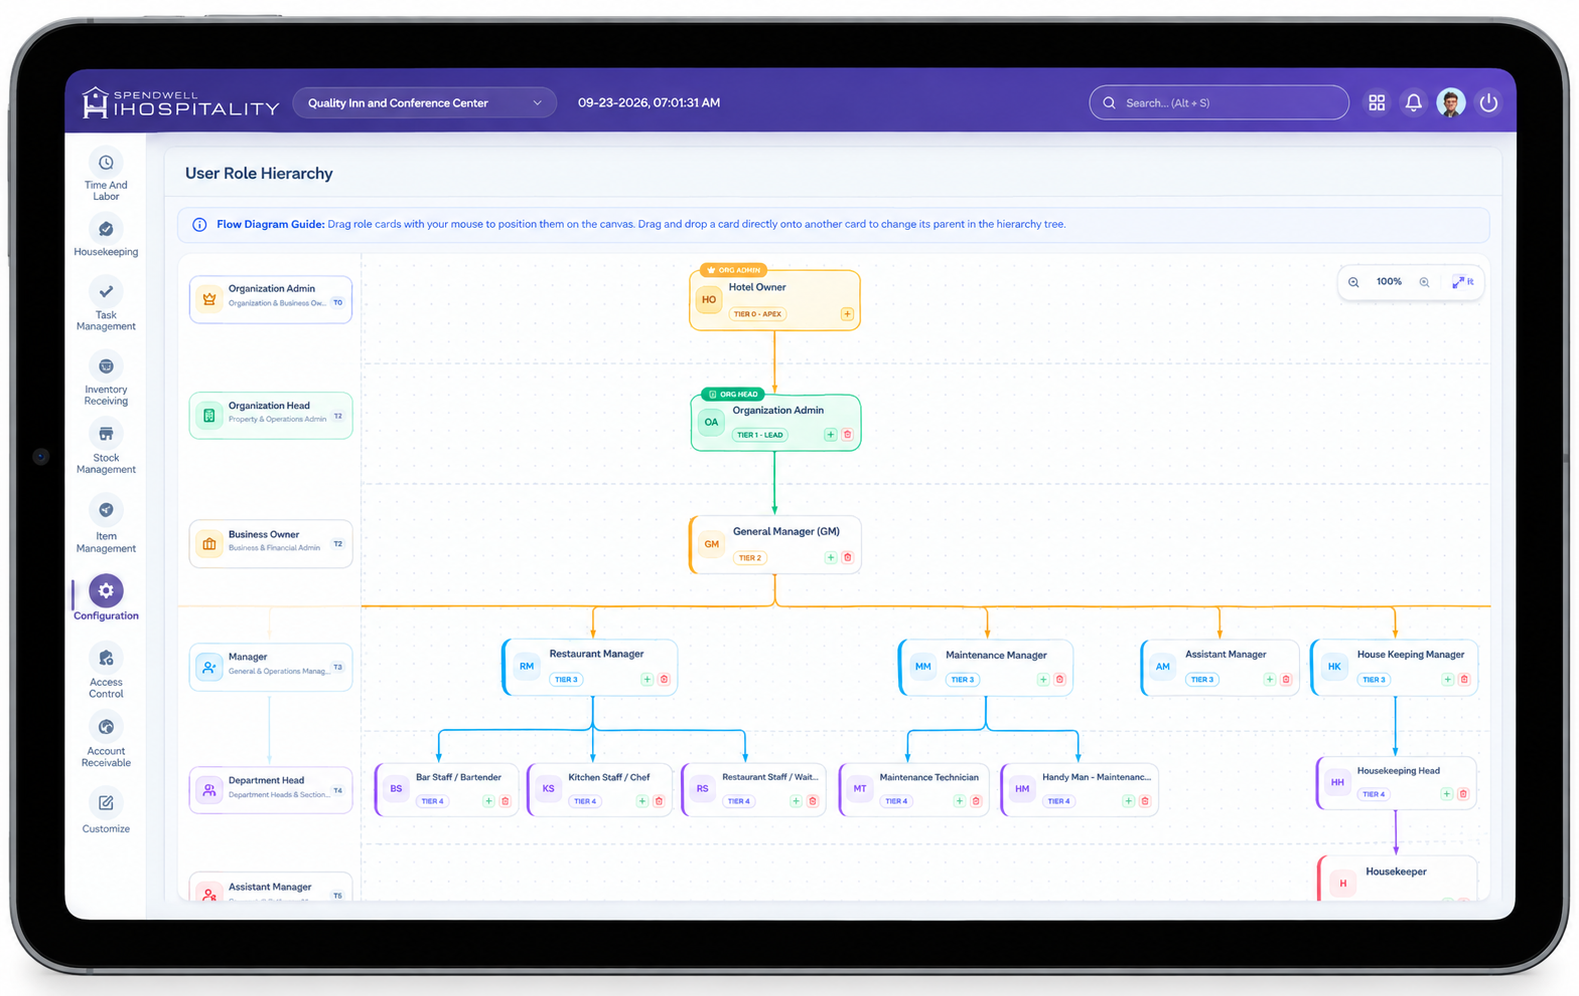
The hierarchy is managed visually from the User Role Hierarchy screen.
Understand the Hierarchy
Each role is displayed as a card connected to its parent role.
For example:
- Super Admin is at the top level.
- Organization Admin is connected below the Super Admin.
- Property Admin is connected below the Organization Admin.
- Hotel Manager is connected below the Property Admin.
- Lower-level roles can be connected beneath the appropriate parent role.
The connecting lines show the relationship between parent and child roles.
Add or Remove a Role to the Hierarchy
Use Add when you want to assign one or more available roles below a selected parent role.
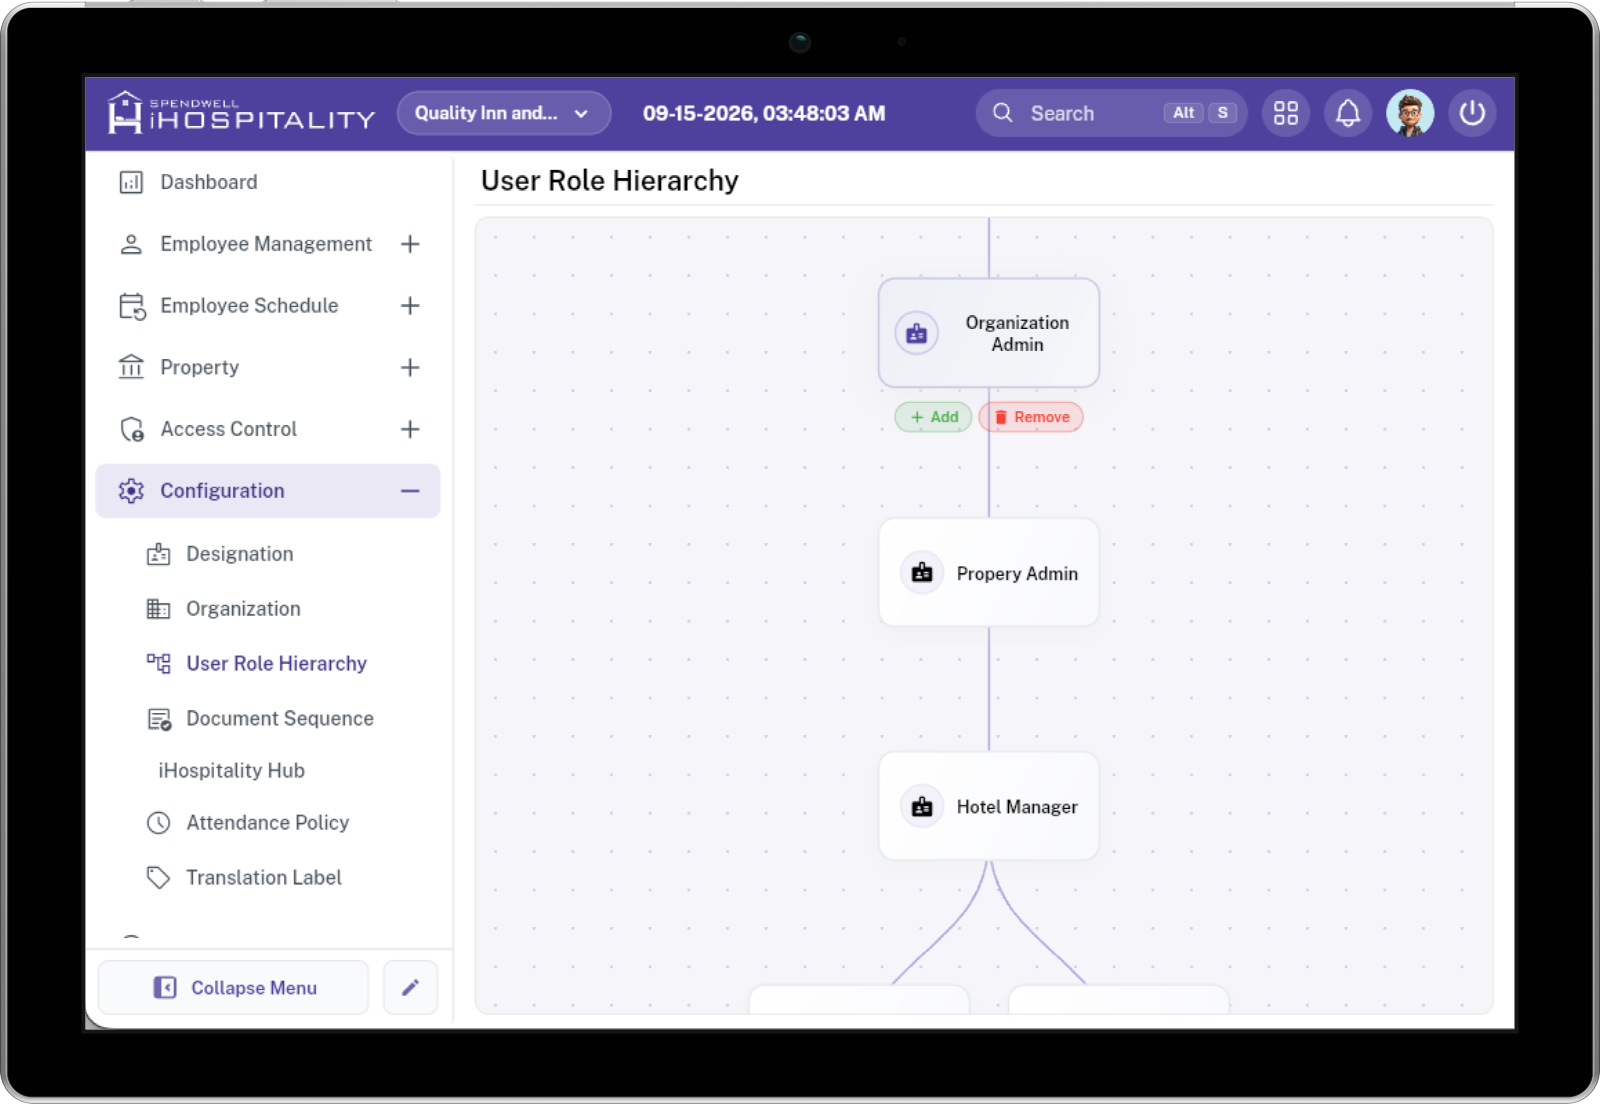
Select the Parent Role
Select the role card under which you want to add another role.
For example, select Organization Admin.
The Add and Remove actions appear for the selected role.
Add User Role
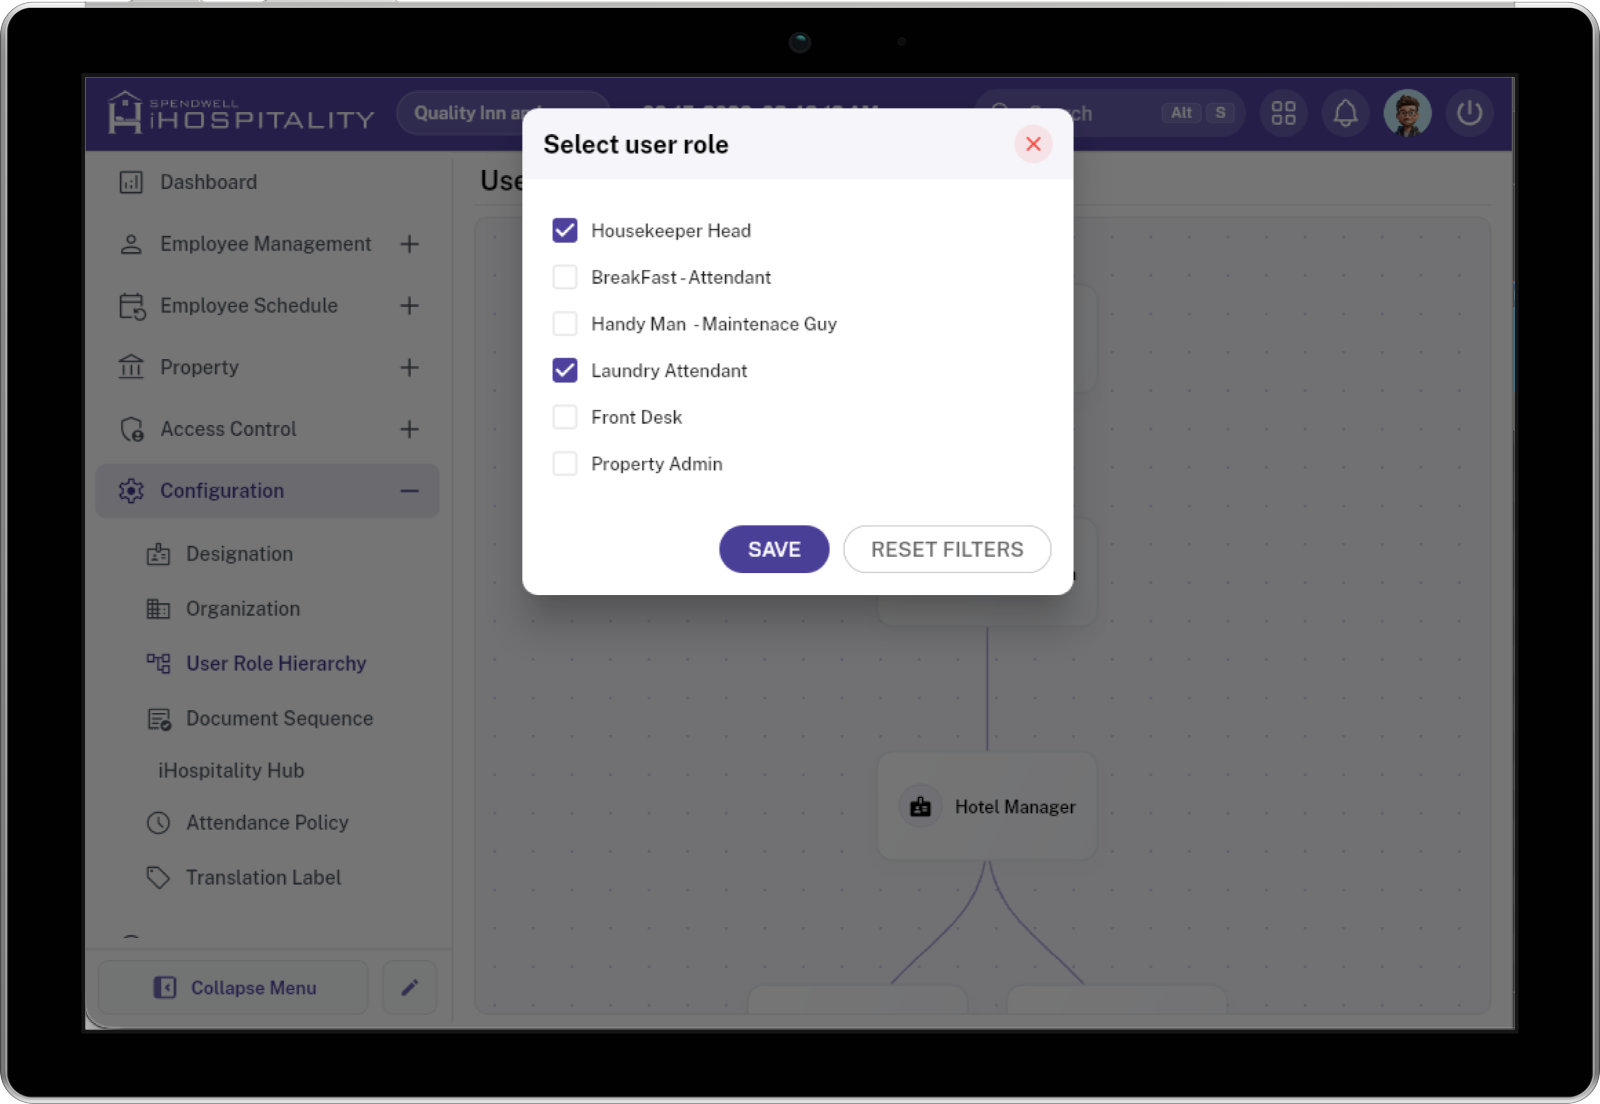
A Select user role window opens.
-
The window displays the available roles with checkboxes.
- Select the checkbox next to each role you want to add.
- You can select more than one role.
- Selected roles are shown with a checked checkbox.
-
Select SAVE.
-
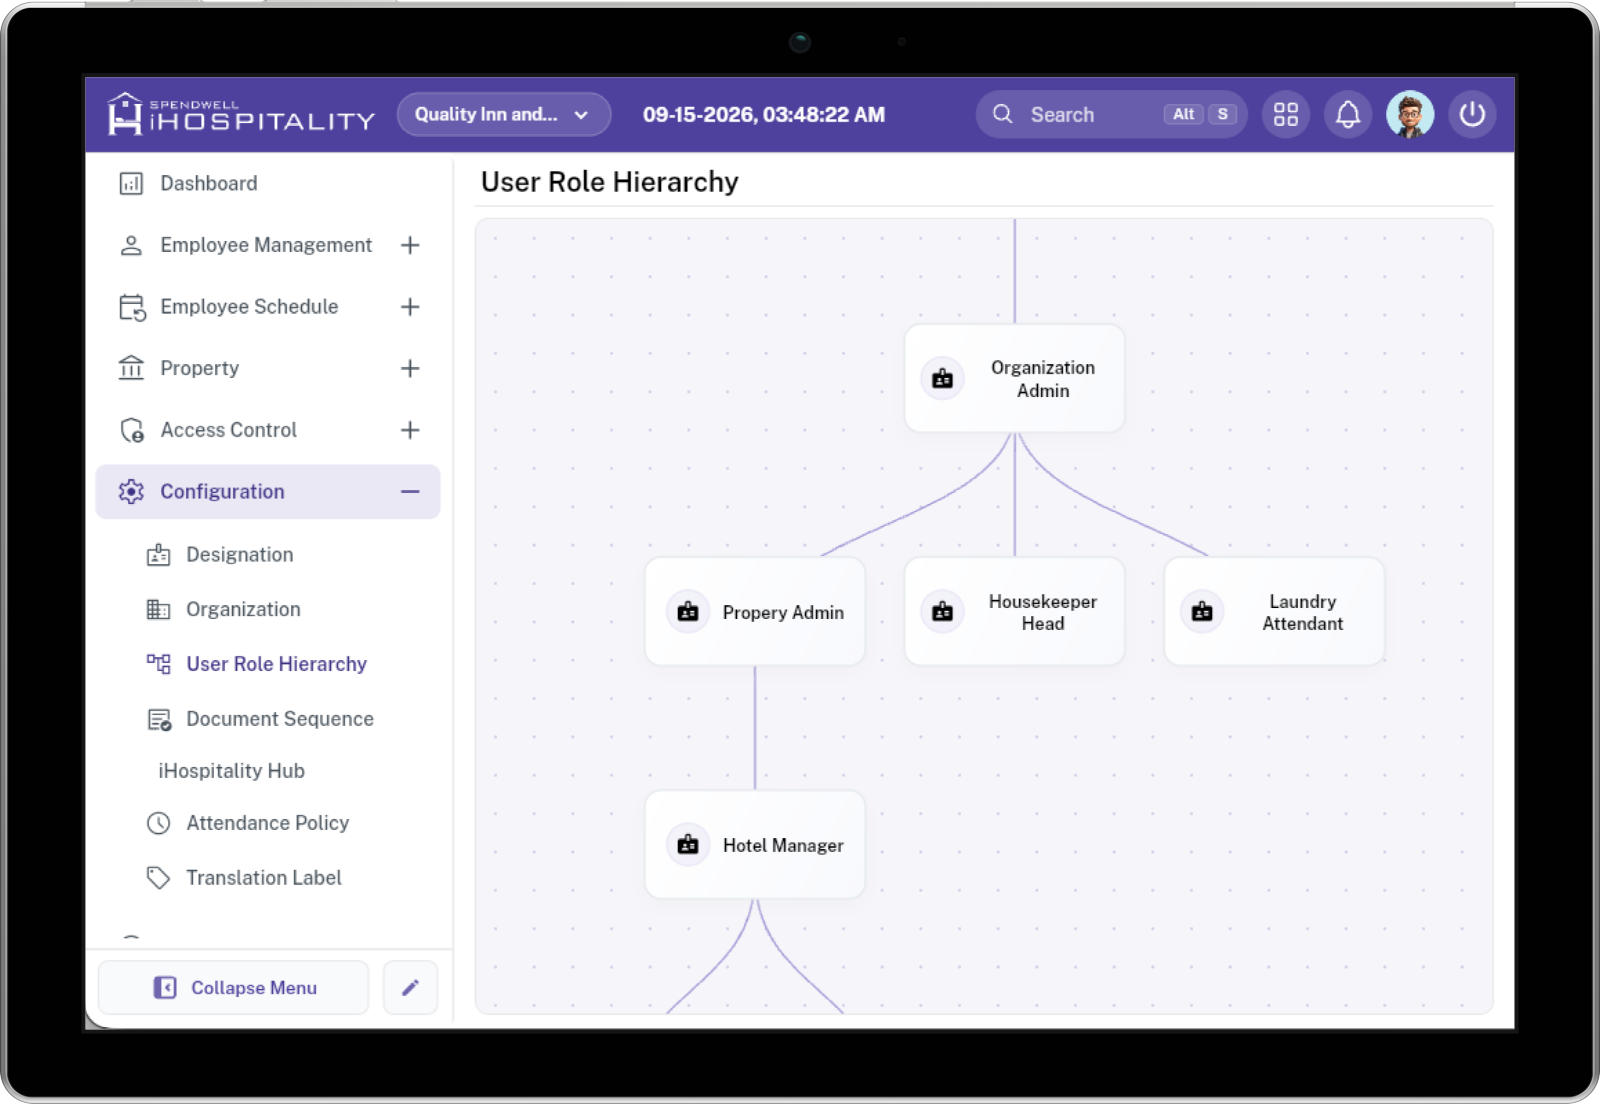
The selected roles are added under the parent role in the hierarchy.
Remove a Role from the Hierarchy
Use Remove when a role or role relationship is no longer required under the selected parent.
- Select the role that you want to remove.
- The Remove action appears next to the Add action.
- Select Remove.
- The selected role is removed from that hierarchy position.
Important: Removing a role from the hierarchy changes its relationship with the selected parent.
Userrights
Overview
The User Rights module allows administrators to control what users can access and what actions they can perform in Spendwell iHospitality.
Rights can be assigned based on:
- Module Type — Web or App
- User Role — Assign rights to all employees under a selected role
- Employee — Assign rights to a specific employee
- Module — Filter and manage rights for a specific module
- Form — Configure rights for individual screens or forms
The User Rights screen allows you to manage the following permissions:
| Permission | Description |
|---|---|
| 👁️ Can View | Controls whether the user can view the form and its data |
| ➕ Can Add | Controls whether the user can create new records |
| ✏️ Can Update | Controls whether the user can edit existing records |
| 🗑️ Can Delete | Controls whether the user can delete records |
| 📋 Can Manage Request? | Controls whether the user can manage or process requests |
Each applicable permission can be configured as All or Self.
User Rights Screen
The User Rights screen provides filters at the top and a permission matrix below.
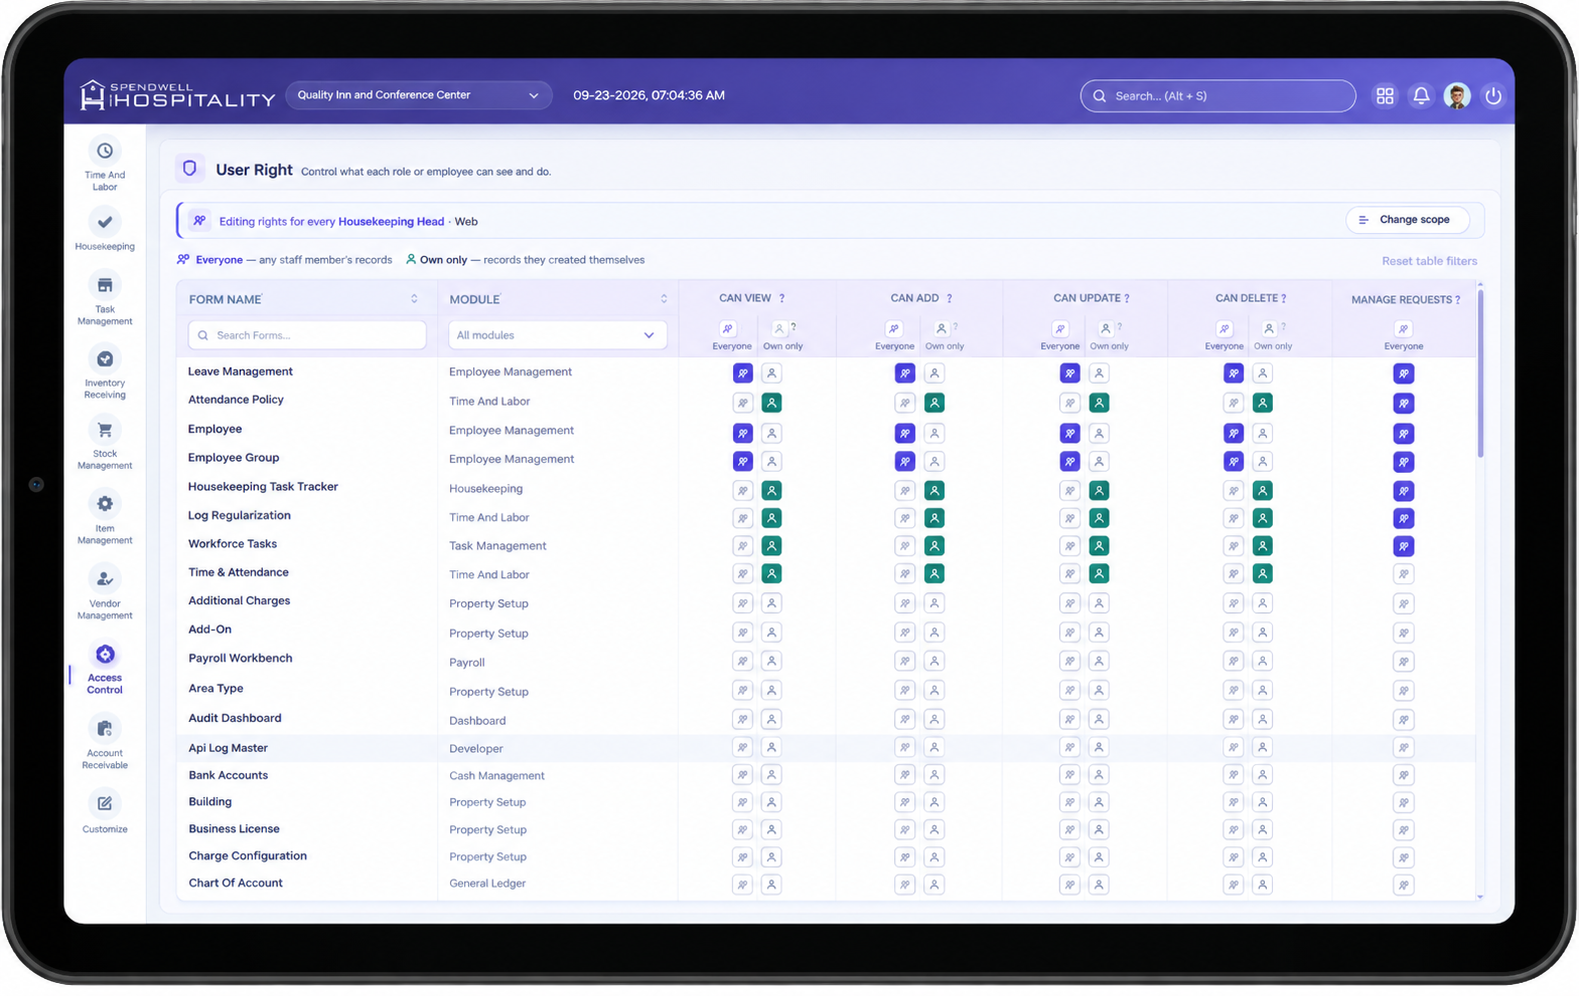
| Field | Description |
|---|---|
| Module Type | Select where the rights will apply: Web or App |
| User Role | Select a role to assign rights to all employees under that role |
| Employee | Select a specific employee to assign individual rights |
| Module | Filter forms belonging to a specific module |
| Search Here | Search for a form by name |
| Create | Save or create the configured user rights |
| Reset Filters | Clear the selected filters and reset the screen |
Note: Select either a User Role or an Employee based on how you want to assign the rights.
How User Rights Assignment Works
User Rights can be assigned in two ways.
1. Role-Wise Rights
Use User Role when the same permissions should be assigned to multiple employees.
Example
Suppose you select:
- Module Type: App
- User Role: Housekeeping
When rights are configured and saved, the selected permissions apply to the employees associated with the Housekeeping role.
Best Used For
- Employees with the same responsibilities
- Department-level access
- Standard permission setup
- Assigning rights to multiple users at once
2. Employee-Wise Rights
Employee-Wise Rights are used when a specific employee needs customized permissions.
Example
- Module Type: App
- Employee: Aarav Patel
Only Aarav Patel receives this specific permission.
Best Used For
- Specific employee access
- Customized permissions for individual employees
- Giving different rights to employees with the same role
- Managing employee-specific form access
- Granting access to selected forms only
All vs Self
All
All means the user can access data of the users below their role in the User Role Hierarchy.
Example
Hierarchy:
Hotel Manager
↓
Housekeeper
↓
Laundry Staff
If Tushar is a Hotel Manager and has:
View → All
Tushar can view data of the roles below him in the hierarchy:
Tushar
Hotel Manager
↓
✓ Housekeeper data
↓
✓ Laundry Staff data
All = Access data of users under the logged-in user's role hierarchy.
Self
Self means the user can access only their own data.
Example
If Tushar is logged in and has:
View → Self
Then:
Tushar
↓
✓ Tushar's own data
✕ Housekeeper data
✕ Laundry Staff data
Attendance Policy
Document Sequence
The Document Sequence feature is used to create a standard numbering format for documents, records, or transactions.
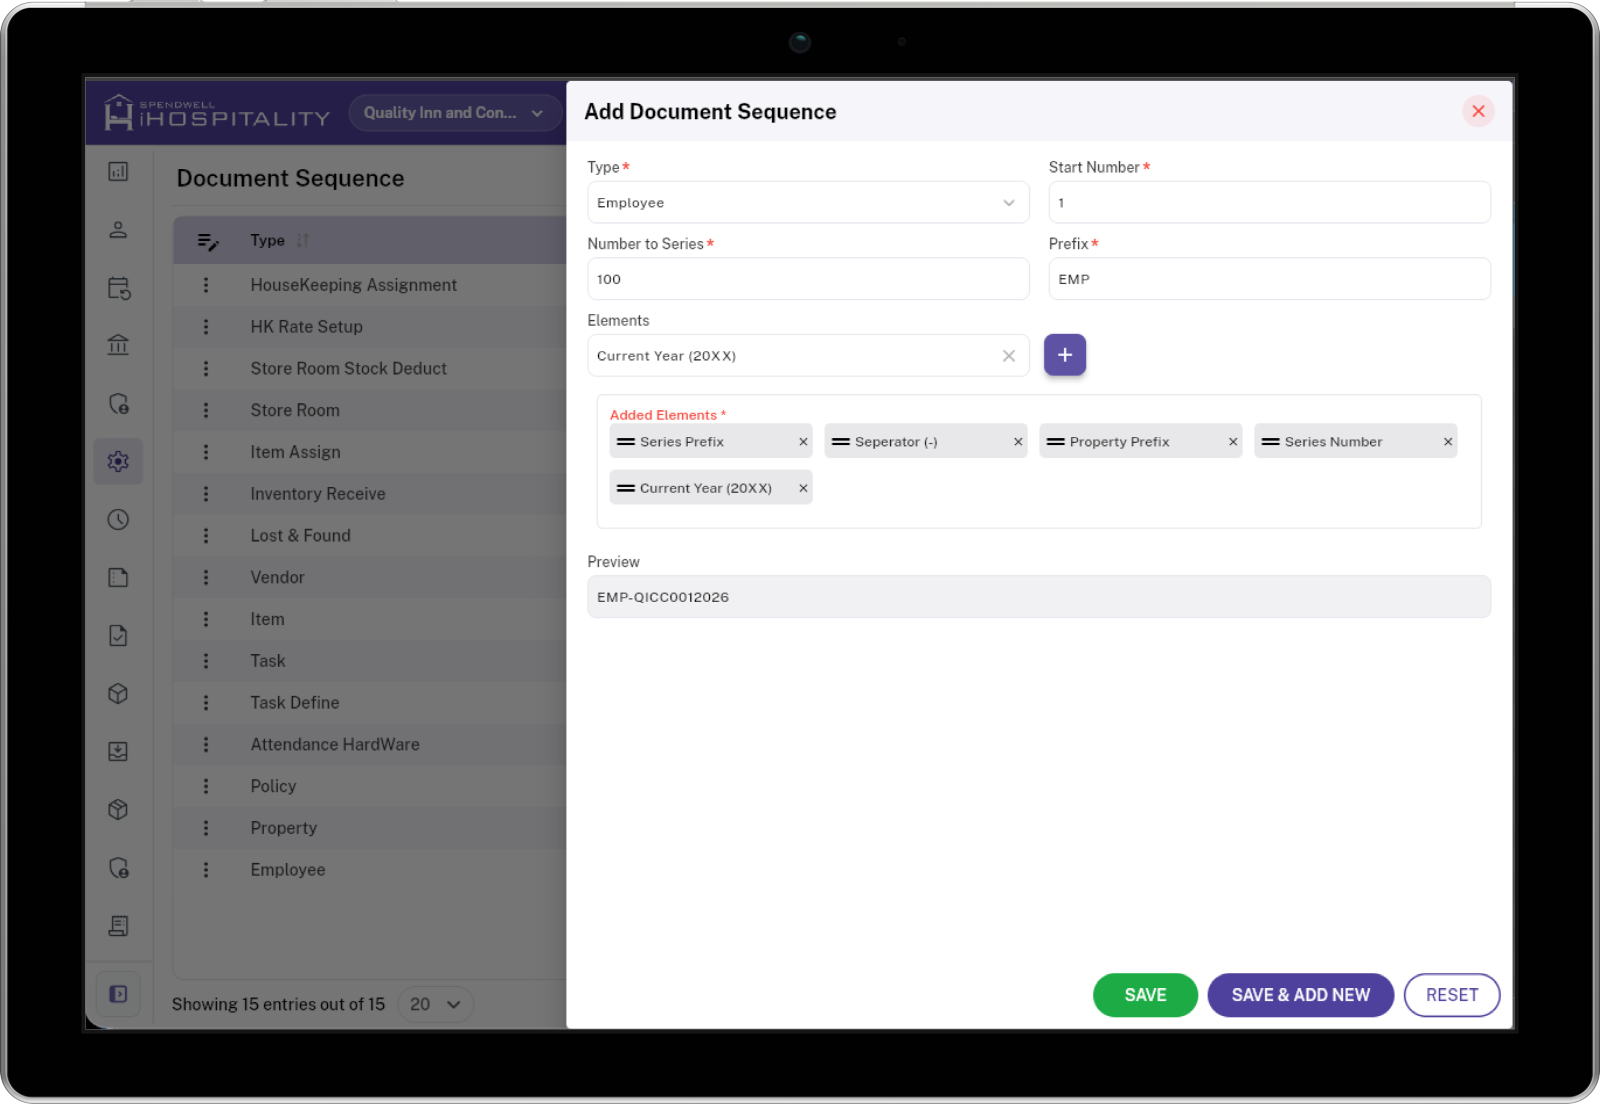
Purpose: Create a document numbering format such as
EMP-QICC0012026.
1. What Goes Where?
| Field | What to enter |
|---|---|
| Property* | Select the property |
| Type* | Select what the sequence is for |
| Date Range* | Select the active period, when shown |
| Reset | Choose when numbering restarts: Every Day, Every Month, Every Year, Never |
| Start Number* | First number in the sequence |
| Number to Series* | Number/range covered by the series |
| Prefix* | Short identifier for the sequence |
| Elements | Select parts to build the number |
| Added Elements* | Arrange the selected parts in order |
| Preview | Shows the resulting format |
* = Required field
2. Build the Number
Think of the Added Elements area as building blocks.
| 1 | 2 | 3 | 4 | 5 |
|---|---|---|---|---|
| Series Prefix | Separator | Property Prefix | Series Number | Current Year |
EMP |
- |
QICC |
001 |
2026 |
Result
EMP-QICC0012026
So:
EMP + - + QICC + 001 + 2026
→ EMP-QICC0012026
3. How to Create a Sequence
| Step | Action | Example |
|---|---|---|
| 1 | Select Property | Quality Inn and Conference Center |
| 2 | Select Type | Employee |
| 3 | Set Date Range if available | 01-Jan-2026 → 31-Dec-2026 |
| 4 | Select Reset if required | Every Year |
| 5 | Enter Start Number | 1 |
| 6 | Enter Number to Series | 100 |
| 7 | Enter Prefix | EMP |
| 8 | Select an Element | Current Year (20XX) |
| 9 | Click + | Adds the element |
| 10 | Drag elements into the required order | Prefix → Separator → Property → Number → Year |
| 11 | Check Preview | EMP-QICC0012026 |
| 12 | Click Save | Sequence created |
4. Elements — What They Do
The Elements are the building blocks of the final document number.
Select an element, click +, and arrange the added elements in the required order.
| Element | What it does | Example |
|---|---|---|
| Series Number | Uses the Start Number and formats it with leading zeros based on the length of Number to Series. | Start Number 1, Number to Series 100 → 001 |
| Series Prefix | Uses the value entered in the Prefix field. | Prefix EMP → EMP |
| Company Prefix | Uses the configured company preview/label for the selected company. | ABC |
| Property Prefix | Uses the configured prefix/label for the selected property. | QICC |
| Vendor Prefix | Uses the vendor name or vendor prefix configured for the record. | VEND |
| Category Prefix | Uses the category name or category prefix configured for the record. | FOOD |
| Current Year (20XX) | Adds the complete current year. | 2026 |
| Current Year (YY) | Adds the last two digits of the current year. | 26 |
| Current Month (MM) | Adds the current month as a 2-digit number. | January → 01 |
| Current F.Y (20XX/YY) | Adds the financial year in start year/end year format. The financial year starts in April. |
2026/27 |
| Current F.Y (20XX-YY) | Adds the financial year in start year-end YY format. The financial year starts in April. |
2026-27 |
| Month Alphabets (MM) | Adds the current month using its 3-letter abbreviation. | January → Jan |
| Year Alphabets (YY) | Adds the last two digits of the current year. | 2026 → 26 |
| Current Day (DD) | Adds the current day as a 2-digit number. | 5 → 05 |
| Separator (-) | Adds a hyphen between elements. | - |
| Separator (/) | Adds a slash between elements. | / |
Important: The order of these elements controls the final document number.
5. Change the Order
Current order
Prefix → Separator → Property → Number → Year
EMP-QICC0012026
If you change the order
Year → Separator → Prefix → Number
2026-EMP001
Drag and drop the items in Added Elements to change their order.
6. Add / Remove Elements
| Action | How |
|---|---|
| Add | Select an item in Elements → click + |
| Remove | Click × on the element |
| Reorder | Drag the element to a new position |
| Check result | Look at Preview |
Example
Remove Current Year:
EMP-QICC0012026
↓
EMP-QICC001
7. Reset Options
| Reset option | Meaning |
|---|---|
| Every Day | Numbering restarts each day |
| Every Month | Numbering restarts each month |
| Every Year | Numbering restarts each year |
| Never | Numbering does not automatically restart |
8. Buttons
| Button | Action |
|---|---|
| SAVE | Save the sequence |
| SAVE & ADD NEW | Save and immediately create another sequence |
| RESET | Reset the form |
Property Registration & Setup
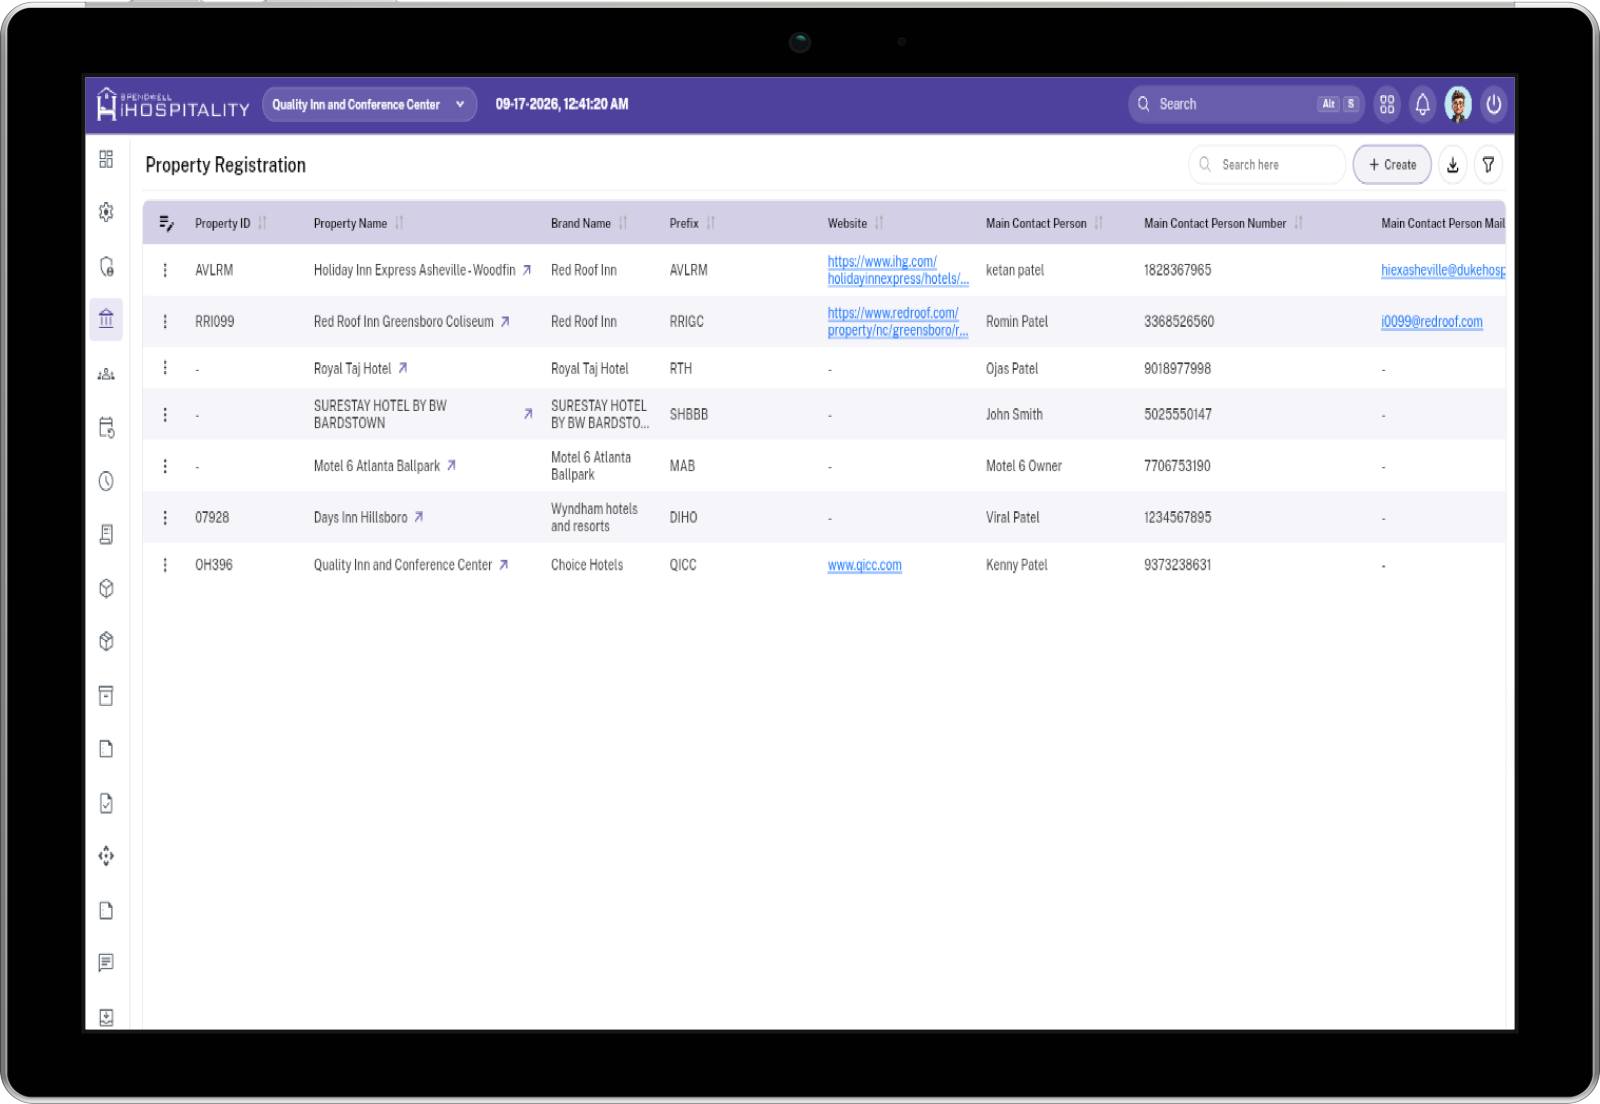
Property Registration
The Property Registration page stores complete property information, including property details, contacts, business details, branding, PMS connection, and images. It is used to link properties with employees, reservations, rooms, tasks, inventory, housekeeping, reports, and other property-based operations.
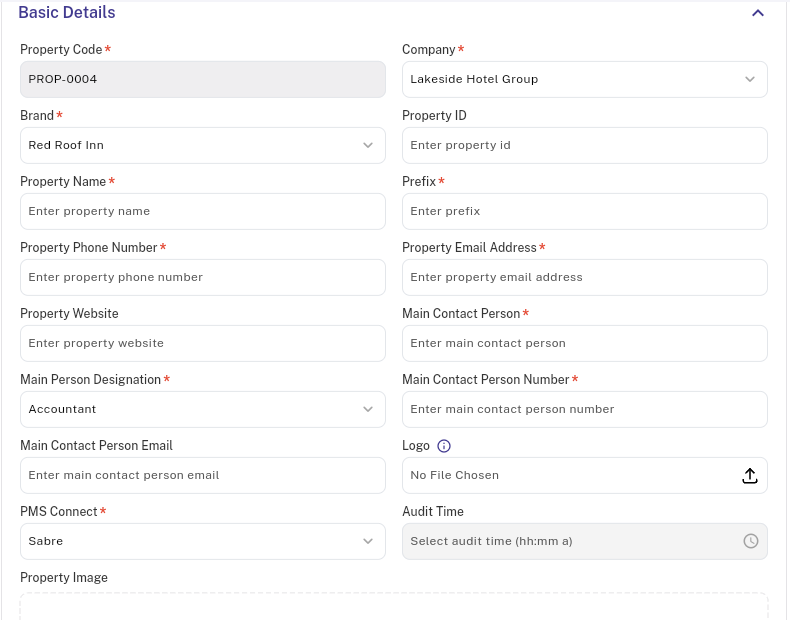
Basic Details
| Field | Required | Description |
|---|---|---|
| Property Code | Yes | System-generated property series code. It is read-only and populated automatically when the property is added. |
| Company | Yes | Company that owns the property. Select the correct company before entering the remaining details. |
| Brand | Yes | Property brand. The active brand list also supplies the brand logo and stores it with the selected property. |
| Property ID | No | Optional business or external identifier for the property. It must be unique within the company when provided. |
| Property Name | Yes | Display and business name of the property. It must be unique within the company. |
| Prefix | Yes | Property prefix used by downstream property-related numbering or identification. It must be unique within the company. |
| Property Phone Number | Yes | Main phone number for the property. Enter a valid 10-digit number. |
| Property Email Address | Yes | Main email address for the property. Enter a valid email address. |
| Property Website | No | Optional property website. Enter a complete, valid website address. |
| Main Contact Person | Yes | Name of the primary contact person for the property. |
| Main Person Designation | Yes | Designation selected for the primary contact. Only active designations are available. |
| Main Contact Person Number | Yes | Phone number of the primary contact. Enter a valid 10-digit number. |
| Main Contact Person Email | No | Optional email address of the primary contact. |
| Logo | No | Optional property logo uploaded through the file picker. Supported image extensions are configured by the application. |
| PMS Connect | Yes | PMS connection used by the property. Select the active connection that matches the property's operational system. |
| Audit Time | No | Optional time used for the property's audit scheduling configuration. |
| Property Image | No | Optional collection of property images. Multiple image files are accepted. |
Key Usage for Basic Details
- Property Code is created automatically. Employees do not need to enter or change it.
- Company determines where the property belongs. Administrators should check this before saving.
- Property Name, Property ID, and Prefix identify the property in lists, searches, reports, and related setup screens. Use consistent naming so employees can find the correct property.
- PMS Connect determines how the property works with its connected PMS. Select the correct connection before saving.
- Main Contact Person details should be kept current because they are used when the property needs to be contacted.
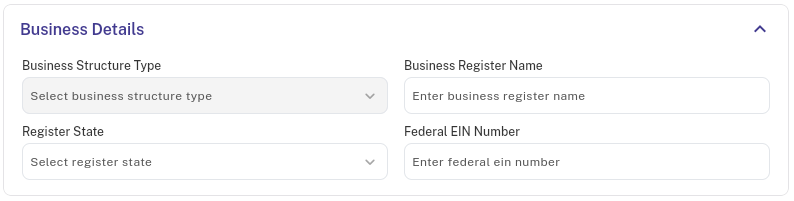
Business Details
| Field text | Required | Description |
|---|---|---|
| Business Structure Type | No | Optional legal or organizational structure. |
| Business Register Name | No | Optional registered business name. |
| Register State | No | Optional state where the business is registered. |
| Federal EIN Number | No | Optional federal employer identification number. Enter numbers only, without decimals, and use no more than 10 characters. |
Important Checks Before Saving
Complete every required field before saving. The application checks duplicate values and displays a message when a value is already used by another property in the same company.
| Field | Requirement |
|---|---|
| Property Name | Required and unique within the company |
| Prefix | Required and unique within the company |
| Property ID | Optional, but must be unique within the company when entered |
| Federal EIN Number | Optional, but must be unique within the company when entered |
If a duplicate message appears, search the property list first and correct the value or edit the existing property instead of creating a duplicate.
How Administrators Use Property Registration
- Open the Property Registration page and select Add.
- Complete Basic Details, using a clear property name and the correct company, brand, contact information, and PMS connection.
- Complete Business Details when the property's legal or registration information is available.
- Review the details, especially Property Name, Property ID, Prefix, PMS Connect, and contact information.
- Save the property. The Property Code is created automatically.
- Configure the property's location, timing, charges, taxes, rooms, and policies from the related property configuration pages.
- Assign the property to the employees who need to work with it.
- Edit the property when contact details, branding, PMS connection, or business information changes. Avoid creating a second property for the same location.
How Employees Use a Property
Employees normally do not create properties. An administrator assigns one or more properties to their employee profile.
- Select the assigned property when opening a property-based task or screen.
- Check the property name before adding reservations, tasks, room information, inventory, housekeeping work, reports, or other transactions.
- Use only the properties available in the employee's assignment list.
- Contact an administrator when the required property is missing, has the wrong name, or shows as Inactive.
- Employees should not change the Property Name, Prefix, PMS Connect, or status unless they have administrator permission.
The selected property connects daily work across reservations, rooms, employees, tasks, inventory, housekeeping, reports, integrations, and other operational areas. Using the wrong property can place work, reports, or configuration under the wrong location.
Active and Inactive Properties
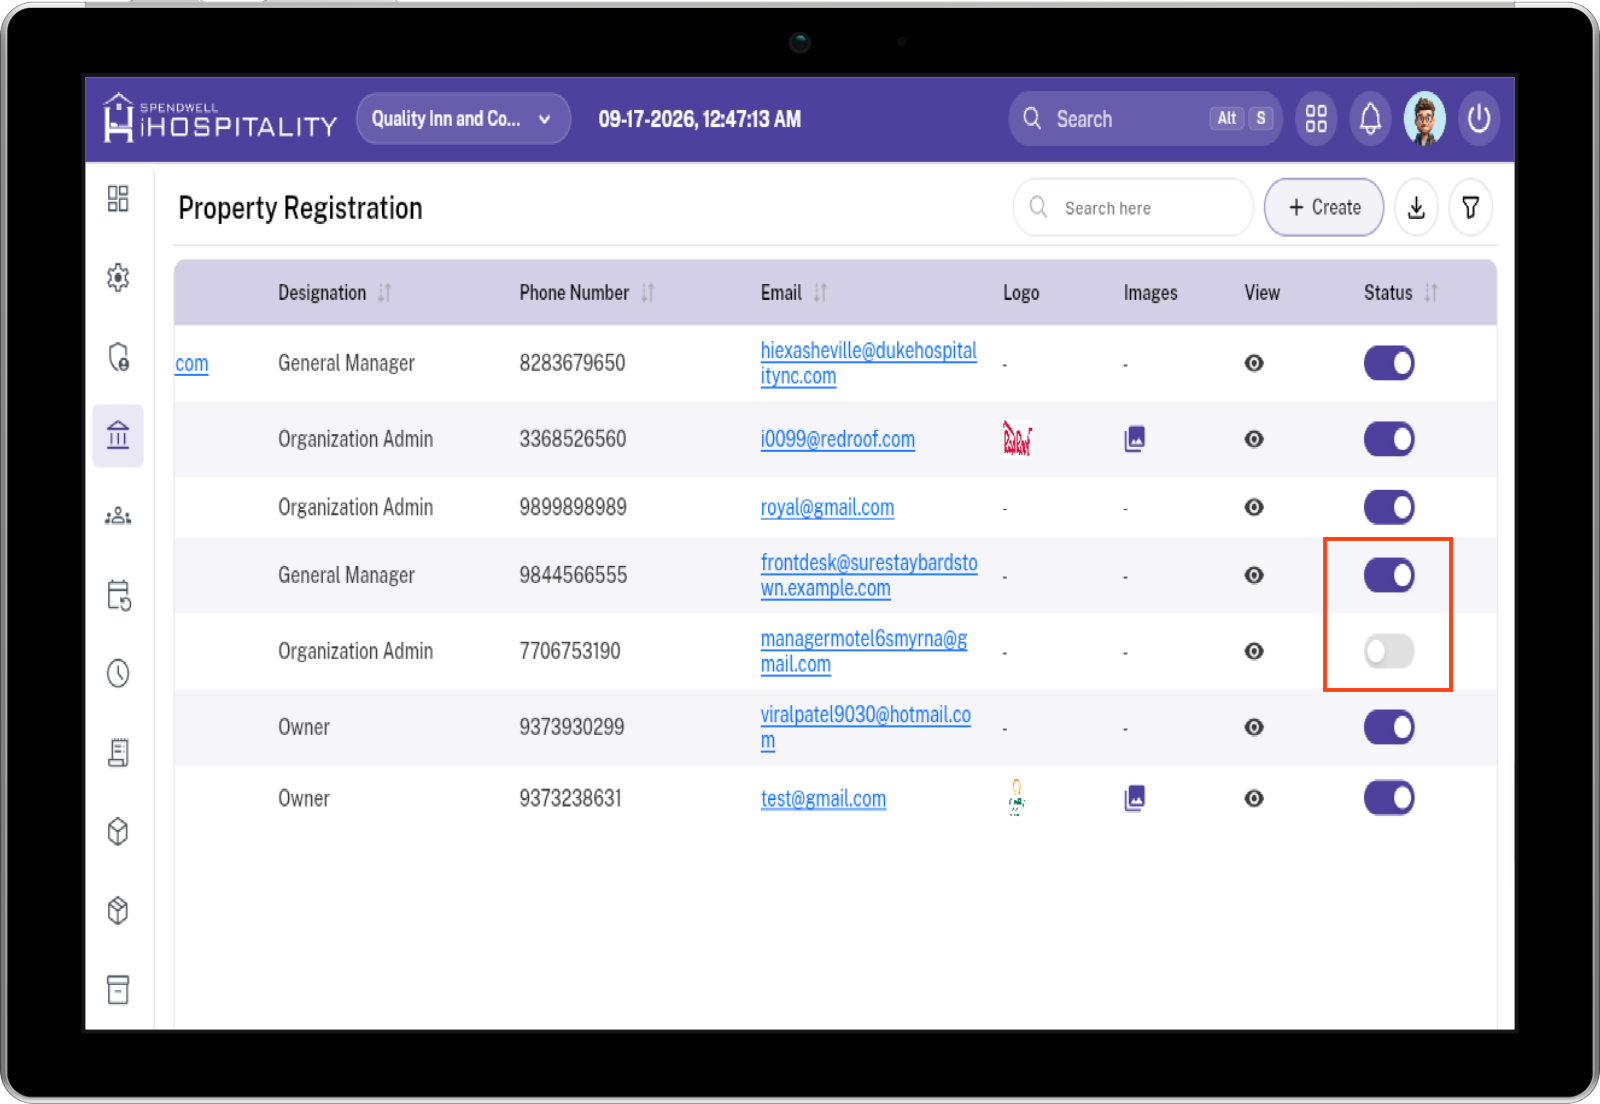
The Add form does not contain a status field. New properties are Active by default. Administrators manage status from the Property list through the Status switch.
What the status means
- Active: the property can be selected and used by workflows that require an available property.
- Inactive: the property remains stored for history and existing references, but should not be offered for new operational work.
- Inactive is a soft status, not deletion. Do not remove the record merely to disable it because many modules retain references to the property.
How status is reflected in the project
The Property list displays and edits the status using the Status switch. Employees can work only with properties that are Active and assigned to them. Historical reports and administrative screens may show Inactive properties when history is required, but the status should be clearly visible.
Recommended status change flow
- Open the Property list and find the property.
- Switch the status to Inactive when the property should no longer receive new operational work.
- Tell affected employees that the property is no longer available for new work.
- Keep existing rooms, employees, reservations, reports, and history intact.
- Switch the property back to Active only after confirming it is ready for operational use.
Related Configuration Forms
Property Registration stores the main property information. After saving, administrators can complete Location, Charge Configuration, Timing, Room Configuration, Tax, Policy, and PMS Connect setup. Employees use the completed property record in their assigned operational screens.